react-native에서 NativeWind 적용기
저는 tailwindCss를 주로 사용하여 왔으며 프로젝트에서 NativeWind를 적용하는 방법을 알려드리겠습니다.
공식 홈페이지: https://www.nativewind.dev/
1. nativewind 및 tailwindcss를 설치
npm install nativewind
npm install --save-dev tailwindcss@3.3.2

or

yarn add nativewind
yarn add --dev tailwindcss@3.3.2

주의 사항으로 nativewind는 tailwindcss 3.3.2 이상 버전에서는 동작하지 않습니다.
반드시 tailwindcss@3.3.2 버전 이하로 설치하셔야 합니다.
2. tailwind.config.js을 만들기 위해 아래 명령어를 입력합니다.
npx tailwindcss init3. tailwind.config.js 파일을 다음과 같이 수정합니다.
module.exports = {
  - content: [],(삭제)
  + content: ["./App.{js,jsx,ts,tsx}", "./src/**/*.{js,jsx,ts,tsx}"](추가)
  theme: {
    extend: {},
  },
  plugins: [],
}

필자 같은 경우에는 src 폴더안에 모든 파일이 있기에 src 폴더 기준으로 css가 적용되게끔 설정하였습니다.
4. babel.config.js 파일을 다음과 같이 수정합니다.
module.exports = {
  presets: ['module:metro-react-native-babel-preset'],
+ plugins: ["nativewind/babel"],
};
여기까지 완료 되었다면 nativeWind를 사용할 준비가 마무리 되었습니다.
App.tsx에 대한 코드를 고쳐서 잘 적용되는지 확인해보겠습니다.
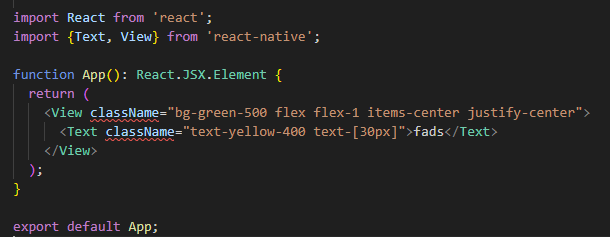

해당 코드가 잘 적용된 것을 확인 할 수 있습니다.
오늘은 react-native에 NativeWind를 설정하는 방법을 알아보았습니다.
추가 이슈
App.tsx 코드에 className에 빨간 줄 뜨는게 신경이 쓰여서 해결 방법을 찾아보았습니다.
프로젝트 루트 폴더에 nativewind-env.d.ts 라는 파일을 만들어 아래 코드를 넣어서 해결하였습니다.
///<reference types="nativewind/types" />

안녕하세요 리액트 네이티브 개발자입니다.