빈 생명주기 콜백
빈 생명주기 콜백 시작
데이터베이스 커넥션 풀이나 네트워크 소켓처럼 애플리케이션 시작 시점에 필요한 연결을 미리 해두고, 애플리케이션 종료 시점에 연결을 모두 종료하는 작업을 진행하려면, 객체의 초기화와 종료 작업이 필요하다.
간단하게 외부 네트워크에 미리 연결하는 객체를 하나 생성한다 가정해보자.
이 NetworkClientsms 애플리케이션 시작 시점에 connect()를 호출해서 연결을 맺어두어야하고, 애플리케이션이 종료되면 disconnect()를 호출해서 연결을 끊어야한다.
public class NetworkClient{

    private String url;

    public NetworkClient(){
    	System.out.println("생성자 호출, url = " + url);
        connect();
        call("초기화 연결 메시지");
    }

    public void setUrl(String url){
   		this.url = url;
    }

    //서비스 시작시 호출
    public void connect(){
   	 	System.out.println("connect: " + url);
    }

    public void call(String message){
    	System.out.println("call: " + url + " message = " + message);
    }

    // 서비스 종료시 호출
    public void disconnect(){
    	System.out.println("close: " + url);
    }
 }
public class BeanLifeCycleTest{
@Test
public void lifeCycleTest(){
ConfigurableApplicationContext ac = new AnnotationConfigApplicationContext(LifeCycleConfig.class);
NetworkClient client = ac.getBean(NetworkClient.class);
ac.close();
}
@Configuration
static class LifeCycleConfig{
@Bean
public NetworkClient networkClient(){
NetworkClient networkClient = new NetworkClient();
networkClient.setUrl("http://hello-spring.dev");
return networkClient;
}
}
}해당 코드를 실행하면 이상한 결과가 나온다.
생성자 호출, url = null
connect: null
call: null message = 초기화 연결 메시지
생성자 부분에 url 없이 connect()가 호출된다.
객체를 생성하는 단계에서 url이 없고, 객체를 생성한 다음에 외부에서 수정자 주입을 통해서 setUrl()이 호출되어야 url이 존재하게 된다.
스프링 빈은 객체 생성 -> 의존관계 주입의 라이프 사이클을 가진다.
객체를 생성하고, 의존관계 주입이 다 끝난 다음에야 필요한 데이터를 사용할 수 있는 준비가 완료된다. 그렇기에 초기화 작업은 의존관계 주입이 모두 다 완료되고 난 다음에 호출해야한다. 하지만 개발자가 의존관계 주입이 모두 완료된 시점을 어떻게 알 수 있을까?
스프링은 의존관계 주입이 완료되면 스프링 빈에서 콜백 메서드를 통해서 초기화 시점을 알려주는 다양한 기능을 제공한다.
또한 스프링은 스프링 컨테이너가 종료되기 직전에 소멸 콜백을 준다.
스프링 빈의 이벤트 라이프 사이클
스프링 컨테이너 생성 -> 스프링 빈 생성 -> 의존관계 주입 -> 초기화 콜백 -> 사용 -> 소멸 전 콜백 -> 스프링 종료
객체의 생성과 초기화를 분리하자.
생성자는 필수 정보(파라미터)를 받고, 메모리를 할당해서 객체를 생성하는 책임을 가진다.
초기화는 이렇게 생성된 값들을 활용해서 외부 커넥션을 연결하는 등의 무거운 동작을 수행한다.
따라서 생성자 안에서 무거운 초기화 작업을 함께 하기보다는 객체를 생성하는 부분과 초기화하는 부분을 명확하게 나누는 것이 유지보수 관점에서 좋다.
물론 초기화 작업이 단순하게 내부 값들을 약간 변경하는 정도면 생성자에서 다 처리해도 된다.
스프링은 크게 3가지 방법으로 빈 생명주기 콜백을 지원한다.
- 인터페이스 (InitializingBean, DisposableBean)
- 설정 정보에 초기화 메서드, 종료 메서드 지정
- @PostConstruct, @PreDestroy 에노테이션 지원
결론은 3번째 항목인 @PostConstruct, @PreDestroy를 쓰자이지만 변천 과정을 알아보자.
인터페이스 InitializingBean, DisposableBean
public class NetworkClient implements InitializingBean, DisposableBean{

    private String url;

    public NetworkClient(){
    	System.out.println("생성자 호출, url = " + url);
    }

    public void setUrl(String url){
    	this.url = url;
    }

    //서비스 시작시 호출
    public void connect(){
    	System.out.println("connect: " + url);
    }

    public void call(String message){
    	System.out.println("call : " + url + " message = " + message);
    }

    //서비스 종료시 호출
    public void disConnect(){
    	System.out.println("close : " + url);
    }

    @Override
    public void afterPropertiesSet() throws Exception{
    	connect();
        call("초기화 연결 메시지");
    }

    @Override
    public void destroy() throws Exception{
    	disConnect();
    }
}- InitializingBean은 afterPropertiesSet() 메서드로 초기화를 지원한다.
- DisposableBean은 destroy() 메서드로 소멸을 지원한다.
우선 해당 초기화, 소멸 인터페이스는 단점이 명확하다.
해당 인터페이스는 스프링 전용 인터페이스이기 때문에, 스프링에 의존한다.
또 인터페이스이다보니, 메서드의 이름을 변경할 수 없다.
해당 방법은 스프링 초창기에 나온 방법들이고 지금은 거의 사용하지 않는다.
빈 등록 초기화, 소멸 메서드 지정
설정 정보에 @Bean(initMethod = "init", destroyMethod = "close")처럼 초기화, 소멸 메서드를 지정할 수 있다.
public class NetworkClient{

    private String url;

    public NetworkClient(){
    	System.out.println("생성자 호출, url = " + url);
    }

    public void setUrl(String url){
    	this.url = url;
    }

    //서비스 시작시 호출
    public void connect(){
    	System.out.println("connect: " + url);
    }

    public void call(String message){
    	System.out.println("call : " + url + " message = " + message);
    }

    //서비스 종료시 호출
    public void disConnect(){
    	System.out.println("close : " + url);
    }

    public void init(){
    	System.out.println("NetworkClient.init");
        connect();
        call("초기화 연결 메시지");
    }

    public void close(){
    	System.out.println("NetworkClient.close");
        disConnect();
    }
}
@Configuration
static class LifeCycleConfig{
@Bean(initMethod = "init", destroyMethod = "close")
public NetworkClient networkClient(){
NetworkClient networkClient = new NetworkClient();
networkClient.setUrl("http://hello-spring.dev");
return networkClient;
}
}우선 전의 인터페이스와 비교하면 메서드 이름을 자유롭게 지정할 수 있다는 장점이 있다. 또 스프링 빈이 스프링 코드에 의존하지 않는다.
지금 코드에 적용하는게 아니라 설정 정보를 사용하고 있기 때문에 코드를 고칠 수 없는 외부 라이브러리에서도 해당 기능을 사용할 수 있다.
여기서 하나 주의깊게 봐야하는 점은, destroyMethod이다.
외부 라이브러리들을 보면 대부분이 close, shutdown이라는 이름의 종료 메서드를 사용한다.
@Bean의 destroyMethod는 기본값이 (inferred), 즉 추론으로 등록되어있다. 이 추론기능은 close, shutdown이름의 메서드를 자동으로 호출해준다.
따라서 직접 스프링 빈으로 등록하면 종료 메서드를 따로 지정해주지않아도 잘 동작한다.
애노테이션 @PostConstruct, @PreDestroy
public class NetworkClient{

    private String url;

    public NetworkClient(){
    	System.out.println("생성자 호출, url = " + url);
    }

    public void setUrl(String url){
    	this.url = url;
    }

    //서비스 시작시 호출
    public void connect(){
    	System.out.println("connect: " + url);
    }

    public void call(String message){
    	System.out.println("call : " + url + " message = " + message);
    }

    //서비스 종료시 호출
    public void disConnect(){
    	System.out.println("close : " + url);
    }

    @PostConstruct
    public void init(){
    	System.out.println("NetworkClient.init");
        connect();
        call("초기화 연결 메시지");
    }

    @PreDestroy
    public void close(){
    	System.out.println("NetworkClient.close");
        disConnect();
    }
}
현재 최신 스프링에서 가장 권장하는 방법이다.
해당 애노테이션의 패키지는 javax.annotation.이다. 즉, 자바 표준 기술이기에 스프링 뿐만이 아니라 다른 컨테이너에서도 잘 동작한다.
유일한 단점은, 외부 라이브러리에 적용을 못한다는 것이다.
외부 라이브러리를 초기화 종료할 때는 2번째 방법인 @Bean기능을 사용하자.
<결론>
@PostConstruct, @PreDestroy 애노테이션을 사용하자.
코드를 고칠 수 없는 외부 라이브러리 경우에만 설정 정보에 @Bean(initMethod, destroyMethod)를 사용하자.
빈 스코프
빈 스코프란?
스프링 빈은 스프링 컨테이너의 시작과 함께 생성되어서 스프링 컨테이너가 종료될 때까지 유지된다고 배웠다. 기본적으로 스프링 빈이 싱글톤 스코프로 생성되기 때문이다.
스코프는 말 그대로 빈이 존재할 수 있는 범위를 말한다.
우리가 기억해야 할 스코프는 크게 3가지 정도이다.
- 싱글톤 : 기본 스코프. 컨테이너의 시작과 종료까지 유지되는 가장 넓은 범위의 스코프
- 프로토타입 : 컨테이너는 프로토타입 빈의 생성과 의존관계 주입까지만 관여를 하고 그 이후는 더는 관리하지 않는 짧은 범위의 스코프
- 웹 관련 스코프 - request : 웹의 servlet context와 같은 범위로 유지되는 스코프
빈 스코프를 지정하는 방법은 크게 두가지이다.
// 자동 등록
@Scope("prototype")
@Component
public class HelloBean{
}

// 수동 등록
@Scope("prototype")
@Bean
PrototypeBean HelloBean(){
	return new HelloBean();
}
우리가 기존까지는 싱글톤 스코프를 사용했다.
배우지 않은 프로토타입 스코프를 배워보자.
프로토타입 스코프
싱글톤 스코프의 빈을 조회하면 컨테이너는 항상 같은 인스턴스의 스프링 빈을 반환한다.
반면에 프로토타입 스코프를 스프링 컨테이너에 조회하면 스프링 컨테이너는 항상 새로운 인스턴스를 생성해서 반환한다.
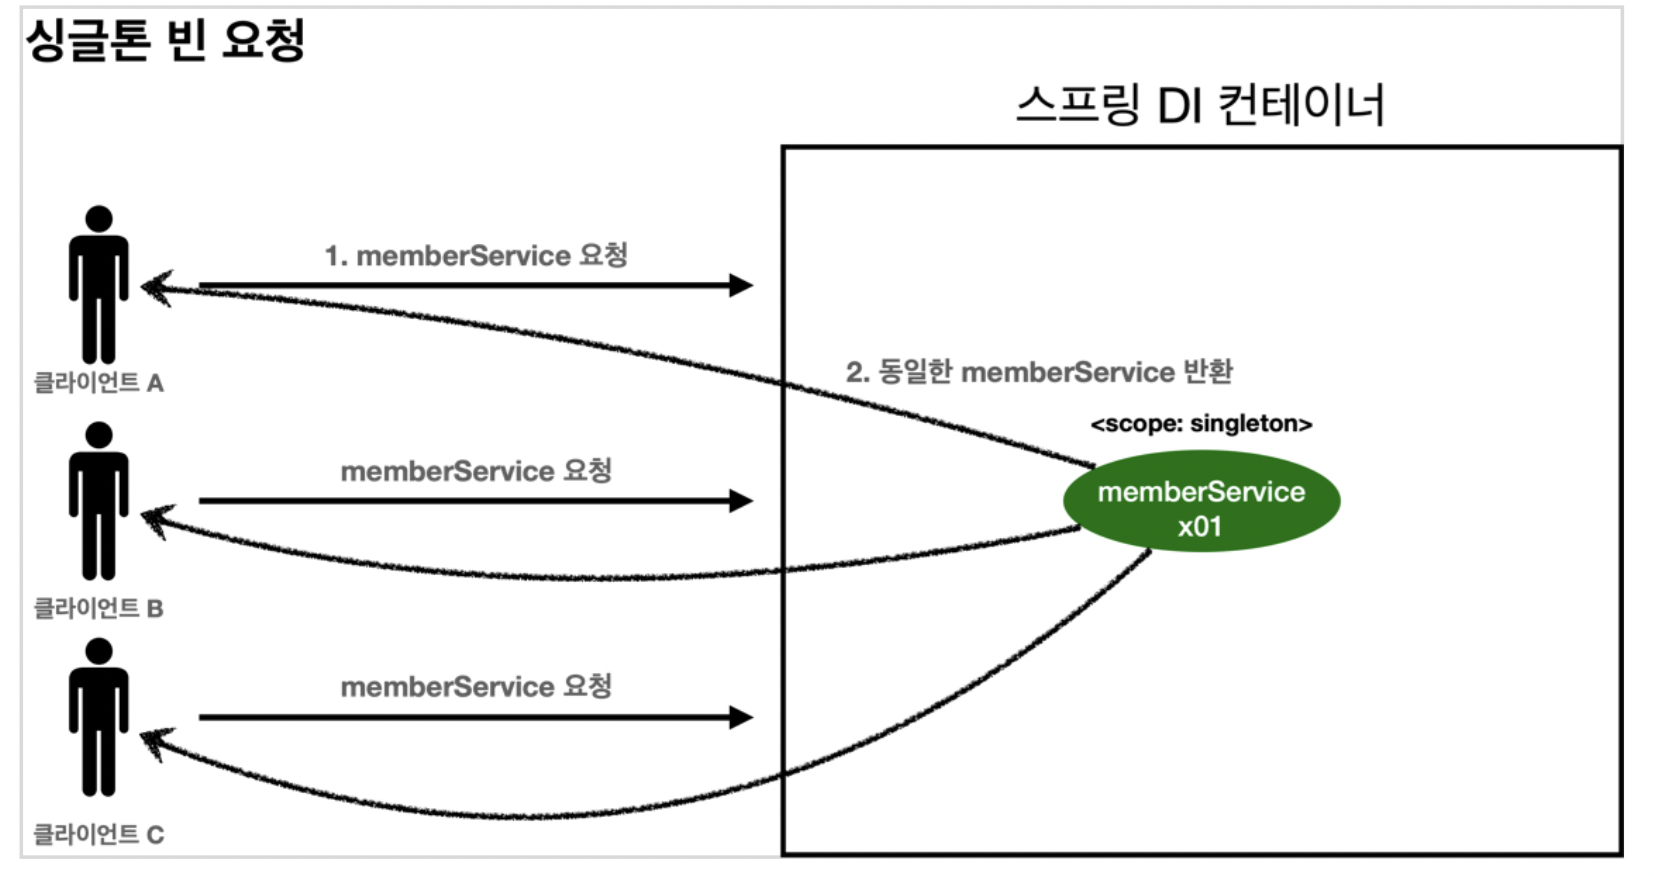
싱글톤의 경우, 스프링 컨테이너는 본인이 관리하는 스프링 빈을 반환하고, 스프링 컨테이너에 같은 요청이 와도 같은 객체 인스턴스의 스프링 빈을 반환한다.
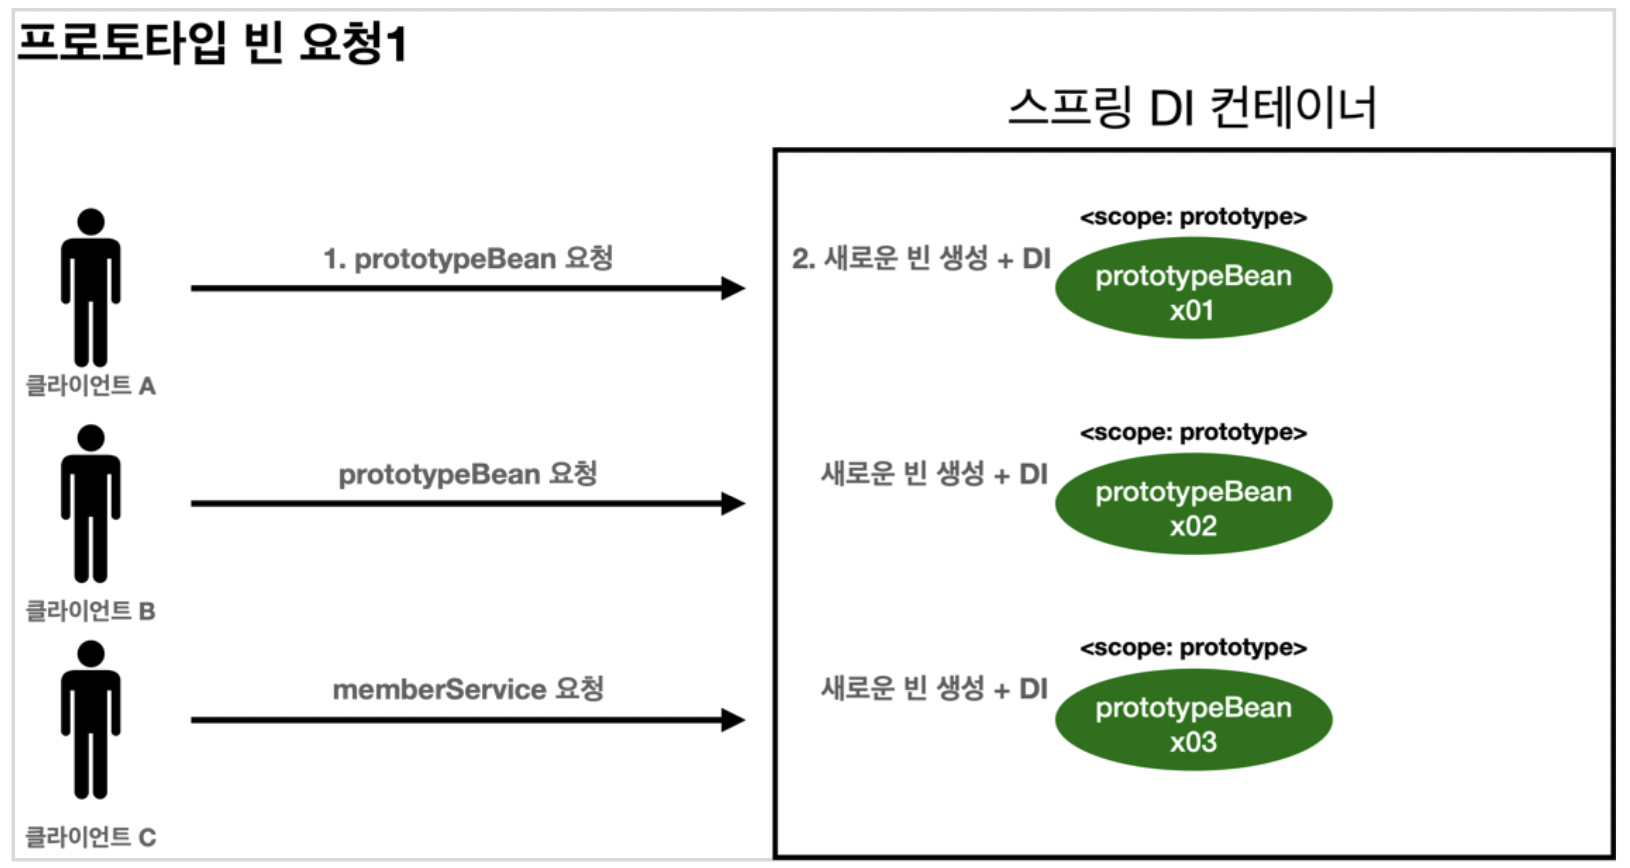
이와 달리, 프로토타입 스코프의 빈을 컨테이너에 요청하면 컨테이너는 그 시점에 프로토타입 빈을 생성하고, 필요한 의존관계를 주입한다.

그 이후에는 생성한 프로토타입 빈을 클라이어느에 반환한다.
그리고 그 이후엔 관리를 하지 않는다. 이후 컨테이너에 같은 요청이 오면 항상 새로운 빈을 만들어서 반환한다.
핵심은 스프링 컨테이너는 프로토타입 빈을 생성하고, 의존관계 주입 및 초기화까지만 처리한다는 것이다. 클라이언트에 빈을 반환하고, 그 이후엔 관리를 하지 않는다.
빈을 관리할 책임은 빈을 받은 클라이언트에 있다. 그렇기에 @PreDestory 같은 종료 메서드가 호출되지 않는다. 하려면 클라이언트가 종료 메서드를 호출해줘야한다.
// 싱글톤 빈 테스트
public class SingletonTest {
    @Test
    void singletonBeanFind(){
        AnnotationConfigApplicationContext ac = new AnnotationConfigApplicationContext(SingletonBean.class);

        SingletonBean singletonBean1 = ac.getBean(SingletonBean.class);
        SingletonBean singletonBean2 = ac.getBean(SingletonBean.class);
        System.out.println("singletonBean1 = " + singletonBean1);
        System.out.println("singletonBean2 = " + singletonBean2);
        Assertions.assertThat(singletonBean1).isSameAs(singletonBean2);

        ac.close();
    }

    @Scope("singleton")
    static class SingletonBean{
        @PostConstruct
        public void init(){
            System.out.println("SingletonBean.init");
        }

        @PreDestroy
        public void destroy(){
            System.out.println("SingletonBean.destroy");
        }
    }
}

// 실행 결과
SingletonBean.init
singletonBean1 = scope.SingletonTest$SingletonBean@1d470d0
singletonBean2 = scope.SingletonTest$SingletonBean@1d470d0
SingletonBean.destroy
스프링 컨테이너 생성 시점에 초기화 메서드가 실행되고
같은 인스턴스의 빈을 정상 호출했다.
싱글톤 빈은 스프링 컨테이너가 관리하기 때문에 컨테이너가 종료될 때 빈의 종료 메서드가 호출되었다.
//프로토타입 빈 테스트
public class PrototypeTest {
    @Test
    void prototypeBeanFind(){
        AnnotationConfigApplicationContext ac = new AnnotationConfigApplicationContext(PrototypeBean.class);
        System.out.println("find prototypeBean1");
        PrototypeBean prototypeBean1 = ac.getBean(PrototypeBean.class);
        System.out.println("find prototypeBean2");
        PrototypeBean prototypeBean2 = ac.getBean(PrototypeBean.class);
        System.out.println("prototypeBean1 = " + prototypeBean1);
        System.out.println("prototypeBean2 = " + prototypeBean2);
        Assertions.assertThat(prototypeBean1).isNotSameAs(prototypeBean2);

        // 프로토타입 빈이기 때문에 destroy가 호출이 안된다.
        ac.close();

        // destroy를 하고 싶다면 클라이언트에서 직접 수동으로 작업해줘야한다.
        prototypeBean1.destroy();
        prototypeBean2.destroy();


    }

    @Scope("prototype")
    static class PrototypeBean{

        @PostConstruct
        public void init(){
        System.out.println("Prototype.init");
        }

        @PreDestroy
        public void destroy(){
        System.out.println("Prototype.destroy");
        }
    }
}
// 실행결과
find prototypeBean1
Prototype.init
find prototypeBean2
Prototype.init
prototypeBean1 = scope.PrototypeTest$PrototypeBean@1d470d0
prototypeBean2 = scope.PrototypeTest$PrototypeBean@24d09c1
Prototype.destroy
Prototype.destroy
싱글톤과 대비되게 프로토타입 스코프의 빈은 스프링 컨테이너에서 빈을 조회할 때 생성되고, 초기화 메서드가 실행된다.
프로토타입 빈을 2번 조회했기 때문에 완전히 다른 스프링 빈이 생성되고 초기화도 2번 실행되었다.
프로토타입 빈은 스프링 컨테이너가 생성과 의존관계 주입, 초기화까지만 관여하고 그 이후는 관리하지 않기 때문에 프로토타입 빈은 스프링 컨테이너가 종료될 때 종료 메서드(@PreDestroy)가 실행되지 않는다.
지금 실행 결과는 클라이언트(PrototypeBean1, PrototypeBean2)에서 종료 메서드를 호출해서이다.
프로토타입 스코프 - 싱글톤 빈과 함께 사용시 문제점
스프링 컨테이너에 프로토타입 스코프의 빈을 요청하면 항상 새로운 객체 인스턴스를 생성해서 반환한다고 배웠다.
하지만 싱글톤과 함께 사용하면 의도한 대로 잘 동작하지 않는다.
먼저 프로토타입 빈을 직접 요청하는 경우를 생각해보자.
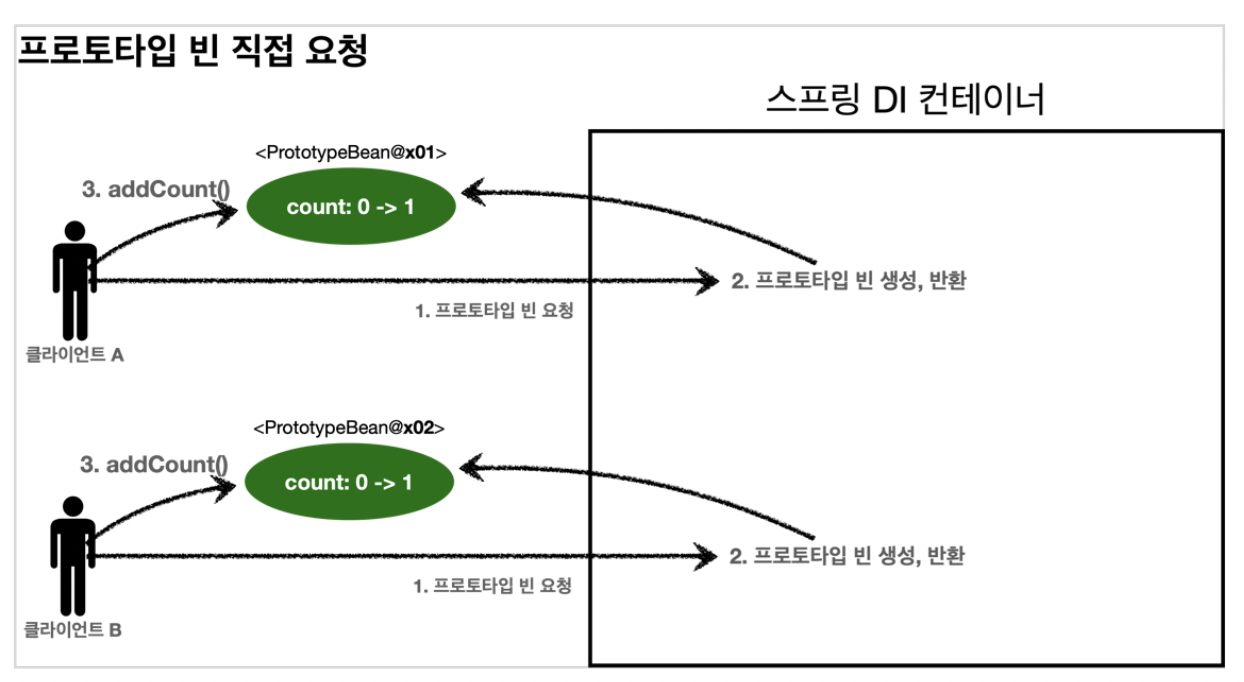
프로토타입 빈은 서로 다른 인스턴스이기 때문에 count++를 해줘도 각자 1을 가지고 있을 것이다.
public class SingletonWithPrototypeTest1 {

    @Test
    void prototypeFind(){
        AnnotationConfigApplicationContext ac = new AnnotationConfigApplicationContext(PrototypeBean.class);
        PrototypeBean prototypeBean1 = ac.getBean(PrototypeBean.class);
        prototypeBean1.addCount();
        Assertions.assertThat(prototypeBean1.getCount()).isEqualTo(1);

        PrototypeBean prototypeBean2 = ac.getBean(PrototypeBean.class);
        prototypeBean2.addCount();
        Assertions.assertThat(prototypeBean2.getCount()).isEqualTo(1);
    }
    @Scope("prototype")
    static class PrototypeBean{
        private int count = 0;

        public void addCount(){
            count++;
        }

        public int getCount(){
            return count;
        }

        @PostConstruct
        public void init(){
            System.out.println("PrototypeBean.init" + this);
        }
        @PreDestroy
        public void destroy(){
            System.out.println("PrototypeBean.destroy");
        }
    }
}
이번엔 싱글톤 빈이 의존관계 주입을 통해서 프로토타입 빈을 주입받아서 사용하는 경우를 생각해보자.
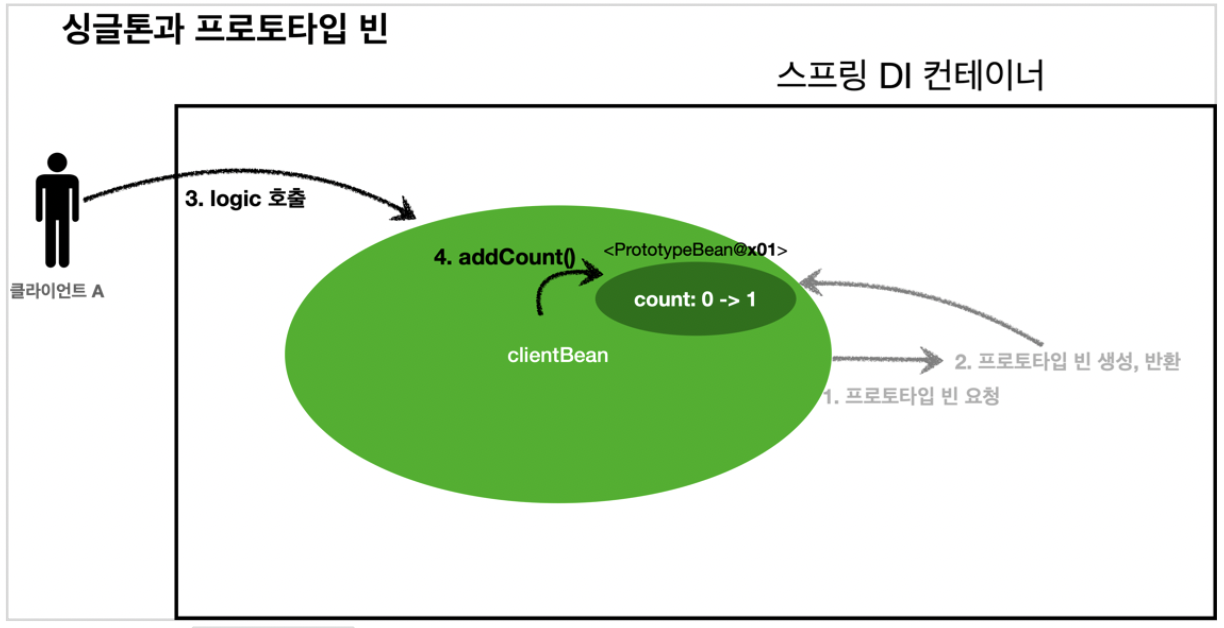
clientBean은 싱글톤이므로, 스프링 컨테이너 생성 시점에 함께 생성되고, 의존관계도 발생한다. 의존관계 자동 주입을 하면서 주입 시점에 컨테이너에 프로토타입 빈을 요청한다. 컨테이너는 프로토타입 빈을 생성해서 clientBean에 반환한다.
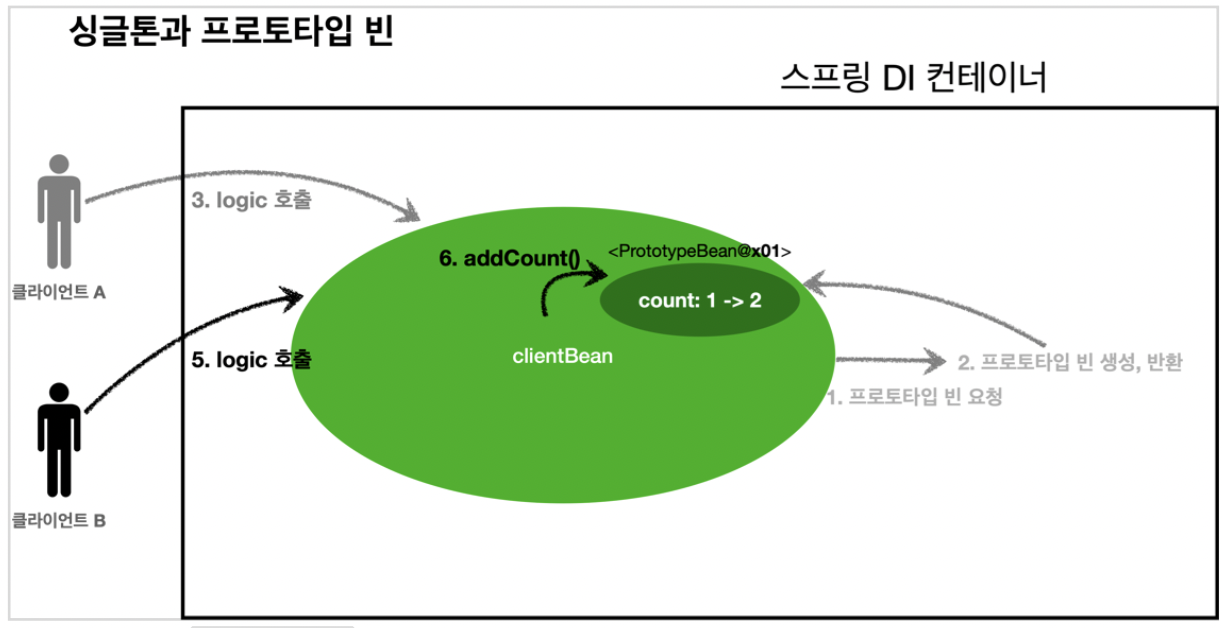
클라이언트B가 clientBean을 스프링 컨테이너에 요청해서 받는다. 싱글톤이므로 같은 clientBean이 반환된다. 중요한 점은, clientBean이 내부에 가지고 잇는 프로토타입 빈은 이미 과거에 주입이 끝났다. 주입 시점에서 스프링 컨테이너에 요청해서 프로토타입 빈이 새로 생성이 된 것이지, 사용할 때마다 새로 생성되는 것은 아니다.
public class SingletonWithPrototypeTest1 {
    @Test
    void singletonClientPrototype(){
        AnnotationConfigApplicationContext ac =
                new AnnotationConfigApplicationContext(ClientBean.class, PrototypeBean.class);

        ClientBean clientBean1 = ac.getBean(ClientBean.class);
        int count1 = clientBean1.logic();
        Assertions.assertThat(count1).isEqualTo(1);

        ClientBean clientBean2 = ac.getBean(ClientBean.class);
        int count2 = clientBean2.logic();
        Assertions.assertThat(count2).isEqualTo(2);
    }
    @Scope("singleton")
    static class ClientBean{
        private final PrototypeBean prototypeBean; // 생성 시점에서 주입

        @Autowired
        public ClientBean(PrototypeBean prototypeBean) {
            this.prototypeBean = prototypeBean;
        }

        public int logic(){
            prototypeBean.addCount();
            int count = prototypeBean.getCount();
            return count;
        }
    }

    @Scope("prototype")
    static class PrototypeBean{
        private int count = 0;

        public void addCount(){
            count++;
        }

        public int getCount(){
            return count;
        }

        @PostConstruct
        public void init(){
            System.out.println("PrototypeBean.init" + this);
        }
        @PreDestroy
        public void destroy(){
            System.out.println("PrototypeBean.destroy");
        }
    }
}
스프링은 일반적으로 싱글톤 빈을 사용하므로, 싱글톤 빈이 프로토타입 빈을 사용하게 된다. 그런데 싱글톤 빈은 생성 시점에만 의존관계 주입을 받기 때문에 프로토타입 빈이 새로 생성되기는 하지만 싱글톤 빈과 함께 쭉 유지가 된다.
이것은 우리가 프로토타입 빈에게 기대했던 것이 아니다.
프로토타입 빈을 주입 시점에만 새로 생성하는 것이 아닌, 사용할 때마다 새로운 인스턴스를 생성해서 사용하는 것을 원했다.
프로토 타입 스코프 - 싱글톤 빈과 함께 사용시 문제 해결 - Provider
먼저 생각해볼 수 있는 것은 싱글톤 빈이 프로토타입을 사용할 때마다 스프링 컨테이너에 새로 요청하는 것이다.
public class PrototypeProviderTest{
	@Test
    void providerTest(){
    	AnnotaitonConfigApplicationContext ac = new AnnotationConfigApplicationContext(ClientBean.class, PrototypeBean.class);

        ClientBean clientBean1 = ac.getBean(ClientBean.class);
        int count1 = clientBean1.logic();
        assertThat(count1).isEqualTo(1);

        ClientBean clientBean2 = ac.getBean(ClientBean.class);
        int count2 = clientBean2.logic();
        assertThat(count2).isEqualTo(1);
	}
    static class ClientBean{
    	@Autowired
        private ApplicationContext ac;

        public int logic(){
        	PrototypeBean prototypeBean = ac.getBean(PrototypeBean.class);
            prototypeBean.addCount();
            int count = prototypeBean.getCount();
            return count;
        }
   }

   @Scope("prototype")
   static class PrototypeBean{

   		private int count = 0;

        public void addCount(){
        	count++;
        }

        public int getCount(){
        	return count;
        }

        @PostConstruct
        public void init(){
        	System.out.println("PrototypeBean.init" + this);
        }

        @PreDestroy
        public void destroy(){
        	System.out.println("PrototypeBean.destroy");
        }
      }
 }
해당 코드에서 핵심이 되는 부분은 바로 여기다.
@Autowired
private ApplicationContext ac;

public int logic(){
     PrototypeBean prototypeBean = ac.getBean(PrototypeBean.class);
     prototypeBean.addCount();
     int count = prototypeBean.getCount();
     return count;
}
ac.getBean()을 통해서 항상 새로운 프로토타입 빈을 생성하고 있다.
의존관계를 이렇게 외부에서 주입받는 것이 아닌, 직접 필요한 의존관계를 찾는 것을 Dependency Lookup(DL) 의존관계조회라고 한다.
하지만 해당 코드는 스프링 애플리케이션 콘텍스트 전체를 주입받기 때문에, 스프링에 종속적인 코드가 되고 단위 테스트도 어렵게 된다.
지금 당장 필요한 기능은 애플리케이션 콘텍스트처럼 큰 범위가 아닌, DL의 기능만 필요하다.
스프링은 이를 ObjectProvider라는 것으로 이를 지원한다.
@Autowired
private ObjectProvider<PrototypeBean> prototypeBeanProvider;

public int logic(){
	PrototypeBean prototypeBean = prototypeBeanProvider.getObject();
    prototypeBean.addCount();
    int count = prototypeBean.getCount();
    return count;
}
ObjectProvider의 getObject()를 호출하면 내부에서는 스프링 컨테이너를 통해서 해당 빈을 찾아 반환한다.(DL)
마지막 방법은 자바 표준에 있는 Provider 기능을 활용하는 것이다.
javax.inject.Provider.
이를 사용하면 gradle에 라이브러리를 추가해야한다.
package javax.inject;
public interface Provider<T>{
	T get();
}
@Autowired
private Provider<PrototypeBean> provider;
public int logic(){
PrototypeBean prototypeBean = provider.get();
prototypeBean.addCount();
int count = prototypeBean.getCount();
return count;
}정리
그러면 프로토타입 빈을 언제 사용해야할까?
매 번 사용할 때마다 의존관계 주입이 완료된 새로운 객체가 필요할 때 사용하면 된다. 하지만 실무에서 실제로 싱글톤 빈만으로도 대부분의 문제를 해결할 수 있기 때문에, 프로토타입 빈을 직접 사용하는 일은 매우 드물다.
또, 자바 표준인 Provider를 사용해야할지, 스프링에서 제공하는 ObjectProvider를 써야할지 고민이 된다.
만약 코드를 스프링이 아닌 다른 컨테이너에서도 사용해야한다면 자바 표준을 쓰는 것이 합당하다.
하지만 현재 대부분 스프링이 더 다양하고 편리한 기능을 제공하고 있기 때문에, 특별히 다른 컨테이너를 사용할 일이 없다면 스프링이 제공하는 기능을 사용하면 된다.
웹스코프
지금까지 싱글톤과 프로토타입 스코프를 학습했다.
이번엔 웹 스코프에 대해 알아보자.
웹 스코프는 웹 환경에서만 동작한다.
웹 스코프는 프로토타입과 달리 스프링이 해당 스코프의 종료 시점까지 관리한다. 그렇기에 종료 메서드가 호출된다.
웹 스코프 종류)
- request : HTTP 요청 하나가 들어오고 나갈 때까지 유지되는 스코프,
각각의 HTTP 요청마다 별도의 빈 인스턴스가 생성되고 관리된다. - session : HTTP Session과 동일한 생명주기를 가지는 스코프
- application : 서블릿 컨텍스트(ServletContext)와 동일한 생명주기를 가지는 스코프.
- websocket : 웹 소켓과 동일한 생명주기를 가지는 스코프
우선 request 스코프를 알아보자.
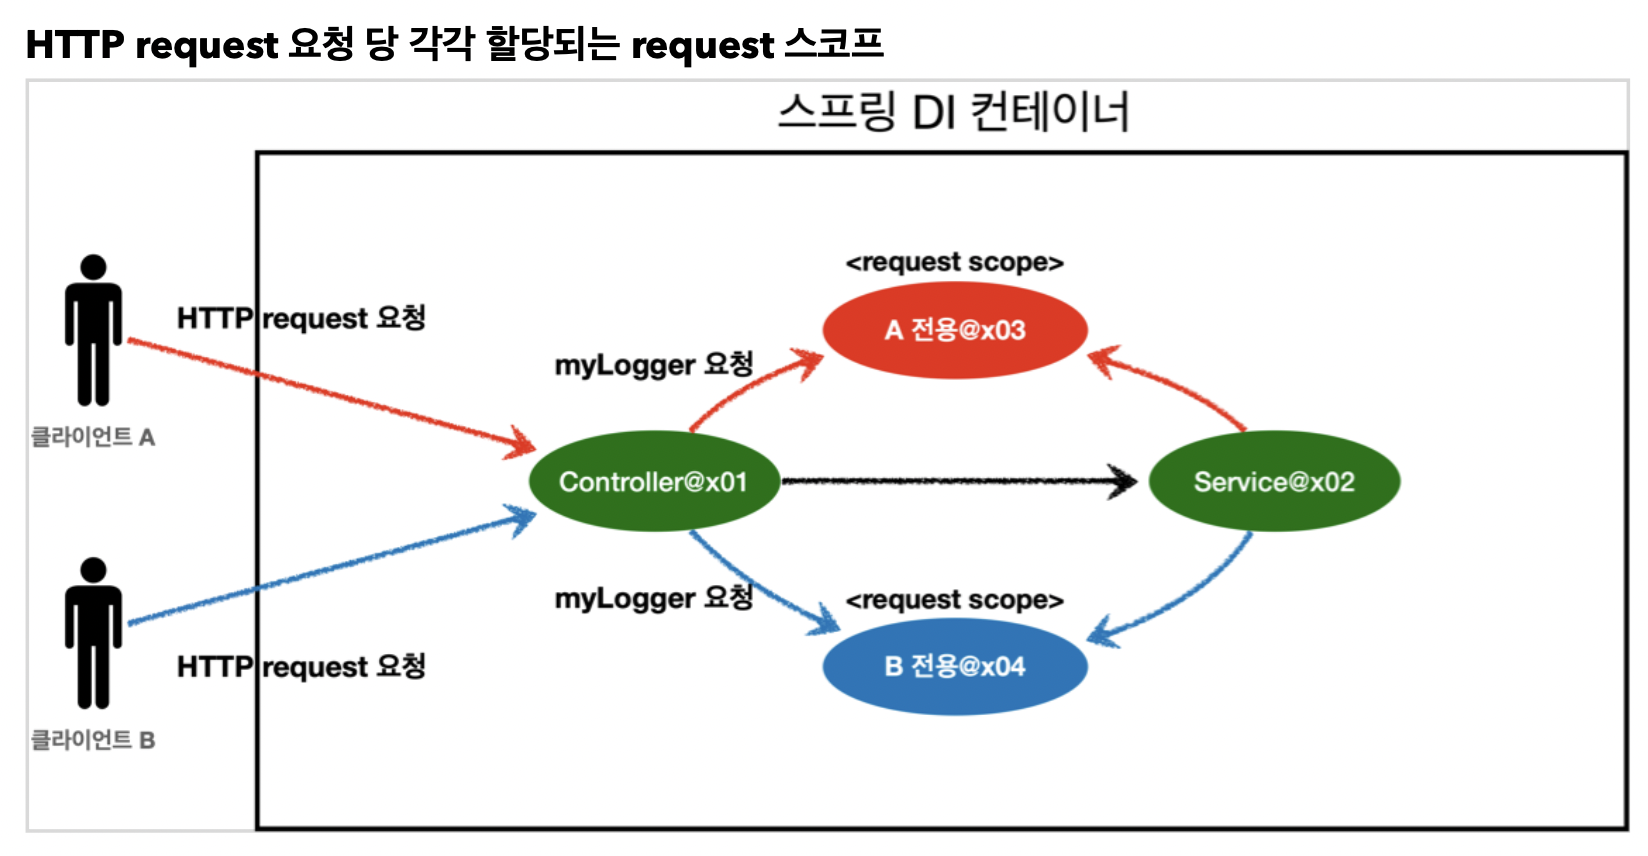
동시에 여러 HTTP 요청이 오면 정확히 어떤 요청이 남긴 로그인지 구분하기 어렵다. 이럴 때 사용하는 것이 request 스코프이다.
이런 형태의 로그가 남도록 request 스코프를 활용해서 기능을 개발해보자.
[UUID][requestURL]{message}UUID의 경우 정말 유니크한 아이디를 말한다.
이걸로 http 요청을 구분하는 것이다.
requestURL을 활용해서 어떤 URL을 요청해서 남은 로그인지 확인해보자.
@Component
@Scope("request")
public class MyLogger{
	private String uuid;
    private String requestURL;

    public void setRequestURL(String requestURL){
    	this.requestURL = requestURL;
    }

    public void log(String message){
    	System.out.println("[" + uuid + "]" + "[" + requestURL + "]" + message);
    }

    @PostConstruct
    public void init(){
    	uuid = UUID.randomUUID().toString();
        System.out.println("[" + uuid + "] request scope bean create : " + this);
    }

    @PreDestroy
    public void close(){
    	System.out.println("[" + uuid + "] request scope bean close : " + this);
    }
}
request 스코프로 지정을 했기 때문에 해당 빈은 HTTP 요청 당 하나씩 생성되고, HTTP 요청이 끝나는 시점에 소멸된다.
requestURL의 경우 빈이 생성되는 시점에서는 알 수가 없다.
그렇기에 외부에서 setter로 입력받기로 했다.
@Controller
@RequiredArgsConstructor
public class LogDemoController{

	private final LogDemoService logDemoService;
    private final MyLogger myLogger;

    @RequestMapping("log-demo")
    @ResponseBody
    public String logDemo(HttpServletRequest request){
    	String requestURL = request.getRequestURL().toString();
        myLogger.setRequestURL(requestURL);

        myLogger.log("controller test");
        logDemoService.logic("testId");
        return "OK";
    }
}

@Service
@RequiredArgsConstructor
public class LogDemoService{

    private final MyLogger myLogger;

    public void logic(String id){
        myLogger.log("service id = " + id);
    }
}
requestURL의 값은 HttpServletRequest를 통해서 받았다.
값은 http://localhost:8080/log-demo일 것이다.
해당 값은 myLogger에 저장된다. myLogger는 HTTP요청 당 각각 구분되므로 다른 요청 때문에 값이 섞일 일은 없다.
여기서 중요하게 기억해야 할 점은, request scope를 사용하지 않고 파라미터로 모든 정보를 서비스 계층에 넘긴다면, 파라미터가 많아져서 지저분해진다.
더 큰 문제는 requestURL과 같은 웹과 관련된 정보가 웹과 관련없는 서비스 계층까지 넘어가게 된다.
웹과 관련된 부분은 컨트롤러까지만 사용해야한다.
서비스 계층은 웹 기술에 종속되지 않고, 가급적 순수하게 유지하는 것이 유지보수에 좋다.
지금의 경우 request scope의 MyLogger 덕분에 파라미터로 넘기지 않고
멤버 변수로 저장해서 깔끔하게 유지시킬 수 있었다.
하지만 우리의 기대와 다르게, 해당 코드들은 오류가 난다. 왜 그럴까??
우리가 스프링 애플리케이션을 실행하는 시점에서 싱글톤 빈은 생성해서 주입이 가능하지만, request 스코프 빈은 아직 생성되지 않는다. 왜?
고객으로부터 실제 요청이 와야 생성되기 때문이다. 생성이 되지 않았는데 주입을 하려 했으니 오류가 난 것이다.