디자인 패턴없이 개발을하다가, 몇주전에 디자인패턴을 사용해야겠다고 다짐했다.
사용해볼것은 MVVM패턴인데 기본적으로 알아야 하는것이 DataBinding과 LiveData이다.
1. 😃 DataBinding이란?
XML에 데이터를 바인딩하여 불필요한 코드를 줄이는것을 뜻한다. 더이상 코드상에서
setText를 사용하지 않아도 된다.
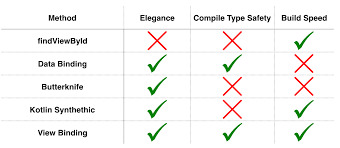
ViewBinding은 변수나 표현식을 제공하지 않아서 동적인 UI콘텐츠를 생성할수 없기때문에
단순한 처리의 경우에 ViewBinding을 사용해야 할것같다.
2. 😊 DataBinding의 사용법
아래의 코드를 보자.
android {
.
.
.
dataBinding {
    enabled = true

}
앱 수준의 Build.gradle에서 적은뒤, Plugin을 집어넣는다.
apply plugin: 'kotlin-kapt'
이제 사용할 XML에 간다.
//맨위에 layout을 선언한다.
<layout xmlns:android="http://schemas.android.com/apk/res/android"
    xmlns:app="http://schemas.android.com/apk/res-auto"
    //넣게 되면 BindingAdapter 구분할때 편리하다.
    xmlns:bind="http://schemas.android.com/tools"
    xmlns:tools="http://schemas.android.com/tools">

  //Activity와 Data를 Bind시켜주는 말그대로의 의미
    <data>

        <variable
            name="activity"
            type="kr.co.kworks.studylivedatabindingadapter.MainActivity" />
    </data>

    <androidx.constraintlayout.widget.ConstraintLayout
        android:layout_width="match_parent"
        android:layout_height="match_parent"
        tools:context=".MainActivity">

        <TextView
            android:id="@+id/text_view"
            android:layout_width="wrap_content"
            android:layout_height="wrap_content"
            이제 직접적으로 해당 액티비티의 변수를 바로바로 Bind할 수 있다.
            android:text="@{activity.liveText}"
            bind:visibleL="@{activity.liveVisible}"
            app:layout_constraintLeft_toLeftOf="parent"
            app:layout_constraintRight_toRightOf="parent"
            app:layout_constraintTop_toTopOf="parent"
            app:layout_constraintBottom_toTopOf="@id/btn_change1"
            app:layout_constraintVertical_chainStyle="packed"/>

        <Button
            android:id="@+id/btn_change1"
            android:layout_width="wrap_content"
            android:layout_height="wrap_content"
            android:text="visible"
            app:layout_constraintLeft_toLeftOf="parent"
            app:layout_constraintRight_toRightOf="parent"
            app:layout_constraintTop_toBottomOf="@+id/text_view"
            app:layout_constraintBottom_toTopOf="@id/btn_change2"/>

        <Button
            android:id="@+id/btn_change2"
            android:layout_width="wrap_content"
            android:layout_height="wrap_content"
            android:text="gone"
            app:layout_constraintLeft_toLeftOf="parent"
            app:layout_constraintRight_toRightOf="parent"
            app:layout_constraintTop_toBottomOf="@+id/btn_change1"
            app:layout_constraintBottom_toBottomOf="parent"/>

    </androidx.constraintlayout.widget.ConstraintLayout>

</layout>
3. 🥰 BindingAdapter
데이터 바인딩을 실무에 적용하기 위해서는 BindingAdapter를 자유자재로 다뤄야 한다.
ImageView,ListView, Recycleview 같은 기능이 복잡한 뷰는 BindingAdpater를 통해 처리해야하기 때문이다.
@BindingAdapter("dragTargetView")
fun setSwipeLayout(swipeLayout: SwipeLayout, dragTargetView: View?) {
    //null일경우, 리턴한다.
    dragTargetView ?: return
    swipeLayout.apply {
        showMode = SwipeLayout.ShowMode.LayDown
        isLeftSwipeEnabled = false
        addDrag(SwipeLayout.DragEdge.Left, dragTargetView)
    }
}
이 바인딩 어뎁터는 SwipeLayout를 set하기 위해 만들어졌다.
아래가 해당하는 xml이다.
  <com.daimajia.swipe.SwipeLayout xmlns:android="http://schemas.android.com/apk/res/android"
        android:id="@+id/swipeLayout_item_main"
        android:layout_width="match_parent"
        android:layout_height="wrap_content"
        android:layout_marginStart="8dp"
        android:layout_marginTop="8dp"
        android:layout_marginEnd="8dp"
        android:minHeight="80dp"

        변수로 아래의 ConstraintLayout을 줘버렸다.
        bind:dragTargetView="@{constraintLayoutDeleteButtonContainer}">

        <androidx.constraintlayout.widget.ConstraintLayout
            android:id="@+id/constraintLayout_delete_button_container"
            android:layout_width="wrap_content"
            android:layout_height="match_parent"
            android:layout_gravity="end"
            android:background="@android:color/holo_red_dark"
            android:paddingStart="36dp"
            android:paddingEnd="36dp">

            <ImageView
                android:id="@+id/imageView_delete"
                android:layout_width="24dp"
                android:layout_height="24dp"
                android:layout_marginBottom="4dp"
                android:contentDescription="@string/item_main_delete_image_content_description"
                android:src="@drawable/ic_delete_white_48dp"
                app:layout_constraintBottom_toTopOf="@id/textView_delete"
                app:layout_constraintEnd_toEndOf="parent"
                app:layout_constraintStart_toStartOf="parent"
                app:layout_constraintTop_toTopOf="parent"
                app:layout_constraintVertical_chainStyle="packed" />

            <TextView
                android:id="@+id/textView_delete"
                android:layout_width="wrap_content"
                android:layout_height="wrap_content"
                android:text="@string/item_main_delete_text"
                android:textColor="@android:color/white"
                android:textSize="12sp"
                app:layout_constraintBottom_toBottomOf="parent"
                app:layout_constraintEnd_toEndOf="@id/imageView_delete"
                app:layout_constraintStart_toStartOf="@id/imageView_delete"
                app:layout_constraintTop_toBottomOf="@id/imageView_delete" />

        </androidx.constraintlayout.widget.ConstraintLayout>
이런식으로 스와이프 레이아웃의 세팅이 끝났다. 보틍이였으면 activity에 오버라이드 해서 직접적으로 넣었어야 했지만 BindingAdapter를 사용하니 깔끔해진것을 볼수있다.
4. 😚 중복 BindingAdapter
만약 같은 이름이되, 다른 변수를 받는것도 가능하다.
이럴 경우, 알아서 적절하게 매핑을 해준다.
@BindingAdapter("loadImage")
public static void loadImage(ImageView view, String path) {
    GlideApp.with(view.getContext())
            .load(path)
            .into(view);
}
@BindingAdapter("loadImage")
public static void loadImage(ImageView view, Uri uri) {
    GlideApp.with(view.getContext())
            .load(uri)
            .into(view);
}
@BindingAdapter("loadImage")
public static void loadImage(ImageView view, int resId) {
    GlideApp.with(view.getContext())
            .load(resId)
            .into(view);
}
또 알아볼것은 한 메소드를 xml에서 다른 view에다 쓸때, 이런식이 가능하다.
@BindingAdapter(value = {"android:visibility", "visibleAnimType"
, "goneAnimType "}, requireAll = false)
public static void setVisibility(View view,
int visibility, int visibleAnimType, int goneAnimType ) {
}
requireAll = false 를 사용하면, 모든파라미터가 필요없다. 대신,
넘어오지 않는값을 대비해 예외처리를 해줘야한다.
Java의 기본값인 Object 형태인 null, primitive type이라면 0을 넘겨준다.
2021-08-29 내용 추가
dataBinding을 간단하게 써보자.
BaseActivity에
    protected inline fun <reified T : ViewDataBinding> binding(resId: Int): Lazy<T> =
        lazy { DataBindingUtil.setContentView<T>(this, resId) }
BaseFragment에
    protected inline fun < T : ViewDataBinding> binding(
        inflater: LayoutInflater,
        @LayoutRes resId: Int,
        container: ViewGroup?
    ): T = DataBindingUtil.inflate(inflater, resId, container, false)
두가지의 코드를 넣는다.
호출
Activity는 이렇게 호출한다.
    private val binding by binding<ActivityIntroBinding>(R.layout.activity_intro)

       override fun onCreate(savedInstanceState: Bundle?) {

        super.onCreate(savedInstanceState)

        with(binding) {
            lifecycleOwner = this@IntroActivity // binding에 LifeCycle을 지정해줘야함.
            }
       }
Fragment는 이렇게 호출한다.
class AddDialogFragment : BaseBottomSheetDialogFragment() {

    override fun onCreateView(
        inflater: LayoutInflater,
        container: ViewGroup?,
        savedInstanceState: Bundle?
    ) = binding<FragmentAddBinding>(
        inflater, R.layout.fragment_add, container
    ).apply {
        lifecycleOwner = this@AddDialogFragment
    }.root