지난 글 참조
이제 숫자가 채워졌으니 어떤 몸무게를 지정하는 인디케이터를 만들 예정이다.
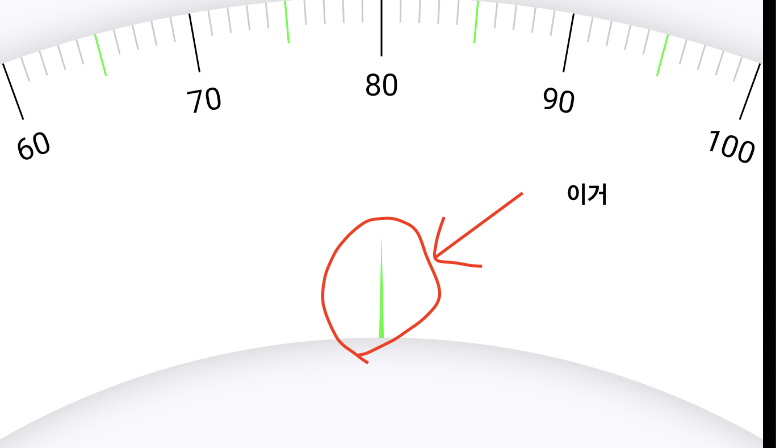
인디케이터 결과
사실 이전에 했던 것을 잘 생각하면 쉽게 구현할 수 있을 것이다.
코드
//..WeightPicker Composable
		//인디케이터 부분 코드
        val middleTop = Offset(
            x = circleCenter.x,
            y = circleCenter.y - innerRadius - style.scaleIndicatorLength.toPx()
        )
        val bottomLeft = Offset(
            x = circleCenter.x - 4f,
            y = circleCenter.y - innerRadius
        )
        val bottomRight = Offset(
            x = circleCenter.x + 4f,
            y = circleCenter.y - innerRadius
        )

        val indicator = Path().apply {
            moveTo(middleTop.x, middleTop.y)
            lineTo(bottomLeft.x, bottomLeft.y)
            lineTo(bottomRight.x, bottomRight.y)
            lineTo(middleTop.x, middleTop.y)
        }

        drawPath(
            path = indicator,
            color = style.scaleIndicatorColor
        )
//...
코드를 보면 정말 간단하다. 세 점을 지정하고 Path를 이용해 이어준 다음 drawPath를 이용해 그려주면 된다.
1. middleTop
세 점중에 가리키는 방향의 점이다.
가장 가운데 위치를 해야하기 때문에 x의 좌표는 circleCenter.x를, y의 좌표는 innerRadius부터 시작해 지정한 길이(style.scaleIndicatorLength)만큼 이동한 것이다.
다시한번 circleCenter.y와 innerRadius가 어떤 값인지 확인해보자(이전 편에 다루긴 했다.)
circleCenter = Offset(center.x, scaleWidth.toPx() / 2f + radius.toPx())

val outerRadius = radius.toPx() + scaleWidth.toPx() / 2
val innerRadius = radius.toPx() - scaleWidth.toPx() / 2
circle.y와 innerRadius의 차이를 구하면 결국 scaleWidth.toPx()이 나온다. 이는 두께 넓이가 되는것이다.(scaleWidth.toPx()의 길이) 이 두께의 넓이에서 indicator 길이 만큼 뺀 값이 가리키는 삼각형의 좌표가 된다.
2. BottomLeft 와 BottomRight
두 점은 innerRadius의 중앙 점에서 좌우로 4f만큼 준것이다. 아까 봤던 middleTop에서 scaleWidth.toPx() 구한 값과 같다.
이제 이를 drawPath로 그리면 처음 보여주었던 화면과 같지 결과가 나온다.
다음은 이제 스와이프 동작을 이용해 몸무게에 이동을 구현할 예정이다.

좋은 개발자가 되기까지