구현 결과

예전에 가끔 사용했던 방식이지만 요즘 앱에서는 많이 보이지 않는 왼쪽 또는 오른쪽으로 스와이프를 통해 상호작용하는 방법을 Compose UI로 구현해보려 한다.
해당 코드는 아래 링크 유튜브 동영상을 보고 학습을 진행했습니다.
https://www.youtube.com/watch?v=-L_d-0Emmwc&t=962s
SwipeableItemWithActions
@Composable
fun SwipeableItemWithActions(
    modifier: Modifier = Modifier,
    isRevealed: Boolean,
    actions: @Composable RowScope.() -> Unit,
    onExpanded: () -> Unit = {},
    onCollapsed: () -> Unit = {},
    content: @Composable () -> Unit
) {
    var contextMenuWidth by remember {
        mutableFloatStateOf(0f)
    }
    val offset = remember {
        Animatable(initialValue = 0f)
    }
    val scope = rememberCoroutineScope()

    LaunchedEffect(isRevealed, contextMenuWidth) {
        if (isRevealed) {
            offset.animateTo(contextMenuWidth)
        } else {
            offset.animateTo(0f)
        }
    }

    Box(
        modifier = modifier
            .fillMaxWidth()
            .height(IntrinsicSize.Min)
    ) {
        Row(
            modifier = Modifier
                .onSizeChanged {
                    contextMenuWidth = it.width.toFloat()
                },
            verticalAlignment = Alignment.CenterVertically
        ) {
            actions()
        }
        Surface(
            modifier = Modifier
                .fillMaxSize()
                .offset { IntOffset(offset.value.roundToInt(), 0) }
                .pointerInput(contextMenuWidth) {
                    detectHorizontalDragGestures(
                        onHorizontalDrag = { _, dragAmount ->
                            scope.launch {
                                val newOffset = (offset.value + dragAmount)
                                    .coerceIn(0f, contextMenuWidth)
                                offset.snapTo(newOffset)
                            }
                        },
                        onDragEnd = {
                            when {
                                offset.value >= contextMenuWidth / 2f -> {
                                    scope.launch { offset.animateTo(contextMenuWidth) }
                                    onExpanded()
                                }

                                else -> {
                                    scope.launch {
                                        offset.animateTo(0f)
                                        onCollapsed()
                                    }
                                }
                            }
                        }
                    )
                }
        ) {
            content()
        }
    }
}
이 SwipeableItemWithActions이 하나의 아이템의 스와이프 동작을 하는 컴포저블이다.
코드가 단순해보여 막상 혼자서 만들라고 했으면 생각보다 시간 소요가 됐을 것 같다.
코드를 작성하면서 궁금한 부분을 알아보자.
1. Animatable
Animatable은 안드로이드 공식 링크에 찾을 수 있었다.
지금까지 animateDpAsState, animateIntOffsetAsState을 생각날 때 사용은 했었지만, Animatable은 처음 사용하고 처음 본 것 같다.
Animatable은 Jetpack Compose의 애니메이션 API 중 하나로, 값의 변화를 시간에 따라 부드럽게 보간(Interpolate)하면서 애니메이션을 실행할 수 있도록 도와주는 클래스.
참고로 Animatable의 넣을 수 있는 값은 Color와 Float가 있다.
fun Animatable(
    initialValue: Float,
    visibilityThreshold: Float = Spring.DefaultDisplacementThreshold
) = Animatable(
    initialValue,
    Float.VectorConverter,
    visibilityThreshold
)

fun Animatable(initialValue: Color): Animatable<Color, AnimationVector4D> =
    Animatable(initialValue, (Color.VectorConverter)(initialValue.colorSpace))
참고로 두 패키지 위치는 달라서 사용 방법은 조금 다를 수 있다.
이번에는 스와이프 했을 때 위치를 옮기기 때문에 Float를 사용해서 위치에 따른 animateTo, snapTo함수를 호출해 움직이는 방향으로 진행했다.
글머 animateTo와 snapTo의 차이점이 무엇일까?
결론부터 얘기하면 애니메이션 적용 여부의 차이다. animationTo의 파라미터를 보면 아래와 같다.
 suspend fun animateTo(
        targetValue: T,
        animationSpec: AnimationSpec<T> = defaultSpringSpec,
        initialVelocity: T = velocity,
        block: (Animatable<T, V>.() -> Unit)? = null
    ): AnimationResult<T, V> {
        val anim = TargetBasedAnimation(
            animationSpec = animationSpec,
            initialValue = value,
            targetValue = targetValue,
            typeConverter = typeConverter,
            initialVelocity = initialVelocity
        )
        return runAnimation(anim, initialVelocity, block)
    }

    //기본 애니메이션은 Spring이다.
    internal val defaultSpringSpec: SpringSpec<T> =
        SpringSpec(visibilityThreshold = visibilityThreshold)
애니메이션이 적용할 수 있는 animationSpec을 사용할 수 있다.
snapTo의 함수는 아래와 같다.
    suspend fun snapTo(targetValue: T) {
        mutatorMutex.mutate {
            endAnimation()
            val clampedValue = clampToBounds(targetValue)
            internalState.value = clampedValue
            this.targetValue = clampedValue
        }
    }
애니메이션 스펙을 적는 파라미터 없이 targetValue에 따른 동작만 하는 것을 볼 수 있다.
2. onSizeChanged
onSizeChanged는 사실 해당 컴포저블의 사이즈가 변할 때마다 관찰할 때 많이 사용했다.
하지만 실제로 사용만 해봤지 정확히는 알지 못해 이참에 한 번 알아보도록 하자.
공식 문서에 따르면 아래와 같은 수정자라고 한다.
요소가 처음 측정될 때 또는 요소의 크기가 변경될 때 수정된 Compose UI 요소의 크기로 호출됩니다.
측 처음 측정될 때 사이즈와, 해당 컴포저블의 사이즈가 변경될 때 onSizeChanged가 호출이 된다고 한다.
그래서 크기의 변화를 감지하고 싶을 때 주로 사용하는 것 같다.
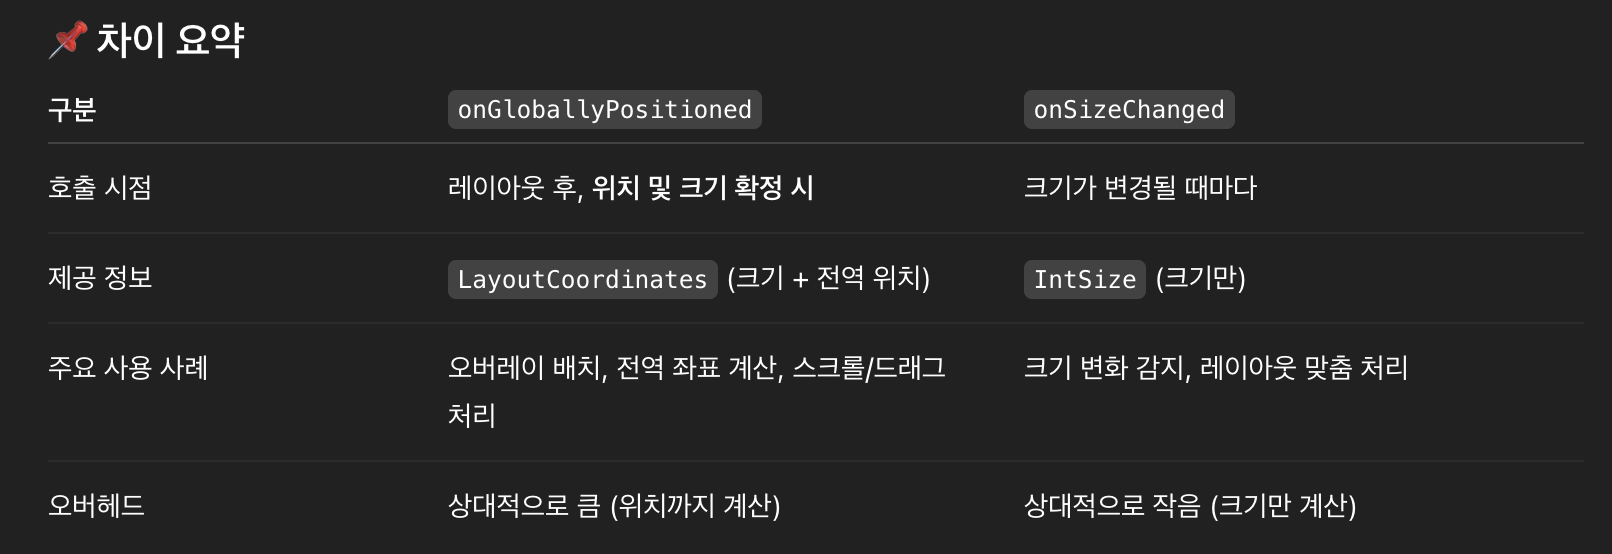
그런데 이 함수랑 비슷하게 사용하는 것이 하나 더 있다. 바로 onGloballyPositioned 수정자이다.
onGloballyPositioned의 수정자 내용은 아래와 같다.
콘텐츠의 전역 위치가 변경되었을 수 있다면 요소의 LayoutCoordinates로 onGloballyPositioned를 호출합니다.
이 둘의 차이점이 무엇일까?
일단 두 수정자의 사용하는 객체가 다르다. onGloballyPositioned은 LayoutCoordinates객체이며, onSizeChanged는 IntSize객체를 사용할 수 있다.
이 객체의 차이점으로는 onSizeChanged는 크기의 변화만을, onGloballyPositioned는 크기 + 위치의 정보를 가지고 있다.
따라서 각각의 상황에 맞게 사용하면 좋을 것 같다.
3. pointerInput
진짜 많이 사용하는 방식인데 이걸 계속 공부해야겠다고 생각만 하고 결국 gpt한테 도움받는 녀석
pointerInput 공식 문서
진짜 얼마나 많으면 여러 방식의 예시를 보여주긴한다. 이를 다룰려면 따로 공부해서 만들도록 하자.
일단 여기서 사용한 방식은 detectHorizontalDragGestures을 이용한 onHorizontalDrag방식과 onDragEnd를 이용한 스와이프 기능을 이용했다. onHorizontalDrag를 이용해 이동한 위치를 감지해 더하거나 빼는 방식을 이용했다. (최소 0, 최대 아이콘의 너비만큼)
onDragEnd는 드래그를 풀었을 때 아이콘 너비의 반을 넘으면 보여주고, 아닌 경우 숨기는 방식으로 구현했다.