음악 관련이나, 녹음 관련 앱을 만들 경우 아래와 같이 녹음 관련 Ui를 구현해야할 때까 있다.

진행이 되면 점점 진해져서 진행되는 것을 보여주는 UI

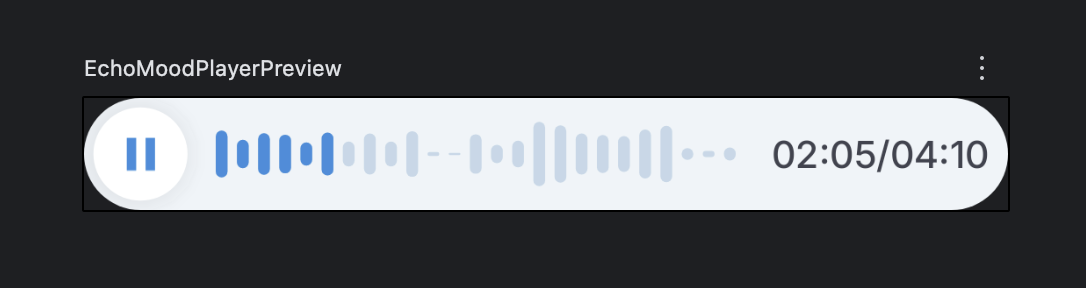
위처럼 음성 녹음 기록한 것을 토대로 높이가 나오는 방법인데, 일단 기능을 제외하고 UI를 구현해보려고 한다.
메인 UI 구성(EchoMoodPlayer)
먼저 구현하는 방식은 Mood, 즉 상태에 따른 색상이 다르게 보여주는 방식이다.
먼저 이미지를 보면 총 3가지로 구성되어 있다.
1. 버튼 입력 이미지
2. 음성의 높이를 보여주는 방식과 그 중 얼마나 진행되었는지 보여주는 UI
3. 시간을 보여주는 UI
이를 이용한 기본적인 코드를 보면 아래와 같다.
@Composable
fun EchoMoodPlayer(
    moodUI: MoodUI?,
    playbackState: PlaybackState,
    playerProgress: () -> Float,
    durationPlayed: Duration,
    totalPlaybackDuration: Duration,
    powerRatios: List<Float>,
    onPlayClick: () -> Unit,
    onPauseClick: () -> Unit,
    modifier: Modifier = Modifier,
    amplitudeBarWidth: Dp = 5.dp,
    amplitudeBarSpacing: Dp = 4.dp,
) {
	//각 Mood에 맞는 컬러 설정
    val iconTint = when (moodUI) {
        null -> MoodPrimary35
        else -> moodUI.colorSet.vivid
    }

    val trackFillColor = when (moodUI) {
        null -> MoodPrimary80
        else -> moodUI.colorSet.vivid
    }

    val backgroundColor = when (moodUI) {
        null -> MoodPrimary25
        else -> moodUI.colorSet.faded
    }

    val trackColor = when (moodUI) {
        null -> MoodPrimary35
        else -> moodUI.colorSet.desaturated
    }

    //Kotlin Duration을 String 형식으로 보여주는 방식
    val formattedDurationText = remember(durationPlayed, totalPlaybackDuration) {
        "${durationPlayed.formatMMSS()}/${totalPlaybackDuration.formatMMSS()}"
    }

    Surface(
        shape = CircleShape,
        color = backgroundColor,
        modifier = modifier
    ) {
        Row(
            modifier = Modifier
                .height(IntrinsicSize.Max),
            verticalAlignment = Alignment.CenterVertically
        ) {
            //1. 버튼 이미지

            //2. 음성 UI

            //3. 시간 관련 UI
            Text(
                text = formattedDurationText,
                color = MaterialTheme.colorScheme.onSurfaceVariant,
                modifier = Modifier.padding(end = 8.dp)
            )
        }
    }
}
1. 버튼 이미지(EchoPlaybackButton)
@Composable
fun EchoPlaybackButton(
    playbackState: PlaybackState,
    onPlayClick: () -> Unit,
    onPauseClick: () -> Unit,
    colors: IconButtonColors,
    modifier: Modifier = Modifier
) {
    FilledIconButton(
        onClick =
            when (playbackState) {
                PlaybackState.PLAYING -> onPlayClick
                PlaybackState.PAUSED,
                PlaybackState.STOPPED -> onPauseClick
            },
        colors = colors,
        modifier = modifier.defaultShadow()
    ) {
        Icon(
            imageVector = when (playbackState) {
                PlaybackState.PLAYING -> Icons.Filled.Pause
                PlaybackState.PAUSED,
                PlaybackState.STOPPED -> Icons.Filled.PlayArrow
            },
            contentDescription = when (playbackState) {
                PlaybackState.PLAYING -> stringResource(R.string.playing)
                PlaybackState.PAUSED -> stringResource(R.string.paused)
                PlaybackState.STOPPED -> stringResource(R.string.stopped)
            }
        )
    }
}
이미지는 버튼은 단순히 FilldIconButton을 이용해 구현했다. 정지, 멈춤, 종료인 PlaybackState에 따른 이미지와 Mood에 따른 colors를 지정, 음성 시작과 정지를 구현하는 고차함수 onPlayClick, onPauseClick 이용했다.
2. 음성 UI (EchoPlayBar)
사실 이 글의 목표인 음성에 따른 UI를 보여주는 것이다.
음성 UI는 Canvas를 이용해 구현했다.
@Composable
fun EchoPlayBar(
    amplitudeBarWidth: Dp,
    amplitudeBarSpacing: Dp,
    powerRatios: List<Float>,
    trackColor: Color,
    trackFillColor: Color,
    playerProgress: () -> Float,
    modifier: Modifier = Modifier
) {
    Canvas(
        modifier = modifier
    ) {
    	//바의 width (dp -> px)
        val amplitudeBarWidthPx = amplitudeBarWidth.toPx()

        //바 사이의 간격 (dp -> px)
        val amplitudeBarSpacingPx = amplitudeBarSpacing.toPx()

        val clipPath = Path()

        powerRatios.forEachIndexed { index, ratio ->
            val height = ratio * size.height
            val xOffset = index * (amplitudeBarSpacingPx + amplitudeBarWidthPx)
            val yTopStart = center.y - height / 2f
            val topLeft = Offset(
                x = xOffset,
                y = yTopStart
            )

            val rectSize = Size(
                width = amplitudeBarWidthPx,
                height = height
            )

            val roundRect = RoundRect(
                rect = Rect(
                    offset = topLeft,
                    size = rectSize
                ),
                cornerRadius = CornerRadius(100f)
            )
            clipPath.addRoundRect(roundRect)

			//전체 음성 녹음 UI
            drawRoundRect(
                color = trackColor,
                topLeft = topLeft,
                size = rectSize,
                cornerRadius = CornerRadius(100f)
            )
        }

		//음성 녹음 중 진행된 UI 색칠된 부분
        clipPath(clipPath) {
            drawRect(
                color = trackFillColor,
                size = Size(
                    width = size.width * playerProgress(),
                    height = size.height
                )
            )
        }
    }
}
결과
@Composable
fun EchoMoodPlayer(
    moodUI: MoodUI?,
    playbackState: PlaybackState,
    playerProgress: () -> Float,
    durationPlayed: Duration,
    totalPlaybackDuration: Duration,
    powerRatios: List<Float>,
    onPlayClick: () -> Unit,
    onPauseClick: () -> Unit,
    modifier: Modifier = Modifier,
    amplitudeBarWidth: Dp = 5.dp,
    amplitudeBarSpacing: Dp = 4.dp,
) {
    val iconTint = when (moodUI) {
        null -> MoodPrimary35
        else -> moodUI.colorSet.vivid
    }

    val trackFillColor = when (moodUI) {
        null -> MoodPrimary80
        else -> moodUI.colorSet.vivid
    }

    val backgroundColor = when (moodUI) {
        null -> MoodPrimary25
        else -> moodUI.colorSet.faded
    }

    val trackColor = when (moodUI) {
        null -> MoodPrimary35
        else -> moodUI.colorSet.desaturated
    }
    val formattedDurationText = remember(durationPlayed, totalPlaybackDuration) {
        "${durationPlayed.formatMMSS()}/${totalPlaybackDuration.formatMMSS()}"
    }

    Surface(
        shape = CircleShape,
        color = backgroundColor,
        modifier = modifier
    ) {
        Row(
            modifier = Modifier
                .height(IntrinsicSize.Max),
            verticalAlignment = Alignment.CenterVertically
        ) {
            EchoPlaybackButton(
                playbackState = playbackState,
                onPlayClick = onPlayClick,
                onPauseClick = onPauseClick,
                colors = IconButtonDefaults.iconButtonColors(
                    containerColor = MaterialTheme.colorScheme.surface,
                    contentColor = iconTint
                ),
            )

            EchoPlayBar(
                amplitudeBarWidth = amplitudeBarWidth,
                amplitudeBarSpacing = amplitudeBarSpacing,
                trackColor = trackColor,
                trackFillColor = trackFillColor,
                powerRatios = powerRatios,
                playerProgress = playerProgress,
                modifier = Modifier
                    .weight(1f)
                    .padding(vertical = 10.dp, horizontal = 8.dp)
                    .fillMaxHeight()
            )

            Text(
                text = formattedDurationText,
                color = MaterialTheme.colorScheme.onSurfaceVariant,
                modifier = Modifier.padding(end = 8.dp)
            )
        }
    }
}
Preview를 통해 보여진 UI
확실이 이런 UI를 그릴 때는 Canvas를 잘 활용해야한다는 것을 다시 한 번 느꼈다.
예전부터 조금씩 Canvas를 써보려고 노력하지만 막상 적용하려하니 어떤걸 써야할 지 막막했는데 이렇게 적용할 수 있어서 조금 사용 방법을 알게 되었다.
좋은 개발자가 되기까지