1. 프로젝트 소개
목표
- 실시간으로 웹캠에서 영상을 가져와 OpenCvSharp를 이용하여 다양한 필터 효과를 적용하고, WPF를 이용하여 결과 화면을 보여주는 프로그램을 제작
사용 기술
- C#
- WPF (Windows Presentation Foundation)
▶ XAML, UI 컨트롤, 이벤트 처리 - OpenCVSharp (OpenCV 라이브러리의 C# 래퍼)
▶ 영상 캡처, 이미지 처리
개발 환경
- Visual Studio 2022
- .NET 9.0
- OpenCVSharp4.Windows NuGet 패키지
2. 기능 설명
주요 기능
- 웹캠 영상 실시간 출력: 사용자 PC에 연결된 웹캠에서 영상을 실시간으로 가져와 화면에 출력한다.
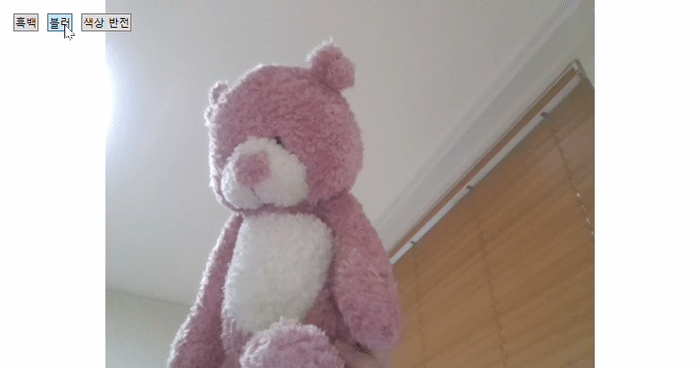
- 필터 적용: 흑백, 블러, 색상 반전 등 이미지 처리 필터를 적용한다.
- GUI: WPF를 이용하여 사용자 인터페이스를 구성하고, 버튼 클릭을 통해 웹캠 영상에 필터를 선택하고 적용 및 해제한다.
사용법
- 프로그램을 실행한다.
- 웹캠 영상이 화면에 표시된다.
- "흑백", "블러", "색상 반전" 버튼을 클릭하여 원하는 필터를 적용하거나 해제한다.
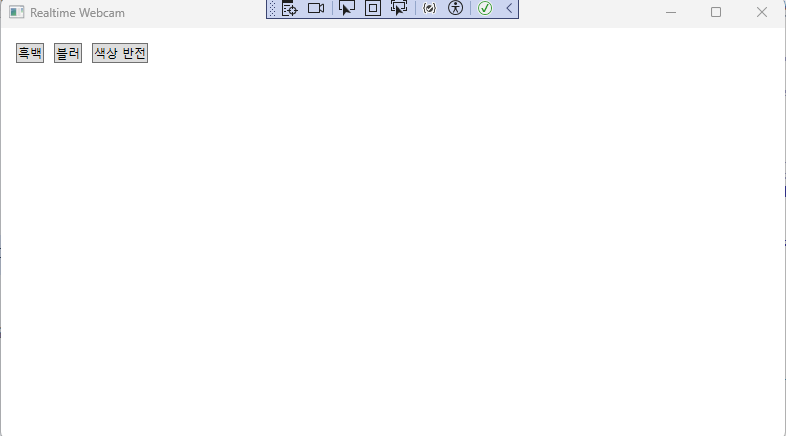
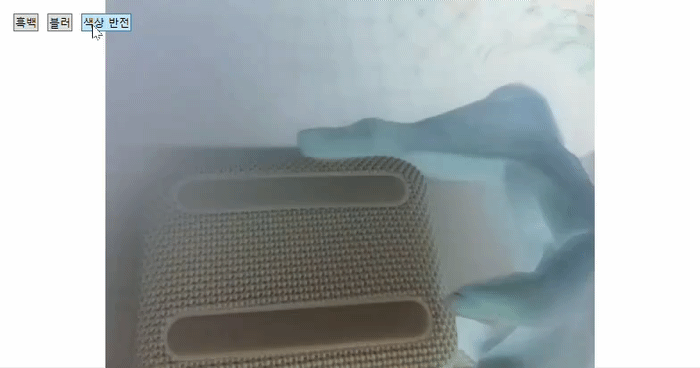
실행 화면
3. 코드
프로젝트 진행 방향
- WPF 프로젝트 생성: Visual Studio에서 WPF 앱 (.NET Framework 또는 .NET) 프로젝트를 생성한다.
- OpenCV 설치: NuGet 패키지 관리자를 통해 OpenCVSharp 라이브러리를 설치한다.
- 웹캠 영상 캡처: OpenCV의 VideoCapture 클래스를 이용하여 웹캠에서 영상을 가져온다.
- WPF UI 디자인: XAML을 이용하여 웹캠 영상을 표시할 Image 컨트롤과 필터 선택 버튼 등을 배치한다.
- 필터 구현: OpenCV 함수를 이용하여 흑백, 블러, 엣지 검출 등 다양한 필터 효과를 구현한다.
- 필터 적용 및 화면 출력: 버튼 클릭 이벤트 등을 통해 선택된 필터를 웹캠 영상에 적용하고, 결과 영상을 WPF Image 컨트롤에 출력한다.
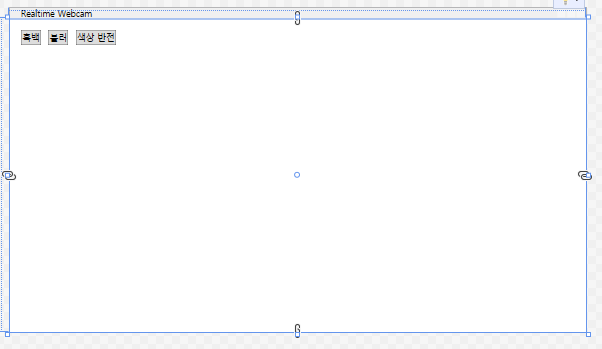
(1) WPF UI 디자인(MainWindow.xaml)
<Window x:Class="RealtimeWebcam.MainWindow"
        xmlns="http://schemas.microsoft.com/winfx/2006/xaml/presentation"
        xmlns:x="http://schemas.microsoft.com/winfx/2006/xaml"
        xmlns:d="http://schemas.microsoft.com/expression/blend/2008"
        xmlns:mc="http://schemas.openxmlformats.org/markup-compatibility/2006"
        xmlns:local="clr-namespace:RealtimeWebcam"
        mc:Ignorable="d"
        Title="MainWindow" Height="450" Width="800">

    <Grid>
        <Image x:Name="imgDisplay" Stretch="Uniform" />
        <StackPanel Orientation="Horizontal" HorizontalAlignment="Left" VerticalAlignment="Top" Margin="10">
            <Button Content="흑백" Margin="5" Click="GrayscaleButton_Click" />
            <Button Content="블러" Margin="5" Click="BlurButton_Click" />
            <Button Content="색상 반전" Margin="5" Click="InvertButton_Click" />
        </StackPanel>
    </Grid>
</Window>
이 XAML 코드는 WPF (Windows Presentation Foundation) 창을 정의하고, 웹캠에서 가져온 이미지를 표시하고 필터를 적용하는 UI를 구성한다.
-
<Window>: WPF 창을 나타내는 루트 요소이다.x:Class="RealtimeWebcam.MainWindow": 이 XAML 코드와 연결될 C# 클래스를 지정한다.RealtimeWebcam네임스페이스의MainWindow클래스가 이 창의 코드 비하인드 클래스가 된다.xmlns="http://schemas.microsoft.com/winfx/2006/xaml/presentation": WPF 네임스페이스를 지정한다. WPF UI 요소들을 사용하려면 이 네임스페이스를 선언해야 한다.xmlns:x="http://schemas.microsoft.com/winfx/2006/xaml": XAML 네임스페이스를 지정한다. XAML 언어의 기본적인 기능을 사용하려면 이 네임스페이스를 선언해야 한다.Title="Realtime Webcam": 창의 제목을 "Realtime Webcam"로 설정한다.Height="450": 창의 높이를 450으로 설정한다.Width="800": 창의 너비를 800으로 설정한다.
-
<Grid>: 창의 내용을 담는 컨테이너 컨트롤이다.Grid컨트롤은 행과 열을 사용하여 UI 요소를 배치할 수 있는 컨테이너이다.-
<Image x:Name="imgDisplay" Stretch="Uniform" />: 이미지를 표시하는Image컨트롤이다.<Image>: WPF에서 이미지를 표시하는 컨트롤을 나타낸다.x:Name="imgDisplay":Image컨트롤의 이름을imgDisplay로 설정한다. 코드 비하인드에서 이 이름을 사용하여Image컨트롤에 접근할 수 있다. 접근해서 속성을 변경하거나 이벤트를 처리할 수 있다.Stretch="Uniform": 이미지의 가로 세로 비율을 유지하면서 컨트롤 크기에 맞게 이미지 크기를 조정한다. 즉, 이미지가 컨트롤 영역에 맞춰 늘어나거나 줄어들지만 원본 이미지의 가로 세로 비율은 유지된다.Stretch속성에는 다음과 같은 값을 지정할 수 있다.
-None: 이미지의 원본 크기를 유지한다.
-Fill: 이미지의 가로 세로 비율을 무시하고 컨트롤 영역을 채운다.
-Uniform: 이미지의 가로 세로 비율을 유지하면서 컨트롤 영역에 맞게 이미지 크기를 조정한다.
-UniformToFill: 이미지의 가로 세로 비율을 유지하면서 컨트롤 영역을 채운다.
따라서Stretch="Uniform"을 사용하면 이미지가 왜곡되지 않고 컨트롤 영역에 최대한 크게 표시된다.
-
<StackPanel Orientation="Horizontal" HorizontalAlignment="Left" VerticalAlignment="Top" Margin="10">: 컨트롤을 가로 방향으로 배치하는StackPanel컨트롤이다.-
Orientation="Horizontal": 컨트롤을 가로 방향으로 배치한다. -
HorizontalAlignment="Left":StackPanel을 창의 왼쪽에 정렬한다. -
VerticalAlignment="Top":StackPanel을 창의 위쪽에 정렬한다. -
Margin="10":StackPanel주변에 10의 여백을 설정한다. -
<Button Content="흑백" Margin="5" Click="GrayscaleButton_Click" />: "흑백"이라는 텍스트를 표시하는 버튼 컨트롤이다.Margin="5": 버튼 주변에 5의 여백을 설정한다.Click="GrayscaleButton_Click": 버튼을 클릭했을 때GrayscaleButton_Click메서드를 호출한다.
-
<Button Content="블러" Margin="5" Click="BlurButton_Click" />: "블러"라는 텍스트를 표시하는 버튼 컨트롤이다.Margin="5": 버튼 주변에 5의 여백을 설정한다.Click="BlurButton_Click": 버튼을 클릭했을 때BlurButton_Click메서드를 호출한다.
-
<Button Content="색상 반전" Margin="5" Click="InvertButton_Click" />: "색상 반전"이라는 텍스트를 표시하는 버튼 컨트롤이다.Margin="5": 버튼 주변에 5의 여백을 설정한다.Click="InvertButton_Click": 버튼을 클릭했을 때InvertButton_Click메서드를 호출한다.
-
-
(2) 웹캠 영상 캡처 및 출력(MainWindow.xaml.cs)
using System.Text;
using System.Windows;
using System.Windows.Controls;
using System.Windows.Data;
using System.Windows.Documents;
using System.Windows.Input;
using System.Windows.Media;
using System.Windows.Media.Imaging;
using System.Windows.Navigation;
using System.Windows.Shapes;
using System.Windows.Threading;

using OpenCvSharp;

namespace RealtimeWebcam
{
    /// <summary>
    /// Interaction logic for MainWindow.xaml
    /// </summary>
    public partial class MainWindow : Window
    {
        private VideoCapture capture; // 웹캠 캡처를 위한 VideoCapture 객체
        private Mat frame; // 이미지 프레임을 저장하는 Mat 객체
        private DispatcherTimer timer; // UI 스레드에서 일정 간격으로 작업을 수행하기 위한 DispatcherTimer 객체


        public MainWindow()
        {
            InitializeComponent();

            capture = new VideoCapture(0); // 기본 웹캠 장치를 사용하여 VideoCapture 객체를 초기화
            frame = new Mat(); // Mat 객체를 생성
            timer = new DispatcherTimer(); // DispatcherTimer 객체를 생성
            timer.Interval = TimeSpan.FromMilliseconds(33); // 타이머 간격을 33밀리초로 설정하여,
                                                            // 약 30fps로 프레임을 업데이트한다
            timer.Tick += UpdateFrame; // timer의 Tick 이벤트에 UpdateFrame 메서드를 연결
            timer.Start(); // 타이머를 시작한다
        }


        private void UpdateFrame(object sender, EventArgs e)
        {
            capture.Read(frame); // 웹캠에서 프레임을 읽어와 frame 객체에 저장
            if (!frame.Empty()) // frame 객체가 비어 있지 않으면, 즉 프레임을 읽어오는 데 성공하면 다음 코드를 실행한다.
            {
                imgDisplay.Source = frame.ToBitmapSource(); // frame 객체를 BitmapSource로 변환하여,
                                                            // imgDisplay 컨트롤의 Source 프로퍼티에 할당한다.
            }
        }
    }
}
오류 발생 1
오류
- 'Window'은(는) 'OpenCvSharp.Window' 및 'System.Windows.Window' 사이에 모호한 참조입니다.
해결방법
`public partial class MainWindow : Window` 를
`public partial class MainWindow : System.Windows.Window`로 변경한다.
오류 발생 2
오류
- 'Mat'에는 'ToBitmapSource'에 대한 정의가 포함되어 있지 않고, 'Mat' 형식의 첫 번째 인수를 허용하는 액세스 가능한 확장 메서드 'ToBitmapSource'이(가) 없습니다. using 지시문 또는 어셈블리 참조가 있는지 확인하세요.
해결방법
OpenCvSharp.WpfExtensions 라이브러리를 누겟에서 찾아서 설치한다. 그리고 using OpenCvSharp.WpfExtensions;을 선언해서 참조한다. OpenCvSharp.WpfExtensions은 OpenCVSharp에서 WPF 컨트롤에 이미지를 표시하기 위한 확장 메서드를 제공한다.
오류 발생 3
오류
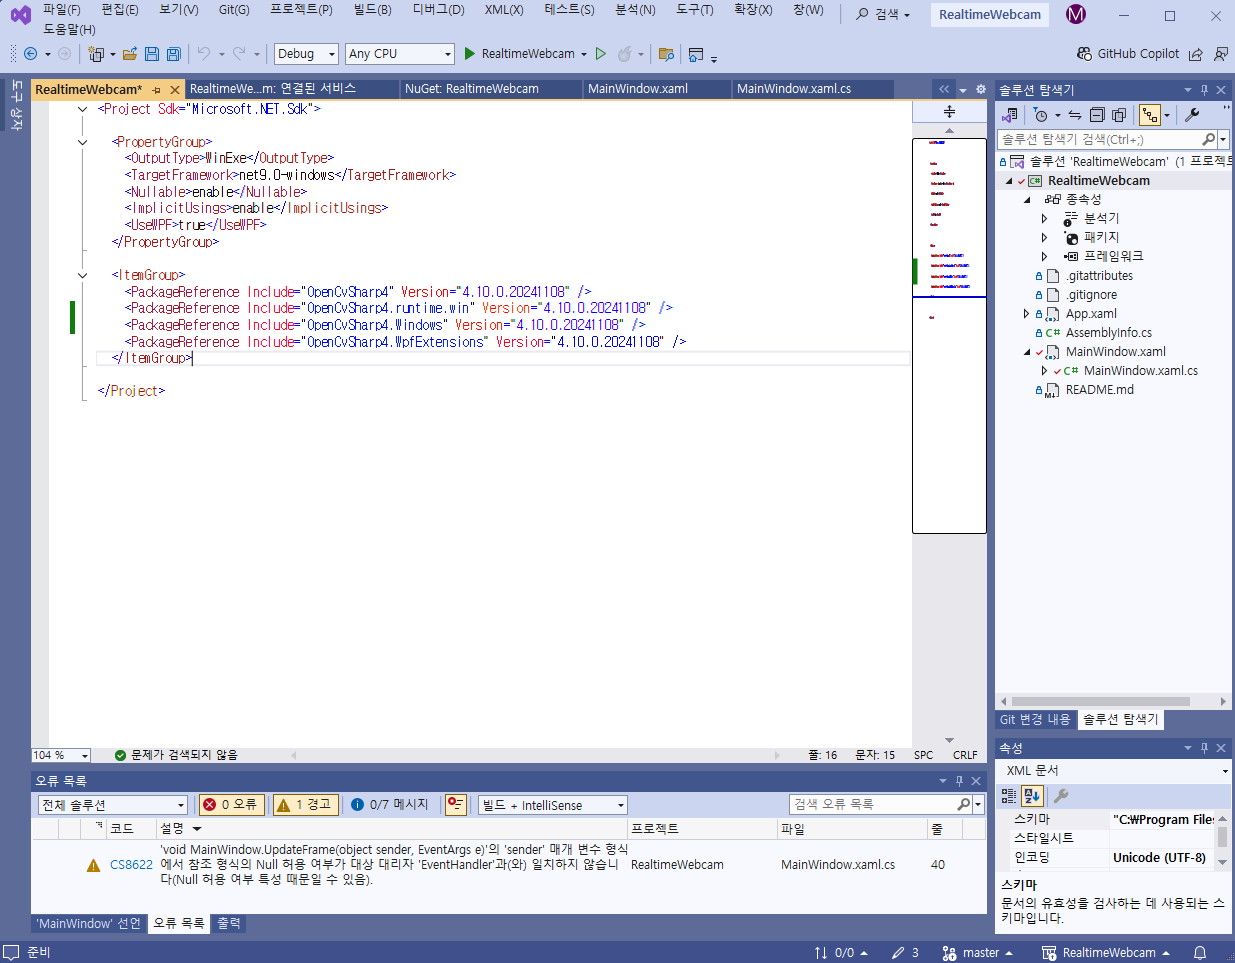
- 'void MainWindow.UpdateFrame(object sender, EventArgs e)'의 'sender' 매개 변수 형식에서 참조 형식의 Null 허용 여부가 대상 대리자 'EventHandler'과(와) 일치하지 않습니다(Null 허용 여부 특성 때문일 수 있음).
발생 원인
이 오류는 C# 8.0 이후에 도입된 Nullable Reference Types 기능과 관련된 오류다. Nullable Reference Types 기능은 참조 형식에 null 값을 허용할지 여부를 명시적으로 지정하여 null 참조 예외를 방지하는 데 도움을 준다.
EventHandler 델리게이트는 object sender 매개변수를 갖는데, 이 매개변수는 null이 될 수 없는 object 타입이다. 하지만 UpdateFrame 메서드의 sender 매개변수는 null이 될 수 있는 object? 타입으로 추론될 수 있다. 이러한 타입 불일치로 인해 오류가 발생하는 것이다.
해결방법
sender매개변수의 타입을 명시적으로object로 지정한다.EventHandler델리게이트의sender매개변수를 null 허용 타입으로 변경한다.
private void UpdateFrame(object sender, EventArgs e)
{
    // ...
}
or
public delegate void EventHandler(object? sender, EventArgs e);추가 정보
- Nullable Reference Types 기능은 null 참조 예외를 방지하는 데 도움이 되는 유용한 기능이다.
?는 null 허용 타입을 나타내는 데 사용된다.!는 null 값이 아니라고 단언하는 데 사용된다.
참고
ToBitmapSource() 메서드는 Mat 객체를 BitmapSource로 변환하는 확장 메서드이다.
DispatcherTimer는 WPF 애플리케이션에서 UI 스레드에서 작업을 수행하기 위한 타이머이다.
(3) 필터 기능 구현 (MainWindow.xaml.cs)
- 각 컨트롤에 대한 이벤트 핸들러 껍데기를 만든다. 그리고 각 이벤트 핸들러 내에 OpenCV 함수를 이용해서 필터 효과 적용을 위한 코드를 작성한다. (ex. 흑백 필터 (
Cv2.CvtColor())
private void GrayscaleButton_Click(object sender, RoutedEventArgs e)
{
    if (!frame.Empty())
    {
        Mat grayFrame = new Mat();
        Cv2.CvtColor(frame, grayFrame, ColorConversionCodes.BGR2GRAY);
        imgDisplay.Source = grayFrame.ToBitmapSource();
    }
}
mgDisplay.Source = grayFrame.ToBitmapSource();대신에WriteableBitmapConverter.ToWriteableBitmap(grayFrame);를 사용해도 된다.
-
imgDisplay.Source = grayFrame.ToBitmapSource();는OpenCvSharp.WpfExtensions라이브러리의ToBitmapSource()확장 메서드를 사용하여Mat객체를BitmapSource로 변환하여Image컨트롤에 표시하는 방법이다. -
WriteableBitmapConverter.ToWriteableBitmap(grayFrame)는OpenCvSharp.WpfExtensions라이브러리의WriteableBitmapConverter클래스를 사용하는 방법이다.두 방법 모두
Mat객체를Image컨트롤에 표시하기 위한 방법이지만,ToBitmapSource()메서드를 사용하는 것이 더 간결하고 직관적이다.하지만
WriteableBitmapConverter를 사용하는 방법은WriteableBitmap객체를 반환하기 때문에, 이미지를 수정해야 하는 경우에는WriteableBitmapConverter를 사용하는 것이 더 유용하다.(이름에서부터 알 수 있음.)
WriteableBitmapConverter.ToWriteableBitmap() 메서드는 Mat 객체의 이미지 데이터를 공유하는 WriteableBitmap 객체를 생성한다. 즉 원본 Mat 객체(grayFrame)를 수정하면 Image 컨트롤(imgDisplay)에 표시되는 이미지도 변경된다.< 참고: https://velog.io/@vvvv/BitmapSource-%ED%81%B4%EB%9E%98%EC%8A%A4-vs-WriteableBitmapConverter-%ED%81%B4%EB%9E%98%EC%8A%A4 >
코드
using OpenCvSharp;
using OpenCvSharp.WpfExtensions;
using System;
using System.Windows;
using System.Windows.Media.Imaging;
using System.Windows.Threading;

namespace RealtimeWebcam
{
    /// <summary>
    /// Interaction logic for MainWindow.xaml
    /// </summary>
    public partial class MainWindow : System.Windows.Window
    {
        // ... (기존 코드)

        private void GrayscaleButton_Click(object sender, RoutedEventArgs e)
        {
            // 흑백 필터를 적용합니다.
            if (!frame.Empty())
            {
                Mat grayFrame = new Mat();
                Cv2.CvtColor(frame, grayFrame, ColorConversionCodes.BGR2GRAY);
                imgDisplay.Source = WriteableBitmapConverter.ToWriteableBitmap(grayFrame);
                grayFrame.Dispose();
            }
        }

        private void BlurButton_Click(object sender, RoutedEventArgs e)
        {
            // 블러 필터를 적용합니다.
            if (!frame.Empty())
            {
                Mat blurFrame = new Mat();
                Cv2.Blur(frame, blurFrame, new OpenCvSharp.Size(5, 5));
                imgDisplay.Source = WriteableBitmapConverter.ToWriteableBitmap(blurFrame);
                blurFrame.Dispose();
            }
        }

        private void InvertButton_Click(object sender, RoutedEventArgs e)
        {
            // 색상 반전 필터를 적용합니다.
            if (!frame.Empty())
            {
                Mat invertFrame = new Mat();
                Cv2.BitwiseNot(frame, invertFrame);
                imgDisplay.Source = WriteableBitmapConverter.ToWriteableBitmap(invertFrame);
                invertFrame.Dispose();
            }
        }
    }
}
코드 설명
GrayscaleButton_Click,BlurButton_Click,InvertButton_Click메서드는 각 버튼의Click이벤트에 대한 이벤트 핸들러이다.GrayscaleButton_Click메서드는Cv2.CvtColor()메서드를 사용하여 흑백 필터를 적용한다.BlurButton_Click메서드는Cv2.Blur()메서드를 사용하여 블러 필터를 적용한다.InvertButton_Click메서드는Cv2.BitwiseNot()메서드를 사용하여 색상 반전 필터를 적용한다.
이제 프로그램을 실행하고 버튼을 클릭하면 웹캠 영상에 필터 효과가 적용되는 것을 확인할 수 있다.
grayFrame.Dispose();
:grayFrame.Dispose();는grayFrame객체가 사용하는 리소스를 해제하는 역할을 한다.Mat객체는 이미지 데이터를 저장하기 위해 메모리를 할당하는데,Dispose()메서드를 호출하지 않으면 이 메모리가 해제되지 않고 계속 점유될 수 있다.
imgDisplay.Source = grayFrame.ToBitmapSource();이 코드만으로는grayFrame객체가 사용하는 메모리가 해제되지 않는다.ToBitmapSource()메서드는grayFrame객체의 이미지 데이터를 복사하여BitmapSource객체를 생성하기 때문에,grayFrame객체는 여전히 메모리를 점유하고 있다.
따라서grayFrame객체를 더 이상 사용하지 않을 때는Dispose()메서드를 호출하여 메모리를 해제하는 것이 좋다.
특히, 이 코드처럼 반복문 내에서Mat객체를 계속 생성하는 경우,Dispose()메서드를 호출하지 않으면 메모리 누수가 발생하여 프로그램 성능에 영향을 미칠 수 있다.
이 예제처럼 간단한 프로그램에서는Dispose()메서드를 호출하지 않아도 큰 문제가 발생하지 않을 수 있다. 프로그램이 종료될 때 운영체제가 메모리를 자동으로 해제하기 때문이다.
하지만 좋은 코딩 습관을 위해서는, 사용하지 않는 객체의 리소스는 명시적으로 해제하는 것이 좋다고 한다.
오류 발생 1
오류
- 프로그램을 실행하니까,
System.TypeInitializationException: 'The type initializer for 'OpenCvSharp.Internal.NativeMethods' threw an exception.'
이라는 오류가 발생해서 프로그램이 작동하지 않는다.
해결 방법
솔루션용 NuGet 패키지 관리에서 OpenCVSharp4.Windows 패키지를 찾아서 설치한다.
OpenCvSharp4.Windows 패키지를 설치했으면, C# 코드에서 OpenCVSharp의 기능을 사용하기 위해 다음과 같은 using 문을 추가해야 한다.
using OpenCvSharp;이 using 문은 OpenCvSharp 네임스페이스에 포함된 클래스와 메서드를 사용할 수 있도록 해준다.
OpenCvSharp 네임스페이스에는 Mat, VideoCapture, Cv2 등 OpenCV의 주요 기능을 사용하기 위한 클래스와 메서드가 포함되어 있다.
만약 WPF 애플리케이션에서 OpenCVSharp을 사용하는 경우, OpenCvSharp.WpfExtensions 네임스페이스도 추가해야 한다. 왜냐하면 OpenCvSharp.WpfExtensions 네임스페이스는 Mat 객체를 BitmapSource로 변환하는 ToBitmapSource() 확장 메서드를 제공한다.
using OpenCvSharp.WpfExtensions;이 using 문을 추가하면 Mat 객체를 Image 컨트롤에 표시할 수 있다.
오류 발생 2
오류
프로그램을 실행해도 버튼은 다 뜨는데, 영상화면이 안 뜬다.
해결방법
(1) 우선 관리자 권한이로 Visual Studio를 실행해봤다. -> 소용없음.
(2) 카메라 자체 동작 여부 확인.
기본적으로 카메라의 영상을 가져오는거 테스트하려면 pictureBox와 Timer 컨트롤이 필요한데, 도구 상자에 없음.
-> 검색해보니 System.Windows.Forms을 참조에 추가해야 한다고 함.
-> using System.Windows.Forms;을 선언해도 참조가 안됨.
-> 누겟에도 없음.
-> ".csproj 파일" 내용 확인해봄.
-> ItemGroup에 'FrameworkReference'추가했는데 안됨. .NET 버전이 달라서임.
<ItemGroup>
	<FrameworkReference include="Microsoft.WindowsDesktop.App"/>
</ItemGroup>
-> 카메라가 물리 버튼으로 차단해제(해결 완료)
참조
https://m.blog.naver.com/jrkim/222050059281
4. 어려웠던 점과 해결 과정
이 프로젝트를 진행하면서 몇 가지 어려움에 직면했지만, 다양한 방법을 통해 문제를 해결할 수 있었습니다.
(1) 오류 해결
-
웹캠 영상이 WPF 창에 표시되지 않는 문제: 처음에는 웹캠에서 가져온 영상이 WPF 창에 표시되지 않는 문제가 발생했습니다. 이는 OpenCV에서 사용하는
Mat객체를 WPF의Image컨트롤에 직접 표시할 수 없기 때문입니다.OpenCvSharp.WpfExtensions라이브러리의WriteableBitmapConverter.ToWriteableBitmap()메서드를 사용하여Mat객체를BitmapSource로 변환하여 해결했습니다. -
이외에 오류 및 해결 과정은
3. 코드에서 코드와 함께 제시하였습니다.
(2) 원하던 실행 결과와 다름
- 필터가 버튼을 누르고 있을 때만 적용되는 문제: 처음에는 필터 버튼을 누르고 있을 때만 필터가 적용되는 문제가 있었습니다. 이는 버튼의
Click이벤트가 버튼을 누르는 순간에만 발생하기 때문입니다. 필터 적용 여부를 저장하는 변수를 추가하고,UpdateFrame메서드에서 이 변수의 값에 따라 필터를 적용하도록 코드를 수정하여 해결했습니다.
기존 실행 결과
원인 파악
- 버튼을 누를때 아주 잠시만 필터가 적용된다. 그 이유는 버튼 클릭 이벤트 핸들러에서 필터링된 이미지를
imgDisplay.Source에 설정하고 있지만, 다음 프레임이 업데이트될 때 원본 이미지로 덮어씌워지기 때문인 것으로 파악된다.
즉, 버튼을 클릭하는 순간에는 필터가 적용된 이미지가 표시되지만,UpdateFrame()메서드가 다시 호출되어 원본 이미지가imgDisplay.Source에 설정되면서 필터 효과가 사라지는 것이다.
- 필터를 계속 적용하기 위해, 필터 적용 여부를 저장하는 변수를 만들고,
UpdateFrame()메서드에서 이 변수를 확인하여 필터를 적용해야 한다.
즉, 버튼을 한 번 클릭하면 필터가 계속 적용되도록 하려면, 각 필터 버튼에 대한 클릭 이벤트 핸들러에서 필터 적용 여부를 토글(toggle) 하는 변수를 사용해야 한다.
토글
토글은 스위치처럼 on/off 상태를 전환하는 것을 의미한다. 즉, 필터가 적용되지 않은 상태에서 버튼을 클릭하면 필터가 적용되고, 필터가 적용된 상태에서 버튼을 클릭하면 필터가 해제되는 방식이다.
즉, 토글은 현재 상태를 반전시키는 동작을 한다.
프로그래밍에서 토글은 주로 bool 변수를 사용하여 구현한다.
bool isOn = false; // 초기 상태는 off

// 스위치를 누르면
isOn = !isOn; // isOn의 값을 반전시킨다 (off -> on)

// 스위치를 다시 누르면
isOn = !isOn; // isOn의 값을 반전시킨다 (on -> off)
이 코드에서 isOn 변수는 전등의 on/off 상태를 나타낸다. 스위치를 누를 때마다 isOn 변수의 값이 반전되어 전등의 상태가 변경된다.
토글은 UI 디자인에서 자주 사용되는 개념이다. 예를 들어, 흑백 모드, 야간 모드, 전체 화면 모드 등을 토글 버튼으로 구현할 수 있다.
개선 실행 결과
개선 코드
버튼을 한 번 클릭하면 필터가 계속 적용되도록 하기 위해,
각 필터 버튼에 대한 토글 변수를 추가하고, UpdateFrame() 메서드에서 토글 변수 값에 따라 필터를 적용하도록 코드를 수정하였다.
using System.Text;
using System.Windows;
using System.Windows.Controls;
using System.Windows.Data;
using System.Windows.Documents;
using System.Windows.Input;
using System.Windows.Media;
using System.Windows.Media.Imaging;
using System.Windows.Navigation;
using System.Windows.Shapes;
using System.Windows.Threading;


using OpenCvSharp;
using OpenCvSharp.WpfExtensions;


namespace RealtimeWebcam
{
    /// <summary>
    /// Interaction logic for MainWindow.xaml
    /// </summary>
    public partial class MainWindow : System.Windows.Window
    {
        private VideoCapture capture; // 웹캠 캡처를 위한 VideoCapture 객체
        private Mat frame; // 이미지 프레임을 저장하는 Mat 객체
        private DispatcherTimer timer; // UI 스레드에서 일정 간격으로 작업을 수행하기 위한 DispatcherTimer 객체


        // 각 필터의 적용 여부를 저장하는 bool 타입 변수 선언
        private bool isGrayscale; // 흑백 필터 적용 여부
        private bool isBlur; // 블러 필터 적용 여부
        private bool isInvert; // 색상 반전 필터 적용 여부

        public MainWindow()
        {
            InitializeComponent();

            capture = new VideoCapture(0); // 기본 웹캠 장치를 사용하여 VideoCapture 객체를 초기화
            frame = new Mat(); // Mat 객체를 생성
            timer = new DispatcherTimer(); // DispatcherTimer 객체를 생성
            timer.Interval = TimeSpan.FromMilliseconds(33); // 타이머 간격을 33밀리초로 설정하여,
                                                            // 약 30fps로 프레임을 업데이트한다
            timer.Tick += UpdateFrame; // timer의 Tick 이벤트에 UpdateFrame 메서드를 연결
            timer.Start(); // 타이머를 시작한다


            isGrayscale = false;
            isBlur = false;
            isInvert = false;
        }


        private void UpdateFrame(object? sender, EventArgs e)
        {
            capture.Read(frame); // 웹캠에서 프레임을 읽어와 frame 객체에 저장

            if (!frame.Empty()) // frame 객체가 비어 있지 않으면(프레임을 읽어오는 데 성공하면),
            {
                Mat filteredFrame = frame.Clone(); // 원본 프레임 복사
                                                   // (필터를 적용하기 전에 원본 프레임을 복사하여
                                                   // 필터가 원본 프레임에 영향을 주지 않도록 한다.)


                // isGrayscale, isBlur, isInvert 변수 값에 따라 해당 필터를 적용한다.
                if (isGrayscale) // 흑백 필터 적용
                {
                    Cv2.CvtColor(filteredFrame, filteredFrame, ColorConversionCodes.BGR2GRAY);
                }


                if (isBlur) // 블러 필터 적용
                {
                    Cv2.Blur(filteredFrame, filteredFrame, new OpenCvSharp.Size(5, 5));
                }


                if (isInvert) // 색상 반전 필터 적용
                {
                    Cv2.BitwiseNot(filteredFrame, filteredFrame);
                }


                // 필터링된 이미지를 WPF 컨트롤에 표시
                imgDisplay.Source = WriteableBitmapConverter.ToWriteableBitmap(filteredFrame);


                filteredFrame.Dispose();
            }


        }


        // GrayscaleButton_Click(), BlurButton_Click(), InvertButton_Click() 메서드:
        // 각 필터 버튼의 Click 이벤트 핸들러로, 해당 필터의 적용 여부를 토글한다.
        private void GrayscaleButton_Click(object sender, RoutedEventArgs e)
        {
            isGrayscale = !isGrayscale; // 흑백 필터 토글
        }


        //  블러 필터를 적용
        private void BlurButton_Click(object sender, RoutedEventArgs e)
        {
            isBlur = !isBlur; // 블러 필터 토글
        }


        // 색상 반전 필터를 적용
        private void InvertButton_Click(object sender, RoutedEventArgs e)
        {
            isInvert = !isInvert; // 색상 반전 필터 토글
        }
    }
}
코드 설명
isGrayscale,isBlur,isInvert: 각 필터의 적용 여부를 저장하는bool타입 변수이다.UpdateFrame메서드:Mat filteredFrame = frame.Clone();를 사용하여 원본 프레임을 복사한다. 필터를 적용하기 전에 원본 프레임을 복사하여 필터가 원본 프레임에 영향을 주지 않도록 한다.isGrayscale,isBlur,isInvert변수 값에 따라 해당 필터를 적용한다.
GrayscaleButton_Click,BlurButton_Click,InvertButton_Click메서드: 각 필터 버튼의Click이벤트 핸들러로, 해당 필터의 적용 여부를 토글한다.
이제 버튼을 한 번 클릭하면 필터가 계속 적용되고, 다시 클릭하면 필터가 해제된다.
- 필터를 계속 적용하기 위해 다음과 같이 코드를 수정하는 방법도 있다. 아래는 흑백 필터 코드만 수정한 것이다.
// MainWindow.xaml.cs (기존 코드)
public partial class MainWindow : System.Windows.Window
{
    // ... (기존 코드)

    private bool applyGrayscale = false; // 흑백 필터 적용 여부를 저장하는 변수

    private void GrayscaleButton_Click(object sender, RoutedEventArgs e)
    {
        applyGrayscale = !applyGrayscale; // 흑백 필터 적용 여부를 토글합니다.
    }

    private void UpdateFrame(object sender, EventArgs e)
    {
        capture.Read(frame);
        if (!frame.Empty())
        {
            Dispatcher.Invoke(() =>
            {
                if (applyGrayscale) // 흑백 필터 적용 여부를 확인합니다.
                {
                    Mat grayFrame = new Mat();
                    Cv2.CvtColor(frame, grayFrame, ColorConversionCodes.BGR2GRAY);
                    imgDisplay.Source = WriteableBitmapConverter.ToWriteableBitmap(grayFrame);
                    grayFrame.Dispose();
                }
                else
                {
                    imgDisplay.Source = WriteableBitmapConverter.ToWriteableBitmap(frame);
                }
            });
        }
    }

    // ... (나머지 코드)
}
(3) 메모리
- 메모리 누수 문제:
Mat객체를 사용한 후Dispose()메서드를 호출하지 않아 메모리 누수가 발생하는 문제가 있었습니다. 이 문제를 해결하기 위해using문을 사용하여Mat객체를 감싸고,using블록을 벗어날 때 자동으로Dispose()메서드가 호출되도록 코드를 수정했습니다.
using 문을 사용해서 메모리 해제 방법을 개선
using 문 사용 방법
using키워드 다음에 괄호()를 사용하여 블록을 만든다.- 괄호 안에
IDisposable인터페이스를 구현하는 객체를 선언하고 초기화한다. (Mat객체는IDisposable인터페이스를 구현한다.) using블록 내에서 객체를 사용한다.using블록을 벗어나면 자동으로 객체의Dispose()메서드가 호출되어 리소스가 해제된다.
using 문을 사용하면 Mat 객체의 메모리 해제를 잊어버리는 실수를 방지하고, 코드를 간결하게 만들 수 있다.
기존 코드
private void UpdateFrame(object? sender, EventArgs e)
{
    capture.Read(frame); // 웹캠에서 프레임을 읽어와 frame 객체에 저장

    if (!frame.Empty()) // frame 객체가 비어 있지 않으면(프레임을 읽어오는 데 성공하면),
    {

        Mat filteredFrame = frame.Clone(); // 원본 프레임 복사
                                           // (필터를 적용하기 전에 원본 프레임을 복사하여
                                           // 필터가 원본 프레임에 영향을 주지 않도록 한다.)
                                           // (Mat 객체는 참조 형식이므로,
                                           // Mat 객체를 다른 변수에 할당할 때는 얕은 복사가 수행된다.
                                           // 즉, 두 변수가 같은 메모리 영역을 참조하게 된다.
                                           // 따라서 이미지 데이터를 복사하려면 Clone() 메서드를 사용해야 한다.)


        // isGrayscale, isBlur, isInvert 변수 값에 따라 해당 필터를 적용한다.
        if (isGrayscale) // 흑백 필터 적용
        {
            Cv2.CvtColor(filteredFrame, filteredFrame, ColorConversionCodes.BGR2GRAY);
        }


        if (isBlur) // 블러 필터 적용
        {
            Cv2.Blur(filteredFrame, filteredFrame, new OpenCvSharp.Size(5, 5));
        }


        if (isInvert) // 색상 반전 필터 적용
        {
            Cv2.BitwiseNot(filteredFrame, filteredFrame);
        }


        // 필터링된 이미지를 WPF 컨트롤에 표시
        imgDisplay.Source = WriteableBitmapConverter.ToWriteableBitmap(filteredFrame);


        filteredFrame.Dispose();
    }
개선 코드
using 문을 사용해서 메모리 해제 방법을 개선함.
        private void UpdateFrame(object? sender, EventArgs e)
        {
            capture.Read(frame);
            if (!frame.Empty())
            {
                // using 문을 사용하여 filteredFrame 객체를 감싸고,
                // using 블록을 벗어날 때 자동으로 Dispose() 메서드가 호출되도록 합니다.
                using (Mat filteredFrame = frame.Clone())
                {
                    if (isGrayscale)
                    {
                        Cv2.CvtColor(filteredFrame, filteredFrame, ColorConversionCodes.BGR2GRAY);
                    }

                    if (isBlur)
                    {
                        Cv2.Blur(filteredFrame, filteredFrame, new OpenCvSharp.Size(5, 5));
                    }

                    if (isInvert)
                    {
                        Cv2.BitwiseNot(filteredFrame, filteredFrame);
                    }

                    imgDisplay.Source = WriteableBitmapConverter.ToWriteableBitmap(filteredFrame);
                    // filteredFrame.Dispose()는 using 블록을 벗어날 때 자동으로 호출된다.
                }
            }
        }
코드 설명
UpdateFrame 메서드에서 Mat filteredFrame = frame.Clone(); 부분을 using (Mat filteredFrame = frame.Clone())으로 수정하여, filteredFrame 객체가 using 블록 내에서만 사용되도록 했다.
이렇게 하면 using 블록을 벗어날 때 filteredFrame.Dispose()가 자동으로 호출되어 메모리가 해제된다.
4. 배운 점
이 프로젝트를 진행하면서 다음과 같은 내용을 배웠습니다.
- WPF와 OpenCV 연동: WPF와 OpenCV를 연동하여 실시간 영상 처리 애플리케이션을 개발하는 방법을 배웠습니다.
- 이미지 처리: OpenCVSharp 라이브러리를 사용하여 이미지를 읽고, 쓰고, 변환하고, 필터링하는 방법을 배웠습니다.
- 비동기 프로그래밍:
async/await키워드를 사용하여 비동기적으로 작업을 수행하는 방법을 배웠습니다. - UI 디자인: WPF를 사용하여 사용자 인터페이스를 디자인하는 방법을 배웠습니다.
- 메모리 관리:
using문을 사용하여Mat객체의 메모리를 해제하는 방법을 배웠습니다.
이 프로젝트를 통해 컴퓨터 비전 기술과 WPF 애플리케이션 개발에 대한 이해도를 높일 수 있었습니다. 앞으로 더욱 다양한 기능을 추가하고 성능을 개선하여 프로젝트를 발전시킬 계획입니다.