
SpringBoot 설정
스프링 부트를 사용하기 위해선 아래의 링크를 접속해 설정을 먼저 해주어야한다.
Spring initializr
설정
- Maven 과 Gradle 의 선택?
Maven은 프로젝트의 전체적인 라이프사이클을 관리하기 위한 도구이며, 많은 편리함과 이점으로 인해 사용량이 많다 하지만 비교적 최근에 나온Gradle의
등장은Maven의 단점을 보완하였는데 속도와 관련된 내용도 있지만Groovy같은 스크립트로 플러그인의 관리를 할수있어 많이 사용하는 추세이다.- Dependencies
어떤 라이브러리를 가져올지 정하는 항목이다.
강의 실습에서는 web 설계를 하기 때문에Spring Web라이브러리와
웹에서Html을 만들어주는templeate엔진이 필요하기 때문에
Thymeleaf라는 라이브러리도 가져와 준다.
설정이 끝났으면 Generate 버튼을 눌러주고 다운로드 받아준다.
이후 인텔리제이 에서 Open 해주면 기본 설정이 끝난 Spring Boot 가 준비된거다.
만들어진 프로젝트 살펴보기
build.gradle
dependencies {
	implementation 'org.springframework.boot:spring-boot-starter-thymeleaf'
	implementation 'org.springframework.boot:spring-boot-starter-web'
	testImplementation 'org.springframework.boot:spring-boot-starter-test'
}
Spring Application
기본으로 제공되는 SpringBoot 실행을 위한 동작 어플
@SpringBootApplication
public class LeehoSpringApplication {
	public static void main(String[] args) {
	SpringApplication.run(LeehoSpringApplication.class, args);
		}
	}
External Libraries
가져온 라이브러리들을 확인 할수있다.
bulid.gradle항목에선 분명히 2개의 라이브러리만 가져왔는데 많은 양의 라이브러리가 프로젝트에 땡겨져 온것을 확인할수 있다 이는 라이브러리들 간의 의존성 때문이다Spring web과Thymeleaf를 사용하기위해 추가 라이브러리 들을 가져오고 추가된 라이브러리를 사용하기위해 또 다른 라이브러리들을 가져오는 형식이기 때문에 라이브러리의 양이 많아진것이다.
Springboot-starter_tomcat을 확인해볼 수 있는데.이는tomcat이라는 웹서버 라이브러리 이다 프로젝트 라이브러리에 웹서버를 내장하고있는 현재의 모습과 달리 과거엔 웹서버와 개발 라이브러리를 분리해서 사용하였다
View 환경 설정
static내부에Index.html이라는 welcome page 를 작성해보고
web 어플리케이션 진입점인Controller를 만들어보자.index.html
<head>
  <title>Hi</title>
  <meta http-equiv="Content-Type" content="text/html; charset=UTF-8" />
</head>
<body>
hihihi
<a href="/hello">hi</a>
</body>
</html>
Controller
@Controller
public class HelloController {
    @GetMapping("hello")
    public String hello(Model model) {
        model.addAttribute("data", "hello!!");
        return "hello";
    }
hello.html
<html xmlns:th="http://www.thymeleaf.org">
    -> templeate 을 통한 html 양식을 thymeleaf 로 변환
<head>
    <title>Hello</title>
    <meta http-equiv="Content-Type" content="text/html; charset=UTF-8" />
</head>
<body>
<p th:text="'안녕하세요. ' + ${data}" >안녕하세요. 손님</p>
</body>
</html>
동작
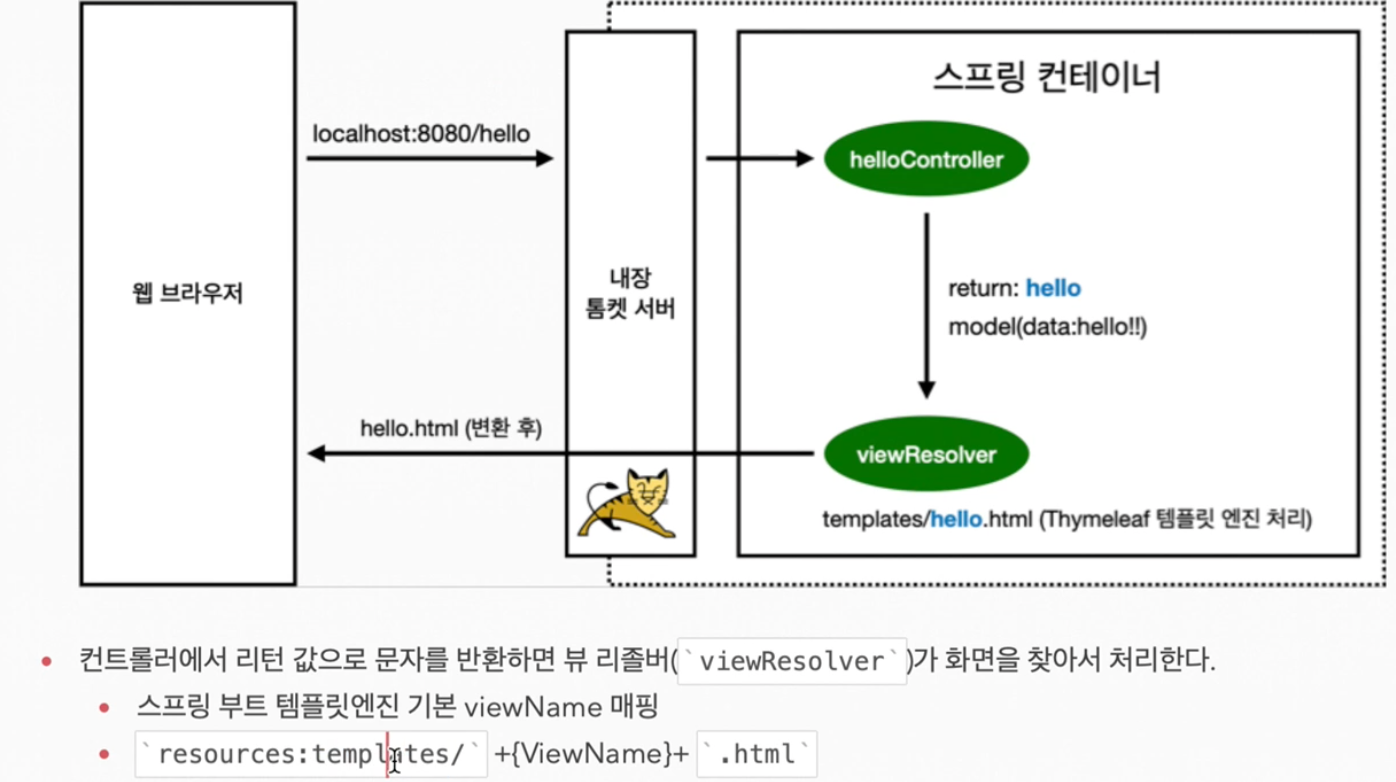
컨트롤러가 실행되면 model 을 통해 데이터를 보내게 되는데 이때 addAttribute 로인해
key = data,value = hello!!가 된다 이후return "hello";를 통해 templeate 에 만들어둔 hello.html 로 값이 반환${data}에 value 값인hello!!가 대체 텍스트인손님대신에 들어가게된다.동작원리
Reference
김영한 강사님의 Spring 입문 강의를 토대로 복습하기위한 글 이며 벨로그 글
강의를 들은 다른분들의 학습내용이 포함되어 있습니다
해당하는 모든 출처는 링크와 강의에 있습니다.