
메모리 할당, 포인터와 레퍼런스, switch 구문
ex00: BraiiiiiiinnnzzzZ
Zombie 클래스를 구현하십시오.
- private 멤버: string
name- 멤버함수:
void announce(void);
Zombie가 자신을 다음과 같이 소개합니다:<name>: BraiiiiiinnnzzzZ...
- 추가로 다음 두가지 함수를 구현하십시오.
Zombie* newZombie(std::string name);:
name이름으로 Zombie 인스턴스를 생성하여, 함수 스코프 외부에서도 쓸 수 있게 반환합니다.void randomChump(std::string name);:
name이름으로 Zombie 인스턴스를 생성하고,announce()를 실행합니다.
- 디버깅을 위해 소멸자에 적절한 출력 메시지를 구현하십시오.
- 과제의 핵심?
Zombie 인스턴스 생성 시, 정적 할당과 동적 할당의 차이를 물어보는 문제.
- 메모리 영역 복습
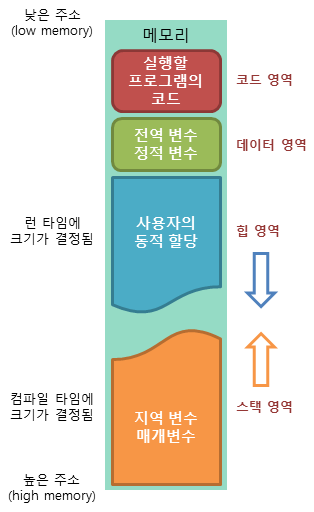
stack 영역:
- 빠른 엑세스
- 런타임 시점에 크기가 결정
- OS에 따른 스택 최대 크기 제한
- LIFO(후입선출) 구조
- 함수의 매개변수와 지역변수가 위치하며, 선언했던 함수 영역을 벗어나면 자동으로 소멸
.연산자를 통해 인스턴스에 접근
heap 영역:
- 상대적으로 느린 엑세스
- 컴파일 시점에 크기가 결정
- 메모리 크기 제한 없음
- 사용 종료 시 할당을 해제해주지 않으면 메모리 누수 발생
->연산자를 통해 인스턴스에 접근- C에서는
malloc,calloc으로 할당,free로 해제 - C++ 에서는
new로 할당,delete로 해제
Zombie.hpp
#ifndef ZOMBIE_HPP
# define ZOMBIE_HPP

#include <iostream>
#include <string>

class Zombie{
    public:
            Zombie(std::string name);
            ~Zombie();

            void    announce(void);
    private:
            std::string name;
};

Zombie* newZombie(std::string name);
void    randomChump(std::string name);

#endif- 두 함수는 Zombie 클래스 내부적으로 동작을 정의하거나 호출할 함수가 아니므로 따로 빼준다.
Zombie.cpp
#include "Zombie.hpp"

Zombie::Zombie(std::string name){
    this->name = name;
}

Zombie::~Zombie(){
    std::cout << this->name << " has been destroyed" << std::endl;
}

void    Zombie::announce(){
    std::cout << this->name << ": BraiiiiiiinnnzzzZ..." << std::endl;
}
newZombie.cpp
#include "Zombie.hpp"

Zombie  *newZombie(std::string name){
    Zombie  *new_zombie;

    new_zombie = new Zombie(name);
    return (new_zombie);
}
randomChump.cpp
#include "Zombie.hpp"

void    randomChump(std::string name){
    Zombie Chump(name);

    Chump.announce();
}- 위에서 설명했듯이
newZombie함수는 Zombie 인스턴스를 힙에 선언하여 함수 스코프 외부에서도 쓸 수 있게 반환하고,randomChump함수는 스택에 선언하여announce()만 실행하고 소멸된다.
main.cpp
#include "Zombie.hpp"

int main(void){
    Zombie  *new_zombie;

    randomChump("Bob");
    std::cout << std::endl;

    new_zombie = newZombie("Alice");
    new_zombie->announce();
    delete new_zombie;
    return (0);
}- 실행 결과를 보면 스택에 선언된 "Bob"은
randomChump실행 후 바로 소멸자 메시지가 출력되는것을 확인할 수 있다.
ex01: Moar brainz!
Zombie 떼거리를 구현하십시오.
- 다음 함수를 구현해야 합니다.
Zombie* zombieHorde(int N, std::string name);N개의 Zombie 오브젝트를 한번의 동작으로 할당해야하며, 매개변수로 주어진
name으로 이름을 각각 초기화합니다.
- 테스트 케이스를 구현해보고, 각각
announce()를 실행해봅니다.delete로 모두 할당을 해제하고 메모리 누수를 방지하는것을 잊지 마세요.
Zombie.hpp
#ifndef ZOMBIE_HPP
# define ZOMBIE_HPP

#include <iostream>
#include <string>

class Zombie{
    public:
            Zombie();
            Zombie(std::string name);
            ~Zombie();

            void    announce(void);
            void    set_name(std::string name);
    private:
            std::string name;
};

Zombie* zombieHorde(int N, std::string name);

#endif
zombieHorde.cpp
#include "Zombie.hpp"

Zombie  *zombieHorde(int N, std::string name){
    Zombie* horde = new Zombie[N];

    for (int i = 0; i < N; i++){
        horde[i].set_name(name);
    }
    return (horde);
}- N개의 객체를 한번에 할당하기 위해서 객체 배열 전체를 선언하여 할당해야 한다. 따라서 하나하나 생성자를 통한
name초기화가 불가능하므로, 디폴트 생성자를 넣어주었다. - 반복문을 통해 각 객체에 이름을 부여해야 하는데,
Zombie의name변수는private이므로setter함수도 만들어주었다.
ex02: HI THIS IS BRAIN
string 변수 "HI THIS IS BRAIN" 을 선언합니다.
변수의 포인터 stringPTR를 선언합니다.
변수의 레퍼런스 stringREF를 선언합니다.
- 순서대로 각각의 메모리 주소와, 다음으로 각각의 value를 출력하는 프로그램을 작성하세요.
#include <iostream>
#include <string>

int main(void){
    std::string brain = "HI THIS IS BRAIN";
    std::string* stringPTR = &brain;
    std::string& stringREF = brain;

    std::cout << "Printing memory addresses..." << std::endl;
    std::cout << "string variable: " << &brain << std::endl;
    std::cout << "string pointer: " << stringPTR << std::endl;
    std::cout << "string reference: " << &stringREF << std::endl;
    std::cout << std::endl;

    std::cout << "Printing string values..." << std::endl;
    std::cout << "string: " << brain << std::endl;
    std::cout << "pointer: " << *stringPTR << std::endl;
    std::cout << "reference: " << stringREF << std::endl;
}- 내용이 정말 심플하지만, 이번에 새로 등장하는 개념인
reference에 대해 알아보라는 예제다.
- Reference(참조자) & Pointer?
Pointer
- 변수의 메모리 주소를 가지는 또 하나의 변수이다. 주소값을 통해 메모리 접근을 한다.
- 가리키는 주소값을 변경 할 수 있으며, NULL 초기화가 가능하다.
- 주소값을 저장하기 위해 별도의 메모리 공간을 차지한다.
- 함수 매개변수로 포인터 전달 시 메모리 소모가 발생하고, 값 복사가 일어난다.
Reference:
- 참조하고 있는 원래 변수를 대신하는 또 하나의 이름이다(alias). 변수명을 통해서 접근한다.
- 가리키는 대상을 바꿀 수 없으며, 반드시 선언과 동시에 초기화를 해야한다. NULL 초기화는 불가능하다.
- 원래 변수와 같은 메모리 공간을 참조하므로 별도의 메모리 공간을 차지하지 않는다.
- 함수 매개변수로 레퍼런스 전달 시 원래 변수를 전달하는 것과 마찬가지이므로 메모리 소모가 없고, 값 복사 또한 일어나지 않는다.
- 요약하자면 레퍼런스는 조금 더 사용하기 편하며, 불필요한 값 복사를 방지하고 에러를 줄인 포인터이다. C++에 들어오면서 사용할 수 있다면 레퍼런스를 우선으로 사용하고, 꼭 필요할때만 포인터를 사용하도록 권장된다.
ex03: Unnecessary violence
1. Weapon 클래스를 구현하십시오.
- private 멤버: string
type- 멤버함수:
getType() -type의 const reference를 반환한다.
setType(...) - 인자로 받은 string으로type을 설정한다.
2. HumanA, HumanB 클래스를 구현하십시오.
Weapon과name을 가집니다.- 멤버함수 attack(): 다음 형식의 문구를 출력
<name> attacks with their <weapon type>
- HumanA는 생성자에
Weapon을 가지지만, HumanB는 가지지 않습니다.- HumanB는
Weapon을 항상 지니지 않아도 되지만, HumanA는 항상 무장상태이어야 합니다.
다음 코드가 정상적으로 작동하는지 테스트해보세요.
두 케이스에 대해서 각각 첫번째attack()실행 시 "crude spiked club" 으로, 두번째 실행 시 "some other type of club" 으로 출력되어야 합니다.
int	main()
{
	Weapon club = Weapon("crude spiked club");

    HumanA bob("Bob", club);
    bob.attack();
    club.setType("some other type of club");
    bob.attack();
}
{
	Weapon club = Weapon("crude spiked club");

    HumanB jim("Jim");
    jim.setWeapon(club);
    jim.attack();
    club.setType("some other type of club");
    jim.attack();
}

	return 0;
}- ex02에서 배운 개념을 활용하여, 어떤 상황에서
Weapon을 포인터로 전달할지, 레퍼런스로 전달할지 판단하는게 핵심인 예제다.
- 우선 main()에서
setType()후, 별도의setWeapon없이 공격의 출력 결과가 바뀌어야 한다는 것을 확인할 수 있다. 따라서Weapon은 포인터 또는 레퍼런스의 형식으로 Human에게 전달되어야 한다.
club이 포인터 변수로 선언되지 않은 점,HumanA선언 시 객체 자체가 매개변수로 전달된다는 점에서 레퍼런스 임을 알 수 있다. - 무장 상태에 대한 규칙을 보면,
HumanB는Weapon을 항상 지니지 않아도 된다는 점에서NULL초기화 개념임을 추측할 수 있다. 따라서HumanB는 포인터로,HumanA는 레퍼런스로 지니게 하여 적절히 구현한다.
Weapon.hpp
#ifndef WEAPON_HPP
# define WEAPON_HPP

#include <iostream>
#include <string>

class   Weapon{
    public:
            Weapon(std::string type);
            ~Weapon();

            std::string const &getType() const;
            void    setType(std::string type);
    private:
            std::string type;
};

#endif
Weapon.cpp
#include "Weapon.hpp"

Weapon::Weapon(std::string type){
    this->type = type;
}

Weapon::~Weapon() {}

std::string const &Weapon::getType() const{
    return (this->type);
}

void    Weapon::setType(std::string type){
    this->type = type;
}
HumanA.hpp
#ifndef HUMANA_HPP
# define HUMANA_HPP

#include "Weapon.hpp"

class   HumanA{
    public:
            HumanA(std::string name, Weapon &weapon);
            ~HumanA();

            void    attack();
    private:
            std::string name;
            Weapon &weapon;
};

#endif
HumanA.cpp
#include "HumanA.hpp"

HumanA::HumanA(std::string name, Weapon &weapon) : name(name), weapon(weapon){}

HumanA::~HumanA() {}

void    HumanA::attack(){
    std::cout << this->name << " attacks with their " << this->weapon.getType() << std::endl;
}
HumanB.hpp
#ifndef HUMANB_HPP
# define HUMANB_HPP

#include "Weapon.hpp"

class   HumanB{
    public:
            HumanB(std::string name);
            ~HumanB();

            void    setWeapon(Weapon &weapon);
            void    attack();
    private:
            std::string name;
            Weapon *weapon;

};

#endif
HumanB.cpp
#include "HumanB.hpp"

HumanB::HumanB(std::string name){
    this->name = name;
}

HumanB::~HumanB(){}

void    HumanB::setWeapon(Weapon &weapon){
    this->weapon = &weapon;
}

void    HumanB::attack(){
    std::cout << this->name << " attacks with their " << this->weapon->getType() << std::endl;
}- 정리:
HumanA
-Weapon을 레퍼런스로 지니며, 생성 단계에서 초기화하여 지녀야 한다. 따라서 선언과 동시에 초기화를 해야하기 때문에, 초기화 리스트라는 방식으로 생성자를 구현한다.HumanA::HumanA(std::string name, Weapon &weapon) : name(name), weapon(weapon){}HumanB
-Weapon을 포인터로 지니며, 생성자와 함께 주어지지 않기 때문에 따로setWeapon을 구현하여 "장착" 한다.
ex04: Sed is for losers
filename과 두개의 문자열 s1, s2를 인자로 받는 프로그램을 작성하세요.
파일을 열고, 모든 s1을 찾아 s2로 대체하여 새로운 파일에 저장합니다. C 파일 관리 함수는 사용할 수 없으며,replace를 제외하고std::string클래스의 모든 멤버함수를 사용할 수 있습니다. 가능한 에러를 적절히 처리하고, 테스트 케이스를 만들어 함께 제출하세요.
- 간단하게 쉘 명령어
sed를 재구현하는 과제이다. 이번 과제를 통해 C++에서 파일 입출력,std::string클래스의 멤버함수에 대해 다루게 된다.
main.cpp
#include <iostream>
#include <fstream>
#include <string>

int replace_string(std::string &str, const std::string &old_str, const std::string &new_str) {
    size_t pos = 0;
    size_t reps = 0;

    while ((pos = str.find(old_str, pos)) != std::string::npos) {
        str.erase(pos, old_str.length());
        str.insert(pos, new_str);
        pos += new_str.length();
        reps++;
    }
    return (reps);
}

int main(int argc, char **argv) {
    if (argc != 3 || (std::string)argv[2] == (std::string)argv[3]\
        || strlen(argv[2]) == 0) {
        std::cerr << "Error: Invalid parameters" << std::endl;
        return 1;
    }
    std::string filename = argv[1];
    std::string s1 = argv[2];
    std::string s2 = argv[3];

    std::ifstream infile(filename);
    if (infile.fail()) {
        std::cerr << "Error: could not open file \"" << filename << "\"" << std::endl;
        return 1;
    }

    std::string content;
    std::string line;
    while (std::getline(infile, line)){
        content += line + '\n';
    }
    infile.close();

    if (!replace_string(content, s1, s2)){
        std::cerr << "Error: Cannot find \"" << s1 << "\" in \"" << filename << "\"" << std::endl;
        return (0);
    }

    std::string extension = "";
    size_t extension_pos = filename.find_last_of('.');
    if (extension_pos != std::string::npos) {
        extension = filename.substr(extension_pos);
        filename = filename.substr(0, strlen(filename.c_str()) - strlen(extension.c_str()));
    }
    std::ofstream outfile((filename + "_replace" + extension));
    if (outfile.fail()) {
        std::cerr << "Error: could not create file \"" << filename << ".replace\"" << std::endl;
        return 1;
    }

    outfile << content;
    outfile.close();

    return 0;
}- <fstream> 헤더
- C에서는 fd로 파일을 관리했다면, C++에서는fstream헤더의ifstream,ofstream클래스를 통해FILE구조체 정보를 객체에 저장한다.
std::ifstream infile(filename);
처럼 파일명을 인자로 받아 객체를 생성하면, 따로open()을 해주지 않아도 파일 스트림 정보를 받아온다.
main()흐름:
- 인자 유효성 검사
- 인자가 3개가 아닌 경우
- 찾아서 바꿔야하는 문자열 s1이 비어있는 경우
- s1, s2가 동일하게 주어진 경우 정도를 예외처리 하였다.
ifstream을 통해 파일을 열고,getline을 통해 파일의 내용을 stringcontent에 개행을 포함하여 한줄로 받아온다.- "replace" 구현:
std::string 멤버 함수
size_t find(const string& str, size_t pos) const;
:인덱스pos부터 탐색하여str의 위치를 반환한다.
string& erase(size_t pos, size_t len);
:인덱스pos부터len만큼의 문자를 삭제하고, 문자열의 길이를 줄인다.
string& insert(size_t pos, const string& str);
:인덱스pos에서 시작하여str을 삽입한다.
replace_string을 통해 문자열 대체 횟수를 세어 반환하고, 0번이면 file에 s1이 없다는 뜻이므로 이때 또한 적절한 에러를 출력한다.
- "extension" 관련 코드는 파일명 file을 받으면 대체 파일명으로 file_replace를 만들어주는 부가적인 구현이다.
- std::cin/cout을 쓰듯 infile, outfile도
<<,>>연산을 통해 직접 입출력을 전달하는 것도 가능하다. 대체가 완료되었으면content를outfile에 덮어쓰고, 적절히close()해준다.
ex05: Harl 2.0
Harl 클래스를 구현하십시오.
- private 멤버함수:
- void debug(void);
- void info(void);
- void warning(void);
- void error(void);- public 멤버함수:
- void complain(std::string level);
인자로 받은 level에 따라 반드시 함수 포인터를 사용하여 각각의 private멤버함수를 호출해야합니다. 구현 시 if/else if/else 문을 사용해서는 안됩니다.
Harl.hpp
#ifndef HARL_HPP
# define HARL_HPP

#include <iostream>
#include <string>

class   Harl{
    public:
            Harl();
            ~Harl();

            void    complain(std::string level);
    private:
            void    debug();
            void    info();
            void    warning();
            void    error();
};

#endif
Harl.cpp
#include "Harl.hpp"

Harl::Harl() {}

Harl::~Harl() {}

void Harl::complain(std::string level) {
    int flag = 0;
    std::string levels[4] = {"DEBUG", "INFO", "WARNING", "ERROR"};
    void (Harl::*ptrs[4])(void) = {&Harl::debug, &Harl::info, &Harl::warning, &Harl::error};

    for (int i = 0; i < 4; i++) {
        if (level == levels[i]) {
            (this->*ptrs[i])();
            flag = 1;
        }
    }
    if (flag == 0) {
        std::cout << "Unknown level" << std::endl;
    }
}

void    Harl::debug(){
    std::cout << "I love having extra bacon for my 7XL-double-cheese-triple-pickle-special-ketchup burger. I really do!" << std::endl;
}

void    Harl::info(){
    std::cout << "I cannot believe adding extra bacon costs more money. You didn't put enough bacon in my burger! If you did, I wouldn't be asking for more!" << std::endl;
}

void    Harl::warning(){
    std::cout << "I think I deserve to have some extra bacon for free. I've been coming for years whereas you started working here since last month." << std::endl;
}

void    Harl::error(){
    std::cout << "This is unacceptable! I want to speak to the manager now." << std::endl;
}- 딱히 설명할게 없는 과제이다. 함수 포인터 배열을 선언하고, 인자
level에 맞는 멤버 함수를 for문으로 찾아 호출하는 방식으로 구현하였다. 각 출력 메시지는 pdf에 주어진 문구를 그대로 활용하였다. main()문에서는 무효한level을 포함하여 한번씩 호출해보고 끝냈다.
ex06: Harl filter
ex05 에서 구현한 Harl 클래스를 활용하여, 이번에는 "DEBUG", "INFO", "WARNING", "ERROR" 중 하나를 인자로 받아, 해당 레벨 이상의 모든 메시지를 출력하는 프로그램을 작성하세요.
switch문을 적절히 사용하면 보다 편리합니다.
Harl.cpp
#include "Harl.hpp"

Harl::Harl() {}

Harl::~Harl() {}

void Harl::complain(std::string level) {
    int flag = 0;
    std::string levels[4] = {"DEBUG", "INFO", "WARNING", "ERROR"};
    void (Harl::*ptrs[4])(void) = {&Harl::debug, &Harl::info, &Harl::warning, &Harl::error};

    for (int j = 0; j < 4; j++) {
        if (levels[j] == level) {
            flag = 1;
            switch(j) {
                case 0:
                    (this->*ptrs[0])();
                case 1:
                    (this->*ptrs[1])();
                case 2:
                    (this->*ptrs[2])();
                case 3:
                    (this->*ptrs[3])();
            }
            break;
        }
    }
    if (flag == 0) {
        std::cout << "[ Probably complaining about insignificant problems ]" << std::endl;
    }
}

void    Harl::debug(){
    std::cout << "I love having extra bacon for my 7XL-double-cheese-triple-pickle-special-ketchup burger. I really do!" << std::endl;
}

void    Harl::info(){
    std::cout << "I cannot believe adding extra bacon costs more money. You didn't put enough bacon in my burger! If you did, I wouldn't be asking for more!" << std::endl;
}

void    Harl::warning(){
    std::cout << "I think I deserve to have some extra bacon for free. I've been coming for years whereas you started working here since last month." << std::endl;
}

void    Harl::error(){
    std::cout << "This is unacceptable! I want to speak to the manager now." << std::endl;
}- 문제에서 switch 문을 활용하라는 힌트를 활용하여,
complain부분만 살짝 바꿔주었다. 무효한 인자에 대해서는 지정한 문구를 출력해야한다.
main.cpp
#include "Harl.hpp"

int	main(int argc, char **argv){
    if (argc != 2){
        std::cerr << "Usage: ./Harl_2.0 [LEVEL]" << std::endl;
        return (1);
    }
    Harl harl;

    harl.complain(argv[1]);

    return (0);
}