[4일차] 클라우드에 올리기 (Security + Deploy)
목표: 로컬 앱을 엔터프라이즈급 보안을 갖춘 프로덕션 앱으로 격상한다.
시나리오: XSUAA 인증 설정 → MTA 빌드 → Cloud Foundry 배포 → BTP Cockpit에서 실행.
소요 시간: 이론 1.5시간 + 실습 2.5시간
4일차 학습 목표
이론:
  클라우드 보안의 기초: 인증(Authentication) vs 인가(Authorization)를 이해한다
  XSUAA(XS User Account and Authentication)의 역할을 안다
  MTA(Multi-Target Application)의 개념과 필요성을 이해한다
  Cloud Foundry 배포 파이프라인을 안다 (빌드 → 패키징 → 배포)

실습:
  xs-security.json 작성 (인증 정책)
  mta.yaml 생성 (배포 설정)
  로컬에서 XSUAA 시뮬레이션 (test mode)
  Cloud Foundry에 배포 (cf push / mbt build-push)
  BTP Cockpit에서 배포된 앱 확인
  사용자 할당 및 앱 실행 테스트
  4일차 결과 Git 커밋
이론 세션 (1.5시간)
이론 1. 클라우드의 보안: 인증 vs 인가
온프레미스(로컬)의 보안
로컬 개발:
├─ 인증: 없음 (req.user.id = undefined)
└─ 인가: 없음 (@requires 무시)

→ 개발 편의를 위해 모든 API 접근 가능
클라우드의 보안
클라우드(BTP):
├─ 인증: SAP ID 로그인 필수
│  (XSUAA가 관리)
└─ 인가: 역할(Role) 기반 접근 제어
   ├─ 관리자 역할 = Approve 버튼 보임
   ├─ 신청자 역할 = Create, Submit 버튼만 보임
   └─ 뷰어 역할 = 읽기만 가능
구체적 예시:
로컬 (지금): 누구나 누를 수 있는 버튼
┌─────────────────────────────────┐
│ [제출] [승인] [반려] [삭제]       │  ← 보안 없음
└─────────────────────────────────┘

클라우드 (내일): 역할에 따라 다른 버튼
┌──────────────────────────────────┐
│ 신청자 로그인                     │
│ [제출] [저장]                     │  ← 승인 버튼 없음
├──────────────────────────────────┤
│ 매니저 로그인                     │
│ [제출] [저장] [승인] [반려]       │  ← 모든 버튼 보임
└──────────────────────────────────┘
이론 2. XSUAA(SAP Authentication Service)란?
전통적 인증 (on-premise)
┌────────┐      Username/Password
│ UI     ├────────────────────────→ ┌──────────┐
│ (OSS   │                         │ ABAP AS  │
│ Portal)│ ←──────────────────────- │ (SAP)    │
└────────┘   Session ID            └──────────┘

단일 SAP 시스템 내부에서 인증
→ 외부 앱 연동 어려움
XSUAA (Cloud 인증)
┌────────┐  로그인 시도
│ UI     │────────────────┐
└────────┘                ↓
                   ┌──────────────┐
                   │   XSUAA      │
                   │   (SAP ID)   │
                   │   ↓          │
                   │ OAuth 2.0    │
                   │ JWT Token    │
                   └──────────────┘
                          ↑
        ┌──────────────────┤
        │                  │
    ┌───────────┐      ┌────────────┐
    │ CAP App   │      │ Fiori UI   │
    │ (Backend) │      │ (Frontend) │
    └───────────┘      └────────────┘

→ 여러 앱이 동일 인증 서비스 공유
→ SSO(Single Sign-On) 가능
XSUAA의 역할:
1. 사용자 인증
   OAuth 2.0 표준 사용 → JWT Token 발급

2. 역할 관리
   "앱 관리자" "승인자" "신청자" 등 역할 정의

3. Token 검증
   API 호출 시 Token 확인 → 유효하면 요청 처리

4. 개인정보 보호
   SAP가 사용자 정보 중앙화 관리
이론 3. MTA (Multi-Target Application)
단일 Buildpack 배포 (구형)
┌─────────────────────────────┐
│ Node.js App + Fiori UI      │ ← 한 덩어리
│ node_modules 포함           │
│ dist 폴더 포함              │
│ 전체: 500MB 이상            │
└─────────────────────────────┘
          ↓
     CF 배포
          ↓
     한 번에 전부 배포/업데이트
     → 비효율적, 느림
MTA 배포 (신형, 이 강좌)
┌─────────────────────────────────────┐
│  MTA (Multi-Target Application)     │
├──────────────────┬──────────────────┤
│ CAP Backend      │ Fiori Frontend   │
│ (travel-api)     │ (travel-ui)      │
├──────────────────┼──────────────────┤
│ 500MB 이상       │ 200MB            │
│ 배포 시간: 3분   │ 배포 시간: 1분   │
└──────────────────┴──────────────────┘
          ↓
   각각 독립적으로 빌드/배포
   → 백엔드만 업데이트? 빠르게!
   → UI만 변경? 백엔드 영향 없음!
MTA의 구조:
mta.yaml (배포 설정 파일)
├─ Module 1: CAP Backend
│  └─ Buildpack: nodejs_buildpack
├─ Module 2: Fiori UI
│  └─ Buildpack: staticfile_buildpack
├─ Resource 1: XSUAA 인증 서비스
├─ Resource 2: HANA Database
└─ Resource 3: Destination 설정

MTA Build Tool (mbt)가 이 파일을 읽어서:
  1. 각 Module 빌드
  2. MTAR 파일 생성 (.zip)
  3. CF에 배포
이론 4. Cloud Foundry 배포 흐름
로컬 개발 (DAY1-3)
     ↓
[build] ← npm install, npm run build
     ↓
[package] ← MTA 구조로 패키징 (mbt build)
     ↓ (mtar 파일 생성)
[deploy] ← cf deploy 또는 cf push
     ↓
BTP Cloud Foundry 환경
├─ 앱 실행
├─ 라우트(URL) 할당
├─ 인스턴스 시작
└─ 로그 수집

     ↓
[사용자 접근]
https://travel-app-<suffix>.cfapps.us10.hana.ondemand.com
     ↓
XSUAA Login
     ↓
Fiori UI 로드
     ↓
CAP Backend 호출
실습 세션 (2.5시간)
실습 1. XSUAA 보안 정책 정의
1-1. xs-security.json 생성
프로젝트 루트에 새 파일 생성:
cd /home/user/projects/sap-btp-travel-expense/travel-expense-app
touch xs-security.jsontravel-expense-app/xs-security.json:
{
  "xsappname": "travel-expense-app",
  "tenant-mode": "dedicated",
  "scopes": [
    {
      "name": "$ACCEPT_GRANTED_SCOPES",
      "description": "Accepted granted scopes"
    },
    {
      "name": "Approver",
      "description": "Can approve travel requests"
    },
    {
      "name": "Requester",
      "description": "Can create and submit travel requests"
    },
    {
      "name": "Viewer",
      "description": "Can view all travel requests (read-only)"
    }
  ],
  "role-templates": [
    {
      "name": "Approver",
      "description": "승인권자",
      "scope-references": [
        "Approver",
        "Viewer"
      ]
    },
    {
      "name": "Requester",
      "description": "출장 신청자",
      "scope-references": [
        "Requester",
        "Viewer"
      ]
    },
    {
      "name": "Viewer",
      "description": "뷰어 (읽기만)",
      "scope-references": [
        "Viewer"
      ]
    },
    {
      "name": "Admin",
      "description": "관리자 (모든 권한)",
      "scope-references": [
        "Approver",
        "Requester",
        "Viewer",
        "$ACCEPT_GRANTED_SCOPES"
      ]
    }
  ]
}
이해도 포인트:
scopes: 세분화된 권한 (마이크로 단위)role-templates: 역할 (여러 scope의 조합)Approver역할 = Approver scope + Viewer scope
1-2. CDS에서 권한 검증 추가
srv/travel-service.js를 수정하여 XSUAA 토큰에서 역할 읽기:
// srv/travel-service.js (일부 수정)
const cds = require('@sap/cds');

module.exports = cds.service.impl(async function () {

  const { TravelRequests, ExpenseItems, ApprovalLogs } = this.entities;

  // ════════════════════════════════════════════════════
  //  권한 검증 Helpers
  // ════════════════════════════════════════════════════

  async function requireApprover(req) {
    // Approver 역할 필요
    if (!req.user.is('Approver')) {
      return req.error(403, '승인 권한이 없습니다. (승인자 역할 필요)');
    }
  }

  async function requireRequester(req) {
    // Requester 역할 필요
    if (!req.user.is('Requester')) {
      return req.error(403, '신청 권한이 없습니다. (신청자 역할 필요)');
    }
  }

  // ════════════════════════════════════════════════════
  //  BEFORE Hooks
  // ════════════════════════════════════════════════════

  // 새 신청 생성 시 신청자 역할 필요
  this.before('CREATE', TravelRequests, async (req) => {
    // 권한 검증
    if (!req.user.is('Requester')) {
      return req.error(403, '신청 권한 없음. (Requester 역할 필요)');
    }

    // 신청자 정보 자동 설정
    const user = req.user;
    req.data.requester = user.firstname + ' ' + user.lastname;
    req.data.requesterEmail = user.email;
  });

  // ════════════════════════════════════════════════════
  //  Custom Actions
  // ════════════════════════════════════════════════════

  // 승인 Action — Approver만 가능
  this.on('approve', TravelRequests, async (req) => {
    const { ID } = req.params[0];

    if (!req.user.is('Approver')) {
      return req.error(403, '승인 권한이 없습니다.');
    }

    const request = await SELECT.one.from(TravelRequests).where({ ID });
    if (!request) return req.error(404, '출장 신청을 찾을 수 없습니다.');
    if (request.status !== 'Submitted') {
      return req.error(409, `제출된 신청만 승인할 수 있습니다.`);
    }

    await UPDATE(TravelRequests).set({ status: 'Approved' }).where({ ID });

    await INSERT.into(ApprovalLogs).entries({
      request_ID : ID,
      action     : 'Approved',
      comment    : req.data.comment || '승인되었습니다.',
      actor      : req.user.id  // 인증된 사용자 ID
    });

    req.info(`출장 신청 "${request.title}"이 승인되었습니다.`);
    return await SELECT.one.from(TravelRequests).where({ ID });
  });

  // 반려 Action — Approver만 가능
  this.on('reject', TravelRequests, async (req) => {
    const { ID } = req.params[0];

    if (!req.user.is('Approver')) {
      return req.error(403, '반려 권한이 없습니다.');
    }

    const { comment } = req.data;
    const request = await SELECT.one.from(TravelRequests).where({ ID });
    if (!request) return req.error(404, '출장 신청을 찾을 수 없습니다.');
    if (request.status !== 'Submitted') {
      return req.error(409, '제출된 신청만 반려할 수 있습니다.');
    }
    if (!comment || comment.trim() === '') {
      return req.error(400, '반려 사유를 입력해야 합니다.');
    }

    await UPDATE(TravelRequests).set({ status: 'Rejected' }).where({ ID });

    await INSERT.into(ApprovalLogs).entries({
      request_ID : ID,
      action     : 'Rejected',
      comment    : comment,
      actor      : req.user.id
    });

    return await SELECT.one.from(TravelRequests).where({ ID });
  });

});
@requires 데코레이터 (선택적, 더 선언적인 방식):
// srv/travel-service.cds
service TravelService @(path: '/travel') {

  entity TravelRequests as projection on travel.TravelRequests;

  // Approver만 접근 가능한 Action
  @requires: 'Approver'
  action approve(comment: String) returns TravelRequests;

  @requires: 'Approver'
  action reject(comment: String) returns TravelRequests;

  @requires: 'Requester'
  action submit() returns TravelRequests;
}
실습 2. MTA.yaml 생성 및 빌드 설정
2-1. mta.yaml 생성
프로젝트 루트에 생성:
touch mta.yamltravel-expense-app/mta.yaml:
_schema-version: '3.1'
ID: travel-expense-app
version: 1.0.0
description: "Travel Expense Approval App — SAP BTP Demo"

# ═══════════════════════════════════════════════════
#  Parameters (배포 환경 변수)
# ═══════════════════════════════════════════════════
parameters:
  enable-parallel-deployments: true
  deploy_mode: html5-repo
  appName: travel-expense-app

# ═══════════════════════════════════════════════════
#  Modules (배포할 애플리케이션)
# ═══════════════════════════════════════════════════
modules:

  # ── Module 1: CAP Backend API ──────────────────
  - name: travel-api
    type: nodejs
    path: .

    # 빌드 설정
    build-parameters:
      builder: custom
      commands:
        - npm install --legacy-peer-deps
        - npx cds build --production
      ignore:
        - .travel-expense-app_mta_build_tmp
        - mta_archives
        - node_modules
        - gen

    # 배포 인스턴스 수
    parameters:
      memory: 256M
      instances: 1
      disk-quota: 512M

    # 환경 변수
    properties:
      DEBUG: 'express:*'
      XSAPPNAME: '${appName}'

    # 제공 기능들 (다른 모듈이 참조 가능)
    provides:
      - name: srv
        public: true
        properties:
          srv-url: '${default-url}'

    # 필요한 리소스들
    requires:
      - name: db
      - name: xsuaa

  # ── Module 2: Fiori UI (HTML5 앱) ──────────────
  #   앱 이름에 점(.)이 포함되면 BTP App Router가
  #    'Service Tag unknown' 에러를 발생시킴.
  #    반드시 점 없는 단순 이름을 사용할 것.
  - name: travelexpenseui
    type: html5
    path: app/travel-expense-ui
    build-parameters:
      builder: custom
      commands:
        - npm install --legacy-peer-deps
        - npm run build
        - powershell -Command "cd dist; Compress-Archive -Path * -DestinationPath ..\travelexpenseui.zip -Force"
      build-result: .          # ZIP 파일이 생성되는 위치
      supported-platforms: []

  # ── Module 3: App Router (프론트엔드 진입점) ──
  - name: travel-app-router
    type: approuter.nodejs
    path: app-router

    build-parameters:
      builder: npm

    parameters:
      memory: 128M
      instances: 1

    requires:
      - name: xsuaa
      - name: travel-html5-repo-runtime
      - name: srv
        group: destinations
        properties:
          forwardAuthToken: true
          name: backend
          url: '~{srv-url}'

  # ── Module 4: HANA DB Deployer (테이블/뷰 생성) ──
  # cds build --production 이 gen/db 에 .hdbtable/.hdbview 파일을 생성한다.
  # 이 모듈이 없으면 HANA 스키마에 테이블이 존재하지 않아 검색 시 에러 발생!
  - name: hdb-deployer
    type: hdb
    path: gen/db
    parameters:
      buildpack: nodejs_buildpack
    requires:
      - name: db

  # ── Module 5: UI Deployer (HTML5 콘텐츠 배포) ──
  - name: uideployer
    type: com.sap.application.content
    path: ui-deploy
    requires:
      - name: travel-html5-repo-host
        parameters:
          content-target: true
    build-parameters:
      requires:
        - artifacts:
            - travelexpenseui.zip
          name: travelexpenseui
          target-path: .

# ═══════════════════════════════════════════════════
#  Resources (외부 서비스)
# ═══════════════════════════════════════════════════
resources:

  # ── XSUAA (인증 서비스) ──────────────────────────
  - name: xsuaa
    type: com.sap.xs.uaa
    requires:
      - name: srv
    parameters:
      path: ./xs-security.json
      service-name: travel-auth
      xsappname: ${appName}-${org}-${space}
      instance-name: travel-auth

  # ── HANA Database ───────────────────────────────
  - name: db
    type: com.sap.xs.hana-securestore
    parameters:
      service: hana
      service-plan: hdi-shared

  # ── HTML5 앱 저장소 (업로드용) ───────────────────
  - name: travel-html5-repo-host
    type: org.cloudfoundry.managed-service
    parameters:
      service: html5-apps-repo
      service-plan: app-host

  # ── HTML5 앱 런타임 (서비스용) ───────────────────
  # App Router가 HTML5 저장소에서 파일을 읽어오기 위해 반드시 필요
  - name: travel-html5-repo-runtime
    type: org.cloudfoundry.managed-service
    parameters:
      service: html5-apps-repo
      service-plan: app-runtime
mta.yaml 핵심 포인트 (실습에서 배운 것):
travel-api의ignore목록에서gen을 제외해야hdb-deployer가gen/db를 찾을 수 있음- HTML5 앱 모듈명에는 점(
.)을 쓰지 않는다 →travelexpenseui(O),sap.example.travelexpenseui(X)hdb-deployer가 없으면 테이블이 HANA에 생성되지 않아 검색 시 404 에러 발생html5-apps-repo-runtime리소스는 App Router가 UI 파일을 가져오기 위해 필수
MTA.yaml 이해도:
modules: 배포할 앱들 (CAP, Fiori, AppRouter)resources: 필요한 BTP 서비스들 (XSUAA, HANA, Repository)requires/provides: 모듈 간 의존성
2-2. AppRouter 생성 (프론트엔드 진입점)
AppRouter는 라우팅과 인증을 담당하는 Node.js 앱입니다.
mkdir -p app-router
cd app-router
npm init -yapp-router/package.json:
{
  "name": "travel-app-router",
  "version": "1.0.0",
  "private": true,
  "scripts": {
    "start": "node index.js"
  },
  "dependencies": {
    "@sap/approuter": "^14.0.0"
  }
}app-router/index.js:
// index.js
const approuter = require('@sap/approuter');
approuter().start();app-router/xs-app.json:
{
    "welcomeFile": "/travelexpenseui/index.html",
    "authenticationMethod": "route",
    "logout": {
        "logoutEndpoint": "/do/logout"
    },
    "routes": [
        {
            "source": "^/travel/(.*)",
            "target": "/travel/$1",
            "destination": "backend",
            "authenticationType": "xsuaa"
        },
        {
            "source": "^/(.*)$",
            "target": "/$1",
            "service": "html5-apps-repo-rt",
            "authenticationType": "xsuaa"
        }
    ]
}
xs-app.json 핵심 포인트:
welcomeFile: HTML5 앱 ID(travelexpenseui)로 시작하는 경로를 지정해야 함- 백엔드 라우팅
target은/travel/$1형태로 경로를 보존해야 함 (/$1로 하면/travel경로가 잘려서 404 발생)- HTML5 저장소에서 파일을 서빙할 때는
localDir이 아닌service: html5-apps-repo-rt사용
실습 3. 로컬에서 XSUAA 시뮬레이션
3-1. 로컬 테스트 모드 (mock user)
cds watch 실행 시 XSUAA 없이 테스트하려면:
CDS_REQUIRES_XSUAA_MOCK=true cds watchwindows 파워쉘 에서는
$env:CDS_REQUIRES_XSUAA_MOCK="true"; cds watch
이 모드에서는:
req.user.id= "test@example.com"req.user.is('Approver')= true (모든 역할)
루트 package.json 확인 (travel-expense-app/package.json):
{
  "name": "travel-expense-app",
  "version": "1.0.0",
  "dependencies": {
    "@cap-js/hana": "^1",
    "@sap/cds": "^9",
    "@sap/xssec": "^4",
    "passport": "^0.7.0"
  },
  "devDependencies": {
    "@cap-js/sqlite": "^2",
    "cds-plugin-ui5": "^0.13.0"
  },
  "scripts": {
    "start": "cds-serve",
    "start:mock": "set \"CDS_REQUIRES_XSUAA_MOCK=true\" && cds watch",
    "watch-travel-expense-ui": "cds watch --open sap.example.travelexpenseui/index.html?sap-ui-xx-viewCache=false --livereload false",
    "build": "cds build --production"
  },
  "private": true,
  "cds": {
    "requires": {
      "db": {
        "kind": "sqlite",
        "credentials": {
          "database": "db/travel.sqlite"
        }
      },
      "[production]": {
        "db": {
          "kind": "hana"
        }
      }
    }
  },
  "workspaces": [
    "app/*"
  ],
  "sapux": [
    "app/travel-expense-ui"
  ]
}
핵심 변경 포인트:
start스크립트:cds watch→cds-serve(프로덕션 서버 실행)dependencies에 추가 필요:@cap-js/hana: HANA 데이터베이스 드라이버 (프로덕션 필수)@sap/xssec: XSUAA JWT 토큰 검증passport: 인증 미들웨어
[production]프로파일에서db.kind: "hana"설정 필수
3-2. 로컬에서 Fiori + 권한 테스트
# 터미널 1 (Mock XSUAA)
npm run start:mock

# 터미널 2 (Fiori)
cd app/travel_expense_ui
npm start

# 브라우저: http://localhost:8080
로컬에서는 모든 버튼이 보이지만, 클라우드에 배포되면 역할에 따라 필터됩니다.
실습 4. Cloud Foundry에 배포
4-1. 사전 준비: CF CLI 설치 및 로그인
# CF CLI 버전 확인 (설치되어 있다고 가정)
cf --version

# BTP 로그인
cf login -a https://api.cf.ap21.hana.ondemand.com/

# 대화형 입력:
# Email: <BTP 계정 이메일>
# Password: <BTP 비밀번호>
# Organization: <Org 선택 (보통 trial)>
# Space: <Space 선택 (dev)>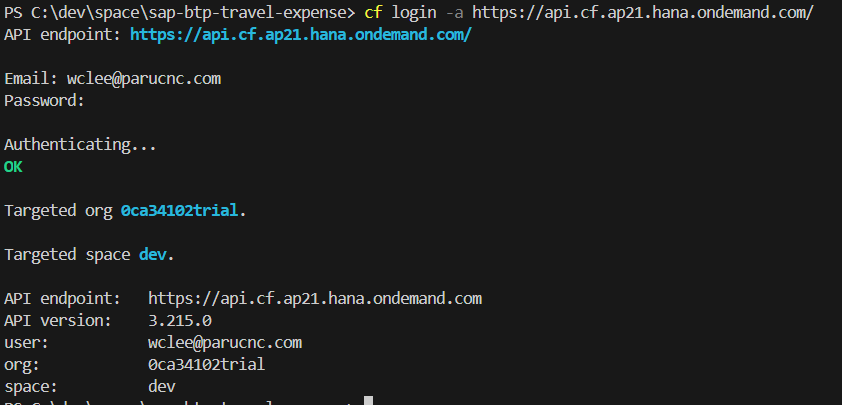
- HANA DB 필요
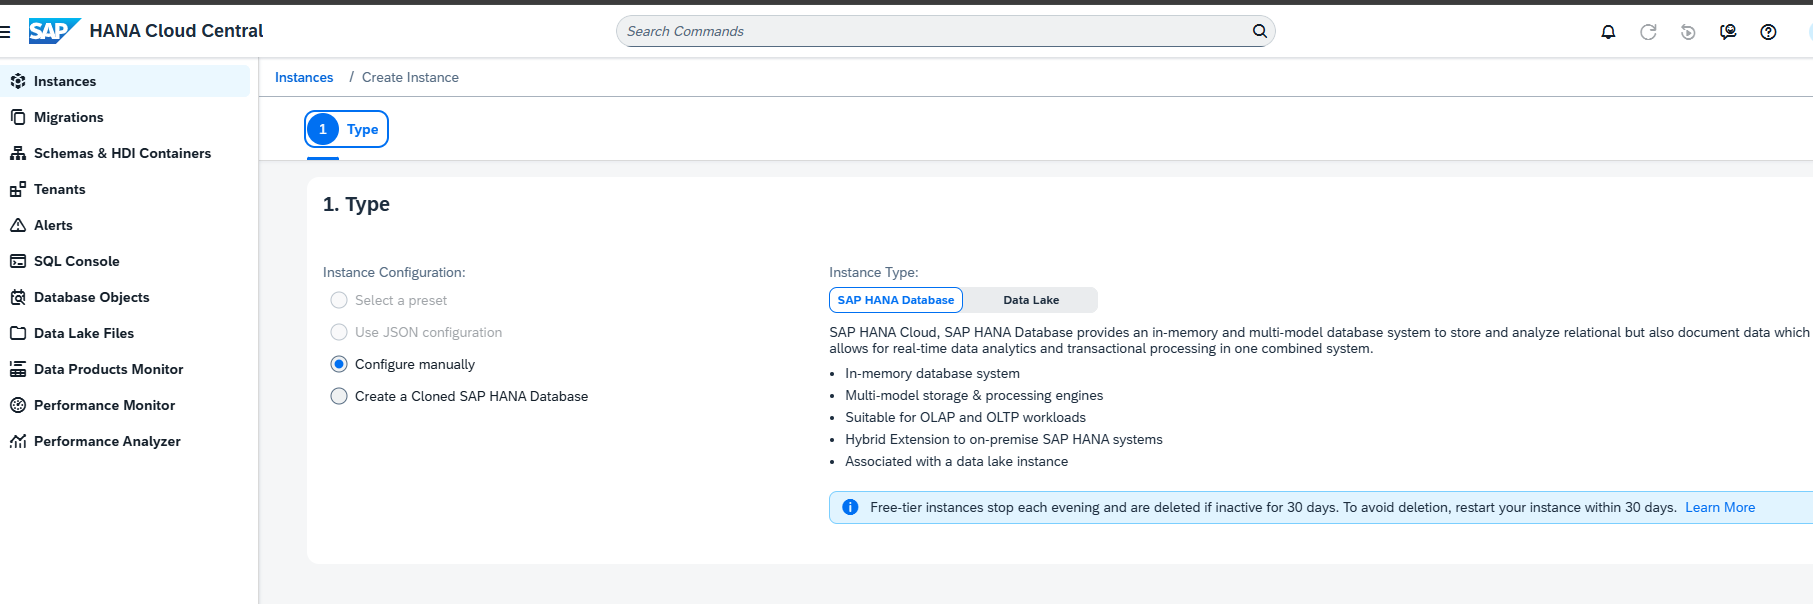
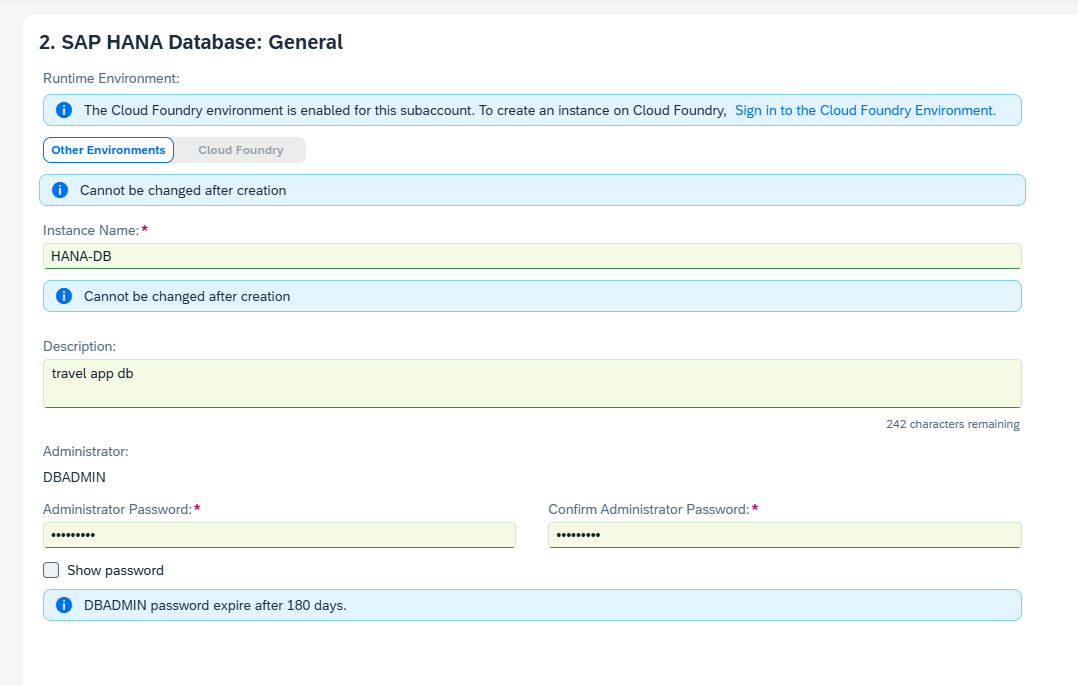
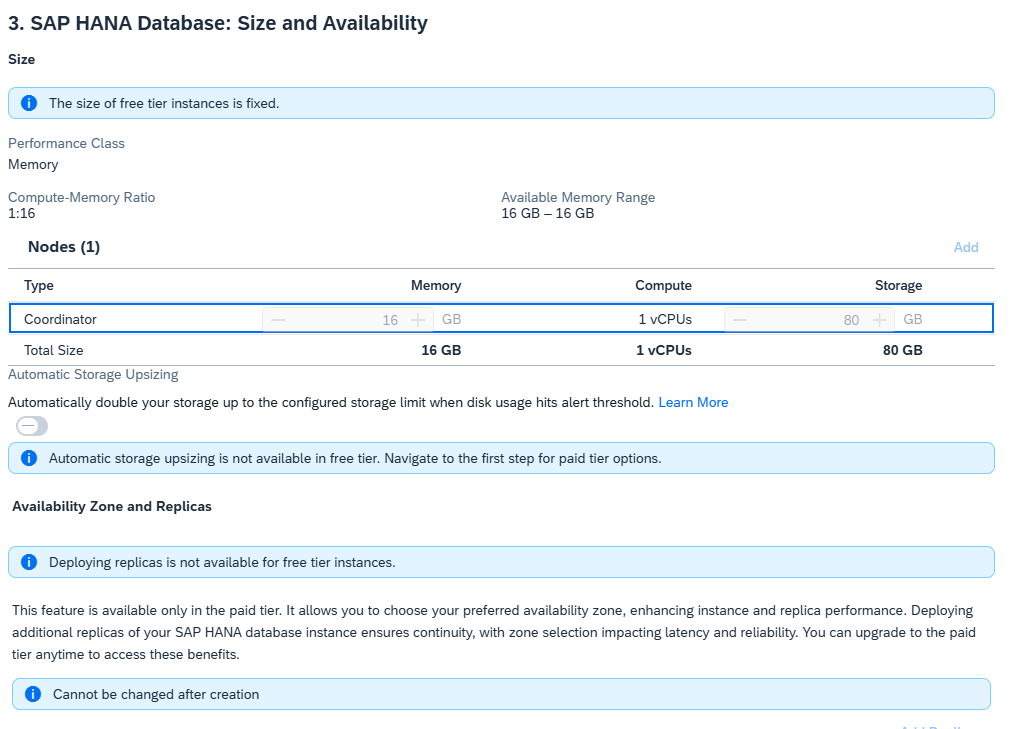
사이즈는 그냥 default 그대로 next~
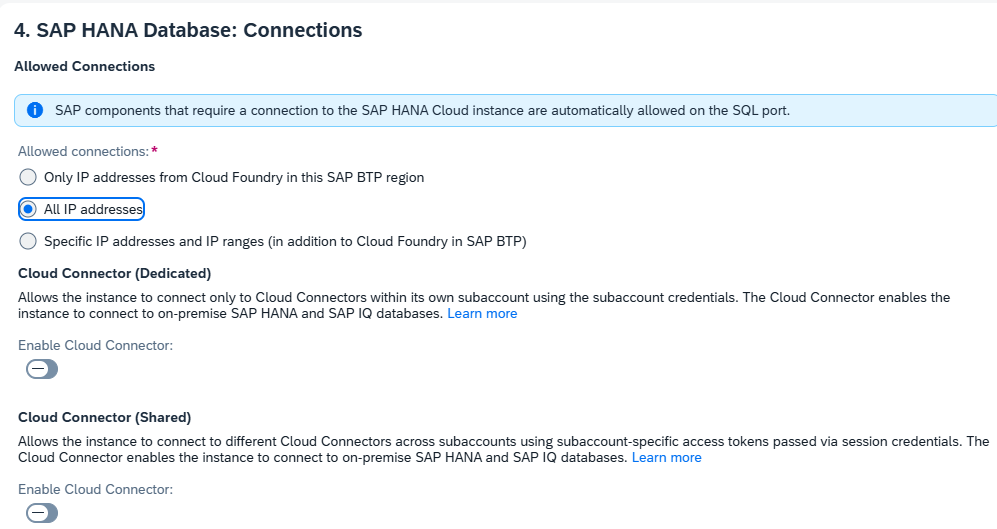
외부 접속을 위해 all ip open 했습니다.
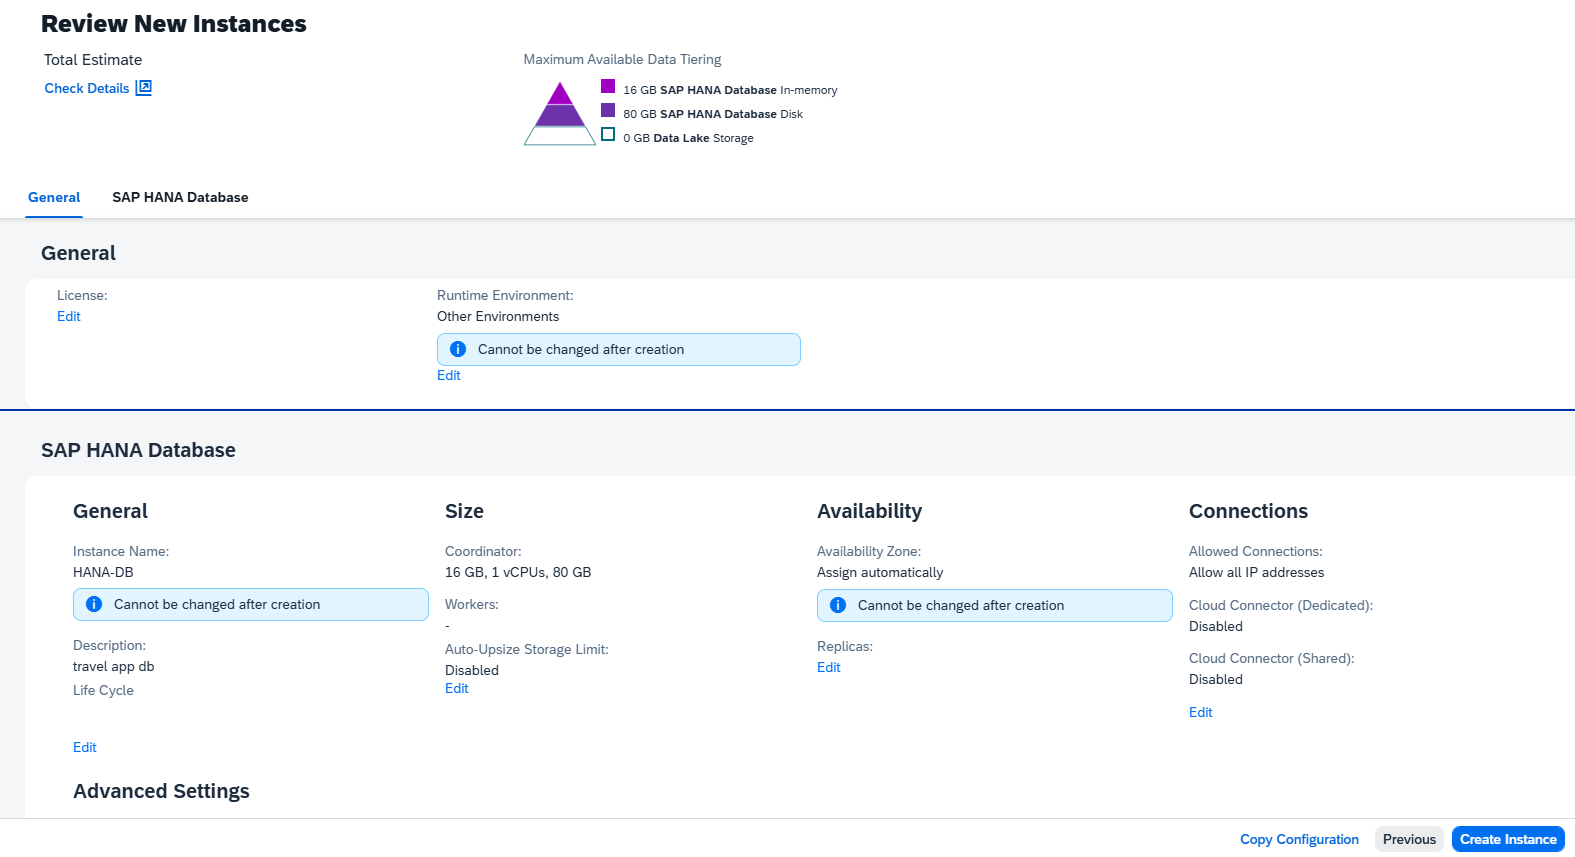
create instance!
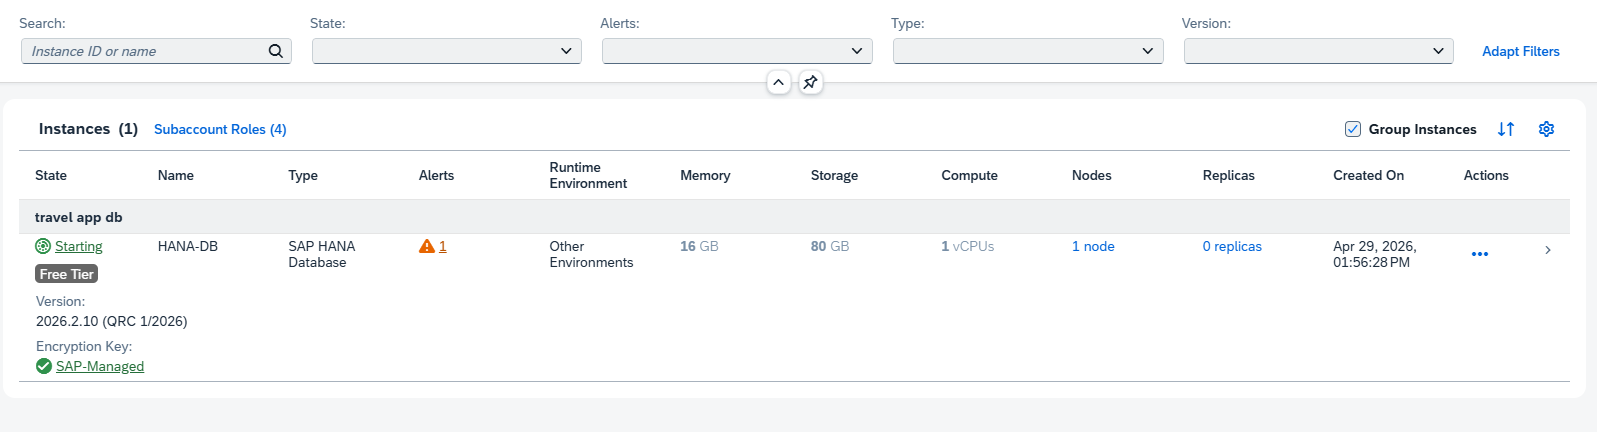
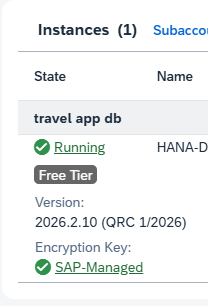
String 이 Running 이 된것을 확인 후 다음 진행을 하세요~
혹시나..참고!
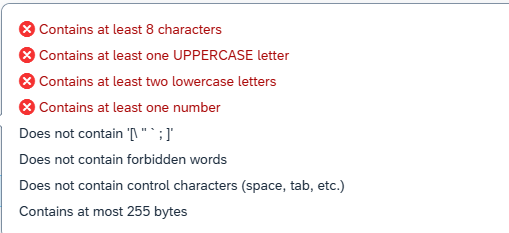
패스워드는 8자로 (규칙은 위에 첨부한 대로)...그리고 기억을...어디다 저장해 두세요.
4-2. MTA 빌드 및 배포
- local 에서 진행하려면 make 설치가 필요하다
winget install ezwinports.make
cd /home/user/projects/sap-btp-travel-expense/travel-expense-app

# MTA 빌드 (mtar 파일 생성)
mbt build

# 생성된 파일:
# mta_archives/travel-expense-app-1.0.0.mtar (약 500MB)

# 플러그인 설치 (MTA 배포 기능 위해)
cf install-plugin -r CF-Community "multiapps"

# Cloud Foundry에 배포
cf deploy mta_archives/travel-expense-app_1.0.0.mtar
or
cf deploy mta_archives/travel-expense-app_1.0.0.mtar --delete-services

# 배포 진행 상황:
# ✔ Uploading
# ✔ Processing
# ✔ Staging modules
# ✔ Starting modules
#   - travel-api (nodejs)
#   - travel-ui (html5)
#   - travel-app-router (approuter)

# 완료 메시지:
# Process finished successfully
소요 시간: 약 5-10분
배포 결과 확인:
# 배포된 앱 목록
cf apps

# 예상 출력:
# name                    requested state   processes
# travel-api              started           web:1/1
# travel-app-router       started           web:1/1
# travel-expense-app-srv  started

# 라우트 확인
cf routes

# 예상 출력:
# host                          domain                  port    path
# travel-app-<random>           cfapps.us10...hana...   -       /
4-3. BTP Cockpit에서 배포 확인
Cockpit 접속:
https://cockpit.btp.cloud.sap/
  → trial (Subaccount)
    → Cloud Foundry
      → Spaces
        → dev
확인할 항목:
앱 목록:
├─ travel-api (Running)
├─ travel-app-router (Running)
└─ travel-ui (Deployed as HTML5)

인스턴스 상세 정보:
├─ CPU 사용량
├─ 메모리 사용량
├─ 로그 스트림 (실시간)
└─ 라우트 URL

서비스:
├─ travel-auth (XSUAA) - Bound
├─ hdi-shared (HANA) - Bound
└─ html5-apps-repo - Bound
실습 5. 클라우드에서 앱 실행 및 사용자 할당
5-1. 사용자 역할 할당
BTP Cockpit:
trial Subaccount
  → Security
    → Users (또는 Role Collections)
      → [본인 이메일]
        → Role Collections 할당:
           ✓ travel-expense-Approver (승인자)
           ✓ travel-expense-Admin (관리자)
주의: 역할 변경 후 5-10분 소요 (캐시 갱신)
5-2. 앱 접근
Cockpit에서 라우트 클릭:
https://travel-app-<random>.cfapps.us10.hana.ondemand.com또는
직접 입력:
cf apps | grep travel-app-router
# 출력된 라우트 복사 후 브라우저에 붙여넣기
로그인:
SAP ID 입력
↓
XSUAA 인증 (SSO 가능)
↓
앱 진입
역할 확인:
Approver 역할 있으면:
  → [승인] [반려] 버튼 표시

Requester 역할만 있으면:
  → [제출] 버튼만 표시
실습 6. 클라우드 앱의 로그 확인
6-1. CF CLI로 로그 보기
# 실시간 로그 (tail -f 같은 효과)
cf logs travel-api

# 최근 로그 (마지막 100줄)
cf logs travel-api --recent

# 특정 문자열 검색
cf logs travel-api --recent | grep ERROR

# 예상 로그:
# 2025-04-25T10:30:45.123Z [APP/PROC/WEB/0] OUT [cds] - serving TravelService
# 2025-04-25T10:31:02.456Z [APP/PROC/WEB/0] OUT [cds] - listening on { url: 'http://0.0.0.0:8080' }
6-2. Cockpit에서 로그 보기
Cockpit → Applications → travel-api
  → Logs (탭)
    → 실시간 로그 스트림
자주 보는 에러들:
 "Cannot find module '@sap/hana-client'"
   → npm ci 재실행, package.json 확인

 "XSUAA service not bound"
   → mta.yaml의 requires 확인

 "Connection refused to database"
   → HANA 서비스 생성 여부 확인
실습 7. 로컬과 클라우드 데이터 격리
중요: 로컬 SQLite 데이터와 클라우드 HANA 데이터는 별도입니다.
로컬 (SQLite):
├─ 원본 Mock 데이터
└─ 개발 중 생성한 테스트 데이터

클라우드 (HANA):
├─ 배포 시점의 Mock 데이터 복사
├─ 클라우드에서 추가로 생성한 데이터
└─ 로컬과 무관
클라우드 데이터 확인:
# Cockpit → HANA Database Tool (Cockpit 내 UI)
# 또는 DBeaver로 HANA 직접 연결

SELECT * FROM com_travel_TravelRequests;
실습 8. 업데이트 배포 (코드 수정 후)
시나리오: Annotation 수정 후 다시 배포
# 1. 로컬에서 코드 수정
#    예: annotation 변경

# 2. 로컬 테스트
npm run start:mock
# 브라우저에서 확인

# 3. Git 커밋
git add .
git commit -m "Fix: annotation 레이아웃 개선"
git push origin main

# 4. 클라우드 재배포
mbt build
cf deploy mta_archives/travel-expense-app_1.0.0.mtar

# 또는 한 줄로:
mbt build-push
배포 중단 방법:
cf cancel-deployment travel-expense-app
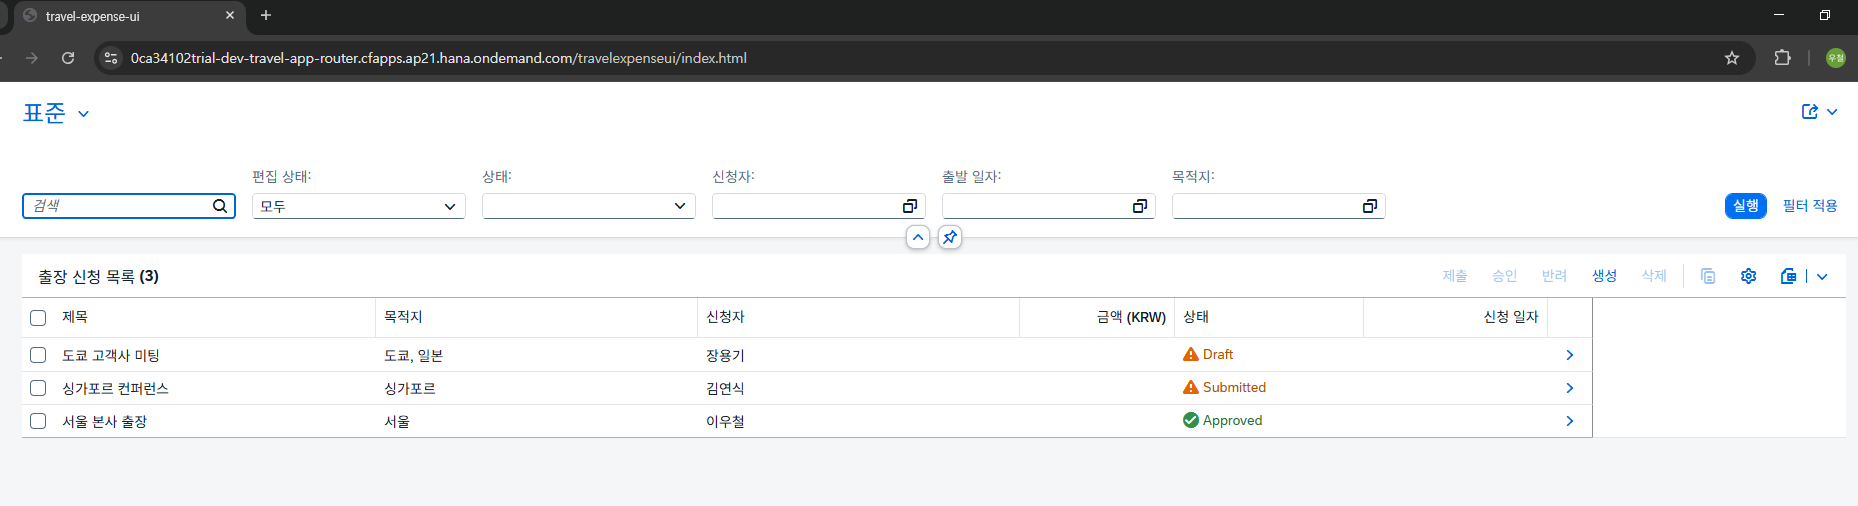
실습 9. Git 커밋
cd /home/user/projects/sap-btp-travel-expense

# .gitignore 업데이트
cat >> .gitignore << 'EOF'
mta_archives/
node_modules/
.cds-build/
dist/
EOF

# 배포 관련 파일만 커밋 (mtar은 제외)
git add mta.yaml xs-security.json app-router/ .gitignore
git add srv/travel-service.js srv/annotations.cds

git commit -m "day4: XSUAA 권한 관리 + MTA 배포 설정 + Cloud Foundry 배포"

git push origin main

# 다음 날을 위한 브랜치
git checkout -b day5-start
git push origin day5-start
git checkout main
트러블슈팅
배포 시 자주 마주치는 문제
1. "mbt not found"
npm install -g mbt2. 앱 시작 실패 (Error starting application)
# 로그로 원인 확인 (필수!)
cf logs travel-api --recent

# 자주 나오는 에러:
# - Cannot find module '@sap/xssec'  → package.json dependencies에 추가
# - Cannot find module 'passport'    → package.json dependencies에 추가
# - cds watch is not for production  → start 스크립트를 cds-serve로 변경
3. "503 Service Temporarily Unavailable" (App Router)
# App Router 로그 확인
cf logs travel-app-router --recent

# 로그에서 확인할 메세지:
# "Service Tag xxx is unknown"
# → HTML5 앱 ID에 점(.)이 포함된 경우 발생
# → manifest.json의 sap.app.id를 점 없는 이름으로 변경
# → mta.yaml, ui5.yaml, Component.ts 모두 동일한 이름으로 통일

# 또는:
# xs-app.json 라우팅 서비스 이름 확인
# "service": "html5-apps-repo-rt"  ← 이 이름이 정확해야 함
4. 빈 화면 표시 (No data, ResourceRequest timed out)
# travel-api 로그 확인
cf logs travel-api --recent | grep ERROR

# 원인 1: HANA 데이터베이스가 자동 중지됨 (Trial 계정 매일 자동 Stop)
# → SAP HANA Cloud Central에서 Start 클릭

# 원인 2: 테이블이 HANA에 존재하지 않음 (hdb-deployer 미실행)
# "Could not find table/view TRAVELSERVICE_TRAVELREQUESTS_DRAFTS"
# → mta.yaml에 hdb-deployer 모듈 추가 후 재배포

# 원인 3: 백엔드 라우팅 경로 오류 (404)
# app-router/xs-app.json의 target을 /travel/$1 로 수정
5. Trial 계정 앱 매일 자동 종료 시 재시작 방법
# 앱 상태 확인
cf apps

# 앱 재시작 (두 개 동시에)
cf start travel-api
cf start travel-app-router

# HANA도 SAP HANA Cloud Central에서 별도로 Start 필요!
6. "Cannot connect to Cloud Foundry"
cf logout
cf login -a https://api.cf.ap21.hana.ondemand.com/
4일차 마무리 체크
확인 항목:
[ ] xs-security.json 작성 (Scopes, Role Templates)
[ ] 권한 검증 로직 CDS에 적용
[ ] mta.yaml 생성 (3개 모듈 정의)
[ ] app-router 생성 (AppRouter 설정)
[ ] 로컬에서 Mock XSUAA 테스트 (npm run start:mock)
[ ] mbt build 성공 (mtar 파일 생성)
[ ] cf login 성공
[ ] cf deploy 성공 (배포 완료)
[ ] BTP Cockpit에서 앱 Running 확인
[ ] 사용자 역할 할당 완료
[ ] 클라우드 앱 URL 접근 성공
[ ] XSUAA 로그인 동작 확인
[ ] Approver 역할로 승인 버튼 표시 확인
[ ] 클라우드 로그 확인 (cf logs)
[ ] Git 커밋 완료

Q&A 주제:
[ ] XSUAA와 OAuth 2.0의 관계?
[ ] JWT Token은 어디에 저장됨?
[ ] AppRouter의 역할은 정확히?
[ ] 여러 앱이 동일 XSUAA 서비스 사용 가능?
4일차 핵심 정리
오늘 배운 것:
┌─────────────────────────────────────────────┐
│  인증: XSUAA (사용자 로그인)                 │
│  인가: Role Collections (기능 접근 제어)     │
│                                             │
│  MTA: 여러 모듈을 조합해 배포                │
│  - CAP Backend                              │
│  - Fiori UI                                 │
│  - AppRouter (라우팅)                       │
│                                             │
│  배포 파이프라인:                            │
│  Build → Package (mta) → Deploy (CF)        │
└─────────────────────────────────────────────┘

성과:
┌─────────────────────────────────────────────┐
│ DAY1: CAP 백엔드 ✓                          │
│ DAY2: 데이터 모델 ✓                         │
│ DAY3: Fiori UI ✓                           │
│ DAY4: 클라우드 배포 ✓                       │
│                                             │
│ 현재: SAP BTP 클라우드에서 실행 중!          │
└─────────────────────────────────────────────┘

내일 할 것:
→ SAP Build Process Automation 통합
→ 승인 워크플로우 자동화
→ E2E 시나리오 완성 및 발표
다음: [5일차] 자동화 + 마무리 (SAP Build PA + E2E 시나리오)