[3일차] Fiori Elements UI + Annotation 마스터링 (Java 버전)
목표: 코드 없이 엔터프라이즈급 UI를 만든다. 백엔드 데이터와 Fiori 화면을 완전히 연결한다.
시나리오: List Report + Object Page로 "출장비 승인 앱"의 완전한 풀스택 로컬 앱 완성.
런타임: CAP Java (Spring Boot 8080) + Fiori Elements
소요 시간: 이론 2시간 + 실습 3시간
3일차 학습 목표
이론:
  Fiori Elements 아키텍처와 Template 종류를 이해한다
  CDS Annotation의 원리를 알고 자유자재로 사용할 수 있다
  List Report와 Object Page의 자동 생성 원리를 안다
  검색, 필터, 정렬을 UI에서 자동으로 생성하는 방법을 안다

실습:
  Fiori 프로젝트 스캐폴딩 (SAP Fiori Generator)
  List Report 생성 및 Annotation 커스터마이징
  Object Page 추가 및 연관 데이터 표시
  CAP Java 서버 + Fiori 앱 동시 실행 (포트 8080 연결)
  로컬에서 풀스택 시나리오 (데이터 입력 → 목록 조회 → 승인) 완동작
  3일차 결과 Git 커밋
이론 세션 (2시간)
이론 1. Fiori Elements란?
Before Fiori: UI를 직접 만든다?
전통적인 SAP UI5 개발:
// 직접 Control 코딩으로 화면 만들기 (매우 번거로움)
var oTable = new sap.ui.table.Table({
  columns: [
    new sap.ui.table.Column({
      label: new sap.m.Label({ text: "출장 제목" }),
      template: new sap.m.Text({ text: "{title}" })
    }),
    // ... 계속 코드로 컬럼 정의
  ]
});
문제점:
- 수백 줄의 보일러플레이트 코드 필요
- UI 변경마다 코드 수정
- 개발자 생산성 매우 낮음
After Fiori Elements: Annotation으로 UI 선언
// annotation은 데이터 모델에 메타데이터만 추가
// CDS 파일이므로 Node.js와 Java 모두 동일!
annotate TravelService.TravelRequests with @(
  UI: {
    LineItem: [
      { Value: title,       Label: '제목' },
      { Value: destination, Label: '목적지' },
      { Value: totalAmount, Label: '금액' },
    ]
  }
);
장점:
- 코드 없이 선언형 UI 정의
- CDS 모델 바꾸면 UI 자동 반영
- Java 백엔드여도 Annotation 방식은 완전히 동일
이론 2. Fiori Elements Template 종류
선택 기준:
- List + Object: 마스터-디테일 관계 (예: 주문 목록 → 주문 상세 → 라인 항목)
- Worklist: 간단한 할일 관리
- Analytical: 대시보드 (매출 분석 차트)
이 강좌: List Report + Object Page (완전한 CRUD 앱)
이론 3. CDS Annotation의 원리
Annotation은 메타데이터
// 실제 데이터는 안 건드림 — 표시만 추가
// CDS 파일이므로 Node.js와 Java 모두 동일!
annotate Travel.TravelRequests with @(
  UI.LineItem: [ ... ]
);

entity TravelRequests {
  // ← 이 부분은 변하지 않음
}
Annotation 계층 구조
UI (UI 표시 방식)
├── SelectionFields (검색/필터)
├── LineItem (목록 컬럼)
├── FieldGroup (그룹 표시)
├── Facets (Object Page 탭)
└── HeaderInfo (페이지 헤더)

Common (공통 설정)
├── Label (레이블)
└── ValueListWithFixedValues (드롭다운)
이론 4. Java 백엔드와 Fiori 연결 구조
[Node.js 버전]                    [Java 버전]
  ┌───────────┐                     ┌───────────┐
  │  Fiori    │                     │  Fiori    │
  │  App      │                     │  App      │
  │ :8080     │                     │ :8080     │
  └─────┬─────┘                     └─────┬─────┘
        │ http proxy                      │ http proxy
        ▼                                 ▼
  ┌───────────┐                     ┌───────────┐
  │ CAP Node  │                     │ CAP Java  │
  │ :4004     │  ← 포트 다름!       │ :8080     │  ← 같은 포트
  └───────────┘                     └───────────┘

* Java 버전에서는 CAP 서버(8080)와 Fiori 앱(8080)이
   같은 포트를 사용할 수 없으므로
   Fiori 앱은 별도 포트(예: 3000)로 설정합니다.
실용적 해결책
Java 버전에서 CAP 서버는:8080으로 유지하고,
Fiori 앱은:3000또는:8081포트로 실행합니다.
ui5.yaml에서 백엔드 URL만:8080으로 변경하면 됩니다.
실습 세션 (3시간)
실습 1. Fiori 프로젝트 생성 (SAP Fiori Generator)
1-1. 필요 도구 설치
npm install -g yo @sap/generator-fiori1-2. CAP Java 서버 먼저 실행
Fiori Generator가 CAP 서버의 메타데이터를 읽어야 합니다.
# 터미널 1: CAP Java 서버 실행
cd /home/user/projects/sap-btp-travel-expense/travel-expense-java
mvn spring-boot:run

# 서버가 :8080에서 실행 중인지 확인
# → http://localhost:8080/travel 접속 확인
1-3. Fiori 프로젝트 생성
# 터미널 2: 새 터미널 열기
cd /home/user/projects/sap-btp-travel-expense

# Fiori 프로젝트 생성
yo @sap/fiori
대화형 질문 응답:
? What do you want to do?
→ Create a new Fiori project [선택]

? Which template do you want to use?
→ List Report Page [선택]

? Data Source
→ Use a Local CAP Project
? OData Service URL
→ http://localhost:8080/odata/v4/travel  ← Java 서버 포트 8080!

? Which entity/table to display?
→ TravelRequests [선택]

? Do you want to add Object Page?
→ Yes [선택]

? Navigation Entity
→ items [선택]

? Enter a project name
→ travel-ui [엔터]

? Enter a module name
→ travel_ui [엔터]

? Enter the namespace for your module
→ sap.example [엔터]

? Add empty i18n file?
→ Yes

? Configure advanced options?
→ No
생성 완료 후 구조:
travel-expense-java/
├── app/
│   └── travel-ui/
│       ├── webapp/
│       │   ├── Component.ts
│       │   ├── manifest.json
│       │   ├── index.html
│       │   └── annotations.cds
│       ├── package.json
│       └── ui5.yaml          ← 이 파일에서 포트 설정
├── db/
├── srv/
├── src/                      ← Java 소스
└── pom.xml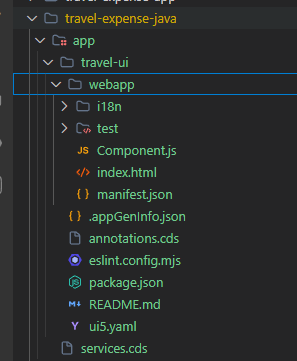
1-4. ui5.yaml 수정 — Java 백엔드 포트 연결
app/travel-ui/ui5.yaml을 아래와 같이 수정합니다.
Node.js 버전과 비교하여 포트만 다릅니다.
# yaml-language-server: $schema=https://sap.github.io/ui5-tooling/schema/ui5.yaml.json

specVersion: "4.0"
metadata:
  name: sap.example.travelui
type: application
server:
  customMiddleware:
    - name: fiori-tools-proxy
      afterMiddleware: compression
      configuration:
        ignoreCertErrors: false
        backend:
          - path: /travel
            url: http://127.0.0.1:8080    # Node.js: 4004 → Java: 8080
        ui5:
          path:
            - /resources
            - /test-resources
          url: https://sapui5.hana.ondemand.com
    - name: fiori-tools-appreload
      afterMiddleware: compression
      configuration:
        port: 35729
        path: webapp
        delay: 300
    - name: fiori-tools-preview
      afterMiddleware: fiori-tools-appreload
      configuration:
        flp:
          theme: sap_horizon
    - name: ui5-tooling-transpile-middleware
      afterMiddleware: compression
      configuration:
        debug: true
        transformModulesToUI5:
          overridesToOverride: true
        excludePatterns:
          - /Component-preload.js
builder:
  customTasks:
    - name: ui5-tooling-transpile-task
      afterTask: replaceVersion
      configuration:
        debug: true
        transformModulesToUI5:
          overridesToOverride: true
1-5. package.json 포트 설정 확인
app/travel-ui/package.json에서 Fiori 앱 포트를 확인합니다.
{
  "scripts": {
    "start": "fiori run --config ./ui5.yaml --open index.html",
    "deploy-config": "npx -p @sap/ux-ui5-tooling fiori add deploy-config cf"
  }
}
Fiori 앱 기본 포트는 보통 8080입니다.
CAP Java 서버도 8080이라 충돌이 발생할 수 있습니다.
충돌 시 아래와 같이 Fiori 앱 포트를 변경합니다:
{
  "scripts": {
    "start": "fiori run --config ./ui5.yaml --open index.html --port 3000"
  }
}
실습 2. CDS Annotation 작성
이 파일은 Node.js 버전과 완전히 동일합니다.
Annotation은 CDS 파일이므로 런타임(Java/Node.js)과 무관합니다.
2-1. Annotation 파일 생성
touch srv/annotations.cds// srv/annotations.cds
// Node.js 버전과 100% 동일한 파일!
using TravelService from './travel-service';
// ════════════════════════════════════════════════════
// TravelRequests 엔티티 어노테이션
// ════════════════════════════════════════════════════
annotate TravelService.TravelRequests with @(
Capabilities.Insertable: true,
Capabilities.Deletable : true,
// ── List Report (검색/필터/목록) ──────────────────────────
UI: {
SelectionFields: [
status,
requester,
departureDate,
destination
],
LineItem: [
{ $Type: 'UI.DataFieldForAction', Action: 'TravelService.submit', Label: '제출', InvocationGrouping: #ChangeSet },
{ $Type: 'UI.DataFieldForAction', Action: 'TravelService.approve', Label: '승인', InvocationGrouping: #ChangeSet },
{ $Type: 'UI.DataFieldForAction', Action: 'TravelService.reject', Label: '반려', InvocationGrouping: #ChangeSet },
{ Value: title, Label: '제목', Importance: #High },
{ Value: destination, Label: '목적지', Importance: #High },
{ Value: requester, Label: '신청자', Importance: #Medium },
{ Value: totalAmount, Label: '금액 (KRW)', Importance: #High },
{
Value: status,
Label: '상태',
Criticality: (status = 'Approved' ? 3 : (status = 'Rejected' ? 1 : 2)),
CriticalityRepresentation: #WithIcon
},
{ Value: createdAt, Label: '신청 일자', Importance: #Low },
],
Identification: [
{ $Type: 'UI.DataFieldForAction', Action: 'submit', Label: '제출' },
{ $Type: 'UI.DataFieldForAction', Action: 'approve', Label: '승인' },
{ $Type: 'UI.DataFieldForAction', Action: 'reject', Label: '반려' }
],
PresentationVariant: {
SortOrder: [{ Property: ID, Descending: false }],
Visualizations: ['@UI.LineItem']
},
// ── Object Page (상세 화면) ────────────────────────────
HeaderInfo: {
TypeName: '출장 신청',
TypeNamePlural: '출장 신청 목록',
Title: { Value: title },
Description: { Value: destination }
},
Facets: [
{
$Type: 'UI.ReferenceFacet',
Label: '기본 정보',
Target: '@UI.FieldGroup#Main'
},
{
$Type: 'UI.ReferenceFacet',
Label: '비용 항목',
Target: 'items/@UI.LineItem'
}
],
FieldGroup#Main: {
Data: [
{ Value: title, Label: '출장 제목' },
{ Value: destination, Label: '목적지' },
{ Value: requester, Label: '신청자' },
{ Value: status, Label: '진행 상태' },
{ Value: departureDate, Label: '출발 일자' },
{ Value: returnDate, Label: '복귀 일자' },
{ Value: totalAmount, Label: '총 예산 (KRW)' }
]
}
}
) {
status @Common.Label : '상태'
@Common.ValueListWithFixedValues : true;
requester @Common.Label : '신청자';
departureDate @Common.Label : '출발 일자';
destination @Common.Label : '목적지';
};
// ════════════════════════════════════════════════════
// ExpenseItems 엔티티 어노테이션
// ════════════════════════════════════════════════════
annotate TravelService.ExpenseItems with @(
UI: {
LineItem: [
{ Value: category, Label: '항목 유형' },
{ Value: itemTitle, Label: '설명' },
{ Value: amount, Label: '금액' },
{ Value: expenseDate, Label: '발생일' }
]
}
);2-2. Annotation 변경 후 CAP Java 서버 재빌드
Annotation은 CDS 파일이므로 Java 서버를 재빌드해야 반영됩니다.
# 터미널 1: Java 서버 재시작
# Ctrl+C로 기존 서버 종료 후
mvn spring-boot:run

# OData 메타데이터에 Annotation이 포함됐는지 확인
# http://localhost:8080/travel/$metadata 접속 → XML에서 Annotation 섹션 확인
💡 Node.js vs Java Annotation 반영 속도
Node.js (cds watch): CDS 파일 저장 즉시 자동 반영
Java (mvn spring-boot:run): 수동 재시작 필요
개발 중 Annotation을 자주 수정한다면 아래 방법 참고:
# Spring Boot DevTools 추가 시 일부 변경사항 자동 반영 가능
# pom.xml에 추가:
# <dependency>
#   <groupId>org.springframework.boot</groupId>
#   <artifactId>spring-boot-devtools</artifactId>
#   <optional>true</optional>
# </dependency>
실습 3. Fiori 앱 로컬 실행 및 통합 테스트
3-1. CAP Java 서버와 Fiori 앱 동시 실행
# 터미널 1 — CAP Java 서버 (백엔드)
cd .../travel-expense-java
mvn spring-boot:run
# → http://localhost:8080 에서 OData API 서비스

# 터미널 2 — Fiori 앱 (프론트엔드)
cd .../travel-expense-java/app/travel-ui
npm install
npm start
# → http://localhost:3000 에서 Fiori UI 서비스 (포트 충돌 시 변경)
포트 요약 (Node.js 버전과 비교):
| 구분 | Node.js 버전 | Java 버전 |
|---|---|---|
| CAP 서버 포트 | 4004 | 8080 |
| Fiori 앱 포트 | 8080 | 3000 (충돌 방지) |
| ui5.yaml 백엔드 URL | localhost:4004 | localhost:8080 |
3-2. Fiori 앱에서 풀스택 시나리오 테스트
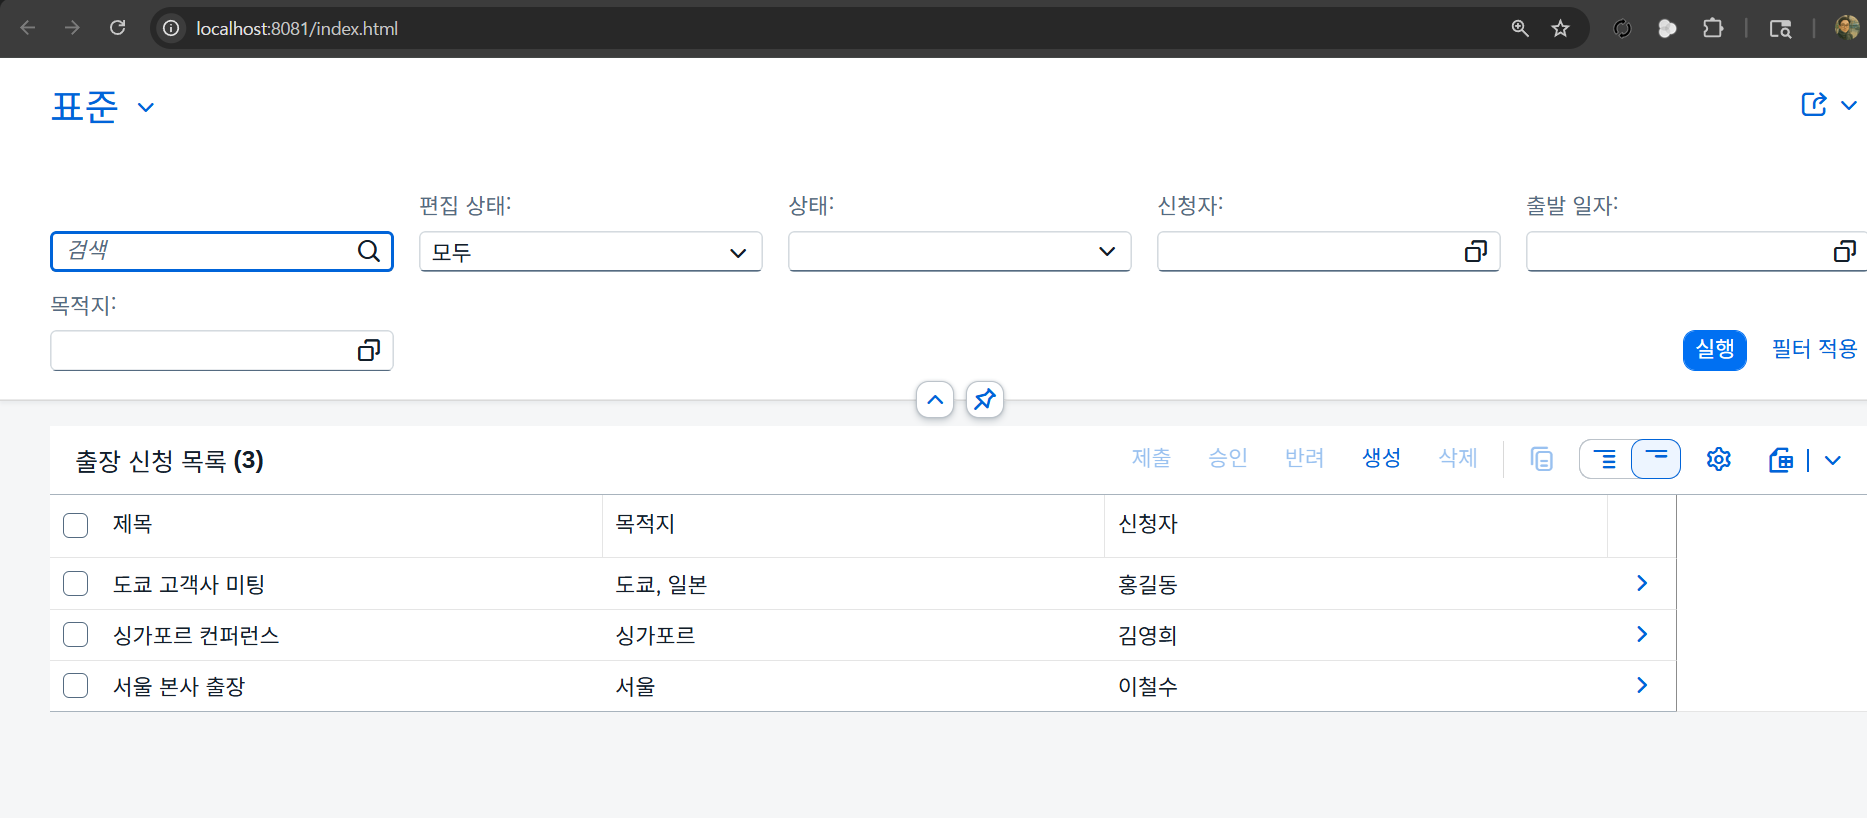
Step 1: List Report 로드
브라우저: http://localhost:8081
↓
검색 폼 자동 표시:
- 상태 (드롭다운)
- 신청자 (텍스트)
- 출발일 (날짜)
- 목적지 (텍스트)
↓
목록 테이블 표시:
┌──────────┬──────────┬────────┬────────────┬──────────┐
│ 제목      │ 목적지   │ 신청자  │ 금액       │ 상태     │
├──────────┼──────────┼────────┼────────────┼──────────┤
│ 도쿄...  │ 도쿄     │ 홍길동  │ 850,000   │ 제출됨   │
│ 싱가...  │ 싱가포르  │ 김영희  │ 2,100,000│ 초안     │
└──────────┴──────────┴────────┴────────────┴──────────┘
Step 2: Object Page
행 클릭 → Object Page 로드:
- 기본 정보, 비용 항목 탭이 자동 생성
- CAP Java 서버
:8080에서 자동으로$expand=items쿼리 실행
Step 3: 상태 변경 Action 실행
Object Page 상단 "승인" 버튼 클릭:
Fiori → POST http://localhost:8080/travel/TravelRequests(ID)/approve
        { "comment": "승인합니다." }
↓
CAP Java TravelServiceHandler.onApprove() 실행
↓
DB 업데이트 (SQLite → 추후 HANA Cloud)
↓
Fiori UI 자동 갱신
핵심 확인 포인트
Fiori가 보내는 HTTP 요청은 Node.js 버전과 완전히 동일합니다.
차이는 백엔드 주소만:4004→:8080으로 바뀐 것뿐입니다.
OData 표준 덕분에 프론트엔드는 백엔드 언어를 전혀 신경 쓰지 않습니다.
실습 4. 신규 항목 생성 기능 활성화
srv/travel-service.cds에 Draft 기능 추가:
// srv/travel-service.cds에 @odata.draft.enabled 추가
service TravelService @(path: '/travel') {

  @odata.draft.enabled  // ← 추가!
  entity TravelRequests as projection on travel.TravelRequests;

  // ... 나머지 동일
}
# Draft 테이블 생성을 위해 DB 재초기화 필요
# Java 버전: 서버 재시작으로 처리
mvn spring-boot:run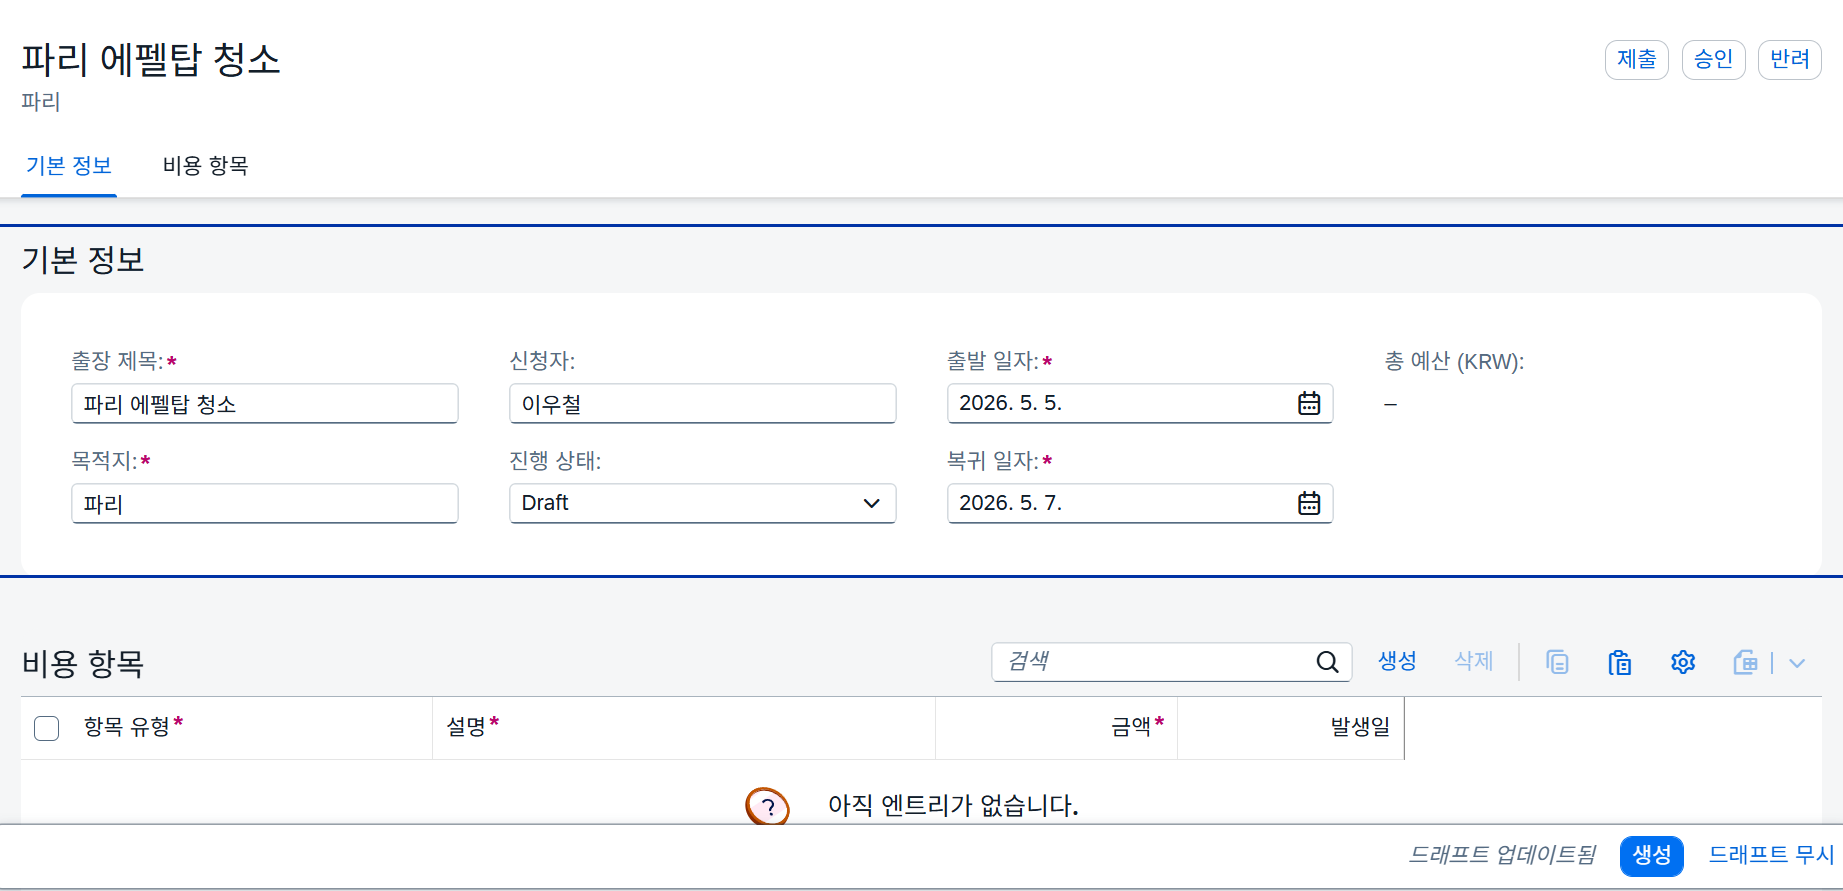
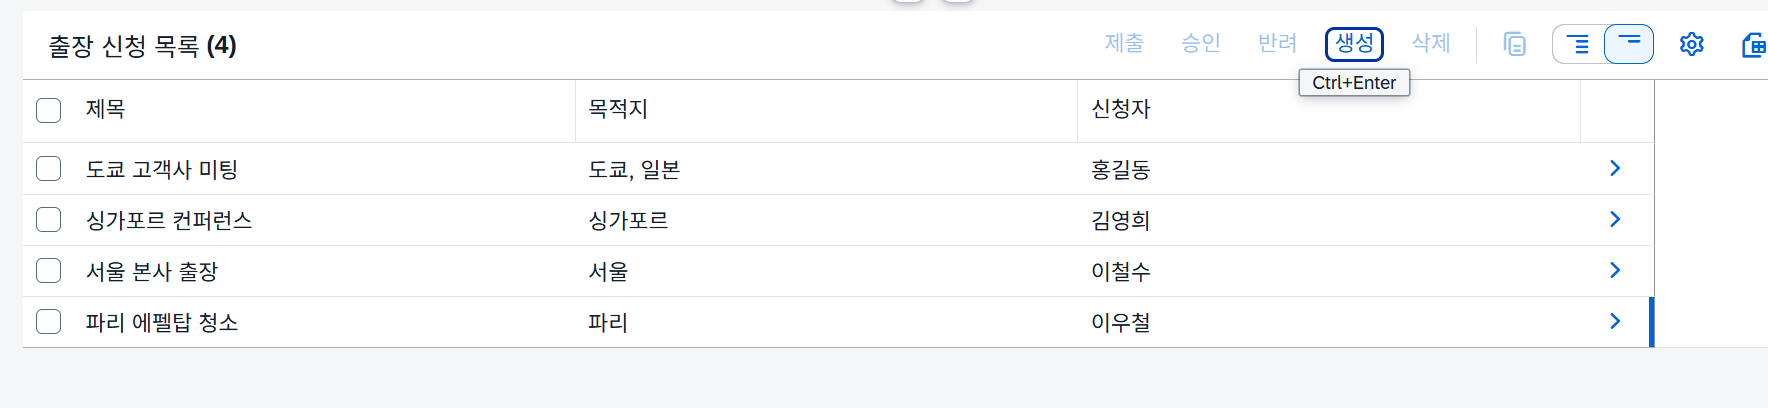
실습 5. 검색 및 필터 활용
시나리오: "2025-09 이후 출발하는 승인된 출장만 보기"

List Report의 SearchBox:
1. 상태: "Approved" 선택
2. 출발일: "2025-08-01" 이후 선택
3. "Go" 클릭
↓
Fiori → CAP Java → OData 쿼리 자동 생성:
GET http://localhost:8080/travel/TravelRequests?
  $filter=status eq 'Approved' and departureDate ge 2025-08-01
  &$orderby=createdAt desc
↓
Java TravelServiceHandler에서 쿼리 처리
↓
필터링된 결과만 표시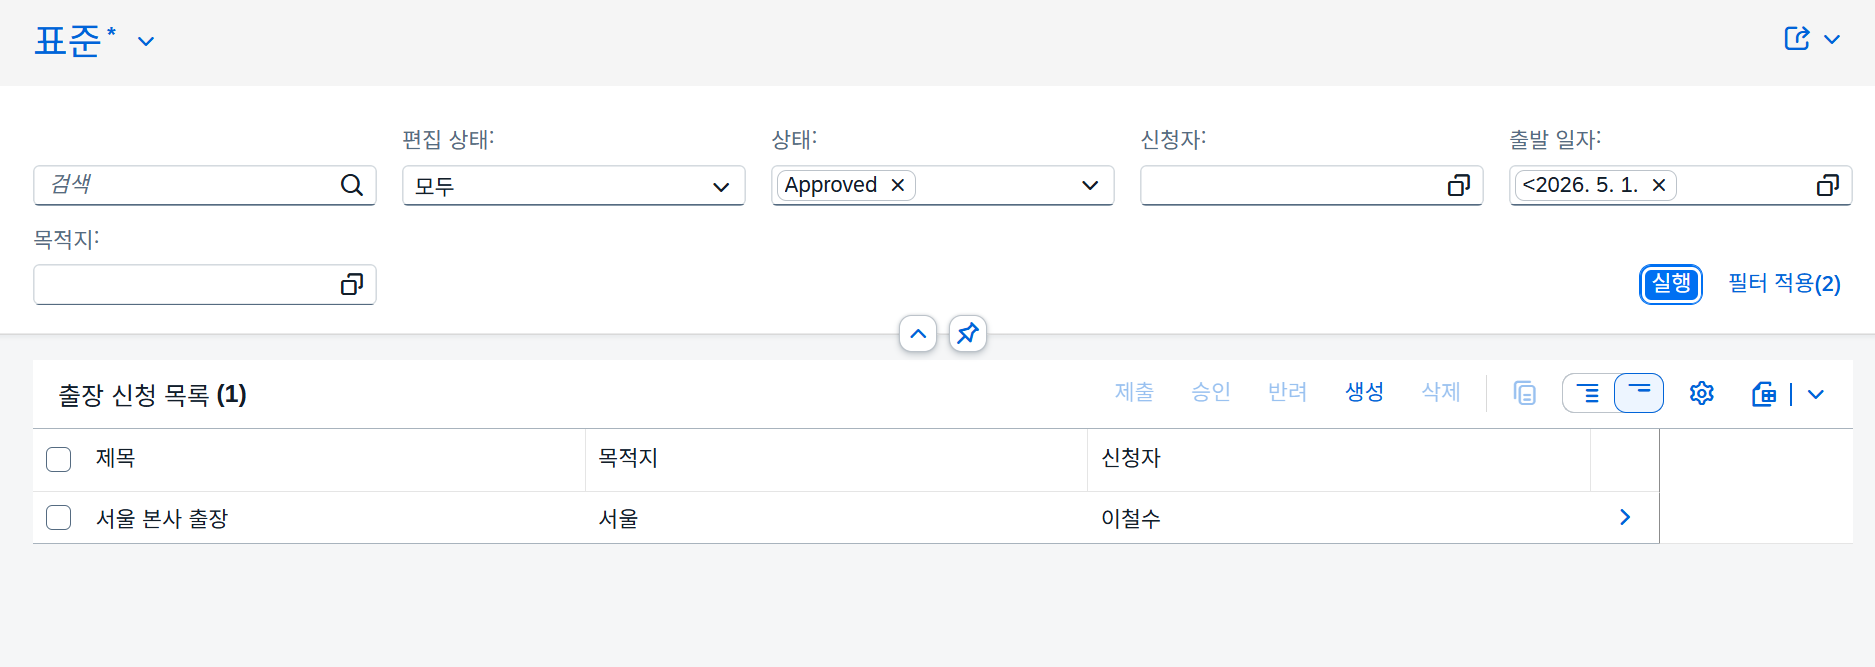
실습 6. Git 커밋
cd /home/user/projects/sap-btp-travel-expense

git add .
git commit -m "day3: Fiori Elements UI (List Report + Object Page) + Annotation 적용 (Java 백엔드)"
git push origin main

git checkout -b day4-start
git push origin day4-start
git checkout main
커스터마이징: 추가 Annotation 예시
이 섹션의 모든 Annotation 코드는 Node.js 버전과 완전히 동일합니다.
1. Object Page에 Action 버튼 추가
// srv/annotations.cds
annotate TravelService.TravelRequests with @(
  UI.HeaderInfo: {
    TypeName: '출장 신청',
    TypeNamePlural: '출장 신청들',
    Title: { Value: title }
  },

  UI.Identification: [
    { Value: 'submit',  Label: '제출',  Inline: true },
    { Value: 'approve', Label: '승인',  Inline: true },
    { Value: 'reject',  Label: '반려',  Inline: true }
  ]
);
2. 필드를 읽기 전용으로 만들기
annotate TravelService.TravelRequests with {
  totalAmount @UI.Hidden: false;  // 항상 표시 (읽기 전용 — @readonly로 지정됨)
  createdAt   @UI.Hidden: false;
};
3일차 마무리 체크
확인 항목:
[ ] yo @sap/fiori로 Fiori 프로젝트 생성 완료
[ ] ui5.yaml 백엔드 URL을 localhost:8080으로 수정 완료
[ ] mvn spring-boot:run 후 Fiori npm start 동시 실행 성공
[ ] List Report 자동 생성 확인 (검색폼, 테이블)
[ ] Object Page 자동 생성 확인 (Facets, FieldGroup)
[ ] 목록 조회, 항목 클릭, 상세 보기 작동
[ ] Create 버튼으로 새 항목 생성 가능
[ ] 필터/검색 기능 작동 (Java 백엔드로 OData 쿼리 전달됨)
[ ] Approve Action 실행 및 상태 변경 확인
[ ] Git 커밋 완료

Q&A 주제 (강사에게 물어보기):
[ ] Fiori Elements와 Freestyle UI5의 선택 기준은?
[ ] Java 개발 중 Annotation 핫리로드 방법은?
[ ] List Report의 성능 최적화 (대량 데이터)?
[ ] Spring Boot DevTools로 CAP Java 빠른 재시작 방법?
3일차 핵심 정리
오늘 배운 것:
┌────────────────────────────────────────────────────────┐
│  Fiori Elements = Annotation으로 UI 생성               │
│  → CDS 파일 기반 → Node.js와 Java 모두 동일!           │
│                                                        │
│  3가지 주요 Annotation:                                │
│  - SelectionFields: 검색폼                             │
│  - LineItem: 목록 컬럼                                 │
│  - Facets: Object Page 탭                              │
│                                                        │
│  Java 버전에서 달라지는 것:                             │
│  - 백엔드 포트: 4004 → 8080                            │
│  - ui5.yaml URL: localhost:4004 → localhost:8080       │
│  - Annotation 반영: 자동 → mvn 재빌드 필요             │
│                                                        │
│  달라지지 않는 것:                                      │
│  - CDS Annotation 파일 (.cds)                          │
│  - Fiori Generator 사용법                              │
│  - OData 통신 프로토콜                                 │
│  - UI 동작 방식                                        │
└────────────────────────────────────────────────────────┘

지금까지의 성과:
┌────────────────────────────────────────────────────────┐
│ DAY1: CAP Java 백엔드 + Spring Boot 설정 ✓             │
│ DAY2: 데이터 모델 고급화 + Java 비즈니스 로직 ✓        │
│ DAY3: Fiori UI 완성 (Java 백엔드 연결) ✓               │
│                                                        │
│ 현재: 로컬에서 완전한 풀스택 앱 완성!                  │
│       Java Spring Boot ↔ OData ↔ Fiori Elements        │
│                                                        │
│ 다음: 클라우드에 배포 (DAY4)                           │
└────────────────────────────────────────────────────────┘

내일 할 것:
→ XSUAA (인증) 설정
→ MTA 빌드 (멀티-타겟 애플리케이션)
→ Cloud Foundry에 Java 앱 배포
→ BTP Cockpit에서 앱 확인
부록: Node.js → Java 전환 치트시트
교육생이 Node.js 교안을 참고할 때 빠르게 대응하기 위한 대조표입니다.
| 항목 | Node.js CAP | Java CAP | 비고 |
|---|---|---|---|
| 프로젝트 생성 | cds init | mvn archetype:generate | |
| 의존성 파일 | package.json | pom.xml | |
| 서버 실행 | cds watch | mvn spring-boot:run | |
| 서버 포트 | 4004 | 8080 | |
| CDS 모델 파일 | .cds 파일 | .cds 파일 | 동일 |
| Mock 데이터 | .csv 파일 | .csv 파일 | 동일 |
| 서비스 핸들러 | srv/*.js | src/main/java/...Handler.java | |
| 서비스 등록 | cds.service.impl() | @Component @ServiceName | |
| Before Hook | this.before(...) | @Before(event=..., entity=...) | |
| After Hook | this.after(...) | @After(event=..., entity=...) | |
| Custom Action | this.on(...) | @On(event=..., entity=...) | |
| 에러 반환 | req.error(400, '...') | throw new ServiceException(...) | |
| DB 조회 | await SELECT.one.from(...) | db.run(Select.from(...)) | |
| DB 업데이트 | await UPDATE(...).set(...) | db.run(Update.entity(...).data(...)) | |
| DB 삽입 | await INSERT.into(...).entries(...) | db.run(Insert.into(...).entry(...)) | |
| 로깅 | console.log(...) | log.info(...) (SLF4J) | |
| Annotation 파일 | srv/annotations.cds | srv/annotations.cds | 동일 |
| Fiori 연결 포트 | localhost:4004 | localhost:8080 | |
| 테스트 | HTTP 파일 | JUnit + MockMvc | Java 추가 강점 |
다음: [4일차] 클라우드 배포 (XSUAA + MTA + CF Deploy) — Java 버전