@Profile 이란?
@Conditional 이란? - Spring Core(AOP)할때 학습
- 설정된 모든 Condition인터페이스의 조건이 True일때 동작한다
@Retention(RetentionPolicy.RUNTIME)
@Target({ElementType.TYPE, ElementType.METHOD})
public @interface Conditional {
  /**
  * All {@link Condition}s that must {@linkplain Condition#matches match}
  * in order for the component to be registered.
  */
  Class? extends Condition[] value();
}
Condition.Java -> matches 메소드의 반환값이 true이면 동작
public interface Condition {

    boolean matches(ConditionContext context, AnnotatedTypeMetadata metadata);

}
AutoConfiguration
@EnableAutoConfiguration
- Auto Configuration은 애플리케이션에서 필요한 Bean을 유추해서 구성해 주는 기능을 담당
- @EnableAutoConfiguration 설정은 spring-boot의 AutoConfiguration 을 사용하겠다는 선언
- @SpringBootApplication 에 포함
- Java Configuration은 AutoConfiguration으로 동작할 수 있음. Java Configuration이 auto configuration으로 동작하기 위해, 설정파일에 대상 Configuration이 설정되어야 한다.
AutoConfiguration에서 제외 - @SpringBootAutoConfiguration에서 exclude 해주면 됨!
@SpringBootApplication을 사용한 경우도 동일하다
@SpringBootApplication(exclude= RedisAutoConfiguration.class)
public class StudentApplication {
    public static void main(String[] args) {
        SpringApplication.run(StudentApplication.class, args);
    }
}
Auto Configuration의 예시
- @ConditionalOnClass, @ConditionalOnMissingBean 등의 애너테이션으로 설정 제어
- EmbeddedWebServerFactoryCustomizerAutoConfiguration.java
@AutoConfiguration
@ConditionalOnWebApplication
@EnableConfigurationProperties(ServerProperties.class)
public class EmbeddedWebServerFactoryCustomizerAutoConfiguration {

	/**
	 * Nested configuration if Tomcat is being used.
	 */
	@Configuration(proxyBeanMethods = false)
	@ConditionalOnClass({ Tomcat.class, UpgradeProtocol.class })
	public static class TomcatWebServerFactoryCustomizerConfiguration {

		@Bean
		public TomcatWebServerFactoryCustomizer tomcatWebServerFactoryCustomizer(Environment environment,
				ServerProperties serverProperties) {
			return new TomcatWebServerFactoryCustomizer(environment, serverProperties);
		}

	}

	/**
	 * Nested configuration if Jetty is being used.
	 */
	@Configuration(proxyBeanMethods = false)
	@ConditionalOnClass({ Server.class, Loader.class, WebAppContext.class })
	public static class JettyWebServerFactoryCustomizerConfiguration {

		@Bean
		public JettyWebServerFactoryCustomizer jettyWebServerFactoryCustomizer(Environment environment,
				ServerProperties serverProperties) {
			return new JettyWebServerFactoryCustomizer(environment, serverProperties);
		}

	}
	// 생략
}
@ConditionalOnXXX - SpringBoot가 제공하는 @Conditional의 확장
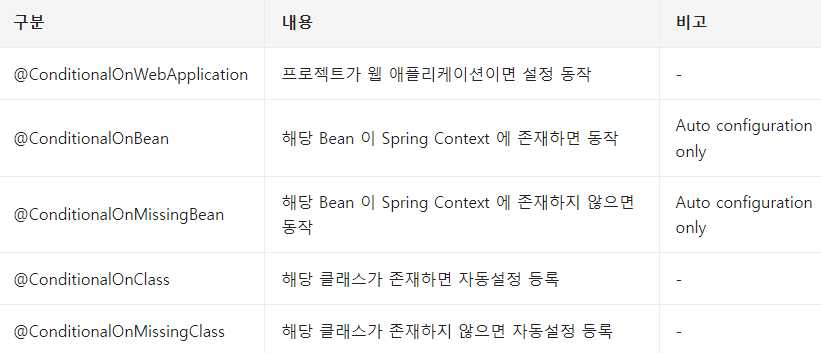
*ConditionalOnBean, ConditionalOnMissingBean -> AutoConfig에서만 쓸 수 있음
@ConditionalOnBean
- Bean이 이미 설정된 경우 동작
- MyService 타입의 Bean이 이미 BeanFactory에 등록된 경우 동작
- Configuration이 AutoConfiguration에 등록된 경우에 사용 가능
@Configuration
   public class MyAutoConfiguration {

       @ConditionalOnBean(Value=Datasource.class) // 이런식으로 많이 씀
       @Bean
       public MyService myService() {
           ...
       }

   }
@ConditionalOnMissingBean
- BeanFactory에 Bean이 설정되지 않은 경우에 동작
- MyService 타입의 Bean이 BeanFactory에 등록되지 않은 경우에 동작한다.
- Configuration 이 AutoConfiguration에 등록된 경우에 사용할 수 있다.
   @Configuration
   public class MyAutoConfiguration {

       @ConditionalOnMissingBean
       @Bean
       public MyService myService() {
           ...
       }

   }
@Externalized Configuration
- spring-boot는 같은 소스코드로 여러 환경에서 동작할 수 있도록 외부화 설정을 제공한다.
- java properties, YAML, 환경변수, 실행 인자로 설정 가능
- 전체 프로젝트의 설정은 .properties, .yaml 중 하나만 사용하는 것을 권장
- 같은 곳에 application.propreties, application.yaml 이 동시에 존재하면 application.propreties 가 우선함
예시) 서버 포트를 변경하는 세가지 방법
1) application.properties : server.port=8888
2) 환경변수 : SERVER_PORT=8888 java -jar target/foo.jar
3) 실행 명령어(Command Line Argument) 인자 : java -jar target/student.jar --server.port=8888
@ConfigurationProperties 바인딩으로 server.port << 시 동작함(ServerProperties라는 클래스에서 값 객체로 받음)
application.properties / application.yaml
com.foo.example=testcom:
foo:
example: test@Value 바인딩: 속성값을 @Value 에너테이션으로 바인딩하여 쓴다
@Component
public class MyBean {

  @Value("${nhn.student.name}")
  private String name;

  // ...
}
@ConfigurationProperties 바인딩
- 속성값(properties)을 @ConfigurationProperties로 바인딩하여 사용
- @ConfigurationProperties 로 설정된 클래스는 Dependency Injection으로 참조하여 사용
@ConfigurationProperties(”nhn.student")
public class StudentProperties {
private String name;
// getters / setters...
}
Externalized Configuration 자동완성
- configuration metadata를 작성하면 IDE에서 자동완성 쓸 수 있음
- spring-boot-configurtaion-processor를 의존성에 설정하면 metadata 자동생성
@ConfigurationProperties의 Relaxed Binding
- 속성값을 @ConfigurationProperties빈에 바인딩하기 위해 Relaxed Binding 을 사용하기 때문에 이름이 정확히 일치할 필요는 없음
- @Value 를 사용한 경우, Relaxed Binding 을 지원하지 않음
예시)
@ConfigurationProperties(”nhn-academy.student")
public class StudentProperties {
private String firstName;
// getters / setters...
}
@ConfigurationProperties 활성화 -> 예시로 실습
이게 달린 클래스는 Bean이 된다.
또한 application.properties에 값을 작성하면 무난하게 값이 들어옴을 확인할 수 있다.
알아야 할 것은
1) application.properties / application-prod.properties에서 active profile을 줄때, 전자가 기본으로 동작하고 후자가 덮어쓰는 방식이다.
2) properties에서 값을 읽을 때 String으로 값을 읽는데, 이를 @ConstructorBinding을 적용하고 if문으로 검사한 다음 값을 넣어주면, 생성자 내부에서 혹시 값이 없으면 에러를 찍어준다. 또한 타입도 변형해서 가져온다.
Spring Profile
- 프로필 지정 설정파일은 spring.profiles.active 인자로 로딩 여부가 결정된다.
- 만약, prod 프로파일을 지정했다면, application.properties 와 application-prod.properties 를 모두 로딩한다.
Externalized Configuration 우선순위 : spring-boot 는 다음 순서로 설정을 읽어 들인다. 중복되는 경우, 덮어쓰게 된다
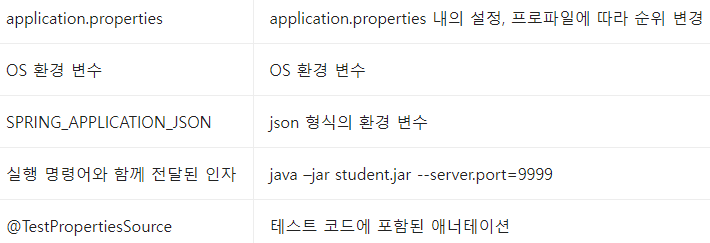
결국 덮어쓰는 순서로 최우선이 된다.
Application Properties 우선순위
실행 인자로 제공하는 spring.profiles.active 설정으로 application-{profile}.properties 를 사용할 것인지 결정한다.
중복되는 경우, 덮어쓰게 된다(override)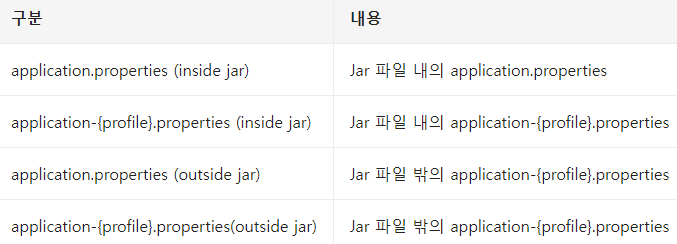
또한. 위치를 찾아가는 순서에 따라 최종 순서도 정할 수 있다.
SpringBoot 개발자 도구
- Spring-Boot-devtools Module을 Pom.xml에 추가하면 된다
비활성화 방법?
- java -jar 로 실행하면 상용(Production) 환경으로 판단하고 비활성화됨
- 서블릿 컨테이너에서 동작하면 자동 비활성화 되지 않기 때문에 - Dspring.devtools.restart.enabled=false 설정 필요
* -D << VM 인자 - maven plugin의 repackaged 로 생성된 바이너리파일에는 자동으로 devtools가 제거됨
개발자 도구와 캐시 - 개발자 도구는 뷰 템플릿, 정적 리소스 캐시를 자동 비활성화 함
개발자 도구 - 자동 재시작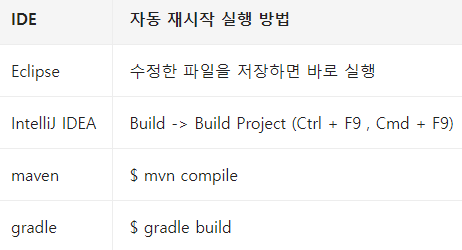
- 기본적으로 애플리케이션의 클래스 패스 내 파일이 변경되면 자동으로 재시작
- 정적 자원이나 뷰 템플릿은 재시작하지 않음
- IDE에서 코드 변경 후 잦은 테스트를 할 경우 유용함
Spring Boot Actuator : 상용화 준비(Production-Ready) 기능을 위한 Spring Boot 모듈
- 실행중인 어플리케이션을 관리하고 정보 수집하고 상태를 점검하는 진입점 제공
- HTTP 또는 JMX 사용 가능
- Dependency 추가해야 함
<dependencies>
  <dependency>
     <groupId>org.springframework.boot</groupId>
     <artifactId>spring-boot-starter-actuator</artifactId>
  </dependency>
</dependencies>
Spring Boot Actuator - Endpoint(/Get/foo <<<)
- Actuator 엔드포인트로 spring boot 애플리케이션의 모니터링 및 상호작용 가능
- 스프링 부트는 다양한 빌트인 엔드포인트를 제공
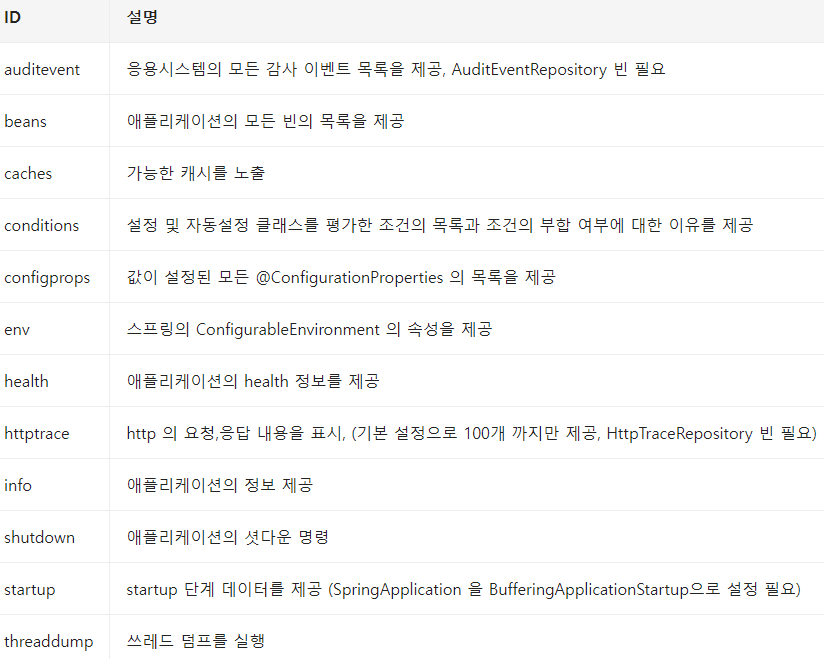
shutdown, threaddump -> 상호작용
그 외 -> 모니터링
Spring Boot Actuator - EndPoint 활성화
기본적으로 shutdown 빼고 전부 활성화(누가 끄면 안됨)
management.endpoint.{id}.enabled 속성으로 활성화/비활성화 (id는 위 사진에 있는 id)
shutdown endpoint 활성화
management.endpoint.shutdown.enabled=true (properties)
management: (yaml)
 endpoint:
   shutdown:
     enabled: true
shutdown endpoint Opt-in 설정
management.endpoints.enabled-by-default=false ## 모두 비활성화
management.endpoint.info.enabled=true         ## info만 활성화
management:
  endpoints:
    enabled-by-default: false       ## 모두 비활성화
  endpoint:
    info:
      enabled: true                 ## info만 활성화
Endpoint 노출방식(JMX,Web) 설정
- 민감한 정보를 노출하니, 신중히 설정해야 한다
- Web은 health Endpoint만 제공한다
JMX는 모든 Endpoint를 노출하고, Web은 health만 노출하는것이 기본 설정이니...
include, exclude property로 노출방식을 활성화 할 수 있다!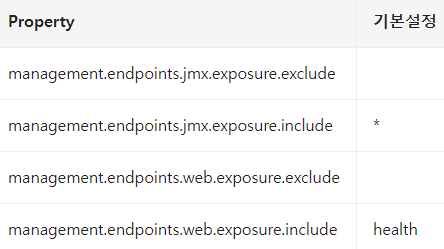
단. Exclude 설정이 include 설정보다 우선된다.
ex) health, info 만 jmx에서노출할 경우
management.endpoints.jmx.exposure.include=health,infoex) env,bean을 제외한모든 Endpoint를 Web에서 노출
management.endpoints.web.exposure.include=*
management.endpoints.web.exposure.exclude=env,bean
EndPoint 사용자 정의
-
@Endpoint : Endpoint로 노출할 Bean에 선언
* WebEndpoint : HTTP Endpoint로만 노출- JmxEndpoint : JMX Endpoint로만 노출(거의 X)
-
@ReadOperation, @WriteOperation, @DeleteOperation - HTTP의 GET,POST,DELETE 메소드
-
@EndpointWebExtension, @EndpointJmxExtension - 이미 존재하는 EndPoint에 기술 전용 operation을 추가할 때 사용
EndPoint 사용자 정의 예시
@Component
@Endpoint(id = "counter") // id 이름이 겹치면 안됨(actuator id와)
public class CounterEndpoint {
   private final AtomicLong counter = new AtomicLong();

   // curl -XGET http://localhost:8080/actuator/counter
   @ReadOperation
   public Long read() {
       return counter.get();
   }

   // curl –X POST -H"Content-Type: application/json" -d'{"delta":100}'  http://localhost:8080/actuator/counter
   @WriteOperation
   public Long increment(@Nullable Long delta) {
       if (delta == null) {
           return counter.incrementAndGet();
       }
       return counter.addAndGet(delta );
   }

   // curl –X DELETE http://localhost:8080/actuator/counter
   @DeleteOperation
   public Long reset() {
       counter.set(0);
       return counter.get();
   }
}
Health Endpoint : 애플리케이션의 정상동작 정보를 제공한다.
- L4 layer에서 서버의 동작을 확인하고 서버가 죽어있으면 다른 서버로 request 전송
- 서버 재 배포 후 다시 연결
- ApplicationContext 내의 HealthContributor 타입의 빈을 모두 활용해서 정보를 제공한다.
- HealthContributor 는 HealthIndicator 나 CompositeHealthContributor의 형태로 사용
HealthIndicator : 실제 Health 정보 제공
CompositeHealthIndicator : HealthContributor 들의 조합정보를 제공 - management.endpoint.health.show-details=always 를 설정하면 각각의 HealthContributor 상세 정보를 볼 수 있다.
Spring Boot의 기본 HealthIndicators - AutoConfiguration에 의해 동작여부 결정
커스텀 HealthIndicator 작성하기 -> 기본 actuator로 받아오는 정보에 추가 정보를 넣을 수 있음
ex)
@Component
public class MyHealthIndicator implements HealthIndicator {

    @Override
    public Health health() {
        int errorCode = check();
        if (errorCode != 0) {
            return Health.down().withDetail("Error Code", errorCode).build();
        }
        return Health.up().build(); // 요기서 Health.down()을 넣으면 status 확인 시 down으로 나옴
    }

    private int check() {
        // perform some specific health check
        return ...
   }

}
info Endpoint : info.* 형식의 모든 환경변수 정보 제공(2.6 이후 기본 비활성화)
application.properties에 설정을 추가해야 함
management.info.env.enabled=true
info.edu.springboot.version=10.1.1 // 내가 넣는 값
info.edu.springboot.instructor=foo // 내가 넣는 값
info Endpoint - GitInfoContributor
- classpath 상의 git.properties 정보 제공, 실행중인 서비스의 git 정보 확인용
info Endpoint - InfoContributor 사용자 정의- 인터페이스 구현체 개발하여 빈으로 등록
@Component
public class ExampleInfoContributor implements InfoContributor {
    @Override
    public void contribute(Info.Builder builder) {
        builder.withDetail("example", Map.of("key", "value"));
    }
}
Endpoint 경로변경
Actuator Endpoint 경로변경
management.endpoints.web.base-path=/actuator2            # SpringBoot 2.x
management.context-path=/actuator2                       # SpringBoot 1.x : Set /actuator
Sync : Rest-Api에 호출했을때 응답을 기다림
Async : Rest-Api에 호출했을때 응답을 기다리지 않고 내 코드 진행
RestTemplate 이란?
- HTTP 통신을 위한 도구로 RESTful API 웹 서비스와의 상호작용을 하기위해 제공하는 스프링 프레임워크의 클래스를 의미함
- 다양한 HTTP 메서드(GET, POST, PUT, DELETE 등)를 사용하며 원격 서버와 동기식 방식으로 JSON, XML 등의 다양한 데이터 형식으로 통신함
- 동기식 방식으로 요청을 보내고 응답을 받을 때까지 블로킹되며, 요청과 응답이 완료되기 전까지 다음 코드로 진행되지 않습니다. 원격 서버와 통신할 때는 응답을 기다리는 동안 대기해야함
- 내 코드가 아무리 빨라도 원격서버 속도가 느리다면 속도가 느려진다!
RestTemplate 빈 설정
- ReadTimeout 과 ConnectionTimeout 은 기본 설정이 -1 로 무제한. 만약, 기본 설정으로 사용하면 서버의 응답이 없는 경우, 무제한으로 대기하게 된다. 따라서, 적절한 대기시간을 설정해 주어야 한다
@Configuration
public class WebConfiguration {
    @Bean
    public RestTemplate restTemplate(RestTemplateBuilder builder) {
        return builder
                .setReadTimeout(Duration.ofSeconds(5L)) // 5sec
                .setConnectTimeout(Duration.ofSeconds(3L)) // 3sec
                .build();
    }
}
GET method를 호출한다면?
@Override
    public List<Student> getStudents() {
        HttpHeaders httpHeaders = new HttpHeaders();
        httpHeaders.setContentType(MediaType.APPLICATION_JSON); // GET일 경우는 안써도 된다.
        httpHeaders.setAccept(List.of(MediaType.APPLICATION_JSON));

        HttpEntity<String> requestEntity = new HttpEntity<>(httpHeaders);
        ResponseEntity<List<Student>> exchange = restTemplate.exchange("http://localhost:8080/students", <- 이 경로로 호출
                HttpMethod.GET,
                requestEntity,
                new ParameterizedTypeReference<List<Student>>() {
                }); // Student는 Get,Set으로 Mapping 가능, List는 Generic으로 객체를 받음. 따라서 List로는 Field를 알 수 가 없음. 따라서 new Para~~~을 통해 List<Student>의 필드를 알게 해준다.
        return exchange.getBody();
    }
POST method를 호출한다면?
@Override
    public Student createStudent(Student student) {
        HttpHeaders httpHeaders = new HttpHeaders();
        httpHeaders.setContentType(MediaType.APPLICATION_JSON);
        httpHeaders.setAccept(List.of(MediaType.APPLICATION_JSON));

        HttpEntity<Student> requestEntity = new HttpEntity<>(student, httpHeaders);
        ResponseEntity<Student> exchange = restTemplate.exchange("http://localhost:8080/students",
                HttpMethod.POST,
                requestEntity,
                new ParameterizedTypeReference<>() {
                });
        return exchange.getBody();
    }