MVC Pattern (Model - View - Controller)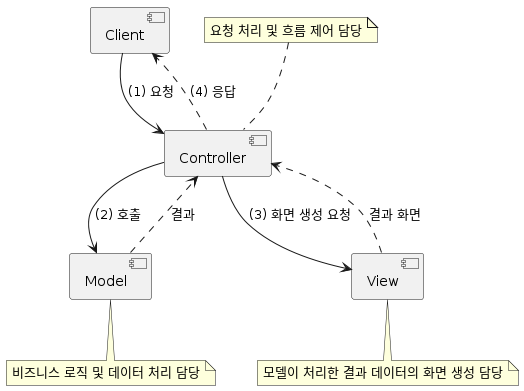
- 역할의 분담을 통해 UI와 비즈니스 로직을 분리시켰다.
Controller - 요청처리 및 흐름 제어 담당
Model - 비즈니스 로직 및 데이터 처리 담당
View - 모델이 처리한 결과 데이터의 화면 생성 담당
JavaBeans/JSP/Servlet (JSP Model2)
Servlet -> Controller
JavaBeans -> Model
JSP -> View
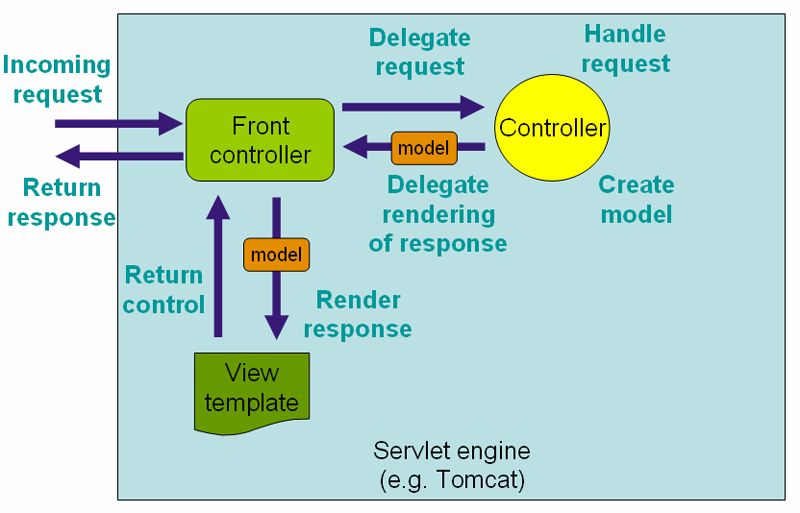
Front Controller Pattern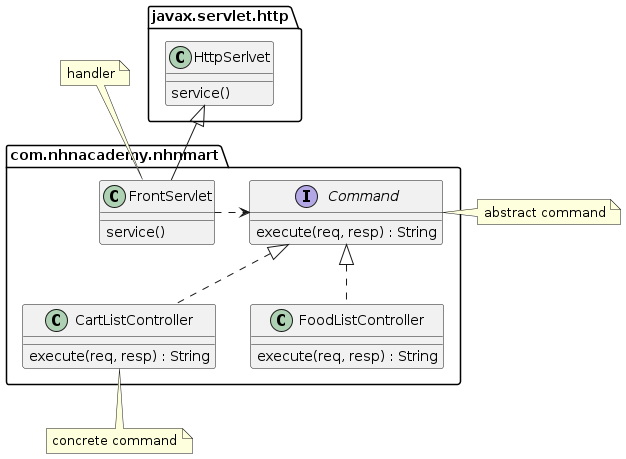
Front Controller -> 요청을 앞에서 우선적으로 처리한다
Spring MVC에서 Front Controller
Dispatcher Servlet
- Spring MVC Framework의 중심이 되는 Servlet
- Controller로 향하는 모든 웹 요청의 entry point
- Front Controller 디자인 패턴의 표현
Root ApplicationContext - implements ServletContextListener
ServletContextListener 를 구현한 구현체
Servlet Context를 관리함
<listener>
    <listener-class>org.springframework.web.context.ContextLoaderListener></listener-class>
</listener>

<context-param>
    <param-name>contextClass</param-name>
    <!-- ... -->
</context-param>

<context-param>
    <param-name>contextConfigLocation</param-name>
    <!-- ... -->
</context-param>
Servlet Application Context - Dispatcher Servlet : Spring MVC의 default Servlet
dispatcher servlet을 관리한다
<servlet>
   <servlet-name>dispatcherServlet</servlet-name>
   <servlet-class>org.springframework.web.servlet.DispatcherServlet</servlet-class>
   <init-param>
       <param-name>contextClass</param-name>
       <!-- ... -->
   </init-param>
   <init-param>
       <param-name>contextConfigLocation</param-name>
       <!-- ... -->
   </init-param>
</servlet>
ApplicationContext vs WebApplicationContext
WebApplicationContext = ApplicationContext + ServletContext
기존 Application Context에다가 Dispatcher Servlet의 기능을 추가한게 WebApplication Context라고 보면 된다.
Configuration
@EnableWebMvc 태그를 달아줘야 한다
Customizing with @EnableWebMvc
- WebMvcConfigurer 인터페이스 구현
Spring MVC에 필요한
add~~ : 새로운 빈이나 오브젝트를 추가하는것
* configure~~ : 설정작업을 하는것
Customizing without @EnableWebMvc
- WebMvcConfigurationSupport 클래스 상속
Demo
WebApplicationInitializer
- WebApplicationInitializer를 사용하면 Web.xml을 사용하지 않고도 구성할 수 있다
- AbstractAnnotationConfigDispatcherServletInitializer을 상속받아서 구성한다
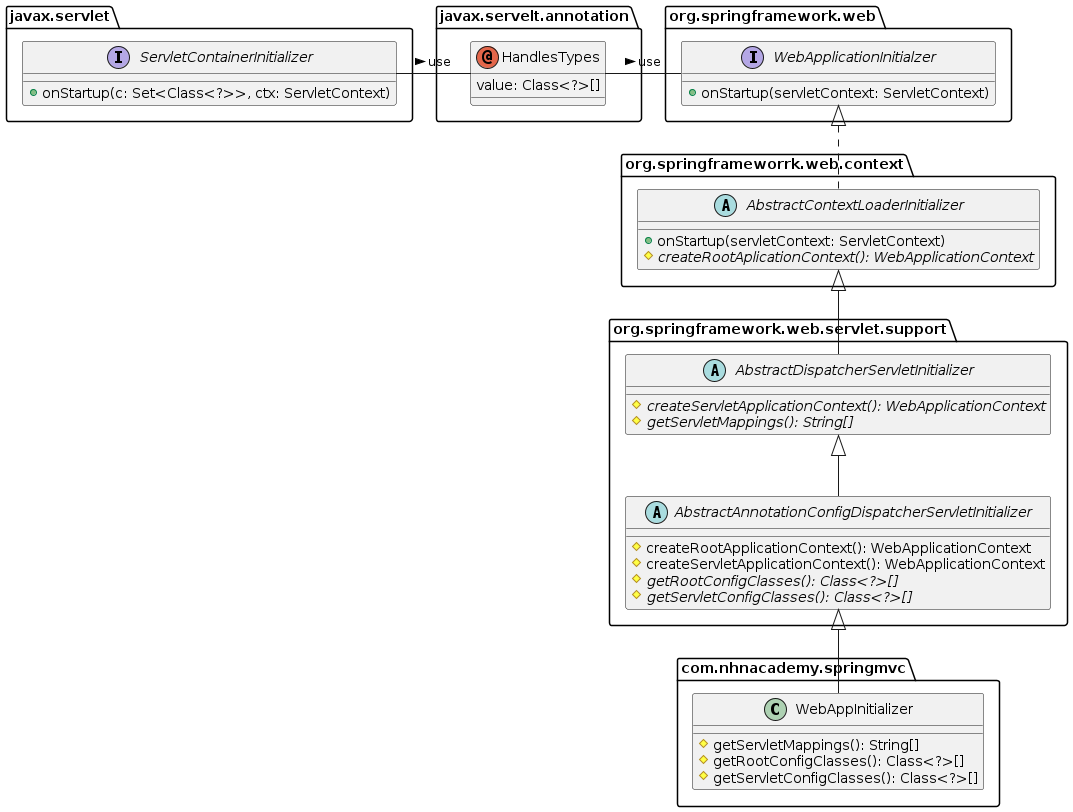
SpringServletContainerInitializer - SpringContainer 기반의 코드구성을 해준다
@HandlesTypes(WebApplicationInitializer.class)
public class SpringServletContainerInitializer implements ServletContainerInitializer {
	@Override
	public void onStartup(Set<Class<?>> set, ServletContext servletContext) {
        // ...
    }
}
위 클래스가 수행되면 onStartUp()에 구현체가 전달되어서 초기화 과정을 거치게 된다
WebApplicationInitializer
public interface WebApplicationInitializer {
	void onStartup(ServletContext servletContext) throws ServletException;
}
Web.xml 파일 없이 구성을 하려 하면, 두가지 방법이 존재한다
1) WebApplicationInitializer을 직접 구현
2) AbstractAnnotationConfigDispatcherServletInitializer을 상속받아 필요한 것 사용하기
필요한 방법대로 선택하여 수행하면 된다
Spring MVC 그림 다시 보니...
FrontController 의 역할은 Dispatcher Servlet이 한다.
Model : Spring Bean (Pojo)
View : JSP
Controller : ?
Controller
- MVC 패턴에서 Controller 역할
* 요청 처리 흐름 및 흐름 제어 담당 - Front Controller 패턴에서 Command Interface 구현 클래스에 해당
* 실제 웹 요청을 처리함
구현
@Controller : Stereo type Bean중 하나로 component scan을 통해 등록된다.
@Controller                         // <-- Controller 임을 지정
public class HomeController {
    @GetMapping("/")                // <-- HTTP Method 지정, URL 맵핑
    public String index() {
        return "index";             // <-- view 이름 지정
    }
}
@RestController : View가 아니라 응답값을 반환(Response)
- @RestController = @Controller + @ResponseBody
- @Controller가 view 이름을 반환하면 ViewResolver가 view를 처리하는 반면
- @RestController는 ViewResolver가 아닌 HttpMessageConverter가 응답 객체를 처리
@RestController
@RequestMapping("/persons")
public class PersonController {
    /*
            GET /persons/12345

            HTTP/1.1 200 OK
            Content-type: application/json;charset=UTF-8

            {
                "name": "dongmyo",
                "age": 19,
                "address": "Ulsan, Korea"
            }
     */
    @GetMapping("/{id}")
    public Person getPerson(@PathVariable Long id) {
        // ...
    }

    /*
            POST /persons
            {
                "name": "dongmyo",
                "age": 19,
                "address": "Ulsan, Korea"
            }

            HTTP/1.1 201 Created
     */
    @PostMapping
    @ResponseStatus(HttpStatus.CREATED)
    public void add(@RequestBody Person person) {
        // ...
    }
}
Request Mapping
@RequestMapping : 요청을 Controller method에 Mapping한다
@RequestMapping("/persons") = @RequestMapping(value = "/persons")@RequestMapping을 통한 HTTP Method Mapping
@RequestMapping(value = "/persons", method=RequestMethod.GET)
@RequestMapping(value = "/persons", method=RequestMethod.POST)
@RequestMapping(value = "/persons", method=RequestMethod.PUT)
@RequestMapping(value = "/persons", method=RequestMethod.DELETE)
@RequestMapping(value = "/persons", method=RequestMethod.PATCH)
@RequestMapping(value = "/persons", method=RequestMethod.HEAD)
@RequestMapping(value = "/persons", method=RequestMethod.OPTIONS)
@RequestMapping(value = "/persons", method=RequestMethod.TRACE)

으로 쓸 수 있고, 또 줄여서 쓸 수 있다

@GetMapping == @RequestMapping(method=RequestMethod.GET)
@PostMapping == @RequestMapping(method=RequestMethod.POST)
@PutMapping == @RequestMapping(method=RequestMethod.PUT)
@DeleteMapping == @RequestMapping(method=RequestMethod.DELETE)
@PatchMapping == @RequestMapping(method=RequestMethod.PATCH)
Request Mapping (w/params)
id parameter가 있는 경우에만
@RequestMapping(method = RequestMethod.GET, params = { "id" })id parameter가 없는 경우에만
@GetMapping(params = { "!id" })type parameter 값이 raw인 경우에만
@GetMapping(params = "type=raw")type parameter 값이 raw가 아닌 경우에만
@GetMapping(params = "type!=raw")Controller Method
`java @GetMapping("/") public String index() { // return type: String, method argument: 없음 return "index"; } @GetMapping("/{id}") public Person getPerson(@PathVariable Long id) { // return type: Person // ... // method argument: @PathVariable return person; } @PostMapping public String doLogin(Member loginInfo, HttpSession session) { // return: redirect:'
// ... // method argument: HttpSession
return "redirect:/login";
}
Controller Method에서 사용 가능한 method argument 및 return type
- HttpServletRequest, HttpServletResponse, HttpSession, WebRequest
- Locale
- InputStream, OutputStream, Reader, Writer
- @PathVariable, @RequestParam, @RequetHeader, @CookieValue, @Value
- Map, Model, ModelMap, @ModelAttribute, @RequestBody
- Errors, BindingResult, ...
return type:
- ModelAndView, View
- Map, Model, ModelMap
- String
- void
- @ResponseBody
- POJO
Model로 이용할 수 있는 타입:
- java.util.Map interface
- org.springframework.ui.Model interface
- org.springframework.ui.ModelMap class
Model에 설정한 속성(Attribute)이 View에 req.attribute로 전달된다
ModelAndView : Model + View
@GetMapping("/some-request")
public ModelAndView doSomething() {
    ModelAndView mav = new ModelAndView("viewName");
    mav.addObject("name", "value");
    // ...

    return mav;
}
// 생성자에 ViewName을 넣어주면 return 할때 해당 View로 이동한다.
// 또한 ModelAndView에 Attribute를 넣어주면 JSP에서 꺼내 쓸 수 있다.
@RequestParam : 요청 Parameter 받아오기
- 요청 URL의 Query String을 처리하기 위한 어노테이션
//요청 URL
GET http://localhost:8080/persons?order=-createdAt

//Controller Method
@GetMapping("/persons")
public List<Person> getPersons(@RequestParam(name="order") String order) {
    // ...
}
@PathVariable : 요청 URL의 가변인자 가져오기
- 요청 URL의 Resource(Path)을 처리하기 위한 Annotation
* @RequestMapping의 Path에 변수명을 입력받기 위한 placeholder가 필요함
//요청 URL
GET http://localhost:8080/persons/99499102

//Controller Method
@GetMapping("/persons/{personId}") //{} <- placeholder
public List<Person> getPersons(@PathVariable(name="personId", required=true) Long personId) {
    // ...
}
@RequestHeader : 요청의 HTTP헤더를 처리하기 위한 Annotation. 요청 Header 값 읽기
//요청
GET /some-request HTTP/1.1
Host: localhost:8080
User-Agent: Mozilla/5.0 (Windows NT 10.0; Win64; x64) AppleWebKit/537.36 (KHTML, like Gecko) Chrome/100.0.4896.127 Safari/537.36

//Controller Method
@GetMapping("/some-request")
public List<User> getUsers(@RequestHeader(name = "User-Agent") String userAgent) {
    // ...
}
@CookieValue : HTTP Cookie 값 읽기
@GetMapping("/some-request")
public List<Person> getPersons(@CookieValue(name = "SESSION") String sessionId) {
    // ...
}
URL Pattern
- Servlet에서 패턴
/: default servlet
/: 하위 경로 전체
ex.) /foo/bar/*
/foo/bar/1 (O)
/foo/bar/1/2/3.html (O)
/foo/var (X)
*.do: 확장자 매칭 (확장자가 .do인 경우) - Spring MVC에서 패턴
Ant Style 지원
? : 1글자 매칭
: 0글자 이상 매칭
* : 0글자 이상 하위 경로 매칭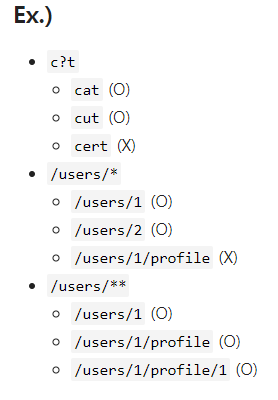
@ModelAttribute
메서드 인자로 선언된 경우 : 모델에서 속성값을 추출할 때 사용
@PostMapping("/user/register")
public String registerUser(@ModelAttribute UserRegisterRequest userRequest) {
    // ...
}
메서드에 선언된 경우 : 모든 @RequestMapping에 앞서 호출되어 공통 속성을 제공한다
@ModelAttribute("user")
public User getUser(@PathVariable("userId") String userId) {
    return userRepository.getUser(userId);
}
예외 처리(Exception Handling)
@ExceptionHandler
- 예외 처리 메서드에 annotation으로 지정
@ExceptionHandler({UserNotFoundException.class})          // <-- 어떤 예외를 처리할 것인지 선언
// --> method argument로 여러 객체들을 선언할 수 있다.
public String handleException(UserNotFoundException ex, HttpServletResponse response) {
    // ...

    // --> method return value로 여러 객체들을 반환할 수 있다.
    return "error";
}
@ExceptionHandler에서 사용 가능한 Method Argument와 Return type
- method args
HttpServletRequest, HttpServletResponse, HttpSession, WebRequest
Locale
InputStream, OutputStream, Reader, Writer
Map, Model, ModelMap - return type
ModelAndView, View
Map, Model, ModelMap
String
void
@ResponseBody
POJO
Controller 기반 예외처리
@ExceptionHandler + @ResponseStatus
@ExceptionHandler(UserNotFoundException.class)
@ResponseStatus(HttpStatus.NOT_FOUND)
public void notFound() {
    // nothing to do
}
@ExceptionHandler + View
@ExceptionHandler(UserNotFoundException.class)
@ResponseStatus(HttpStatus.NOT_FOUND)
public String notFound(UserNotFoundException ex, Model model) {
    model.addAttribute("exception", ex);
    return "error";
}
@ExceptionHandler + @ResponseBody + HttpMessageConverter
@ExceptionHandler(Exception.class)
@ResponseBody
public ErrorDto handleException(Exception ex) {
    // ...
    // 예외를 처리하고 에러 메세지를 담은 `ErrorDto` 객체를 생성해서 반환
    return errorDto;
}
@ControllerAdvice : @Component의 일종으로 component scanning 과정에서 자동으로 Bean을 등록한다
@ControllerAdvice
public class WebControllerAdvice {
    @ExceptionHandler({ UserNotFoundException.class, PostNotFoundException.class })
    public String handleException(Exception ex, Model model) {
        log.error("resource not found", ex);
        model.addAttribute("exception", ex);
        return "error";
    }
}
입력 값 검증 : Validation
Bean Validation - Java SE,EE에서 사용되는 JavaBeans에 대한 검증용 Java API
API and Implementation
API
<dependency>
    <groupId>jakarta.validation</groupId>
    <artifactId>jakarta.validation-api</artifactId>
    <version>2.0.2</version>
</dependency>

IMPL
<dependency>
    <groupId>org.hibernate.validator</groupId>
    <artifactId>hibernate-validator</artifactId>
    <version>6.2.3.Final</version>
</dependency>
Bean Validation Annotation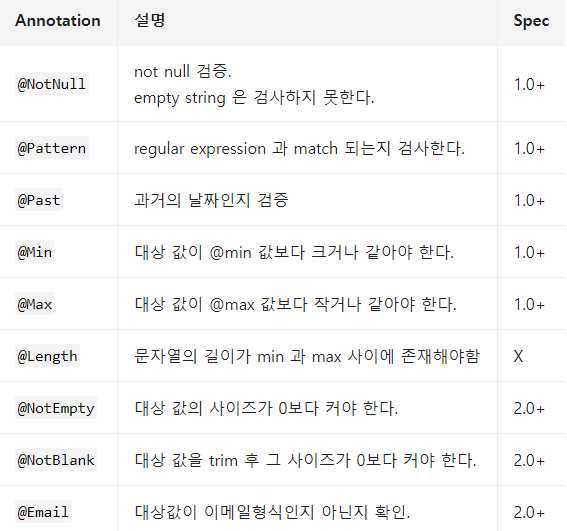
사용예시
@Value
public class UserModifyRequest {
    @NotNull
    @Size(max = 50)
    String name;

    @Min(0)
    int age;
}
Bean Validation 적용
- Controller Method signature 에서
요청 객체에 @Valid 또는 @Validated annotation 적용하고
바로 그 다음 argument로 BindingResult 또는 Errors 객체를 선언한 후 - Controller Method 본문에서
* 앞서 선언한 BindinResult 또는 Errors 객체를 이용해서 Validation 결과 확인
예시
public String modifyUser(@Valid @ModelAttribute UserModifyRequest userRequest,
                         BindingResult bindingResult) {
    if (bindingResult.hasErrors()) {
        throw new ValidationFailedException(bindingResult);
    }

    // ...
}
Spring Validation
Validator Interface
public interface Validator {
	boolean supports(Class<?> clazz);
	void validate(Object target, Errors errors);
}