Spring Framework Dependency InJection 방법
1) Construction Injection
2) Setter Injection
3) Field Injection
- Construction Injection을 사용하라고 가이드 하지만, Field Injection도 자주 사용한다.
Construction Injection
생성자 주입 방식을 사용하여 의존성 주입
XML을 사용하여 자바에서 사용하던 의존성 주입을 대신 작성한다
<bean id="testService" class="com.exam.edu.springframework.test.testService" >
        <constructor-arg ref="testRepo" />
 </bean>
public class ConstructorInjectionMain {
public static void main(String[] args) {
try (ClassPathXmlApplicationContext context = new ClassPathXmlApplicationContext("beans.xml")) {
testService service = context.getBean("testService", testService.class);
service.greet();
}
}
}Setter Injection
Setter Method를 사용해서 의존성 주입
클래스 생성할 때 Setter Method를 작성해 의존성을 주입한다
<bean id="testService" class="com.exam.edu.springframework.test.testService" >
        <property name="testRepo" ref="testRepo" />
</bean>
public class TestService{
private Test test;
public TestService() {}
public void settester(Test test) {
System.out.println("setTester invoked!");
this.test = test;
}
}Autowired Injection(byType)
필드 인젝션 방법.
- byType
- byName
- Constructor
다음과 같은 세가지 방법으로 Autowired Injection을 사용할 수 있다.
<bean id="test" class="com.exam.edu.springframework.test.myTester" scope="prototype">
</bean>

<bean id="testService" class="com.exam.edu.springframework.test.TestingService" autowire="byType">
</bean>
byType 방식으로 autowire를 하려면 해당되는 type의 bean이 1개만 존재해야 함<bean id="test" class="com.exam.edu.springframework.test.myTester" scope="prototype">
</bean>
<bean id="testService" class="com.exam.edu.springframework.test.TestingService" autowire="byName">
</bean>
이 경우, 이름으로 Binding이 되므로, TestService.Java에서 set( ){}메소드를 적어놔야 바인딩이 된다.
byType과는 다르게 setMethod를 설정한 만큼 바인딩이 된다.하지만 비 명시적, 이름에 대한 강한 결합성 때문에 둘다 잘 사용하지 않는다.
Annotation 기반 설정
xml 방식으로 Bean 의존성 주입을 Annotation으로 구현 가능
하지만 Annotation 기반으로 동작하려면 context 네임스페이스가 동작하도록 수정해야 한다.
http://www.springframework.org/schema/context http://www.springframework.org/schema/context/spring-context.xsd
 <context:annotation-config />
--> 어노테이션 사용 명시
@Required : 반드시 의존성이 주입되어야 한다는 것을 강조하는 Annotation(Spring Framework 5 부터 Depreciated)
컴파일타임에 에러가 발생하여 오류 방지를 할 수 있게 해줌.
<bean class="org.springframework.beans.factory.annotation.RequiredAnnotationBeanPostProcessor" />
추가해야 사용 가능. 하지만 Legacy 말고는 굳이?
@Autowired는 다양한 위치에 적용이 가능하다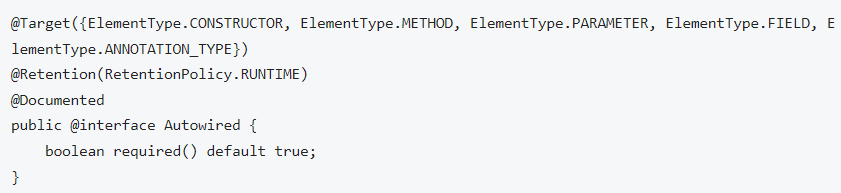
그 중, 생성자에 @Autowired를 설정하는게 Spring Framework에서 권장하는 방식이다
Spring 4.3부터 생성자가 1개인 경우 생략 가능하다
public class TestService {
    private final Tester tester;

    @Autowired
    public TestService(Tester tester) {
        this.tester = tester;
    }

    public void test() {
        tester.sayHello();
    }
}
같은 타입의 객체가 여러개 존재하는 경우, 배열이나 Collection으로 의존성을 주입할 수 있다
public class TestingService {
    private final List<Tester> testers;

    @Autowired
    public TestingService(List<Tester> testers) {
        // EnglishTester, KoreanTester 스프링 빈이 주입 됨.
        // 순서는 알 수 없다.
        this.testers = testers;
    }

    public void test() {
        testers.forEach(Tester::sayHello);
    }
}
@Required가 Depreciated된 이유는 @Autowired에 required 속성이 존재하기 때문이다.
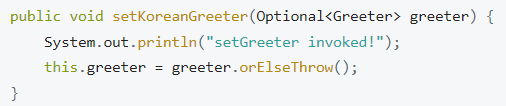
Spring Bean을 Optional 타입으로 받으면 자동으로 Required = false가 된다.
빈 설정에 Primary를 설정하면 같은 타입의 빈이 있어도 우선 적용이 가능하다
<bean id="Greeter" class="com.exam.edu.springframework.ioc.helloworld.MaxGreeter" scope="prototype" primary="true" >
</bean>
그러면 Primary가 두개 있으면 어떻게 되는가? -> 에러가 난다(Bean이 2개인경우 2개에 Primary 적용시) 왜냐하면 같은 계급(?)의 Bean이 2개가 있어서 명시적이지 못하기 때문
하지만 1곳에만 Primary가 있으면 명시적으로 무엇을 우선적으로 처리할 지 알 수 있기 때문에 에러가 나지 않는다.
@Qualifier
- @Autowire시, @Qualifier를 지정하여 Bean의 이름으로 의존성을 주입 할 수 있다.
public class TestService {

    private final Tester tester;

    @Autowired
    public TestService(@Qualifier("koreanTester") Tester tester) {
        this.tester = tester; // koreanTester라는 이름이 있는 Bean을 주입하라
    }

    public boolean test() {
        // 인터페이스의 메소드를 호출하지만 실제 구현 객체의 메소드가 실행됩니다.
        return test.sayHello();
    }
}
커스텀 @Qualifier - 개발자가 직접 Qualifier를 대신하는 어노테이션을 만들 수 있다
@Target({ElementType.FIELD, ElementType.PARAMETER})
@Retention(RetentionPolicy.RUNTIME)
@Qualifier
public @interface Lang {
    String value(); // Lang 어노테이션의 속성값이 된다
}
@Value : 주로 외부 속성을 주입하기 위해 사용
외부 속성은 src/main/resource 디렉토리에 ~~~.properties에 다음과 같이 설정하면 된다.
tester.properties
from=Manty (key = from, value = Manty), 환경이 다양할 때 적용하는법 알아야 한다beans.xml
<beans>
  ....
  <context:property-placeholder location="classpath:tester.properties" />
</beans>
public class TestingService {
private final Tester tester;
@Value("${from}")
private String from;
@Autowired
public TestingService(@Qualifier("koreantester") Tester tester) {
this.tester = tester;
}
public boolean greet() {
// 인터페이스의 메소드를 호출하지만 실제 구현 객체의 메소드가 실행됩니다.
System.out.println("From : " + from);
return tester.sayHello();
}
}New로 생성하면 @Value 설정을 해주어도 from값은 Null 이 나온다.
Java Configuration
Java Based Bean Configuration - Spring IoC 컨테이너 설정을 순수한 Java로만 작성할 수 있는 도구
Spring JavaConfig 클래스 작성
- Spring JavaConfig 클래스에는 @Configuration 어노테이션 설정해야 함
- Spring JavaConfig 클래스에는 @Bean 어노테이션 설정한 메소드로 구성해야 함
Bean 생성
@Configuration
public class JavaConfig {
    @Bean/*(name = "dbms")*/ --> 메소드 이름이 곧 Bean 이름임
    public String dbms() {
        return new String("MYSQL");
    }
}
위 자바 코드는 이 XMl 코드를 자바 코드로 변경한 코드이다.
<bean id="dbms" class="java.lang.String">
        <constructor-arg type="java.lang.String" value="MYSQL" />
</bean>
Default - default 메소드를 가진 인터페이스를 구현하는 방식으로 두 설정을 합성할 수 있다
public interface BaseJavaConfig {
    @Bean
    default String dbms() {
        return new String("MYSQL");
    }
}

@Configuration
public class JavaConfig implements BaseJavaConfig{
// -> interface 를 구현하면 @Bean을 달지 않아도 자동으로 등록된다
}
AnnotationConfigApplicationContext
AnnotationConfigApplicationContext의 생성자 파라미터로 받을 수 있는 클래스는 다음과 같다.
- AnnotationConfigApplicationContext(Class<?>... componentClasses)
@Configuration 설정한 클래스
@Component 설정한 클래스
AnnotationConfigApplicationContext의 생성자 파라미터에 basePackages(문자열) 를 사용하면 패키지 하위의 Component 설정한 클래스를 검색하여 등록한다.
- AnnotationConfigApplicationContext(String... basePackages)
xml 대신 Java 기반 설정을 하기 위해서는 AnnotationConfigApplicationContext를 사용
package com.nhnacademy.edu.springframework.greeting;

import org.springframework.context.annotation.AnnotationConfigApplicationContext;

public class AnnotationMain {

    public static void main(String[] args) {
        AnnotationConfigApplicationContext context =
                new AnnotationConfigApplicationContext("com.exam.edu.spring.greeting");
    }
@Configuration
@ImportResource("classpath:/beans.xml") // ("") 을 읽으면 Import해라
public class MainConfig {
} -> Annotation을 사용하면 xml을 읽을 필요가 없지만 과도기적 설정에 따라 (xml에 bean들이 등록되어 있는데, 자바 코드에는 없는 경우) context에서 하위 패키지를 읽는다(new AnnoContext"com.exam.~.test"). 그 패키지중 @Configuration을 통해 등록된 @ImportResource 에서 ("classpath:/bean.xml")에 등록된 Bean들을 읽는다
Bean LifeCycle
@Bean Annotation에 빈의 생성, 소멸 콜백 메소드 지정할 수 있다.
xml에서 init-method, destroy-method 속성과 동일하다
public class TestingService {
    private final Tester tester;

    @Autowired
    public TestingService(@TestterQualifier(language = Language.KOREAN, dummy = false) Tester tester) {
        this.tester = tester;
    }

    public void test() {
        tester.sayHello();
    }

    public void init() {
        System.out.println(this.getClass().getCanonicalName()+ ": init!!");
    }

    public void cleanup() {
        System.out.println(this.getClass().getCanonicalName()+ ": cleanup!!");
    }
}


@Configuration
public class BeanConfig {
    @Bean(initMethod = "init", destroyMethod = "cleanup")
    public TestingService testingService(Tester tester) {
        TestingService testingService = new TestingService(tester);
        return testingService;
    }
}
암묵적인 Destroy Method
Empty 클래스에 Public인 close, shutdown 메소드가 존재하면 자동으로 소멸 callback으로 등록된다.
이를 비활성화 하고 싶으면 @Bean(destroyMethod="")을 설정하면 된다.
@Bean(destroyMethod="")
public DataSource dataSource() throws NamingException {
    return (DataSource) jndiTemplate.lookup("MyDS");
}
Bean Scope
@Bean annotation을 사용한 경우, @Scope를 설정해서 scope를 설정할 수 있다
@Bean
@Scope("prototype")
public Greeter koreanGreeter() {
    return new KoreanGreeter();
}
Bean Naming
- java configuration에서 선언한 Spring Bean의 이름은 메소드 이름이다
@Bean // BeanName : koreanTester
public Tester koreanTester(){
	return new koreanTester();;
}
@Bean(name = "korean") // 이름을 korean으로 명시 가능하다
public Tester koreanTester(){
return new koreanTester();
}
Bean Aliasing - Spring Bean의 이름을 두개 이상 설정
```java
@Bean(name={"korean", "koreanTester"})
public Tester koreanTester() {
}Bean Dependencies
메서드 호출 - 빈이 같은 클래스 내부에서 선언된 경우에만 사용할 수 있다
@Configuration
public class JavaConfig {
    @Bean
    public ARepository aRepository() {
        return new ARepositoryImpl();
    }

    // with method parameter
    @Bean
    public AService aService() {
        return new AService(aRepository());
    }
}
하지만 싱글톤으로 선언된 Bean이 두번 선언된다면 어떻게 될 것인가?
--> CGLIB 기술을 사용하여 scope에 따라 Spring Bean 반환한다
@Configuration
public class JavaConfig {
    @Bean
    @Scope("singleton")
    public ARepository aRepository() {
        return new ARepositoryImpl();
    }

    @Bean
    public AService aService() {
        return new AService(aRepository());
    }

    @Bean
    public BService bService() {
        return new ASergice(aRepository());
    }
}
다른 곳에서 설정된 Bean으로 의존성 주입을 하기 위해 @Autowired annotation을 사용할 수 있다.
@Configuration
public class JavaConfig {
    @Autowired
    private ARepository aRepository;

    @Bean
    public AService aService() {
        return new AService(aRepository);
    }

    @Bean
    public BService bService() {
        return new ASergice(aRepository);
    }
}
빈 생성의 조건
@Conditional Annotation
조건에 따라서 @Configuration이나 @Bean이 동작하거나/하지않게 설정할 수 있다.
@Conditional은 Condition 인터페이스 구현을 설정해야 한다.
Condition 인터페이스는 matches 메소드를 제공하는데, 반환값이 true이면 설정이 동작한다.
False이면 동작하지 않는다
@Conditional(TestCondition.class)
@Bean
public TestingService testingService(Greeter greeter) {
    TestingService testingService = new TestingService(tester);
    return testingProcessor;
}
class TestCondition implements Condition {

    @Override
    public boolean matches(ConditionContext context, AnnotatedTypeMetadata metadata) {
        return true;
    }
}
ex) @Profile 어노테이션이 @Conditional 을 활용한 예시이다
Bean Scanning
@Configuration, @Component, @Controller, @Service, @Repository 등 어노테이션이 달려있으면 자동으로 Bean Scanning을 수행해서 자동으로 등록한다.
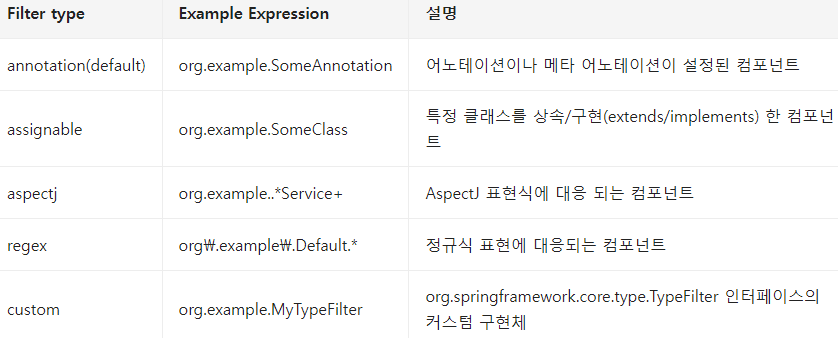
Component Scan - Filter
Component 내부에서 Bean 사용
- @Component 클래스에서도 @Configuration과 마찬가지로 @Bean 선언 가능
- @Configuration 클래스에서 작성한 것과 마찬가지로 @Scope, @Qualifier, @Lazy 등을 사용가능
@Component
public class FactoryMethodComponent {

    @Bean
    @Qualifier("public")
    public TestBean publicInstance() {
        return new TestBean("publicInstance");
    }

    public void doWork() {
        // Component method implementation omitted
    }
}
Component Bean Name
@Service
public class SimpleMovieStar{ // Bean name : simpleMovieStar(클래스지만 소문자시작)

}
@Service("myMovieStar")
public class SimpleMovieStar{ // Bean name : myMovieStar
}
