
왜 이런 기능은 없는가?
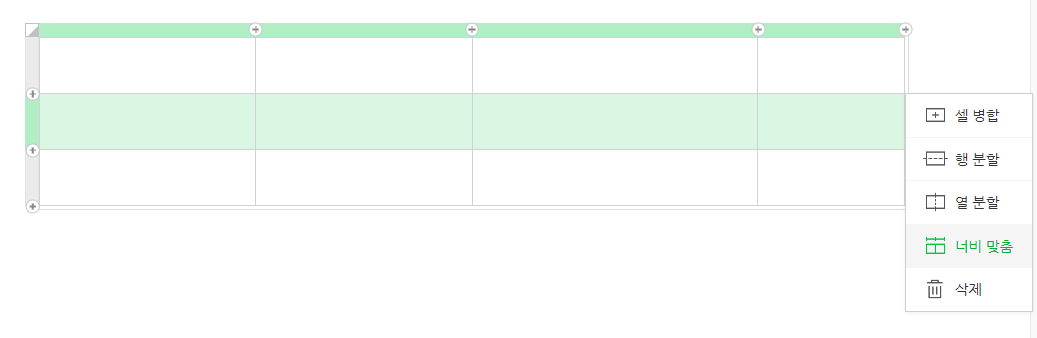
네이버 블로그 에디터에서 테이블을 만들면, 이렇게 너비 간격을 자동으로 맞춰주는 기능이 있습니다. 포폴겸 직접 사용할 블로그를 만들면서 최근에 에디터를 Markdown Editor에서 WYSIWYG기반 Rich Text Editor인 CKEditor5로 변경했습니다.
그런데, CKEditor5의 테이블 기능은 분명 좋지만, 너비 맞춤 기능은 없었습니다. 😭

그래서 직접 만들어보기로 결정!
참고로, 글쓴이는 React.js 기반의 CKEditor5 입니다.
물론 다 같은 js코드인 만큼 다른 환경에서도 활용이 어렵진 않을 것 같네요.
커스텀 버튼 제작하기
버튼을 만드는 방법은 CKEditor5의 docs에서도 잘 나와있습니다.
https://ckeditor.com/docs/ckeditor5/latest/framework/tutorials/creating-simple-plugin-timestamp.html
위의 링크는 가장 기본적인 버튼 만들기 튜토리얼입니다.
이 내용을 이해하셔야 따라가기 쉽습니다.
import { ButtonView, Plugin } from "ckeditor5";

export default class TableAutoFit extends Plugin {
  init() {
    const editor = this.editor;
    editor.ui.componentFactory.add("TableAutoFit", () => {
      const button = new ButtonView();

      button.set({
        label: "AutoFit",
        withText: true,
      });

      button.on("execute", () => {
        const model = editor.model;
        const selection = model.document.selection;
        const tableElement = selection.getFirstPosition().findAncestor("table");
        if (!tableElement) {
          return;
        }

        editor.model.change((writer) => {
          const colGroup = tableElement
            .getChildren()
            .find((child) => child.name === "tableColumnGroup");

          if (!colGroup) {
            return;
          }
          const cols = Array.from(colGroup.getChildren());
          const rate = 100 / cols.length;
          colGroup.getChildren().forEach((col) => {
            writer.setAttribute("columnWidth", `${rate}%`, col);
          });
        });
      });

      return button;
    });
  }
}
일단, 최종 코드입니다. 이제 코드를 하나씩 뜯어볼게요.
참고로 CKEditor에서 제공하는 많은 api가 있는데, 튜토리얼만 살펴보고 만들어서 엉성한 부분이 많습니다!!
먼저 아이디어입니다.
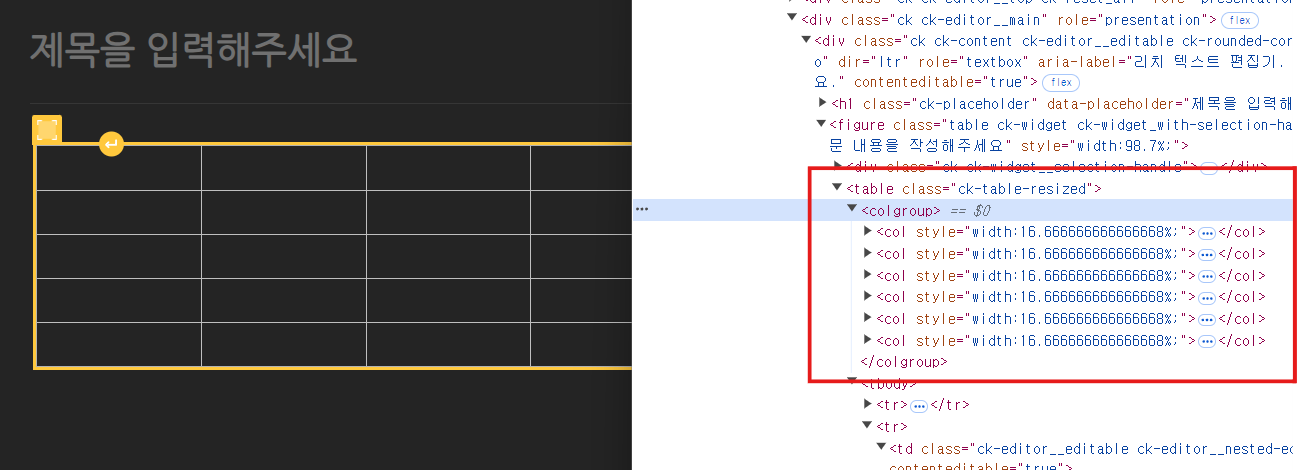
테이블의 너비를 수정하게 되면, table에 ck-table-resized 클래스가 추가되면서, child에 colgroup이 생깁니다. 그리고, colgroup안의 col들의 style을 수정하면 테이블의 각 너비가 실제로 반영됩니다.
이 점에 착안해서, 너비 맞춤 기능을 만들겁니다.
여기서 잠깐! 저도 여기까지만 보고
view만 수정했을 때 에디터에서 잘 반영되길래 성공했나 싶었는데 글을 발행해보면 전혀 적용되지 않습니다.
이런 데이터 변경은model을 수정해야 하기 때문에 html 코드보다는editor.model을 console.log로 찍어서 찾아보셔야 합니다. 👍
button.on("execute", () => {
  		// ckeditor5는 `view`와 `model`로 나뉘는데,
  		// view는 말그대로 화면에 보이는 html 코드, model은 에디터가 내부에서 관리하는 데이터입니다.
        const model = editor.model;
        const selection = model.document.selection; // 선택된 모델
        const tableElement = selection.getFirstPosition().findAncestor("table");
        if (!tableElement) {
          return;
        }
  		...
바로 버튼을 클릭했을 때 실행되는 부분만 살펴봅시다.
model.document.selection으로 선택한 모델을 가져와서, table을 가져옵니다. 만약, table이 아니라면 return으로 바로 빠져나갑니다.
...
editor.model.change((writer) => {
  const colGroup = tableElement
  .getChildren()
  .find((child) => child.name === "tableColumnGroup");

  if (!colGroup) {
    return;
  }
  const cols = Array.from(colGroup.getChildren());
  const rate = 100 / cols.length;
  colGroup.getChildren().forEach((col) => {
    writer.setAttribute("columnWidth", `${rate}%`, col);
  });
});
editor.model.change((writer) => {}는 변경된 데이터 반영을 위한 콜백함수입니다.

먼저, tableElement를 console.log로 찍어보면 위와 같이 나옵니다. children에 보시면 name: 'tableColumnGroup'가 보입니다. html 코드 구조를 보면서 colgroup에서 너비를 관리하고 있음을 알고 있었기 때문에 이 모델을 가져와야 겠네요.
const colGroup = tableElement
  .getChildren()
  .find((child) => child.name === "tableColumnGroup");
tableColumnGroup 안에는 각 컬럼의 너비를 관리하는 children이 있습니다. 각각의 자식은 attr에 columnWidth를 키로 너비 비율을 관리하고 있습니다. 이 부분을 모두 수정해서 같은 비율로 수정하면 될 것 같네요.
각 columnWidth 속성을 100/열 길이로 설정하여 너비를 균일하게 설정할 수 있습니다.
const cols = Array.from(colGroup.getChildren());
const rate = 100 / cols.length;
colGroup.getChildren().forEach((col) => {
  writer.setAttribute("columnWidth", `${rate}%`, col);
});
커스텀 버튼 적용하기
저는 Table의 Toolbar에서만 해당 버튼을 띄우고 싶기 때문에, table.contentToolbar에 커스텀 버튼을 넣었습니다.
const editorConfig = {
  	toolbar: {
    	items: [
      		...
    	],
  	},
    plugins: [
          ...
          TableAutoFit, // 커스텀 버튼 플러그인에 등록
    ],
    table: {
      contentToolbar: [
          "tableColumn",
          "tableRow",
          "mergeTableCells",
          "tableProperties",
          "tableCellProperties",
          "TableAutoFit", // <<--- 커스텀 버튼을 table.contentToolbar에 삽입.
      ],
  },
  ...
}
이러면 완성입니다.
여담으로 같은 에디터를 쓰시는 개발자 지인분이 기능을 찾아보니, 비슷한 기능이 있긴 하다고 하시네요. 셀속성에서 가로크기를 px, em, % 단위로 지정할 수 있다고 하네요. 하지만, 수정하려면 마우스로 2번 들어가고 키보드 입력까지 해야하니...
