Navigation 을 사용하다보면 네비게이션바 백그라운드 컬러에 대한 이슈를 한번쯤 만나게된다.
디자이너가 원하는 색상, 투명도 제거 같은걸 통상적으로 하게되는데 Swift 에서도 생각보다 까다로운 면이 많았다.
SwiftUI 에서는 뭔가 편한 방법이 있을까? 하고 찾아봤더니 역시나...
UIKit 의 UINavigationBar.appearance() 옵션으로 적용해보기
let coloredNavAppearance = UINavigationBarAppearance()

init() {
	coloredNavAppearance.configureWithOpaqueBackground()
	coloredNavAppearance.backgroundColor = UIColor.red
	coloredNavAppearance.titleTextAttributes = [.foregroundColor: UIColor.white]
    coloredNavAppearance.largeTitleTextAttributes = [.foregroundColor: UIColor.white]
	UINavigationBar.appearance().standardAppearance = coloredNavAppearance
	UINavigationBar.appearance().scrollEdgeAppearance = coloredNavAppearance
}
이런식으로 View 의 init 에서 UIKit 의 UINavigationBar.appearance() 를 수정하는 방법이 많이 퍼져있었다.
이 코드를 적용하면 원하는데로 네비게이션 바의 백그라운드를 설정할 수 있지만...
2번째 화면까지도 같은 색상옵션이 적용된다.
문제는 뭘까?
Navigation 이란 결국 하나의 흐름이다. 첫 루트에서부터 이동하는 화면 모두가 하나의 navigation view 를 타고 진행되기 때문에 각 화면별로 다른 navigation bar color 는 적용되기 어려운것이다.
특히 위에 UINavigationBar.appearance() 를 사용한 방법은 코드에서 보여지듯이 singleTon 의 system 객체를 건드리기 때문에 앱에서 동작하는 모든 Navigation View 의 색상이 통일되어버린다.
코드상에서야 그렇다 치지만, 실무에서 적용하다보면 중간에 하나의 화면만 네비게이션 바 색상이 다른경우가 비일비재하다.
화면별로 다른 네비게이션 바 색상을 적용하고싶다.
뷰에 진입할때마다 UINavigationBar.appearance() 를 재설정하면 어떻게되지? 결과는 실패. 다른 방법은 뭐가 있나 찾다보니 접근을 바꿔서 동일한 결과를 뽑아낸 사람들이 몇몇 눈에 보였다.
- UIKit 을 통해 NavigationBar 의 색상을 투명으로 고정한다.
- Navigation Bar 와 메인 컨텐츠 사이에 SafeArea ~> NavigationBar 영역까지 색상레이어를 추가한다.
- 이 설정들을 View Modifier 를 통해 하나의 속성으로 정의한다.
이런 식으로 설정이 가능하다. 뷰 스택으로 설명하면 아래와 같은 식이다.
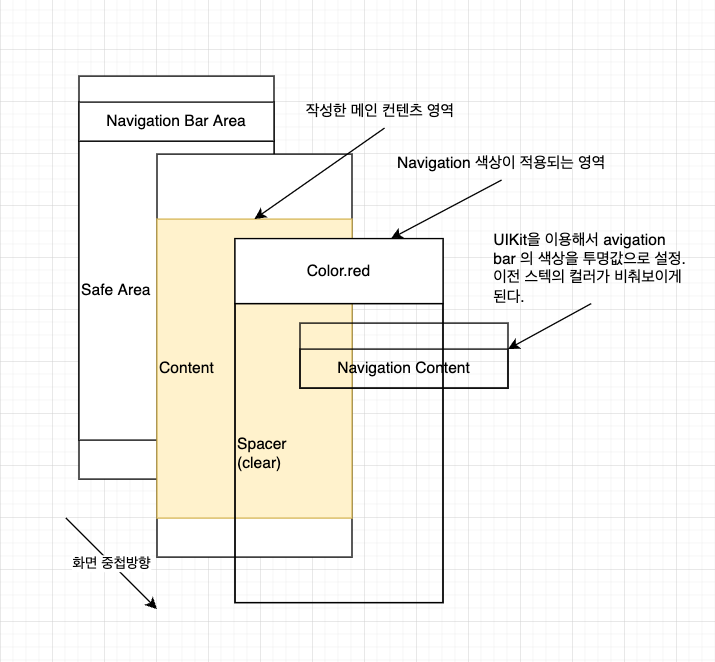
이 방식에서 중점으로 봐야하는 점은 다음과 같다.
1. Spacer 는 컨텐츠보다 위 레이어에 있지만 터치나 동작에 아무 영향이 없다.
2. 시스템이 제공하는 네비게이션 바의 옵션을 투명으로 설정해야한다.
3. navigation bar 의 색상이 적용되는 영역을 공통적으로 끼워넣을 수 있도록 작성해야 편하다.
사설이 길었으니 이걸 코드로 구현해보자.
모든 뷰에서 편하게 사용할 수 있도록 ViewModifier 로 구성했으며, init 될때 모든 네비게이션바를 투명색상으로 전환하고, modifier 가 호출된 뷰를 Zstack 으로 감싸서 NavigationBar 의 색상영역과 묶어줬다.
struct NavigationBarColorModifier<Background>: ViewModifier where Background: View {

    let background: () -> Background

    public init(@ViewBuilder background: @escaping () -> Background) {
        let coloredAppearance = UINavigationBarAppearance()
        coloredAppearance.configureWithTransparentBackground()
        coloredAppearance.backgroundColor = .clear

        UINavigationBar.appearance().standardAppearance = coloredAppearance
        UINavigationBar.appearance().scrollEdgeAppearance = coloredAppearance
        UINavigationBar.appearance().compactAppearance = coloredAppearance

        self.background = background
    }

    func body(content: Content) -> some View {
        // Color(UIColor.secondarySystemBackground)
        ZStack {
            content
            VStack {
                background()
                    .edgesIgnoringSafeArea([.top, .leading, .trailing])
                    .frame(minWidth: 0, maxWidth: .infinity, maxHeight: 0, alignment: .center)

                Spacer() // to move the navigation bar to top
            }
        }
    }
}

public extension View {
    func navigationBarBackground<Background: View>(@ViewBuilder _ background: @escaping () -> Background) -> some View {
        modifier(NavigationBarColorModifier(background: background))
    }
}
적용할때는 아래 코드처럼 NavigationView 아래에 있는 뷰에 navigationBarBackground 로 설정할 수 있다.
var body: some View {
	NavigationView {
		ScrollView {
			...
		}
		.navigationTitle("title")
		.navigationBarTitleDisplayMode(.inline)
		.background(
			Color.red.edgesIgnoringSafeArea(.all)
		)
		.navigationBarBackground({
			Color.red
        })
        ...
    }
struct SecondView: View {
var body: some View {
Color.green
.edgesIgnoringSafeArea(.all)
.navigationBarBackground ({
Color.green
})
}
}
이제 실행해보면...
완성.
마무리
결국 이 방법또한 System Navigation Bar 의 색상을 투명으로 변경해야하기 때문에 기존 앱에서 단일 화면에 대해서만 적용하는데엔 한계가 있다.
하지만 새로 만드는 앱이라면... 이 방법으로 셋팅해도 문제는 없지 않을까?
마음에 걸리는거라면 한 화면 위로 레이어가 너무 중첩된다는건데... 일단은 스크롤이나 hideOnSwipe 같은 옵션에서도 정상작동을 하고있다.
iOS 16에서는 좀 더 편한.. 커스텀 없이 컬러변경이 가능한 옵션이 있다고 하는데, 그건 먼 훗날의 이야기.