Jenkins 파이프라인
Jenkins 파이프라인은 Jenkins 작업들은 모아 순차적으로 실행하는 프로세스를 자동화한 것을 의미한다. 이를 활용해서 애플리케이션이나 웹 서비스의 CI/CD 파이프라인을 구축할 수 있다. 이때 Jenkinsfile로 파이프라인을 구성하게 된다면 Pipeline as Code를 실현할 수 있다.
Pipeline
Pipleline as Code
Pipeline 예시
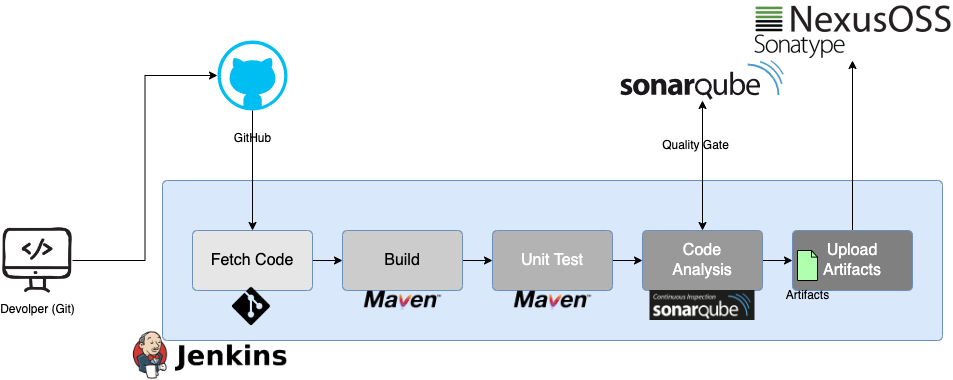
- 개발자는 코드를 작성, 수정, 로컬에서 테스트를 수행한 후 코드를 레포지토리에 푸시한다.
- Jenkins는 변경 사항을 찾아내고 git을 사용해서 코드를 가져온다.
- Java 코드인 경우 maven을 사용해서 빌드 및 유닛 테스트를 실행한다.
- Sonarqube를 사용해서 코드 분석을 실시하고 결과를 sonarqube 서버로 업로드한다. 코드 분석을 하는 이유는 작성된 코드의 취약점이나 버그가 있는지 확인하기 위함이다.
- 모든 검증을 마쳤으면 결과물을 서버에 업로드 및 배포한다.
- 결과물이 배포되기 전에 결과물들은 버전이 지정되어야하고 sonar 형식의 레포지토리인 nexus에 업로드 된다.
Setup pipeline
-
Jenkins setup
-
Nexus setup
-
Centos7, t2.medium으로 동작하는 EC2 인스턴스
-
TCP 프로토콜 8081번 포트 트래픽 허용
-
TCP 프로토콜 8081번 포트 트래픽 중 jenkins 트래픽 허용
-
User data에 Nexus 설치 스크립트 입력
-
설치 후 EC2 퍼블릭 IP:8081로 접속 후 로그인
-
VPN이나 내부망을 사용할 때 nexus의 모든 페이지가 보이지 않을 수 있어 사용할 때는 ISP망을 사용한다.
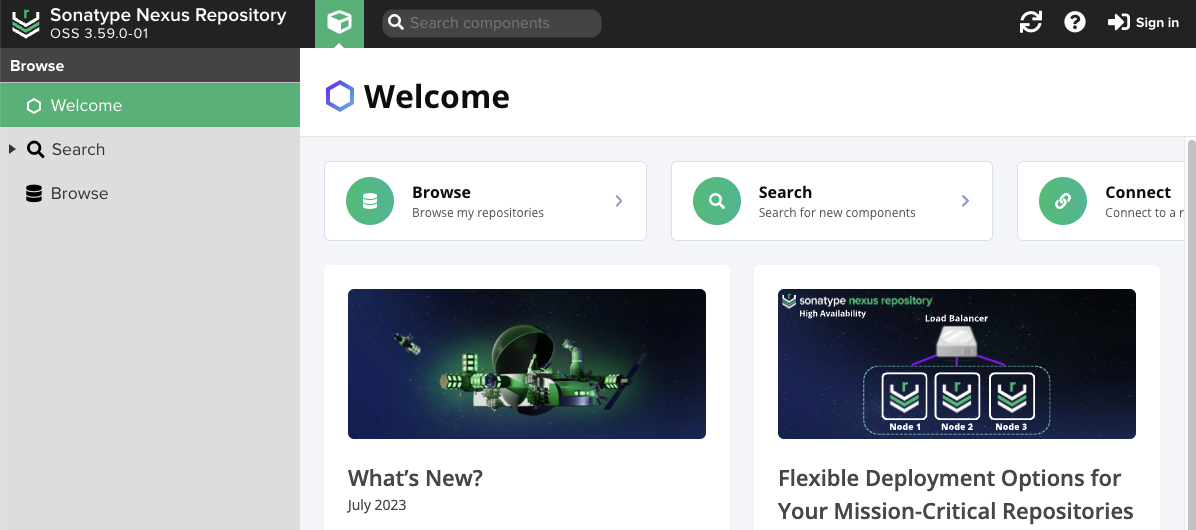
Nexus 첫 페이지
- 첫 로그인은 로그인 안내에 적인 경로의 패드워드를 사용해서 로그인
- 로그인 다음 setup 진행
-
-
-
Sonarqube setup
-
Ubuntu 20, t2.medium으로 동작하는 EC2 인스턴스
-
TCP 프로토콜 80번 포트 트래픽 허용
-
TCP 프로토콜 80번 포트 트래픽 중 jenkins 트래픽 허용
-
User data에 Sonarqube 설치 스크립트 입력
-
설치 후 EC2 퍼블릭 IP로 접속 후 로그인
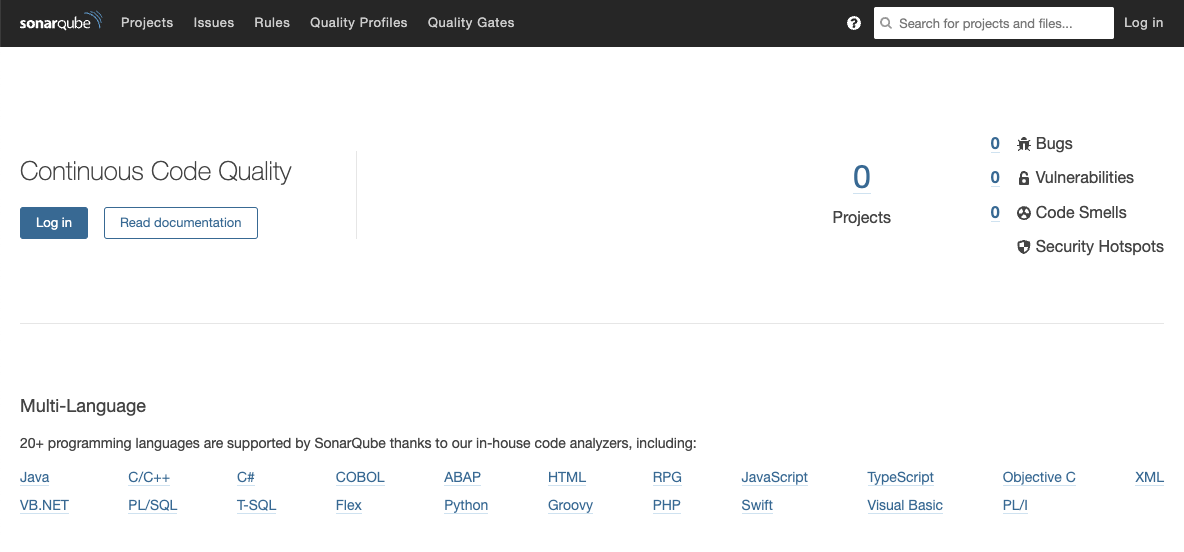
Sonarqube 첫 페이지
로그인 후 화면
-
-
Security group
- Nexus
- ssh 프로토콜, 내 IP만
- TCP 프로토콜 8081, 모든 트래픽 허용
- TCP 프로토콜 8081, jenkins 트래픽 허용
- Sonarqube
- ssh 프로토콜, 내 IP만
- TCP 프로토콜 80, 모든 트래픽 허용
- TCP 프로토콜 80, jenkins 트래픽 허용
- Nexus
-
Plugins
- Nexus - Nexus Artifacts Uploader
- Sonarqube - SonarQube Scanner
- Git
- Pipeline Maven Interagration Plugin - Pipeline Maven Integration, Pipeline Utility Steps
- BuildTimestamp
-
Integrate
- Nexus
- Sonarqube
-
Write pipeline script
-
Set notification
Pipeline as Code
-
Jenkinsfile
- Jenkinsfile을 사용한 파이프라인 셋업을 자동화
- Jenkinsfile은 CI/CD 파이프라인의 단계들을 정의한다.
- Groovy와 유사한 Pipeline DSL 문법을 사용한 텍스트 문서
- Scripted
- Declarative
-
개념
-
Pipeline : 메인 블록이며 파이프라인 실행에 필요한 모든 것은 파이프라인 내부에 있어야한다.
-
Node / Agent : 세팅 정보를 가지고 있으며 파이프라인이 실행되는 node나 agent를 정할 수 있다.
-
Stage : 실제로 작업이 실행되는 영역
-
Step : Stage 내부에서 실행되는 명령 혹은 파이프라인에서 실행하고자 하는 것
-
예시
```groovy
pipeline {       // main block
	agent any      // 작업이 실행되는 위치를 지정
	tools {        // 글로벌 tool 구성
		//
	}
	environment {  // 환경 변수
		//
	}
	stages {       // 실행할 step 작성
		stage('Build') {
			steps {    // 실제 커멘드 실행
				//
			}
			post {     // step 이후 실행
				//
			}
		stage('Test') {
			steps {
				//
			}
		stage(Deploy') {
			steps {
				//
			}
		}
	}
}
```
Create Pipeline with Code
-
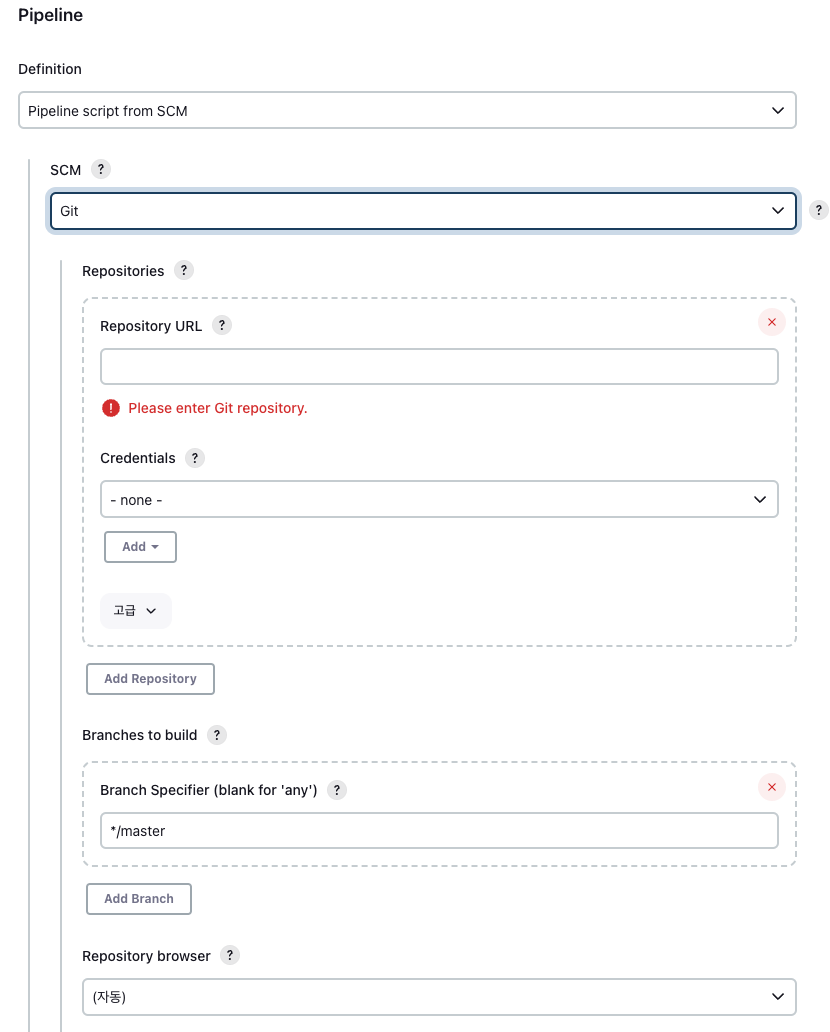
Add item에서 pipeline을 선택
-
Pipeline 탭에 pipeline 생성 스크립트를 입력 후 저장
pipeline { agent any tools { // tools에 기입하는 도구 이름은 Jenkins에 등록한 도구이름과 동일해야한다. maven "MAVEN3" jdk "OracleJDK11" } stages { stage('Fetch Code') { steps { git branch: 'main', url: 'https://github.com/hkhcoder/vprofile-project.git' } } stage('Build') { steps { sh 'mvn install -DskipTests' } post { success { echo 'Archving artifacts now.' archiveArtifacts artifacts: '**/*.war' } } } stage('UNIT TESTS') { steps { sh 'mvn test' } } } } -
Pipeline 스크립트는 레포지토리에 있는 스크립트를 사용할 수도 있다.
-
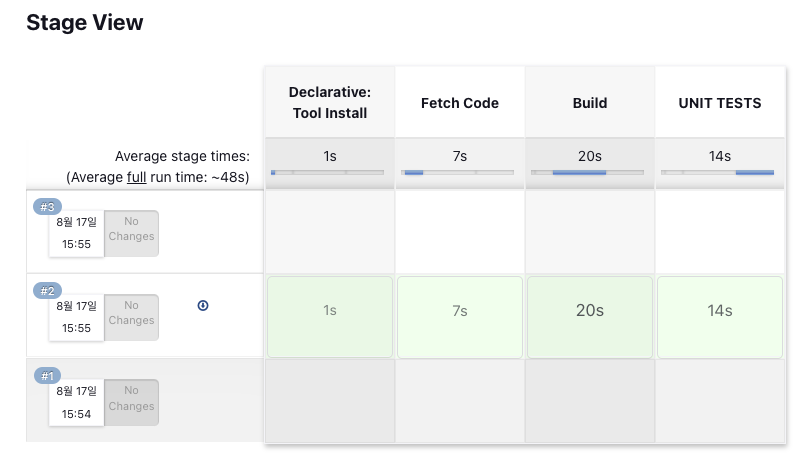
빌드를 실행하면 아래와 같이 파이프라인 스테이지가 표시된다.
-
Code Analysis
Code Analysis detects vulnerability and fuctional errors.
코드 분석 이유
- 모범 사례 - 코드를 작성할 때 다양한 사례들이 존재하지만 효율적인 코드 작성을 위해서 모범 사례를 참조해야할 필요가 있다. 모범 사례와 비교해서 작성한 코드의 문제를 발견하고 개발자가 수정할 수 있도록 한다.
- 코드 취약점 - 코드 개발을 하다보면 10대 OWASP 취약점과 같은 취약점이 발생할 수 있다. 이러한 취약점을 찾아낸다. OWASP란? OWASP 톱 10이란? | Cloudflare
- 배포 전 기능적 오류 발견 - 버그를 발견하거나 차후에 오류로 작용할 수 있는 요소를 찾아낸다.
- 코드 분석의 목표는 다양한 테스트로 코드의 품질을 높이는 것에 있다.
코드 분석 도구
- Checkstyle
- Cobertura
- Mstest
- Owasp
- SonarQube Scanner
SonarQube Scanner를 Jenkins에 연동
-
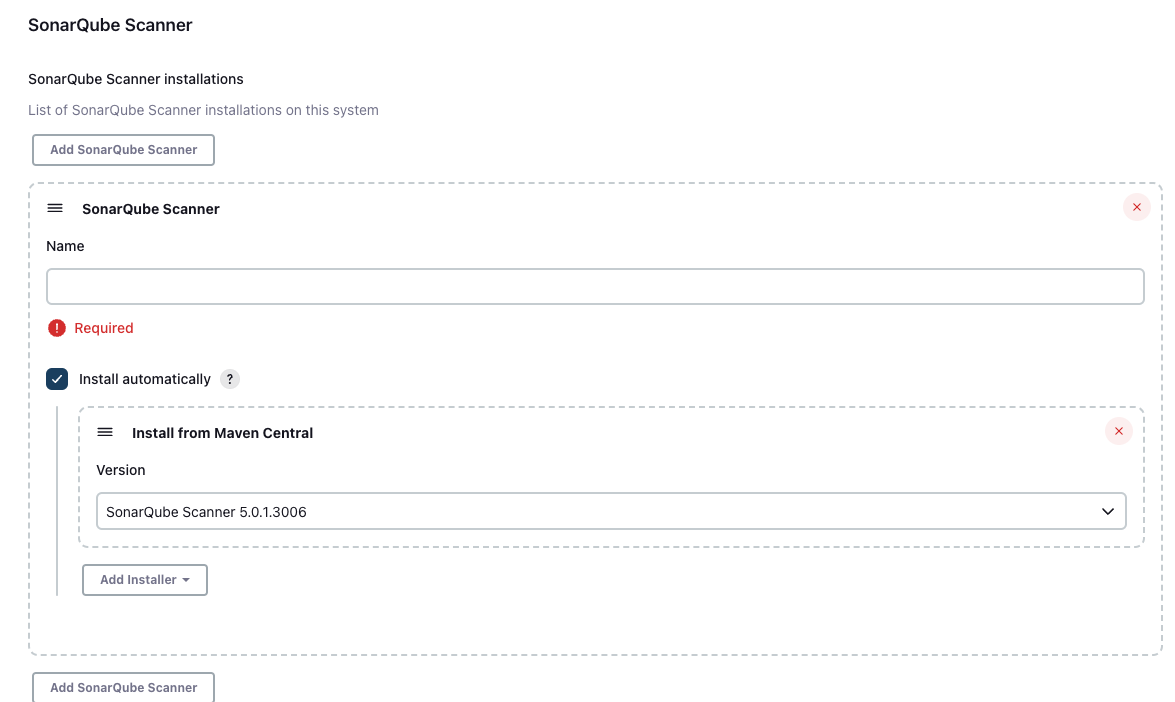
Jenkins 관리의 “Tools”에서 SonarQube Scanner를 추가
SonarQube Scanner for MSBuild도 빌드 도구가 MSBuild인 경우 사용 -
Pipeline 스크립트(Jenkinsfile)에 사용할 도구 이름과 SonarQube Scanner 버전 선택 후 저장
- Name : sonar4.7
- Versiong : SonarQube Scanner 4.7.0.2747
-
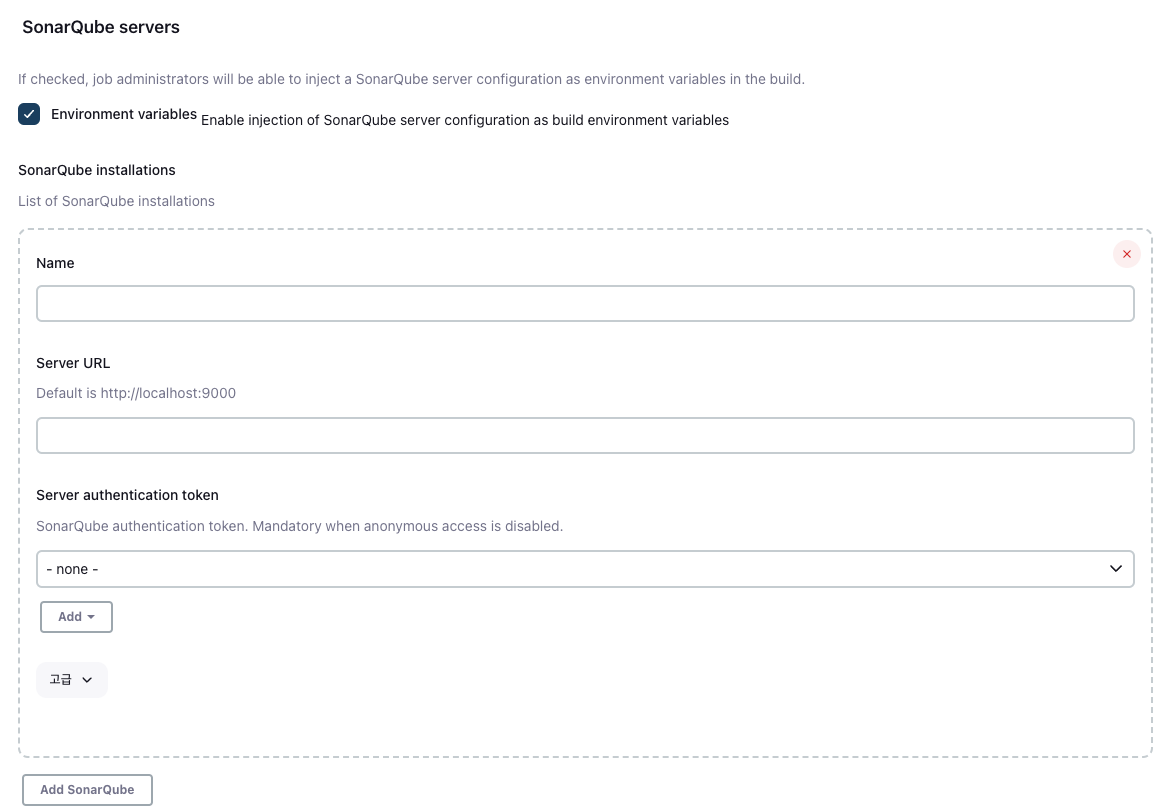
Jenkins 관리의 “System”에서 SonarQube Server 설정 - 보이지 않는다면 SonarQube 플러그인 설치 후 진행
-
환경 변수 활성화
-
사용할 SonarQube server 설정
-
Name : 원하는 것으로 설정
-
Server URL : SonarQube가 실행 중인 URL 주소 입력 - 같은 VPC안의 EC2 인스턴스에서 실행 중이므로 SonarQube 인스턴스의 프라이빗 IP를 사용해도 된다.
-
Server authentication token : SonarQube의 ip로 접속해서 사용자 계정의 보안 탭에서 생성한 토큰을 사용한다.
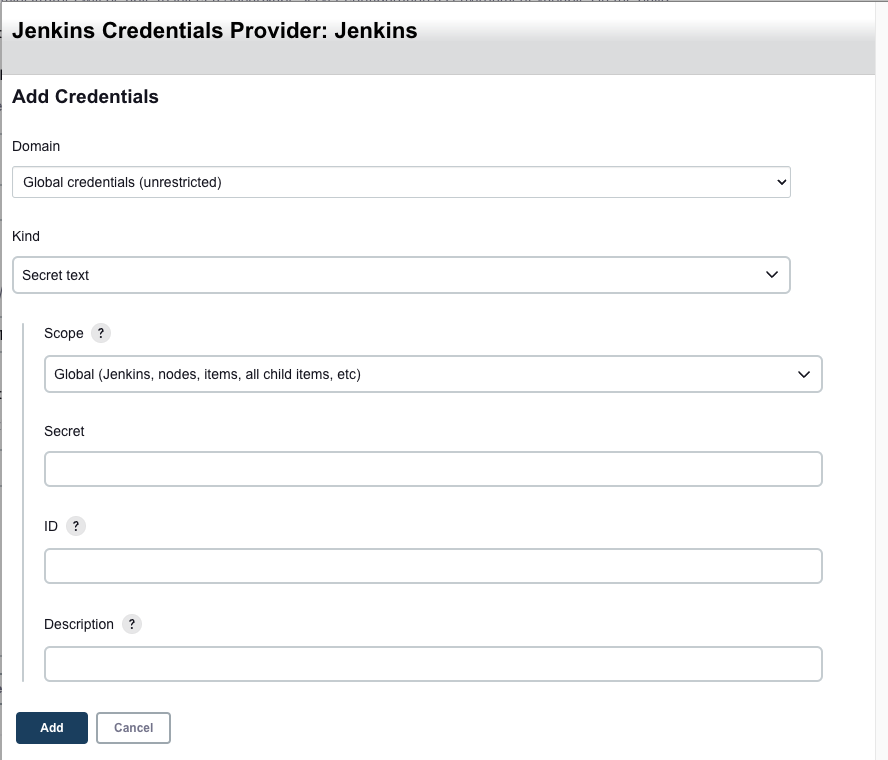
- Kind : Secret text 선택
- Secret : 발급받은 토큰 키를 입력
- ID : 원하는 것으로 사용
-
-
Pipeline을 사용해 SonarQube Scanner 실행 및 결과 업로드
-
스크립트
pipeline { agent any tools { maven "MAVEN3" jdk "OracleJDK11" } stages { stage('Fetch Code') { steps { git branch: 'main', url: 'https://github.com/hkhcoder/vprofile-project.git' } } stage('Build') { steps { sh 'mvn install -DskipTests' } post { success { echo 'Archving artifacts now.' archiveArtifacts artifacts: '**/*.war' } } } stage('UNIT TESTS') { steps { sh 'mvn test' } } stage('Checkstyle Analysis') { steps { sh 'mvn checkstyle:checkstyle' } } stage('Sonar Analysis') { environment { scannerHome = tool 'sonar4.7' } steps { withSonarQubeEnv('Sonar') { sh '''${scannerHome}/bin/sonar-scanner \ -Dsonar.projectKey=vprofile \ -Dsonar.projectName=vprofile \ -Dsonar.projectVersion=1.0 \ -Dsonar.sources=src/ \ -Dsonar.java.binaries=target/test-classes/com/visualpathit/account/controllerTest/ \ -Dsonar.junit.reportsPath=target/surefire-reports/ \ -Dsonar.jacoco.reportsPath=target/jacoco.exec \ -Dsonar.java.checkstyle.reportPaths=target/checkstyle-result.xml''' } } } } } -
실행결과
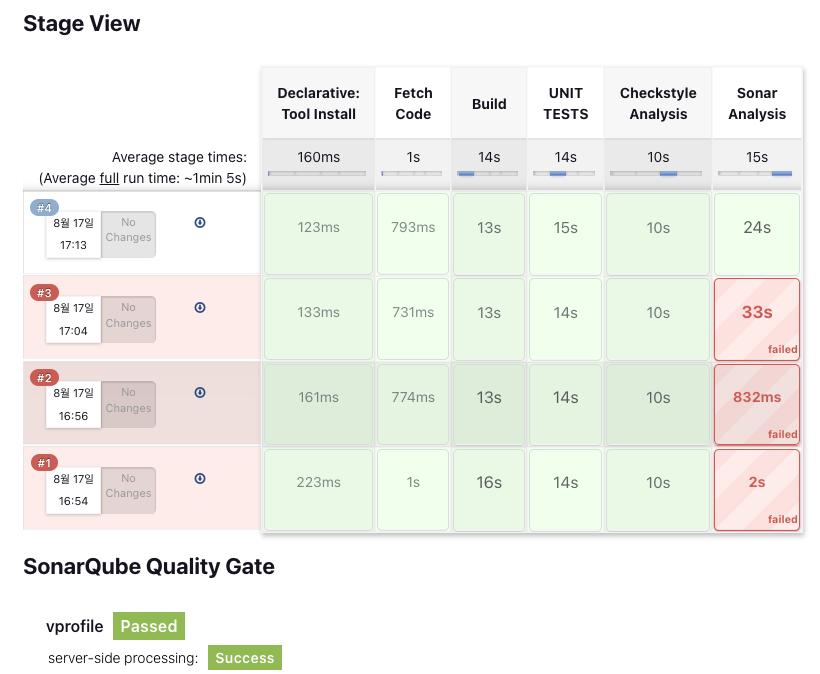
성공한 파이프라인 아래 실패 3개는 스크립트 오타와 SonarQube server URL 주소 오류로 실패
SonarQube 대시보드 - 코드 분석한 프로젝트의 분석 결과를 확인할 수 있다.
Quality Gates
Create Quality Gates
-
SonarQube Server에 접속한 후 Quality Gates 탭에서 생성
-
“Add Condition”으로 규칙을 생성한다.
- On New Code : 새로 추가되는 코드에 대한 설정
- On Overall Code : 전체 코드에 대한 설정
-
Quality Gate를 적용할 프로젝트의 설정에서 Quality Gate 수정
-
SonarQube 서버가 Jenkins으로 정보를 보내기 위해 webhook 설정
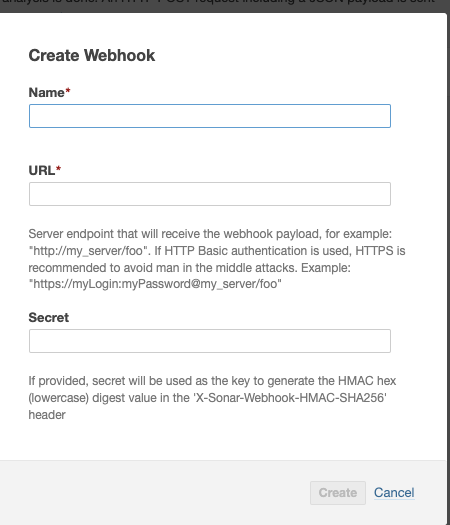
- URL은 Jenkins의 URL을 입력한다.
- “Jenkins 인스턴스의 프라이빗 IP:8080/sonarqube-webhook”형식으로 작성해야한다.
- Jenkins 인스턴스 보안그룹 인바운드 규칙에 8080번 포트로 들어오는 sonarqube 트래픽 허용 규칙 추가
- URL은 Jenkins의 URL을 입력한다.
-
아래 코드를 pipeline 스크립트에 추가 후 빌드
stage('Quality Gate') { steps { timeout(time: 1, unit: 'HOURS') { waitForQualityGate abortPipeline: true } } } -
실행 결과 - SonarQube 서버, Jenk
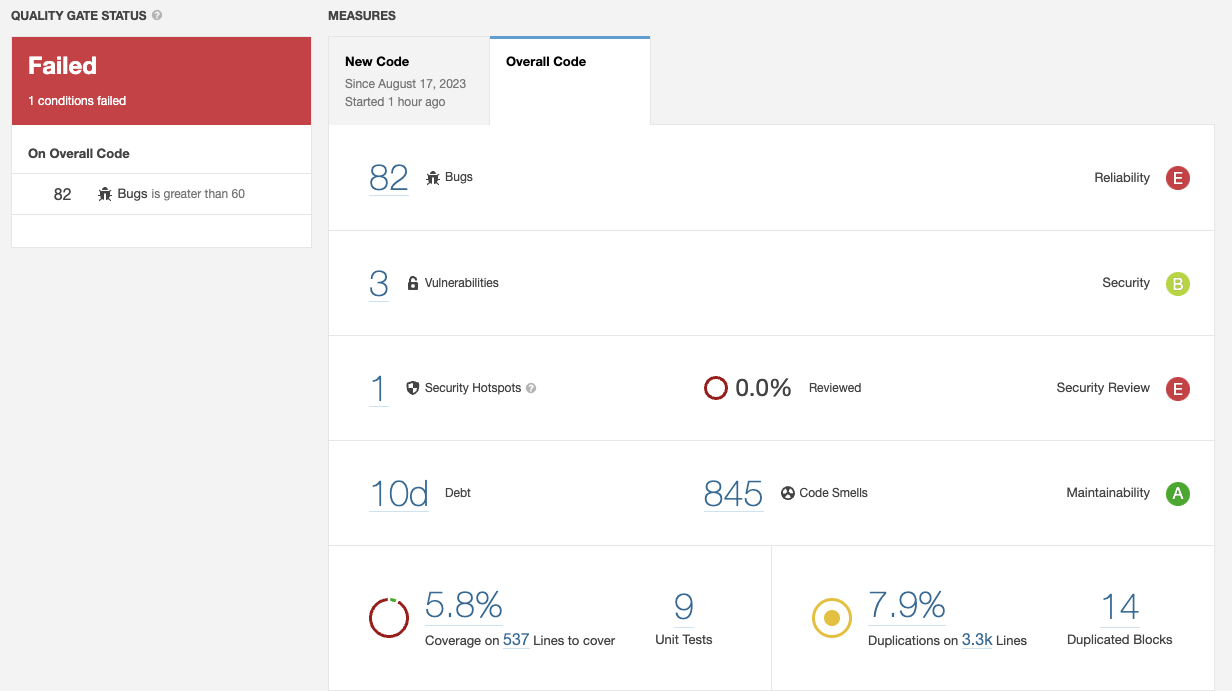
버그가 60개 이하일 때 pass하도록 설정하였지만 발견된 버그는 82개이므로 실패가 출력된다.
Jenkins에서도 SonarQube 서버로부터 정보를 받아 실패를 표시
임계값을 올리면 패스로 변경될 수 있으나 좋은 방법은 아니다.
Upload Artifacts to Repository
코드 분석까지 마친 코드를 저장하고 검색할 수 있는 Nexus Repository에 업로드
- 자바 기반이다.
- Nexus OSS는 sonartype 레포지토리다.
- 빌드 결과물을 저장하기도 하지만 종속성을 다운로드하기 위해 사용하기도 한다.
- 오픈 소스와 엔터프라이즈 버전으로 나뉜다.
- maven, apt, docker, Ruby gem과 같은 다양한 레포지토리를 지원한다.
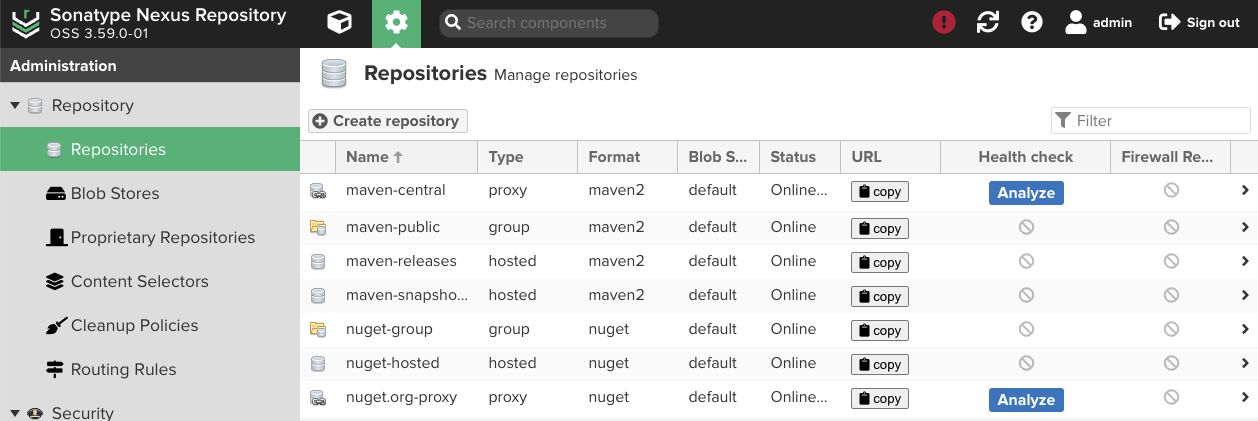
Nexus의 기본 레포지토리. 필요한 레포지토리를 추가할 수 있다.
Create Repository
-
사용할 레포지토리를 선택 후 생성
-
자격증명이 필요하므로 Jenkin 관리의 “Credentials”에서 자격 증명 생성
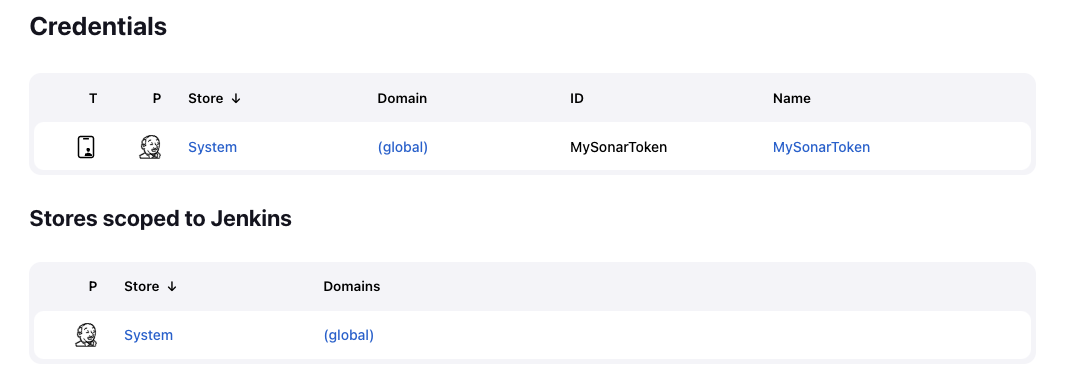
- “System”의 도메인에서 “Add Credential”으로 자격증명 생성
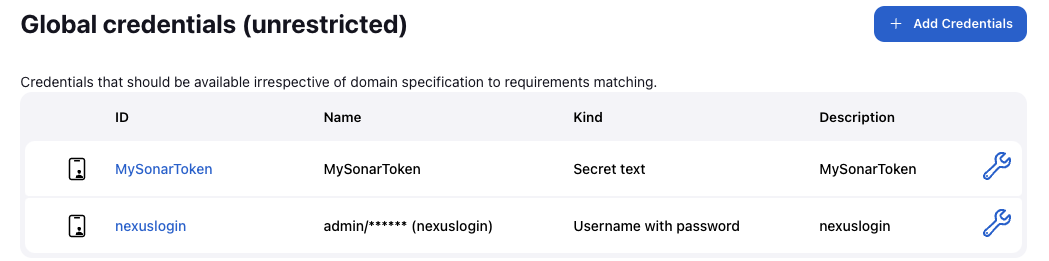
- “System”의 도메인에서 “Add Credential”으로 자격증명 생성
Pipeline
stage('UploadArtifact') {
			steps {
				nexusArtifactUploader(
        			nexusVersion: 'nexus3',
        			protocol: 'http',
	        		nexusUrl: '172.31.9.180:8081',
	        		groupId: 'QA',
	        		version: "${env.BUILD_ID}-${env.BUILD_TIMESTAMP}",
	        		repository: 'vprofile-repo',
	        		credentialsId: 'nexuslogin',
	        		artifacts: [
	            		[artifactId: 'vproapp',
	             		classifier: '',
	             		file: 'target/vprofile-v2.war',
	             		type: 'war']
	        		]
     			)
			}
→ 위 스크립트를 pipeline 스크립트에 추가한다.
-
실행결과
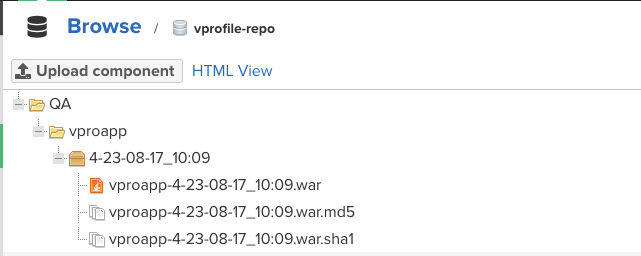
→ 파이프라인 빌드 완료 후 Nexus repo를 확인하면 결과물이 레포지토리에 업로드된 것을 확인할 수 있다.
→ 빌드할 때마다 빌드 버전별로 빌드 결과물이 업로드된다.
Notification
CI 파이프라인을 모두 구성했지만 Jenkins에서 빌드의 성공 혹은 실패를 확인하기 위해서는 Jenkins 대시보드를 확인해야하는 불편함이 아직 남아있다. 이를 Slack Notification을 활용해서 빌드 후 알림이 발생하도록 구성한다.
Configure Slack
- Slack workspace 생성
- Slack에 Jenkins CI app 추가
- 이 앱을 추가할 채널을 선택 후 추가
- 토큰을 복사한다.
- 설정 저장
Configure Jenkins
- Slack Notification 플러그인 설치
- Jenkins 관리의 System에서 Slack 설정
-
workspace : slack workspace → workspace이름을 설정한대로 입력해도 연결테스트가 싪패할 수 있다. 아래 링크에서 workspaces의 주소를 확인해서 workspace의 URL을 입력하면 테스트가 성공할 것이다.
-
자격 증명 생성 - secret text에 Slack token 입력
-
- 채널 / id 입력 - Jenkins app을 추가한 채널 혹은 ID
- 연결 테스트
Pipeline
- stages 영역 아래 코드를 추가
post { always { echo 'Slack Notifications.' slackSend channel: '#jenkinscicd', color: COLOR_MAP[currentBuild.currentResult], message: "*${currentBuild.currentResult}:* Job ${env.JOB_NAME} build ${env.BUILD_NUMBER} \n More info at: ${env.BUILD_URL}" } } - COLOR_MAP이라는 map을 사용하기 위해 스크립트 가장 상단에 COLOR_MAP을 초기화 한다.
 def COLOR_MAP = [
	'SUCCESS': 'good',
	'FAILURE': 'danger',
]
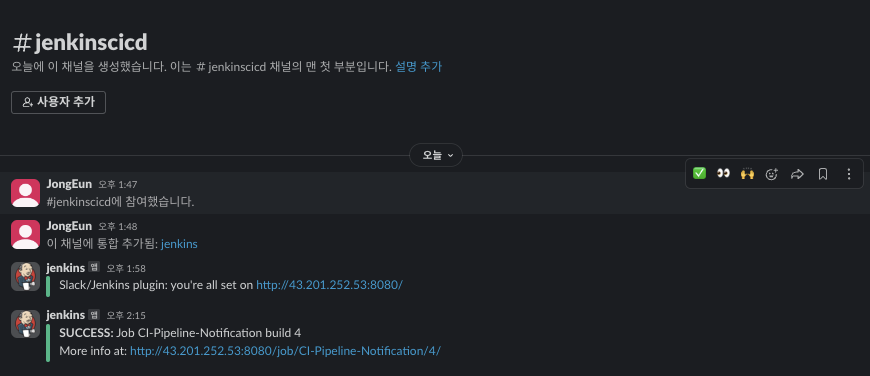
실행결과
빌드가 완료되면 아래 처럼 Slack 메시지를 확인할 수 있다.
Publishing Docker Images
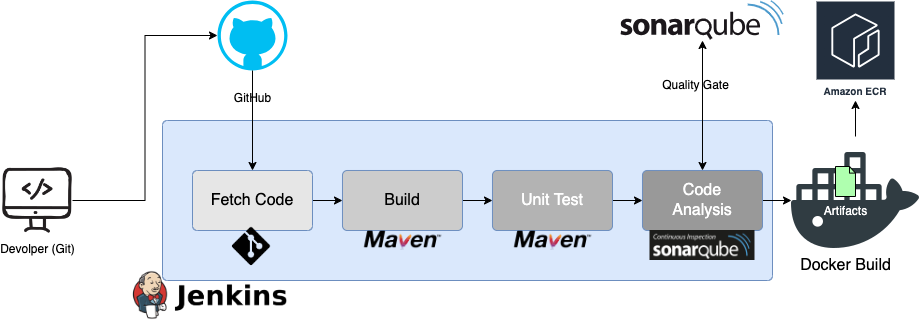
지금까지 만든 Pipeline에서 코드분석까지는 동일하지만 Nexus 레포지토리에 업로드하는 대신 빌드 결과물을 docker image로 빌드하고 이를 Amazon ECR로 업로드하는 것으로 대체한다.
Amazon ECR뿐만 아니라 GCR(Google Container Registry), Azure Registry Service, Docker Hub 혹은 기존에 사용하던 Nexus 레포지토리에도 업로드할 수도 있다. 사용하고 있는 서비스에 따라 Docker image를 업로드할 서비스를 선택하면 된다.
준비 사항
- Docker Engine을 Jenkins에 설치
-
아래 Docker 설치 가이드에 따라 Jenkins 인스턴스에 Docker Engine 설치
-
Jenkins 사용자에서 Docker image를 실행시킬 수 있도록 Docker group에 Jenkins 사용자 추가
usermod -a -G docker jenkins id jenkins uid=114(jenkins) gid=120(jenkins) groups=120(jenkins),998(docker) -
Jenkins 인스턴스 재부팅
-
- ECR 정책 허용된 IAM Role
- AWS IAM에서 jenkins 사용자 추가
- “AmazonEC2ContainerRegistryFullAccess”, “AmazonECS_FullAccess” 정책 허용
- 해당 사용자를 CLI 환경에서 사용할 수 있도록 액세스 키 생성
- AWS에 ECR 레포지토리 생성
- 프라이빗 설정
- 레포지토리 이름 설정
- ECR, Docker 플러그인을 Jenkins에 설치
- “Docker Pipeline”, “CloudBees Docker Build and Publish”, “Amazon ECR”, “Amazon Web Service SDK::All” 설치
- Jenkins에 AWS 자격 증명 저장
- “Global Credentials”에 자격 증명 추가
- Kind는 AWS SDK 플러그인을 설치 후 “AWS Credential” 선택
- Jenkins IAM 사용자의 액세스 키를 입력
- 플러그인 설치 중에 EC2 인스턴스 스토리지 용량 부족이 발생할 수 있다. 이때 아래 링크를 따라 EC2 인스턴스 스토리지 볼륨 용량을 증설한다. [AWS] EC2 디스크 용량 늘리기
Pipeline Script
def COLOR_MAP = [					// Slack message color map
	'SUCCESS': 'good',
	'FAILURE': 'danger',
]
pipeline {					// Pipeline start
	agent any 				// Agent execute anywhere
	environment {			// AWS ECR repository info -> global variables
		registryCredential = 'ecr:ap-northeast-2:awscreds'
		appRegistry = "862279563460.dkr.ecr.ap-northeast-2.amazonaws.com/vprofileappimg"
		vprofileRegistry = "https://862279563460.dkr.ecr.ap-northeast-2.amazonaws.com"
	}
	tools {					// build tools
	  	maven "MAVEN3"
	  	jdk "OracleJDK11"
	}

	stages {				// execute build
		stage('Fetch Code') {
			steps {
				git branch: 'docker', url: 'https://github.com/hkhcoder/vprofile-project.git'
			}
		}

		stage('UNIT TESTS') {
			steps {
				sh 'mvn test'						// Test with maven
			}
		}

		stage('Checkstyle Analysis') {				// Code analysis with maven
			steps {
				sh 'mvn checkstyle:checkstyle'
			}
		}

		stage('Sonar Analysis') {					// Code analysis & Upload result to SonarQube server
			environment {
				scannerHome = tool 'sonar4.7'
			}
			steps {
				withSonarQubeEnv('Sonar') {
					sh '''${scannerHome}/bin/sonar-scanner \
						-Dsonar.projectKey=vprofile \
						-Dsonar.projectName=vprofile \
						-Dsonar.projectVersion=1.0 \
						-Dsonar.sources=src/ \
						-Dsonar.java.binaries=target/test-classes/com/visualpathit/account/controllerTest/ \
						-Dsonar.junit.reportsPath=target/surefire-reports/ \
						-Dsonar.jacoco.reportsPath=target/jacoco.exec \
						-Dsonar.java.checkstyle.reportPaths=target/checkstyle-result.xml'''
				}
			}
		}

		stage('Quality Gate') {						// Wait for quality result from SonarQube server
			steps {
				timeout(time: 1, unit: 'HOURS') {
					waitForQualityGate abortPipeline: true
				}
			}
		}

		stage('Build App Image') {
       		steps {
         		script {
                	dockerImage = docker.build( appRegistry + ":$BUILD_NUMBER", "./Docker-files/app/multistage/")
            	}
    		}

   		}

		stage('Upload App Image') {		// Upload Image to Amazon ECR
			steps {
				script {		// Docker command
					docker.withRegistry( vprofileRegistry, registryCredential ) {
                		dockerImage.push("$BUILD_NUMBER")
                		dockerImage.push('latest')
              		}
				}
			}
		}
	}
	post {				// Slack Notification after stages
		always {
			echo 'Slack Notifications.'
			slackSend channel: '#jenkinscicd',
				color: COLOR_MAP[currentBuild.currentResult],
				message: "*${currentBuild.currentResult}:* Job ${env.JOB_NAME} build ${env.BUILD_NUMBER} \n More info at: ${env.BUILD_URL}"
		}
	}
}-
실행 결과
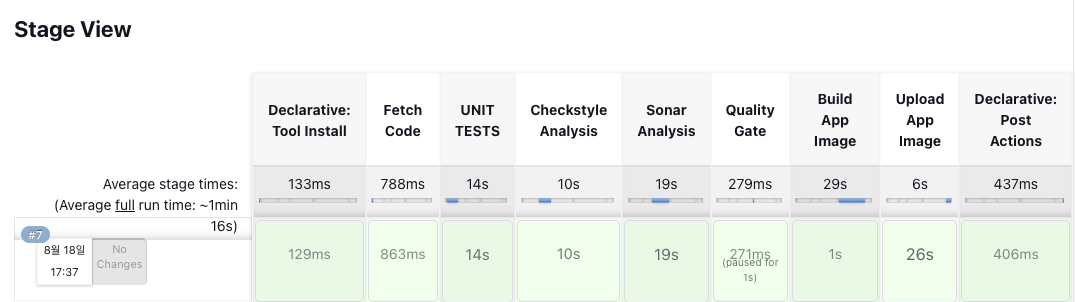
→ Jenkins에서 모두 성공한 것을 확인할 수 있다.
→ Build에서 실패하는 경우에 로그를 살펴보면 Dockerfile이 없다는 내용이 포함되어 있을 때가 많다. git 레포지토리에 Dockerfile이 포함되어 있는지 확인이 필요하다.
→ AWS upload에 실패하는 것은 자격 증명이 잘못되었거나 레지스트리를 잘못 기입했을 때 발생
→ 기타 오타가 없는지 확인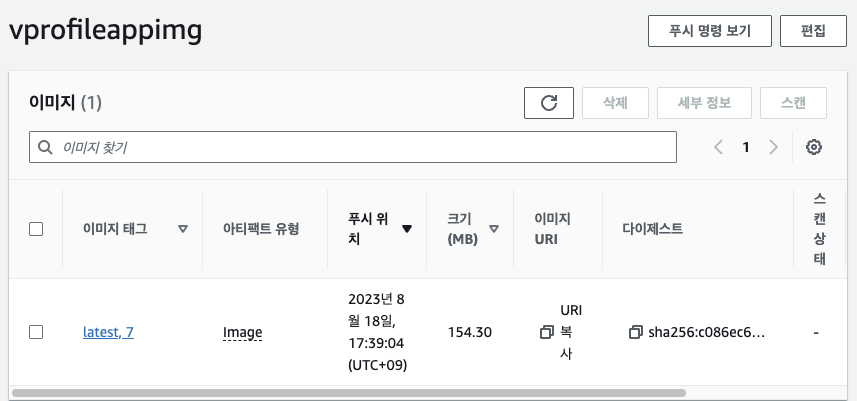
→ Amazon ECR에 이미지가 업로드된 것을 확인할 수 있다.