IoC 컨테이너와 Bean
1. 필요한 이유
public class Controller1 {
	private final Service1 service1;

	public Controller1() {
		this.service1 = new Service1();
	}
}

public class Service1 {
	private final Repository1 repository1;

	public Service1() {
		this.repository1 = new Repository1();
	}
}

public class Repository1 { ... }- 코드를 보면, Controller가 Service에 의존을 하고, Service는 repository에 의존하게 된다. 즉, Controller -> Service -> Repository의 흐름을 가지는 강한 결합을 의미한다.
- 이러한 상황에서 repository가 아래의 코드와 같이 수정 할 일이 생겼다고 가정해보자.
public class Repository1 {

	public Repository1(String id, String pw) {
    // DB 연결
    Connection connection = DriverManager.getConnection("jdbc:mysql://localhost:3306/memo", id, pw);
  }
}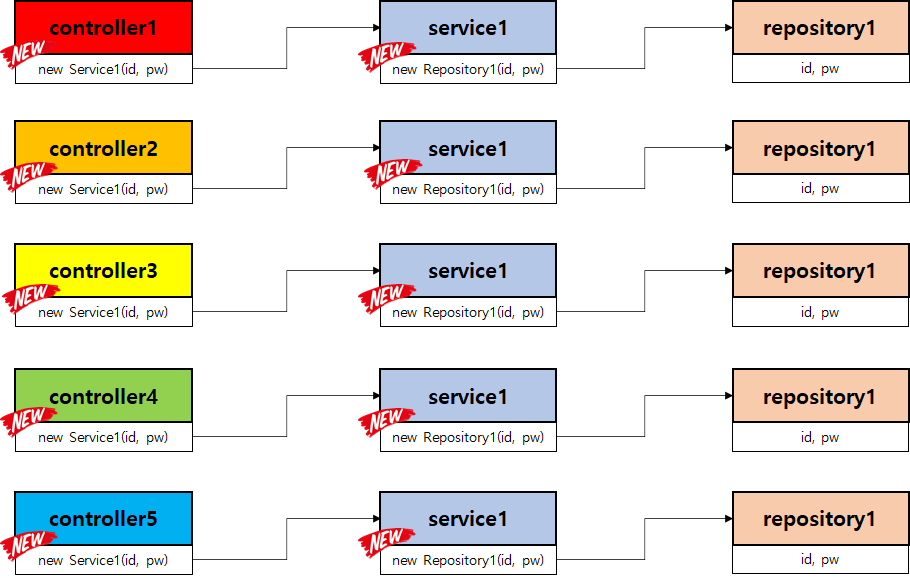
-
Controller 5 개가 각각 Service1 을 생성하여 사용하게 되는 것이고, Repository1 생성자 변경에 의해 모든 Contoller 와 모든 Service 의 코드 변경이 필요하게 되는 문제점이 발생한다.
-
문제점을 해결하기위해서는 아래의 조건이 필요하다.
- 각 객체에 대한 객체 생성은 딱 1번만!
- 생성된 객체를 모든 곳에서 재사용!
- 생성자 주입을 사용하여 필요로하는 객체에 해당 객체 주입! -
조건에 맞게 코드를 수정하면 아래의 코드와 같다.
public class Repository1 { ... }

// 객체 생성
// Repository1  클래스 선언 및 객체 생성 → repository1
Repository1 repository1 = new Repository1();

//Service1  클래스 선언 및 객체 생성 (repostiroy1 사용) → service1
Class Service1 {
	private final Repository1 repitory1;

	// repository1 객체 사용
	public Service1(Repository1 repository1) {
		this.repository1 = repository1;
	}
}

// 객체 생성
Service1 service1 = new Service1(repository1);


// Contoller1  선언 ( service1 사용)
Class Controller1 {
	private final Service1 service1;

	// service1 객체 사용
	public Controller1(Service1 service1) {
		this.service1 = service1;
	}
}- 이러한 상황에서 아래의 코드와 같이 repository가 변경이 일어난다고 가정해 보자.
public class Repository1 {

	public Repository1(String id, String pw) {
    // DB 연결
    Connection connection = DriverManager.getConnection("jdbc:mysql://localhost:3306/memo", id, pw);
  }
}

// 객체 생성
String id = "root";
String pw = "1234";
Repository1 repository1 = new Repository1(id, pw);- Repository1 생성자 변경은 이제 누구에게도 피해(?) 를 주지 않게 된다.
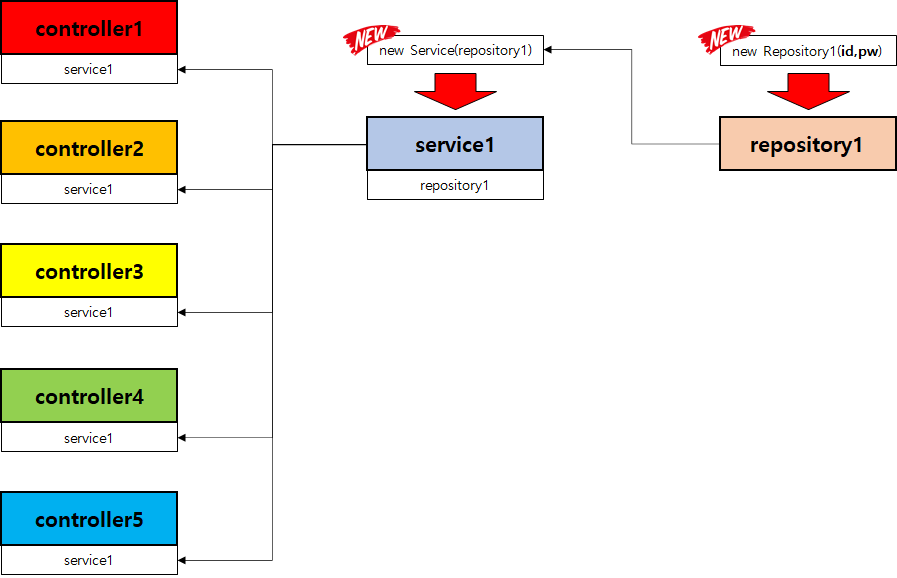
- 즉, 위의 그림과 같은 Repository ⇒ Service ⇒ Controlle의 흐름을 가지는 느슨한 결합이 된다.
위의 상황에서의 문제점은 누가 그럼 service객체와 repository 객체는 누가 만들어 주냐?인 것인데 그 문제점은 Spring이 해결해 준다.
2. IoC Container와 Bean
1. 개념
- 빈 (Bean): Spring이 관리하는 객체
- Spring IoC 컨테이너: 'Bean'을 모아둔 컨테이너(공간)
2. Spring 'Bean' 등록 방법
- @Component
- ‘Bean’으로 등록하고자하는 클래스 위에 설정합니다.
@Component
public class MemoService { ... }- 흐름
- MemoService 객체 생성
- Spring IoC 컨테이너에 Bean (memoService) 저장
- memoService -> Spring IoC 컨테이너
3. @ComponentScan
- 스프링 main 클래스 @SpringBootApplication안에 @ComponentScan이 있다.
- Spring 서버가 작동되면, @ComponentScan에 설정해 준 packages 위치와 하위 packages 들을 전부 확인하여 @Component가 설정된 클래스들을 ‘Bean’으로 등록한다.
4. Spring 'Bean' 사용 방법
- Been을 주입 받을려면 주입하는 생성자나 매서드 or 필드에 @Autowired를 달아야한다
// 필드 위에 DI
@Component
public class MemoService {

    @Autowired
    private MemoRepository memoRepository;

		// ...
}

@Component
public class MemoService {

    private final MemoRepository memoRepository;

// 메서드 위에 DI
    @Autowired
    public MemoService(MemoRepository memoRepository) {
        this.memoRepository = memoRepository;
    }

		// ...
}

//Lombok을 이용한 생성자에 DI 주입
@Component
@RequiredArgsConstructor // final로 선언된 멤버 변수를 파라미터로 사용하여 생성자를 자동으로 생성합니다.
public class MemoService {

    private final MemoRepository memoRepository;

//    public MemoService(MemoRepository memoRepository) {
//        this.memoRepository = memoRepository;
//    }

		...

}
- 객체의 불변성을 확보할 수 있기 때문에 일반적으로는 생성자를 사용하여 DI하는 것이 좋다.
4. 3 Layer Annotation
- Controller, Service, Repository의 역할로 구분된 클래스들을 ‘Bean’으로 등록할 때 해당 ‘Bean’ 클래스의 역할을 명시하기위해 사용
- @Controller, @RestController
- @Service
- @Repository
- @Component가 다 포함 되어 있다.
@Controller는 어디서 사용될까?
내부에서 사용 Handlet Mapping으로 찾은 Controller를 소환 할때 사용된다.

밤낮없는개발자