사전지식
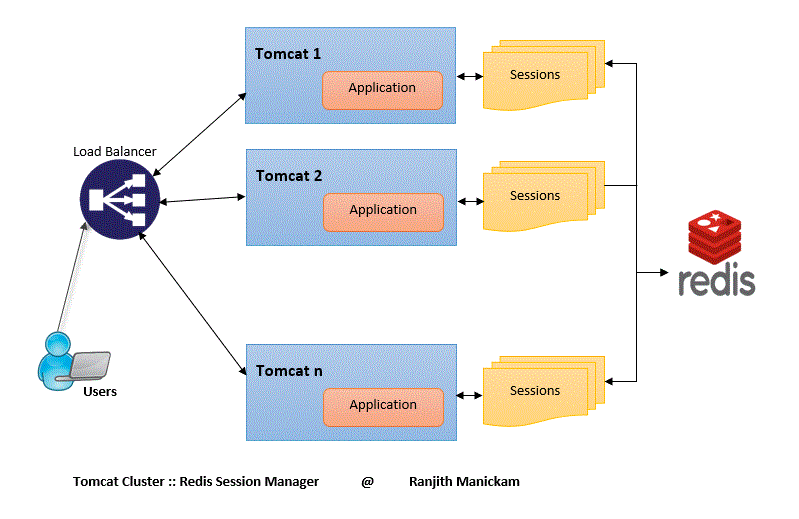
tomcat 서비스를 정상적으로 운영하고 있는 환경에서 빠르고 효율적인 session 관리를 위해 인 메모리 캐싱인 Redis를 구성해서 사용하는 방법에 대해 안내합니다.
작업 환경
AWS Redis 생성
EC2 생성
JDK 설치
Tomcat 설치
ALB 생성
구성 방법
- redis jar 및 환경 파일 다운로드
링크에서 tomcat-cluster-redis-session-manager.zip을 다운로드합니다.
wget https://github.com/ran-jit/tomcat-cluster-redis-session-manager/releases/download/2.0.4/tomcat-cluster-redis-session-manager.zip- 압축을 풀고 conf와 lib 폴더를 Tomcat 루트 폴더에 복사합니다.
cp tomcat-cluster-redis-session-manager/lib/* {tomcat_home}/lib/
cp tomcat-cluster-redis-session-manager/conf/* {tomcat_home}/conf/- {tomcat_home}/conf 디렉토리에 있는 파일들을(redis-data-cache.properties, context.xml, web.xml) 수정합니다.
1) {tomcat_home}/conf/redis-data-cache.properties 설정을 수정합니다.
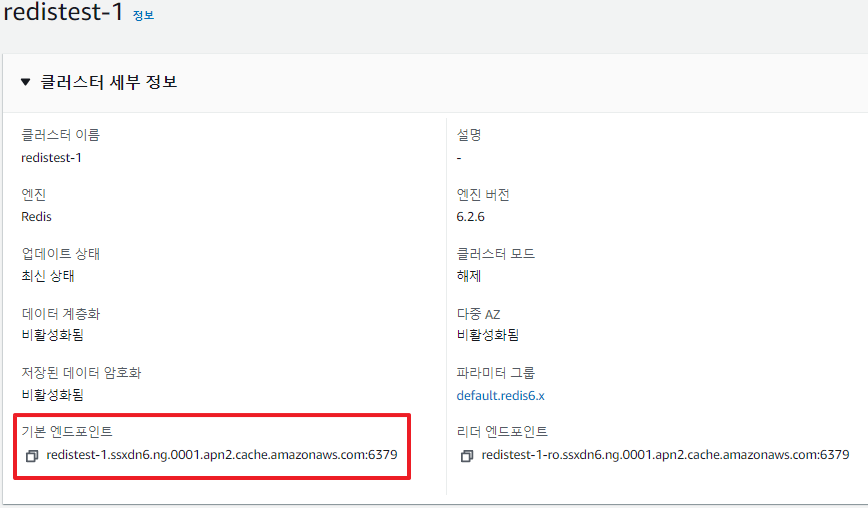
redis.hosts=<AWS Redis Endpoint>:<redis port> redis.hosts 의 값은 생성된 ElastiCache의 기본 엔드포인트 값으로 변경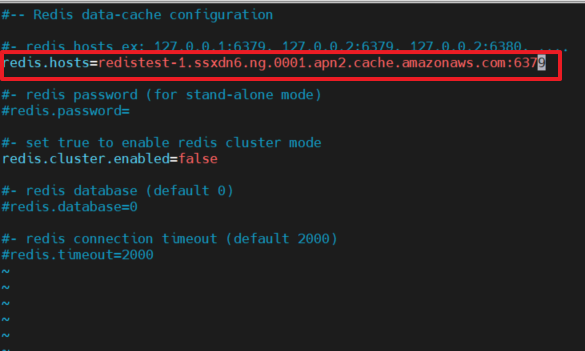
2) {tomcat_home}/conf/context.xml 내용에 아래 항목을 추가합니다.
vi /usr/local/tomcat9/conf/context.xml

<Context>
...
  <!-- 아래 내용 추가 -->
  <Valve className="tomcat.request.session.redis.SessionHandlerValve" />
  <Manager className="tomcat.request.session.redis.SessionManager" />
...
</Context>
3) {tomcat_home}/conf/web.xml에서 세션 timeout을 설정합니다. (단위는 seconds)
vi /usr/local/tomcat9/conf/web.xml

    <session-config>
        <session-timeout>60</session-timeout> <!-- 60 으로 변경 -->
</session-config>- session 체크를 위해 sample source를 배포합니다.
{tomcat_home}/webapps/ROOT/session_check.jsp 파일을 생성합니다.
코드 내용은 아래와 같습니다.
<%@page contentType="text/html; charset=UTF-8"%>
<%@ page import="java.text.*"%>
<%@ page import="java.util.*"%>
<%
String RsessionId = request.getRequestedSessionId();
String sessionId = session.getId();
boolean isNew = session.isNew();
long creationTime = session.getCreationTime();
long lastAccessedTime = session.getLastAccessedTime();
int maxInactiveInterval = session.getMaxInactiveInterval();
Enumeration e = session.getAttributeNames();
%>
<html>
<head>
<meta http-equiv="Content-Type" content="text/html; charset=EUC-KR">
<title>Session Test</title>
</head>
<body>
<table border=1 bordercolor="gray" cellspacing=1 cellpadding=0 width="100%">
<tr bgcolor="gray">
<td colspan=2 align="center"><font color="white"><b>Session Info</b></font></td>
</tr>
<tr>
<td>Server HostName</td>
<td><%=java.net.InetAddress.getLocalHost().getHostName()%></td>
</tr>
<tr>
<td>Server IP</td>
<td><%=java.net.InetAddress.getLocalHost().getHostAddress()%></td>
</tr>
<tr>
<td>Request SessionID</td>
<td><%=RsessionId%></td>
</tr>
<tr>
<td>SessionID</td>
<td><%=sessionId%></td>
</tr>
<tr>
<td>isNew</td>
<td><%=isNew%></td>
</tr>
<tr>
<td>Creation Time</td>
<td><%=new Date(creationTime)%></td>
</tr>
<tr>
<td>Last Accessed Time</td>
<td><%=new Date(lastAccessedTime)%></td>
</tr>
<tr>
<td>Max Inactive Interval (second)</td>
<td><%=maxInactiveInterval%></td>
</tr>
<tr bgcolor="cyan">
<td colspan=2 align="center"><b>Session Value List</b></td>
</tr>
<tr>
<td align="center">NAME</td>
<td align="center">VAULE</td>
</tr>
<%
String name = null;
while (e.hasMoreElements()) {
name = (String) e.nextElement();
%>
<tr>
<td align="left"><%=name%></td>
<td align="left"><%=session.getAttribute(name)%></td>
</tr>
<%
}
%>
</table>
<%
int count = 0;
if(session.getAttribute("count") != null)
count = (Integer) session.getAttribute("count");
count += 1;
session.setAttribute("count", count);
out.println(session.getId() + " : " + count);
%>
</body>
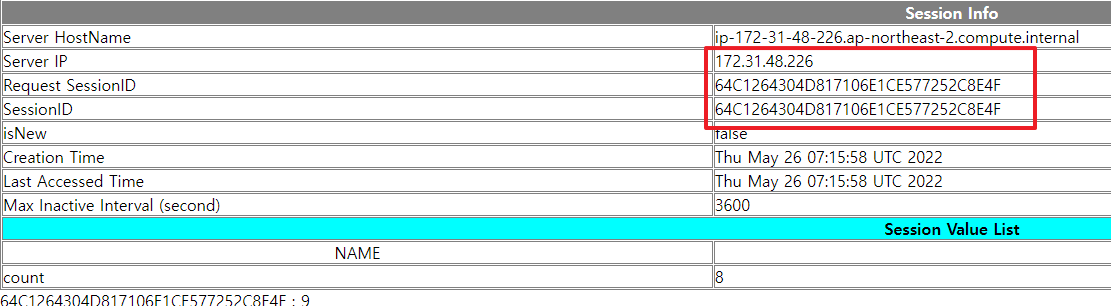
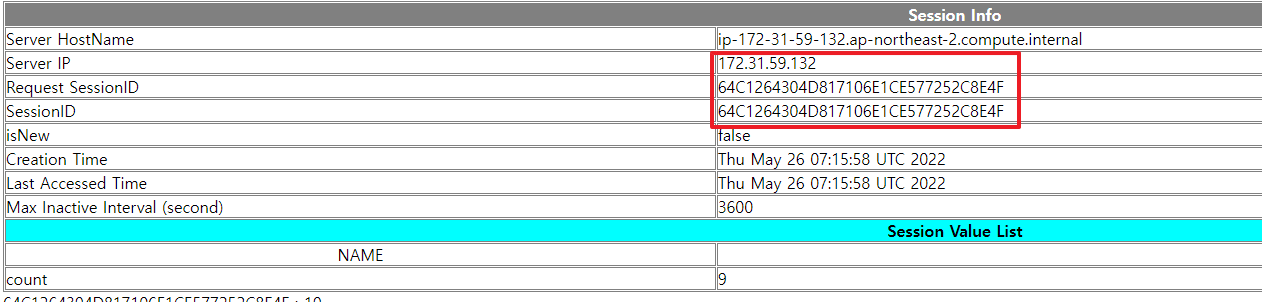
</html>- tomcat을 재기동하고 {ALB DNS}/session_check.jsp로 접근해서 sessionID가 아래와 같이 유지되는지 확인합니다.
구성 결과
redis를 사용하여 tomcat의 세션을 쉽고 간단하게 사용하는 것이 가능합니다.

123