
개인 프로젝트나 면접 과제를 하다보니 초기세팅이 할 일이 많아지는 것 같다.😂
React 프레임워크를 기반으로 CRA를 이용한 빠른 리액트 개발환경 구축방법이다.
:: git repository 생성
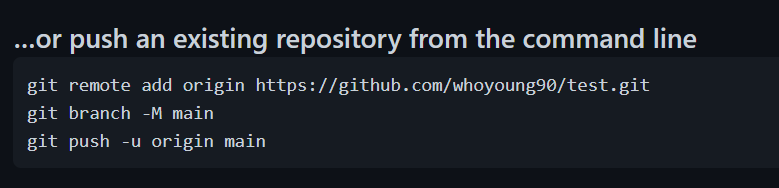
로컬환경 만들어놓고 이렇게 연결하는게 편하더라..
::CRA 설치
npx create-react-app 폴더명
::라우터 설치
npm install react-router-dom --save
:: sass 설치 (선택)
npm install -g sass
:: styled-components + reset 설치 (선택)
npm install --save styled-components styled-reset
:: polyfill 설치 (크로스 브라우징 이슈)
npm install react-app-polyfill
:: Eslint + Prettier 한번에 깔기
npm install -D prettier eslint-config-prettier eslint-plugin-prettier
Mac용 .eslinttrc 작성
{
  "extends": ["react-app", "plugin:prettier/recommended"]
}
window용 .eslintrc 작성
{
  "extends": ["react-app", "prettier"],
  "plugins": ["prettier"],
  "rules": {
    "prettier/prettier": ["error", { "endOfLine": "auto" }]
  }
}
.prettierrc 작성
{
  "tabWidth": 2,
  "endOfLine": "lf",
  "arrowParens": "avoid",
  "singleQuote": true
}
::gitignore에 추가
.eslintcache
:: index.js
import 'react-app-polyfill/stable';
import React from 'react';
import ReactDOM from 'react-dom';
import GlobalStyle from './Styles/globalStyle';
import theme from './Styles/theme';
import { ThemeProvider } from 'styled-components';
import Routes from './Routes';

ReactDOM.render(
  <>
    <GlobalStyle />
    <ThemeProvider theme={theme}>
      <Routes />
    </ThemeProvider>
  </>,
  document.getElementById('root')
);
:: Routes.js
import React from 'react';
import { BrowserRouter as Router, Switch, Route } from 'react-router-dom';
import 컴포넌트명 from './Page/컴포넌트명';

function Routes() {
  return (
    <Router>
      <Switch>
        <Route exact path="/" component={() => <컴포넌트명 />} />
      </Switch>
    </Router>
  );
}

export default Routes;
:: Styles폴더 > globalStyle.js
import { createGlobalStyle } from 'styled-components';
import reset from 'styled-reset';

const GlobalStyle = createGlobalStyle`
${reset}
*{
  position: relative;
  margin: 0;
  padding: 0;
  box-sizing: border-box;
  position: relative;
}

body{
  font-family: 'Noto Sans KR', 'Apple SD Gothic Neo', 'Nanum Gothic', 'Malgun Gothic', sans-serif;
  box-sizing: border-box;
  position: relative;
}

button:hover{
  cursor: pointer;
}
`;

export default GlobalStyle;
::Styles폴더 > theme.js
const theme = {
  background: '#FFFEFC',
  white: '#FFFFFF',
  vermilion: '#ff7425',
  orange: '#FF9900',
  opacityOrange: 'rgba(242,153,74,0.5)',
  yellow: '#FFD66C',
  grey: 'rgba(196,196,196,0.3)',
  middleGrey: 'rgba(65,65,65,0.4)',
  deepGrey: '#828282',
  lightOrange: 'rgba(255,195,170,0.3)',
  fontColor: '#2D2B2B',
  fontTitle: "'Alata', sans-serif;",
};

export default theme;
:: 초기세팅 마무리
git add .
git commit -m “Add : 초기세팅 완료”
git push origin main
⛔ (참고) 초기세팅에 틀린게 없는데 화면에 렌더링 안됐던 상황
package.json에 있는 한문장....
  "name": "my-app",
  "version": "0.1.0",
  "private": true,
  "homepage": "https://github.com/whoyoung90/프로젝트명#readme", // 지워주면 됩니다..
  "dependencies": {
hompage를 지우면 깔끔이 해결 😉
이전에 …or create a new repository on the command line으로 생성하다가 readme와 관련된 홈페이지 주소가 생성되버린 것 같은데, 추후에 따로 분석해봐야겠다.
지금도 혹시나해서 내가 적은대로 초기세팅을 해보았더니 잘 구현이 되었다!

비전공으로 일식 쉐프가 되었듯, 배움에 겸손한 프론트엔드 개발자가 되겠습니다 :)