디자인 패턴
행위 패턴 behavioral pattern
반복적으로 사용되는 객체의 상호작용을 패턴화한 것객체 == 속성 + 행위를 가짐
1) strategy 패턴
자주 바뀌는 것이 기능이라면?
메서드를 클래스로 바꾸고 <<interface>> 타입의 상속 구조를 만든다.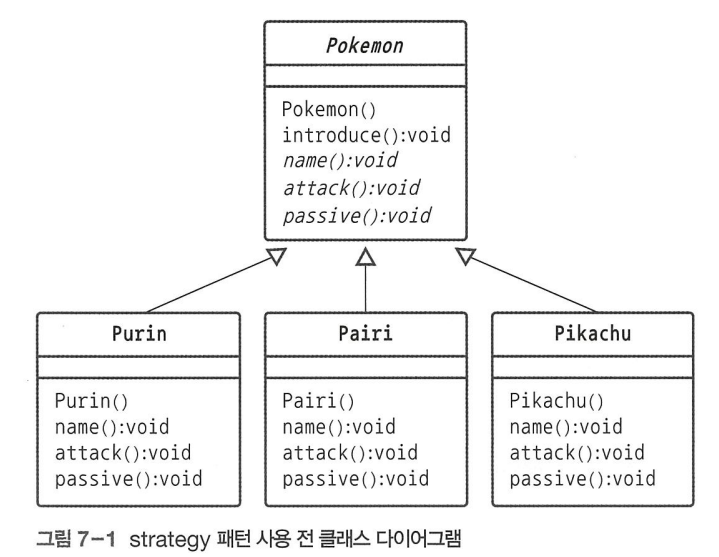
-> 공격과 패시브 기술이 바뀔 때마다 Pokemon 클래스를 계속 수정해야 한다.
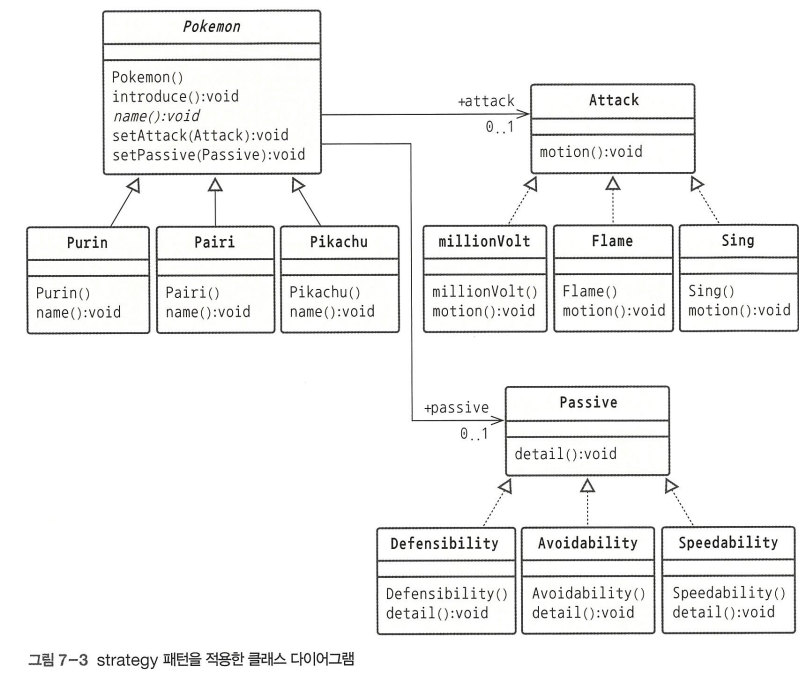
-> 자주 바뀌는 것을 오른쪽에 배치
/*Pokemon class*/

public class Pokemon {
	public Attack attack;
	public Passive passive;
	public Pokemon() {}

	public void introduce() {
		name();
		attack.motion();
		passive.detail();
	}

	abstract void name();
	public void setAttack(Attack attack) {
		this.attack = attack;
	}
	public void setPassive(Passive passive) {
		this.passive = passive;
	}
}
/*Pairi class*/
public class Pairi extends Pokemon {
public Pairi() {
attack = new Flame();
passive = new Defensibility();
}
void name() {
System.out.println("이름: 파이리, 속성: 불");
}
}/*Purin class*/
public class Purin extends Pokemon {
public Purin() {
attack = new Sing();
passive = new Avoidability();
}
void name() {
System.out.println("이름: 푸린, 속성: 노멀");
}
}/*Pikachu class*/
public class Pikachu extends Pokemon {
public Pikachu() {
attack = new millionVolt();
passive = new Speedability();
}
void name() {
System.out.println("이름: 피카츄, 속성: 번개");
}
}/*Attack class*/
public interface Attack {
public void motion();
}/*Sing class*/
public class Sing implements Attack {
public void motion() {
System.out.println("공격 스킬 - 노래하기 : 노래를 불러 상대를 잠재움");
}
}/*Flame class*/
public class Flame implements Attack {
public void motion() {
System.out.println("공격 스킬 - 불꽃 : 뜨거운 불꽃을 쏘아 공격");
}
}/*millionVolt class*/
public class millionVolt implement Attack{
public void motion() {
System.out.println("공격 스킬 - 백말 볼트: 백만 볼트의 강력한 전압으로 공격");
}
}/*Passive class*/
public interface Passive {
public void detail();
}/*Defensibility class*/
public class Defensibility implements Passive {
public void detail() {
System.out.println("패시브 스킬 - 방어: 받는 피해 40% 감소시킴");
}
}/*Avoidability class*/
public class Avoidability implements Passive {
public void detail() {
System.out.println("패시브 스킬 - 회피: 30% 확률로 공격 회피");
}
}/*Speedability class*/
public class Speedability implements Passive {
public void detail() {
System.out.println("패시브 스킬 - 스피드: 한 번에 두 번 공격");
}
}/*Main class*/
public class Main {
public static void main(String args[] {
Pokemon pikachu = new Pikach();
pikachu.introduce();
Pokemon pairi = new pairi();
pairi.introduce();
Pokemon purin = new Purin();
purin.introduce();
purin.setAttack(new millionVolt());
purin.setpassive(new Defensibility());
purin.introduce();
}
}strategy 패턴은 기능이 자주 바뀌기 때문에 오른쪽에 별도로 구성해둔다.
2) state 패턴
자주 바뀌는 것이 상태라면?
상태를 클래스로 바꾸로 <<interface>> 타입의 상속 구조를 만든다.
조건문이 있는 클래스를 수정해야 한다.
-> OCP (개방 폐쇄 원칙) 위반

-> 자주 바뀌는 것이 상태이므로 조건문으로 처리하던 상태를 클래스로 바꾸고 상속 구조형태로 만들어 하위 클래스에서 상태를 추가, 삭제할 수 있도록 한다.
/*ElectricFan class*/
/* 조건문이 없으므로 상태 추가, 삭제 시 코드 수정은 필요 없다. */

public class ElectricFan{
	private State state;
    public ElectricFan(){
    	state = new Off();
    }

    public void setState(State state) {
    	this.state = state;
    }

    public void on_push() {
    	state.on_button(this);
    }
    public void off_push() {
    	state.off_button(this);
    }

    public void operation() {
    	off_push();
        on_push();
        on_push();
        on_push();
        off_push();
    }
}
/*State class*/
public interface State {
public void on_button(ElectricFan EF);
public void off_button(ElectricFan EF);
}/*Stop class*/
public class Stop implements State {
public Stop() {
System.out.println("<<현재 상태: 정지>>");
}
public void on_button(ElectricFan EF) {
System.out.println(" ");
EF.setState(new Wind());
}
public void off_button(ElectricFan EF) {
System.out.println(" ");
}
}/*Wind class*/
public class Wind implements State {
public Wind() {
System.out.println("<<현재 상태: 송풍>>");
}
public void on_button(ElectricFan EF) {
System.out.println(" ");
EF.setState(new Sleep());
}
public void off_button(ElectricFan EF) {
System.out.println(" ");
EF.setState(new Stop());
}
}/*Sleep class*/
public class Sleep implements State {
public Sleep() {
System.out.println("<<현재 상태: 수면>>");
}
public void on_button(ElectricFan EF) {
System.out.println(" ");
EF.setState(new Wind());
}
public void off_button(ElectricFan EF) {
System.out.println(" ");
EF.setState(new Stop());
}
}/*Main class*/
public class Main {
public static void main(String args[]) {
ElectricFan EF = new ElectricFan();
EF.operation();
}
}조건문은 상태가 바뀔 때마다 전체를 수정해야하는 유지보수의 어려움을 초래한다.
이를 interface 타입의 상속 구조로 만들어 클래스에 미치는 영향을 최소화한다.
구조 패턴 structural pattern
클래스, 객체의 구성(합성)으로 더 큰 구조를 만들어야할 때 유용1) decorator 패턴
기본 클래스를 조합해서 더 많으느 클래스를 만들어야 한다면
많은 클래스를 조용히 처리한다.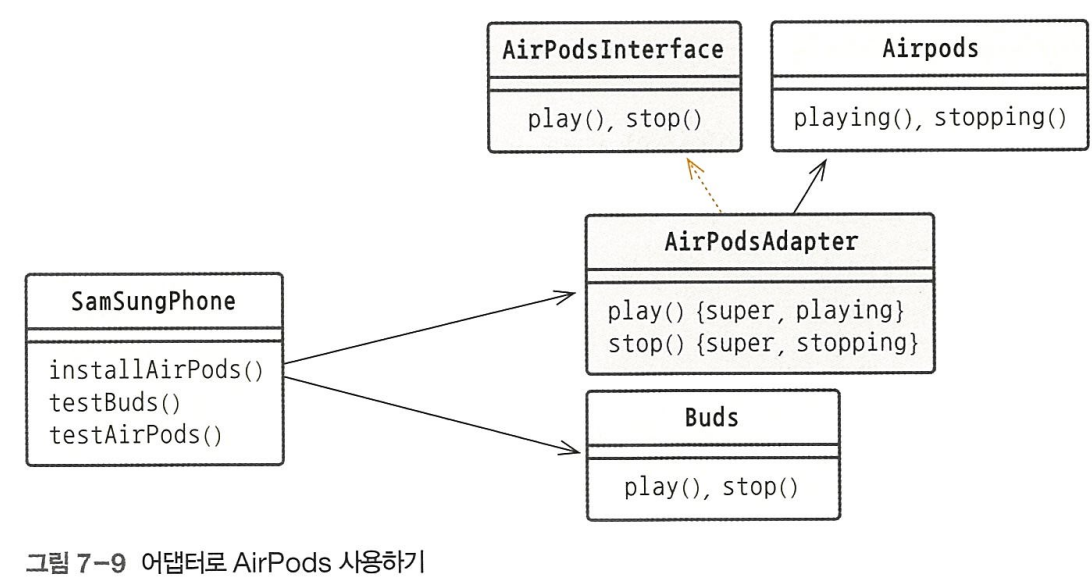
/*Toast class*/

public abstract class Toast {
	public StringBuffer name = new StringBuffer();
    public int kcal;

    public void serve() {
    	getName();
        getKcal();
    }

    public void getName() {
    	System.out.println("	");
    }
    public void getKcal() {
   		System.out.println("	");
    }

    public void addTopping(ToppingDecorator td) {
    	addName(td.Name());
        addKcal(td.Kcal());
    }

    public void addName(String name) {
    	this.name.insert(0, name);
    }
    public void addKcal(int kcal) {
    	this.kcal += kcal;
    }
}
/*WheatBread class*/
public class WheateBread extends Toast {
public WheatBread() {
name.append("호밀식빵 토스트");
addKcal(250);
}
}/*NormalBread class*/
public class NormalBread extends Toast {
public NormalBread() {
name.append("식빵 토스트");
addKcal(300);
}
}/*MilkBread class*/
public class MilkBread extends Toast {
public MilkBread() {
name.append("우유식빵 토스트");
addKcal(350);
}
}/*ButterBread class*/
public class ButterBread extends Toast {
public ButterBread() {
name.append("버터식빵 토스트");
addKcal(400);
}
}/*ToppingDecorator class*/
public abstract class ToppingDecorator extends Toast {
public abstract String Name();
pulbic abstract int Kcal();
}/*Vegetable class*/
public class Vegetable extends ToppingDecorator {
@Override
public String Name() {
return "야채";
}
@Override
public int Kcal() {
return 10;
}
}/*Cheese class*/
public class Cheese extends ToppingDecorator {
public String Name() {
return "치즈";
}
public int Kcal() {
return 50;
}
}/*Egg class*/
public class Egg extends ToppingDecorator {
public String Name() {
return "달걀";
}
public int Kcal() {
return 100;
}
}/*Main class*/
public class Main {
public static void main(String args[]) {
Toast toast1 = new NormalBread();
toast1.addTopping(new Cheese());
toast1.addTopping(new Ham());
toast1.serve();
}
}객체를 실행하는 도중 동적으로 확장한다는 장점이 있다.
decorator 패턴은 객체의 동적 결합을 위해 구성(합성)을 사용해 확장한다.
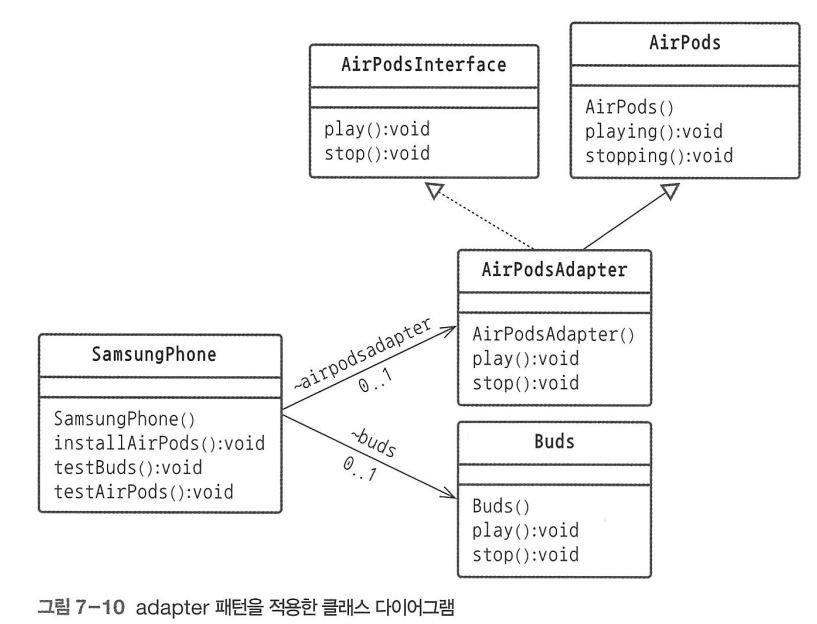
2) adapter 패턴
구매한 컴포넌트가 맞지 않아 바로 사용할 수 없다면?
adapter를 만들어 사용
어댑터 역할
- 클래스 adapter 패턴 : 상속을 이용한 어댑터 패턴
- 인스턴스 adapter 패턴 : 위임을 이용한 어댑터 패턴
/*AirPods class*/

public class AirPods {
	public AirPods() {
    	System.out.println("Airpods임");
    }
    public void playing() {
    	System.out.println("음악 재생 중");
    }
    public void stopping() {
    	System.out.println("음악 중지");
    }
}
/*Buds class*/
public class Buds {
public Buds() {
System.out.println("무선 이어폰");
}
public void play() {
System.out.println("음악 재생 중");
}
public void stopping() {
System.out.println("음악 중지");
}
}/*AirPodsAdapter class*/
public AirpodsAdapter extends AirPods implements AirPodsInterface {
public AirPodsAdapter() {
System.out.println("AirPods가 Samsung과 호환
}
public void play() {
super.playing();
}
public void stop() {
super.stoping();
}
}/*AirPodsInterface class*/
public interace AirPodsInterface {
void play();
void stop();
}/*SamsungPhone class*/
public class SamsungPhone {
Buds buds = new Buds();
AirPodsAdapter airapodsadapter;
public SamsungPhone() {
installAirPods(); //이를 통해 연동
System.out.println();
testBuds();
System.out.println();
testAirPods();
}
public void installAirPods() {
airpodsadapter = new AirPodsAdater();
System.out.println("Buds와 AirPods 연결");
}
public void testBuds() {
buds.play();
buds.stop();
}
public void testAirPods() {
airpodsadapter.play();
airpodsadapter.stop();
}
}/*Main class*/
public class main {
public static void main(String[] args) {
SamsungPhone samsungphone = new SamsungPhone();
}
}
생성 패턴 creational pattern
객체의 생ㅇ성과 참조 과정을 추상화해
특정 객체의 생성 과정을 분리.
언제 변경하더라도 전체 시스템에 미치는 영향을 최소화해준다.
1) factory method 패턴
객체 생성을 직접 하지 않고 누군가에게 맡기고 싶다면?
factory method 패턴 사용- 1단계 : 객체 생성을 담당하는 factory class를 만들어 그곳에서 객체 생성
- 2단계 : 객체를 생성할 수 있는 메서드를 만들어 그 메서드가 factory class 역할을 하도록 한다. 그리고 factory class를 삭제한다.
-> 객체를 만든다. -> (factory 역할을) 대신하도록 설정한다. -> 기존 클래스 (factory)를 삭제한다.
new == 메모리 할당 역할
1-1) factory - 1단계
/*GameServer class*/

pulbic class GameSercer {
	public GameServerFactory gsf;
    public GameServer() {
    	System.out.println("GameServer-정상 연결 완료");
    }
    public GameServer(GameServerFactory gsf) {
    	this.gsf = gsf;
    }
    public void execute(String game) {
    	Games games;
        games = gsf.chooseGame(game);
        games.BootingGame();
        games.RunGame();
    }
}
/*GameSrverFacotry class*/
/*조건문이 여기로 옮김*/
public class GameServerFactory {
SupterMario suptermario = new SuperMario();
Tetris tetris = new Tetris();
public Games chooseGame(String game) {
if(game.equals("supermario")) {
return supermario;
} else if (game.equals("tetris")) {
return tetris;
} else {
System.out.println("지원하지 않는 게임");
return null;
}
}
}/*Games class*/
public abstract class Games {
public String title, version;
public void BootingGame() {
System.out.println("게임명: " +title);
System.out.println("게임 버전: " +version);
System.out.println(title + "게임 실행 준비 완료");
}
public void RunGame() {
System.out.println(title + "시작");
}
}/*SuperMario class*/
public class SuperMario extends Games {
public SuperMario() {
title = "Super Mario";
version = "v1.0";
}
}/*Main class*/
public class Main {
public static void main(String args[]) {
GameServer gs = new GameServer(new GameServerFactory());
gs.execute("supermario");
}
}1-1) factory - 2단계
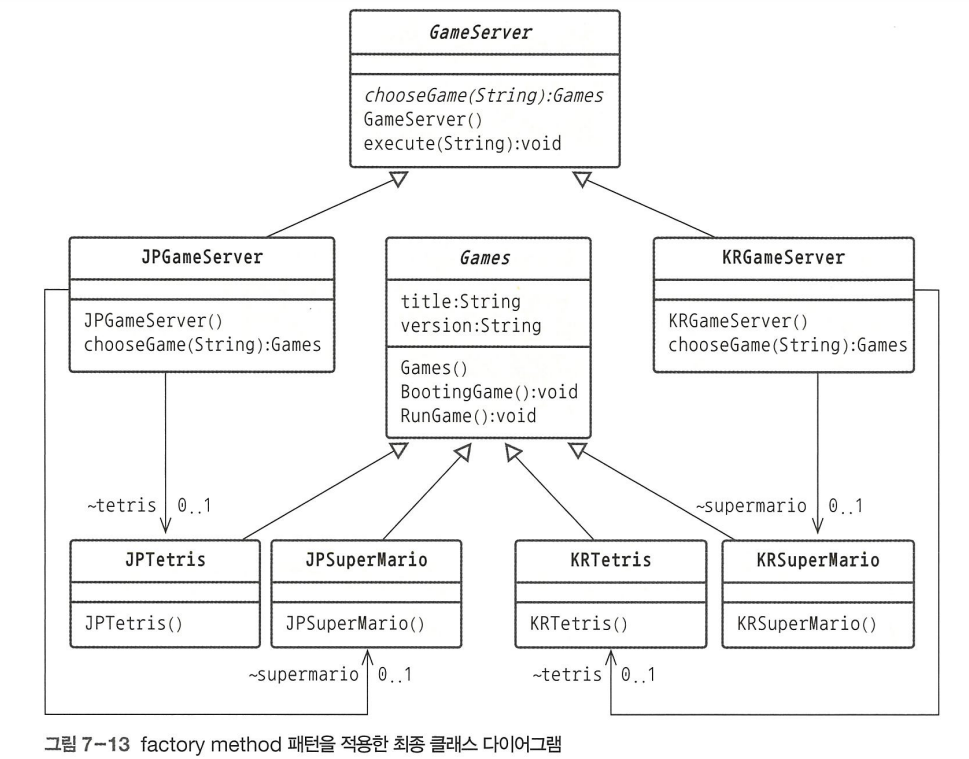
국가별로 GameServer를 계속 추가할 수 있도록 확장
/*GameServer class*/

public abstract Games chooseGame(String game);
public GameServer() {
	System.out.println("GameServer-정상 연결 완료");
}
public void execute(String game) {
	Games games;
    games = chooseGame(game);
    games.BootingGame();
    games.RunGame();
}
/*KRGameServer class*/
public class KRGameServer extends GameServer {
KRSuperMario supermario = new KRSuperMario();
KRTetris tetris = new KRTetris();
public Games chooseGame(String game){
if(game.equals("supermario")){
return supermario;
} else if(game.equals("tetris")) {
return tetris;
} else {
System.out.println("지원하지 않는 게임");
return null;
}
}
}/*Games class*/
public abstract cclass Games {
public String title, version;
public void BootingGame() {
System.out.println("게임명: " +title);
System.out.println("게임 버전: " +version);
System.out.println(title + "게임 실행 준비 완료");
}
public void RunGame() {
System.out.println(title + "시작");
}
}/*KRSuperMario class*/
public class KRSuperMario extends Games {
public KRSuperMario() {
title = "Super Mario";
version = "v1.0";
}
}/*Main class*/
public class Main {
public static void main(String args[]) {
GameServer gs = new KRGameServer();
gs.execute("supermario");
gs = new JPGameServer();
gs.execute("tetris");
}
}singleton 패턴
객체를 오직 1개만 만들어야 한다면?
singleton 패턴 이용
일반적으로 하나의 클래스에는 여러 개의 객체를 생성
BUT, 의도적으로 단 하나의 객체만 생성하도록 하는 경우 존재
※ static으로 사용하지 않는 이유?
-> static은 외부 객체가 생성이 불가능하기 때문
public class Singleton {
	private static Singleton singleton = new Singleton();
    private Singleton() {
    	System.out.println("SingleTon 패턴을 사용하는 경우");
    }

    //접근 루트로 사용
    public static Singleton getInstance() {
    	return singleton;
    }
}
/*Main class*/
public class Main {
public static void main(String[] args) {
NonSingleton nonSingleton_01 = new NonSingleton();
Singleton singleton_01 = Singleton.getInstance();
}
}singleton 패턴을 이용한 객체는 언제나 서로 같다
객체를 하나만 생성해서 그런건가
1) singleton 패턴에서는 private로 선언한다.
외부에서 사용할 수 없도록 막는다.
이 때문에 외부 혀용은 getInstance()를 만들어 사용한다.
2) 객체는 static으로 선언한다.
static은 최초 한 번만 메모리를 할당해 사용한다.
(메모리 사용을 줄인다.)
1-1) singleton & Thread & 동기화
동기화 == syncronized
/*EspressoMachine class*/

public class Espressonmachine {
	'''
    public synchronized static Espressomachine getInstance() {
    	'''
    }
    public synchronized void Brew(String Name, Stirng Beverage) {
    	'''
    }
}
/*User class*/
public class User extends Thread {
public String Name;
public String Beverage;
public User(String Name, String Beverage) {
this.Name = Name;
this.Beverage = Beverage;
}
public void run() {
EspressoMachine EM = EspressonMachine.getInstance();
EM.Brew(Name, Beverage);
}
}P.373 모르겠는데,,,?

UX 기획도 하고 서비스 기획도 하고 PM도 하고 프론트도 하고 PL도 하는 중