DB와 JPA
DB는 데이터를 저장하는 창고로, 데이터베이스를 줄여 부르는 말이다.
회원 ID/PW, 게시판의 글과 댓글 등 데이터들을 DB에 저장하여 관리하고 싶다.
그런데 DB는 SQL 언어를 사용하며 JAVA를 모른다. 어떻게 JAVA로 DB에 명령을 할 수 있을까?
JPA는 JAVA 언어를 DB가 이해할 수 있게 도와줄 뿐 아니라 데이터 관리에 필요한 여러 기능까지 제공한다.
JPA의 핵심 도구로는 Entity와 Repository가 있다.
Entity와 Repository
엔티티는 자바 객체(DTO)를 DB가 이해할 수 있게 잘 규격화된 데이터이고,
리포지터리는 이런 엔티티를 DB에 전달하고 잘 관리될 수 있도록 돕는 일꾼이다.
DTO : Form 데이터를 받는 객체
프로젝트 실습
사용자가 브라우저에서 입력하는 Form 데이터를 받아서 Controller를 통해 DTO를 Entity로 변환하고, Ropository를 통해 DB에 저장하는 과정을 실습해본다.
폼 데이터 전송하기
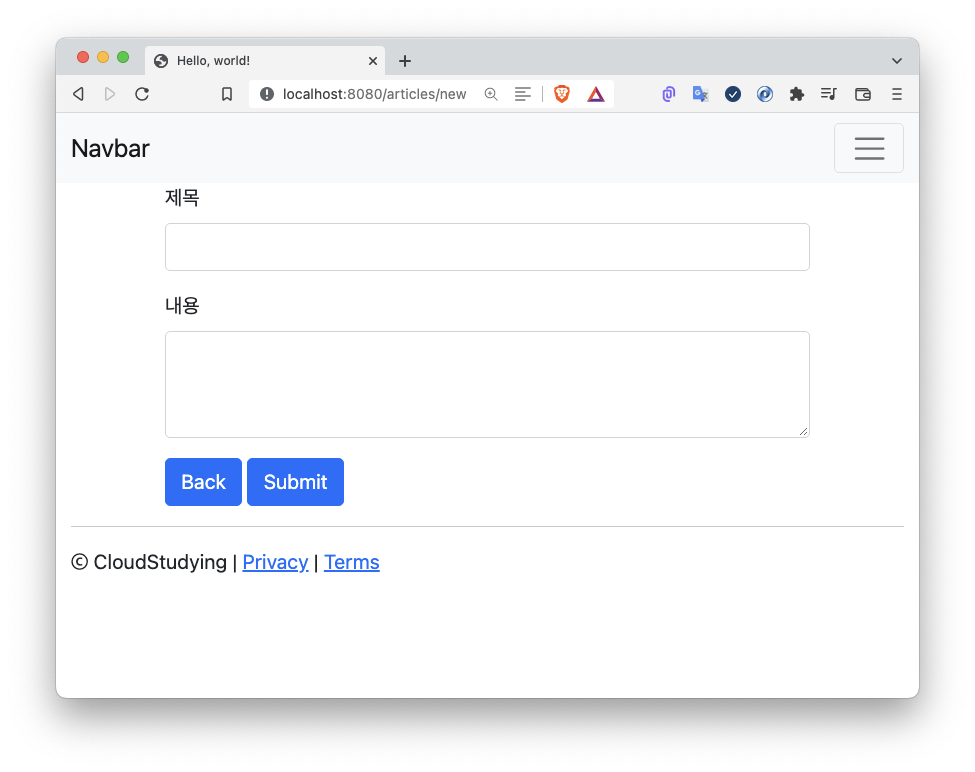
../templates/articles/new.mustache
{{>layouts/header}}
<form class="container" action="/articles/create" method="post">
  <div class="mb-3">
    <label class="form-label">제목</label>
    <!-- 입력값: title -->
    <input type="text" class="form-control" name="title">
  </div>
  <div class="mb-3">
    <label class="form-label">내용</label>
    <!-- 입력값: content -->
    <textarea class="form-control" rows="3" name="content"></textarea>
  </div>
  <button type="submit" class="btn btn-primary">Submit</button>
</form>
{{>layouts/footer}}
먼저, 지난 포스팅 [Spring Boot] View 템플릿과 레이아웃 (Feat.부트스트랩)
을 참고해 폼 데이터를 주고 받을 글 작성 페이지를 만든다.
제목과 내용 각 태그에 name 속성을 주어야 각 데이터를 수신하고 확인할 수 있다.
그리고 해당 페이지에서 작성하는 글은 "/articles/create" 에 post 방식으로 보내도록 한다.
"/articles/create"는 아직 생성되지 않았지만, 이후 컨트롤러에 생성해줄 경로이다.
dto로 데이터받기
../dto/ArticleForm
package com.example.firstproject.dto;

public class ArticleForm {
    private String title;
    private String content;

    public ArticleForm(String title, String content) {
        this.title = title;
        this.content = content;
    }

    @Override
    public String toString() {
        return "ArticleForm{" +
                "title='" + title + '\'' +
                ", content='" + content + '\'' +
                '}';
    }

    public Article toEntity() {
    return new Article(null, title, content);
    }

}
이후 생성될 "/articles/create" 경로에서 처리할 객체를 생성한다.
src > main > java > com.example.프로젝트명 경로 아래에 dto 라는 폴더를 만들고
ArticleForm.java 파일을 생성하여 아래와 같이 작성해준다.
게시글의 제목과 내용을 갖도록 title, content 필드를 지정하고 생성자를 만들었다.
그리고 toString 을 오버라이딩하여 게시글의 내용을 확인할 수 있도록 한다.
또 dto를 엔티티(Article)로 변환해주는 메소드를 만들었다.
엔티티 작성하기
../entity/Article
package com.example.firstproject.entity;

import javax.persistence.Column;
import javax.persistence.Entity;
import javax.persistence.GeneratedValue;
import javax.persistence.Id;

@Entity
public class Article {

    @Id
    @GeneratedValue
    private Long id;

    @Column
    private String title;

    @Column
    private String content;
    public Article(Long id, String title, String content) {
        this.id = id;
        this.title = title;
        this.content = content;
    }

    @Override
    public String toString() {
        return "Article{" +
                "id=" + id +
                ", title='" + title + '\'' +
                ", content='" + content + '\'' +
                '}';
    }
}
src > main > java > com.example.프로젝트명 경로 아래에 entitiy 폴더를 만들고 Article.java 파일을 만든다.
게시글이 가질 id, title, content 속성을 필드로 만들고, 각각 @Id, @Column, @Column 어노테이션을 붙여 db가 필드를 이해할 수 있도록 한다.
특히 id 필드에는 @GeneratedValue 어노테이션을 붙여서 자동으로 id값이 생성되도록 한다.
또 toString 메소드를 오버라이딩해서 게시글 번호와 제목, 내용을 알 수 있도록 한다.
Repository 작성
../repository/ArticleRepository
package com.example.firstproject.repository;

import com.example.firstproject.entity.Article;
import org.springframework.data.repository.CrudRepository;

public interface ArticleRepository extends CrudRepository<Article, Long> {
}
src > main > java > com.example.프로젝트명 경로 아래에 repository 폴더를 만들고 ArticleRepository.java 파일을 생성해 위와 같이 작성한다.
CrudRepository 인터페이스를 구현하고 <> 안에 관리 대상과 관리대상의 대표값 타입을 적어준다.
Article.java 엔티티의 대표값을 Id 로 지정했고, 해당 타입을 Long 으로 선언했었기 때문에 위와 같이 적어준다.
이로써 Article 엔티티에 대한 CRUD(생성, 조회, 수정, 삭제) 동작들을 추가 코드 작성없이 사용할 수 있게 되었다.
데이터 DB 저장
../controller/ArticleController
이렇게 만든 폼데이터와, 폼데이터를 받는 dtd 객체, dto객체를 디비에 맞게 바꿀 엔티티, 엔티티를 디비에 전달해줄 리포지터리를 사용할 컨트롤러를 구현하는 일만 남았다.
package com.example.firstproject.controller;

import com.example.firstproject.dto.ArticleForm;
import com.example.firstproject.entity.Article;
import com.example.firstproject.repository.ArticleRepository;
import org.springframework.beans.factory.annotation.Autowired;
import org.springframework.stereotype.Controller;
import org.springframework.web.bind.annotation.GetMapping;
import org.springframework.web.bind.annotation.PostMapping;

@Controller
public class ArticleController {

    @Autowired
    private ArticleRepository articleRepository;

    @GetMapping("/articles/new")
    public String newArticleForm() {
        return "articles/new";
    }

    @PostMapping("/articles/create")
    public String createArticle(ArticleForm form) {
        System.out.println(form.toString());

        // 1. Dto를 Entity 변환
        Article article = form.toEntity();
        System.out.println(article.toString());

        // 2. Repository에게 Entity를 DB로 저장하게 함
        Article saved = articleRepository.save(article);
        System.out.println(saved.toString());

        return "";
    }
}
new.mustache 파일을 반환해줄 컨트롤러와 메소드를 만들고,
new.mustache 파일이 데이터를 보낼 곳으로 지정한 "/articles/create" 경로에 대한 메소드를 만들었다.
해당 경로에서는 사용자가 입력한 데이터를 db로 보낼 것이므로
위에서 만들었던 dto를 엔티티로 변환하고, Repository에게 Entity를 DB로 저장하게 하는 메소드를 사용한다.
위 코드를 보면, ArticleRepository 객체를 만든적이 없음에도 사용하고 있다.
@Autowired 어노테이션을 사용해서 스프링부트가 미리 생성해놓은 객체를 가져다가 자동 연결되도록 한 것이다.
데이터 저장 흐름 확인

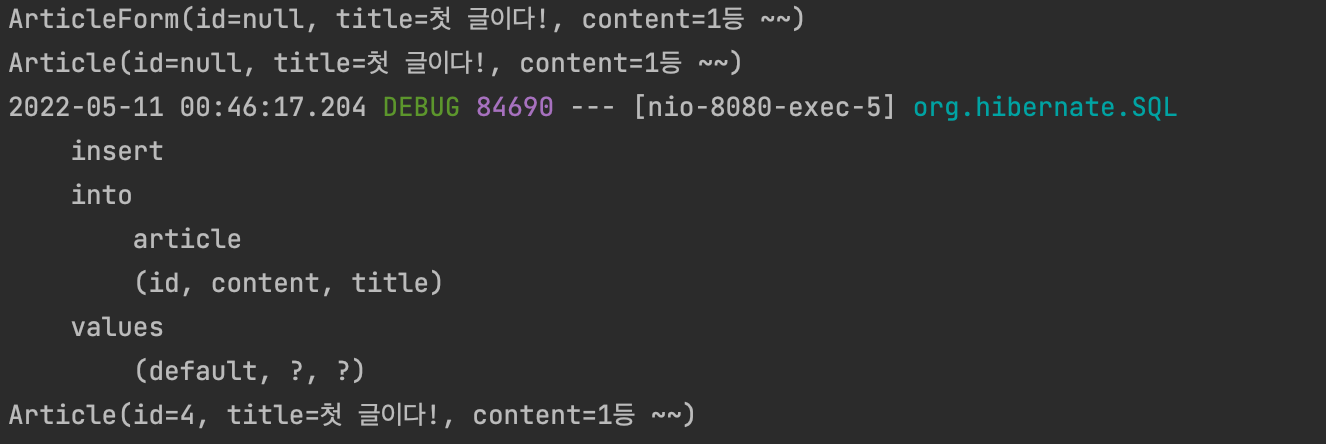
위와 같이 게시글을 작성하고 Submit을 해주면 dto(ArticleForm)가 entity(Article)로 변환되고, repository를 통해 db에 저장된 것을 toString 을 통해 확인할 수 있다.
추가로 정리할 것 (구글링)
- JPA 개념
- JPA 리파지터리란
- JPA Entity 사용법
- @Entity
- @Table
- @Id
- @GeneratedValue
- @Column
- DTO Entity 분리 장점
- JPA CrudRepository
- @Autowired