이때까지 배운 모든 것을 종합해 튜토리얼의 마지막을 소화해보자.
유저-게시물 연결
schema.prisma
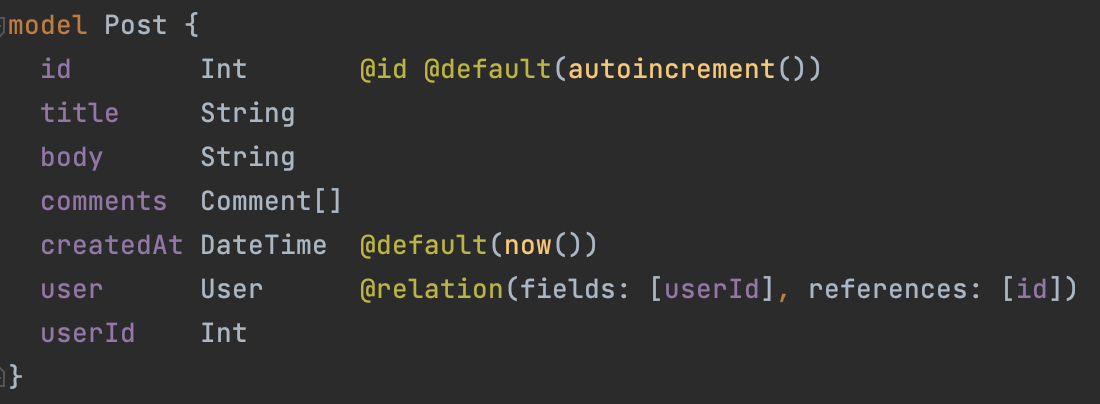
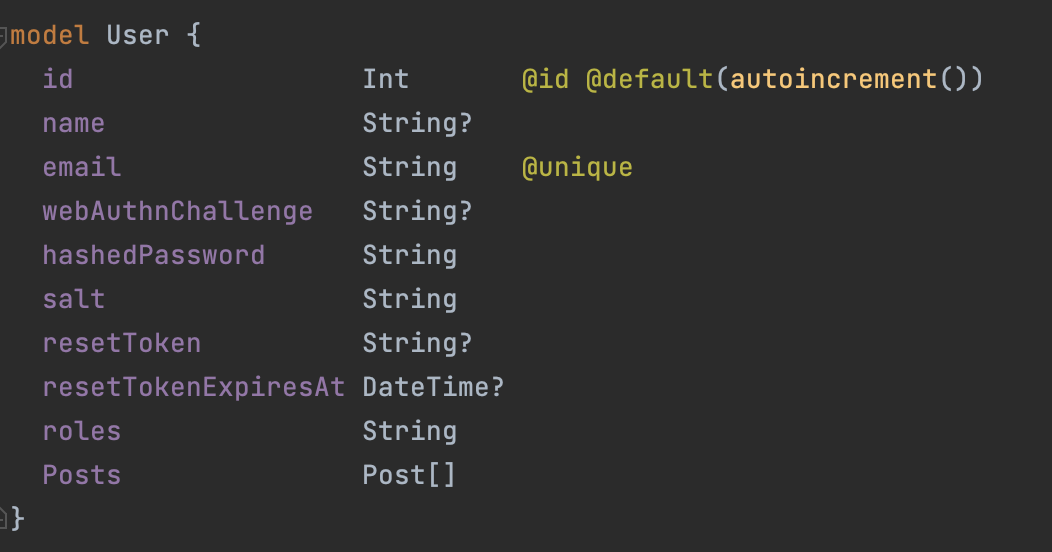
이제 유저와 게시물은 1:N 관계가 되었다.
yarn rw g sdl User --no-crud
yarn rw prisma migrate dev
yarn rw prisma migrate reset
기존 데이터를 모두 리셋하고 user sdl 파일을 생성하자.
post.sdl.ts (수정)
  type Post {
    id: Int!
    title: String!
    body: String!
    createdAt: DateTime!
    user: User!
  }
user 속성을 추가한다.
api/src/services/posts.ts (추가)
export const Post = {
  user: (_obj, { root }) =>
    db.post.findFirst({ where: { id: root.id } }).user(),
}
약간 이해하기 어려웠는데, Post를 작성한 user의 정보를 가져오는 것으로 보았다.
root는 현재 Post를 의미하며, 해당 게시물을 찾은 후 그 게시물에 연관된 유저를 찾아 반환하는 것이다.
N+1 문제
Springboot에서 JpaRepository에서 발생하던 N+1 문제는 GraphQL에서도 발생한다.
한 게시물을 작성한 유저에 접근하려는 순간 모든 게시물이 잠재적 정보인 유저에 접근하기 위해 추가적인 쿼리를 발생시킨다.
export const post = ({ id }) => {
  return db.post.findUnique({
    where: { id },
    include: {
      user: true
    }
  })
}
include를 통해 유저에 대한 데이터까지 가져오는, 즉 JPQL의 Fetch Join와 유사한 방식으로 처리할 수 있다.
다만 유저 데이터를 사용하지 않을 건데도 호출하는 오버헤드가 분명 존재하며,
RedwoodJS 측에선 현재 이 문제를 해결할 보다 세련된 방법을 구상 중에 있다.
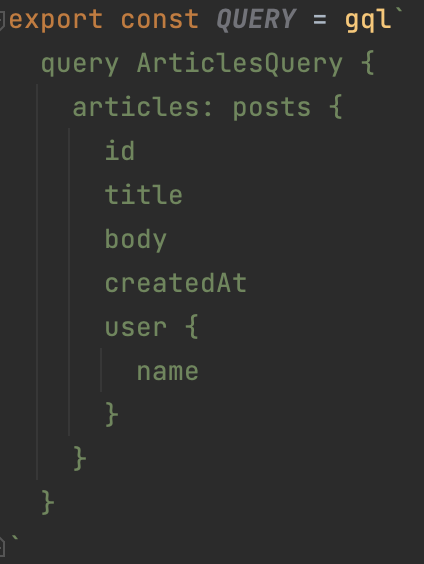
이제 게시물에 유저명을 보이도록 하기 위해, 쿼리 결과에 username을 추가할 것이다.
ArticlesCell과 ArticleCell 파일 모두 쿼리에 user { name } 을 삽입하자.
다음으로 Article.tsx에 username을 위한 span을 추가하자.
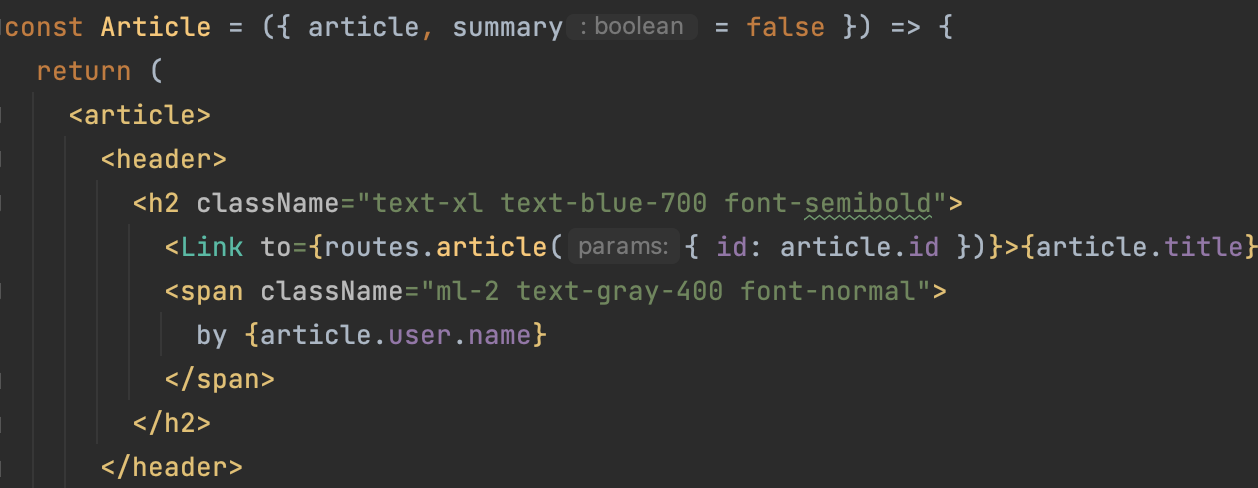
이제 백엔드로부터 받아올 쿼리 결과에 유저와 관련된 추가적인 정보를 담았다.
그런데 유저가 업로드를 요청한 게시물에 대해, API는 어떻게 이 게시물의 유저를 알 수 있는 것일까?
참고로 ...input은 앞쪽에 존재하는 매개변수를 input 안에 담긴 매개변수들로 대신 표현하겠다는 의미이다.
개인적으로 자바가 본받아야 할 기능이라고 생각한다.
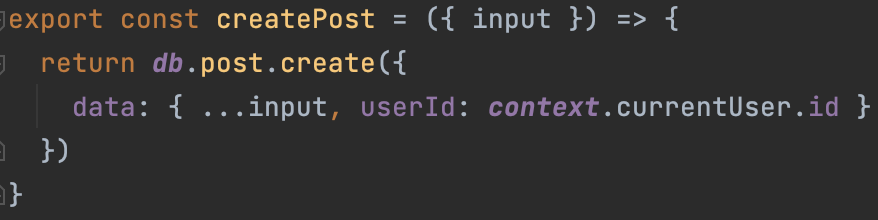
context를 통해 Web 패키지와 동일한 cureentUser를 활용하여 요청한 유저의 정보에 접근할 수 있다.
우리는 지난 게시물에서, 게시물을 새로 업로드하려면 admin이라는 role을 가지고 있어야 한다고 가정하였다.
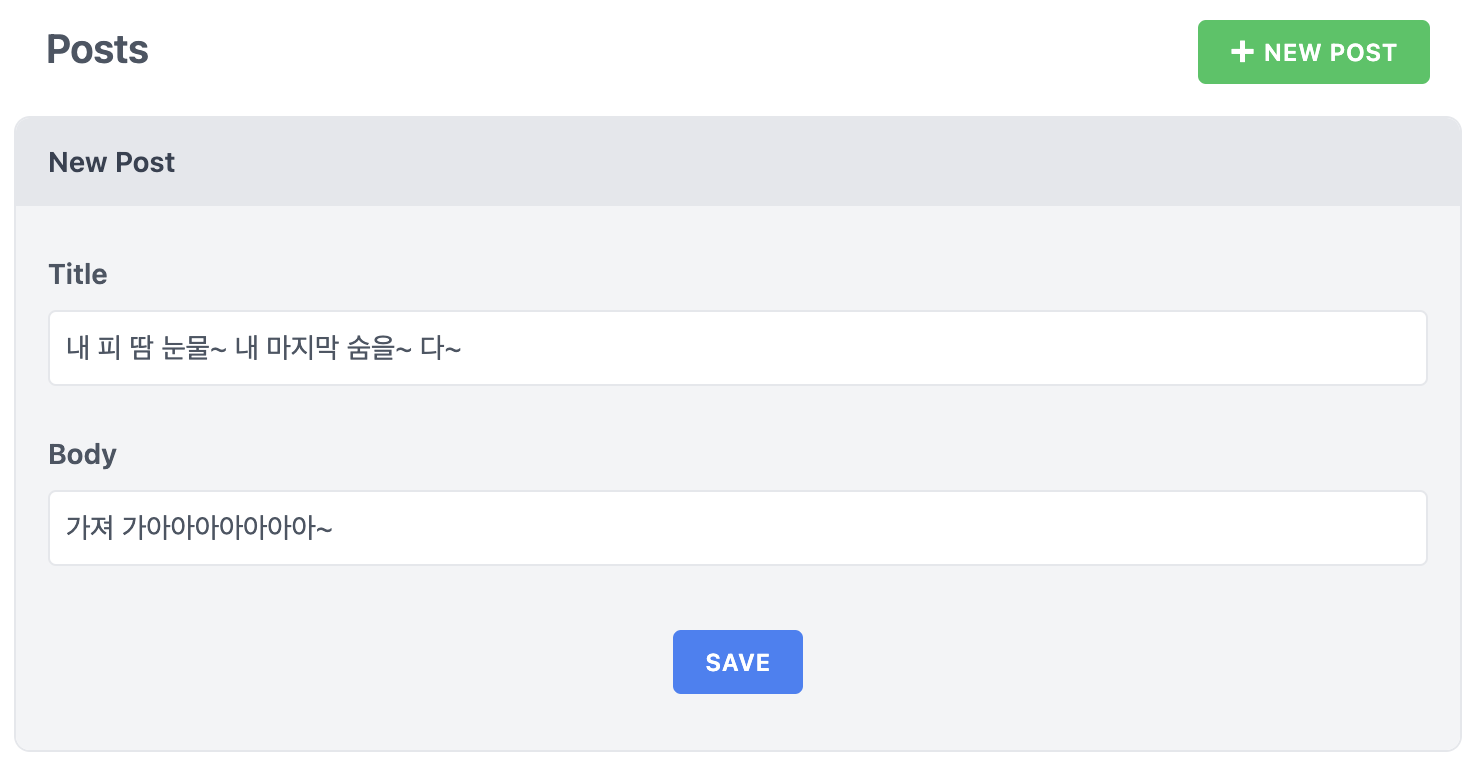
가입한 계정을 admin으로 설정하면 /admin/posts/new에 접근하여 게시물을 업로드할 수 있게 된다!
api/src/services/posts/posts.js
/admin/posts에서 본인이 작성한 게시물에만 접근할 수 있도록 수정하자.
export const posts = () => {
  return db.post.findMany({ where: { userId: context.currentUser.id } })
}

export const post = ({ id }) => {
  return db.post.findFirst({
    where: { id, userId: context.currentUser.id },
  })
}
참고로 Prisma에서 findFirst와 findUnique는 약간 다르다.
Prisma의 findUnique()는 여기서는 절의 모든 속성(id, userId)이 고유한 인덱스를 가져야 한다.
id는 PK이기에 기본적으로 인덱스가 생성되나 userId는 그렇지 않다.
그러므로 findFirst()를 통해 조건을 만족하는 첫번째 레코드를 찾는 것이 바람직하며, 이 조건에 만족하는 레코드가 오직 하나이기에 데이터의 중복성이나 일관성 문제를 고려하지 않아도 된다.

이 코드의 문제점은 로그아웃 시 요청하는 유저의 id를 알 수 없기 때문에 게시물을 불러오지 못한다는 것이다.
게시물 작성 및 수정을 위한 관리자 게시물 페이지와 단순 조회를 위한 일반 게시물 페이지를 분리하자!
post.sdl.ts
export const schema = gql`
  type Post {
    id: Int!
    title: String!
    body: String!
    createdAt: DateTime!
    user: User!
  }

  type Query {
    posts: [Post!]! @skipAuth
    post(id: Int!): Post @skipAuth
  }
`
adminPosts.sdl.js
export const schema = gql`
  type Query {
    adminPosts: [Post!]! @requireAuth(roles: ["admin"])
    adminPost(id: Int!): Post @requireAuth(roles: ["admin"])
  }

  input CreatePostInput {
    title: String!
    body: String!
  }

  input UpdatePostInput {
    title: String
    body: String
  }

  type Mutation {
    createPost(input: CreatePostInput!): Post! @requireAuth(roles: ["admin"])
    updatePost(id: Int!, input: UpdatePostInput!): Post! @requireAuth(roles: ["admin"])
    deletePost(id: Int!): Post! @requireAuth(roles: ["admin"])
  }
`
목록/단일 게시물 조회와 생성/수정/삭제 등이 두 sdl 파일로 분리되었다.
api/src/services/adminPosts/adminPosts.ts
import { db } from 'src/lib/db'

export const adminPosts = () => {
  return db.post.findMany({ where: { userId: context.currentUser.id } })
}

export const adminPost = ({ id }) => {
  return db.post.findFirst({
    where: { id, userId: context.currentUser.id },
  })
}

export const createPost = ({ input }) => {
  return db.post.create({
    data: { ...input, userId: context.currentUser.id },
  })
}

export const updatePost = ({ id, input }) => {
  return db.post.update({
    data: input,
    where: { id },
  })
}

export const deletePost = ({ id }) => {
  return db.post.delete({
    where: { id },
  })
}
posts.ts
import { db } from 'src/lib/db'

export const posts = () => {
  return db.post.findMany()
}

export const post = ({ id }) => {
  return db.post.findUnique({ where: { id } })
}

export const Post = {
  user: (_obj, { root }) =>
    db.post.findFirst({ where: { id: root.id } }).user(),
}
이제 조회의 경우 로그아웃 후에도 가능하고, 생성 및 수정은 admin role 판정을 거쳐야 한다.
/admin/post 페이지는 기존에 설정했던 "본인이 작성했던 게시물"에 대한 조회 기능이 유지되어야 하고,
verifyOwnerShip 함수는 Springboot Service 계층의 validateXXX(Repository 계층에선 existsByXXX) 함수와 유사한 역할을 수행하며 적절한 유효성 검사를 통해 이 유저가 그 게시물을 작성한 사람이 맞는지에 대해 판정한다.
adminPosts.ts
import { ForbiddenError } from '@redwoodjs/graphql-server'
import { db } from 'src/lib/db'
const verifyOwnership = async ({ id }) => {
if (await adminPost({ id })) {
return true
} else {
throw new ForbiddenError("You don't have access to this post")
}
}
export const adminPosts = () => {
return db.post.findMany({ where: { userId: context.currentUser.id } })
}
export const adminPost = ({ id }) => {
return db.post.findFirst({
where: { id, userId: context.currentUser.id },
})
}
export const createPost = ({ input }) => {
return db.post.create({
data: { ...input, userId: context.currentUser.id },
})
}
export const updatePost = async ({ id, input }) => {
await verifyOwnership({ id })
return db.post.update({
data: input,
where: { id },
})
}
export const deletePost = async ({ id }) => {
await verifyOwnership({ id })
return db.post.delete({
where: { id },
})
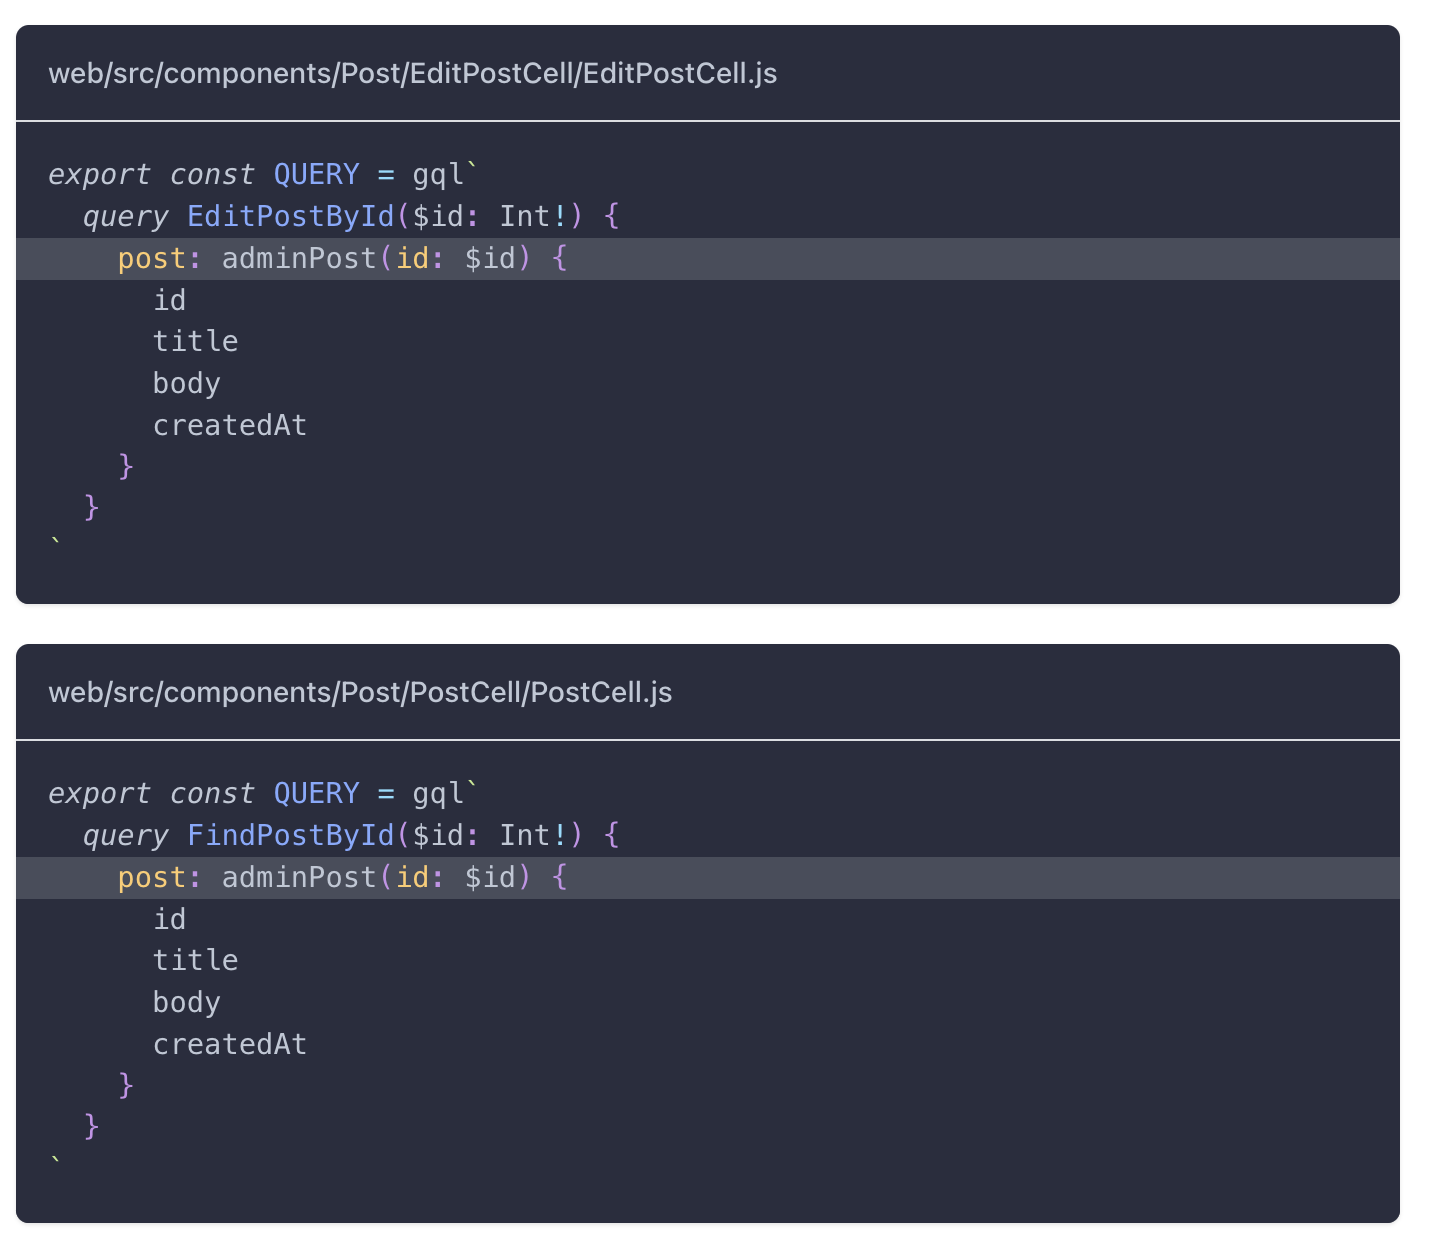
}마지막으로 EditPostCell.ts, PostCell.ts, PostsCell.ts의 GraphQL 쿼리를 업데이트하자.
공식문서를 참고하며 아래와 같은 형태로 바꿔주면 된다.
기존 로직과 달라졌기에, posts.ts에 남은 조회 관련 테스트코드 및 시나리오를 수정하였다.
posts.test.ts
import { posts, post } from './posts'
import type { StandardScenario } from './posts.scenarios'

describe('posts', () => {
  scenario('returns all posts', async (scenario: StandardScenario) => {
    const result = await posts()

    expect(result.length).toEqual(Object.keys(scenario.post).length)
  })

  scenario('returns a single post', async (scenario: StandardScenario) => {
    const result = await post({ id: scenario.post.one.id })

    expect(result).toEqual(scenario.post.one)
  })
})
posts.scenarios.ts
import type {Prisma, Post} from '@prisma/client'
import type {ScenarioData} from '@redwoodjs/testing/api'

export const standard = defineScenario<Prisma.PostCreateArgs>({
  post: {
    one: {
      data: {
        title: 'String',
        body: 'String',
        user: {
          create: {
            email: 'winluck1@cau.ac.kr',
            hashedPassword: 'qwdqwdwqd',
            salt: 'asdasddw',
          }
        }
      }
    },
    two: {
      data: {
        title: 'String',
        body: 'String',
        user: {
          create: {
            email: 'winluck2@cau.ac.kr',
            hashedPassword: 'qwdqwdwqd',
            salt: 'asdasddw',
          }
        }
      }
    },
  }
})

export type StandardScenario = ScenarioData<Post, 'post'>
무사히 테스트가 잘 통과하였다. 다만 시나리오 파일에서 create의 의미와 역할에 대해 공부해볼 필요가 있다. 또한 다른 테스트와 충돌하는 경우에 확인되고 있다.
참고로 블로그엔 없지만 유저의 관계 형성으로 인한 여러 테스트코드에 불이 났을 테니, 한번 각자 수정에 도전해보자!
생성/수정/삭제 역할을 수행하는 adminPosts에 대한 테스트코드 및 시나리오 역시 작성해봐야겠다.
RedwoodJS Tutorial 후기
JavaScript 환경에 익숙하지 않아 쉽지 않았다. test, scenario, mock 등등 수많은 파일들이 CLI 기준으로 그림자처럼 따라붙는 게 약간 혼란스러웠지만 특정 기능을 개발할 때 다양한 도구들이 함께 빛을 발하는 것이 흥미로웠다.
- 기능을 구상한다.
- Storybook으로 일정 크기의 컴포넌트를 구축하고 확인한다.
- Prisma schema, sdl.ts, service 로직을 추가한다.
- Mock,Scenario 등을 기반으로 Jest 테스트코드를 작성하고 검증한다.
대략적으로 이런 느낌의 사이클 구조를 의도하는 듯 하다.
RedwoodJS는 하나의 기능을 다양한 Tool들의 지원 하에서 개발자 혼자서 모두 책임지고 개발할 수 있는 훌륭한 풀스택 환경이라고 생각한다.
공식문서를 번역한 느낌으로 게시물을 작성하려 했는데 가독성이 약간 떨어지는 것 같아 꽤 아쉽다.
(물론 여기서 게시물 작성을 그만두는 것은 절대 아니다! 갈 길이 멀다..)
RedwoodJS Tutorail URL은 아래와 같다.
https://redwoodjs.com/docs/tutorial/foreword
튜토리얼 정도의 준비만으로 회사에서 1인분을 하는것은 당연히 불가능하겠지만, 적어도 내가 만지게 될 프레임워크가 어떤 환경을 가지고 있고, 어떤 절차를 거쳐서 기능을 추가하고 검증하는지에 대해 알 수 있었고, 입사 후 개발 환경 적응에 일정 부분 기여할 수 있는 의미있는 경험이었다.
Specailist가 되기 전에, 편견 없이 주어진 문제를 해결하는 데 여러 도구를 소화할 수 있는 Generalist가 먼저 되어보자!
보충해야 할 지식
- Jest의 작동 원리
- Service 코드와 sdl.ts 코드의 차이와 역할
- Scenario 작성 과정에서 create의 역할
- 복잡한 관계에서의 CRUD
