08월25일
게임 코드 중 : hero의 중앙 정렬 변수 처리
import pygame
1. 초기화 -> 변수의 구성
pygame.init()
2. 게임 화면 설정 -> 고정값
size = [400, 900]
screen = pygame.display.set_mode(size)
title = "pyGameExample"
pygame.display.set_caption(title)
3. 게임 내에서의 설정 -> 변수로 처리
clock = pygame.time.Clock()
color1 = (160, 250, 208)
color2 = (191, 234, 255)
black_color = (0,0,0)
white_color = (255,255,255)
hero = pygame.image.load("C:/Users/201/Pictures/pyGame/hero1.png").convert_alpha()
hero = pygame.transform.scale(hero, (80, 80))
hero_width, hero_height = hero.get_size()
print(hero_width)
print(hero_height)
hero_x = round(size[0] / 2) - round(hero_width / 2)
hero_y = size[1] - hero_height - 70
4. 메인 이벤트
system_exit = 0
while system_exit == 0:
#   4-1. FPS(Frames per Sec) 설정
clock.tick(60)
#   4-2. 입력(키보드, 마우스)의 감지
for event in pygame.event.get():
    if event.type == pygame.QUIT:
        system_exit = 1
#   4-3. 입력, 시간에 따른 변화

#   4-4. 전사작업(그리기)

screen.fill(black_color)
screen.blit(hero,(hero_x, hero_y))

#   4-5. 업데이트
pygame.display.flip()
5. 종료(x버튼을 클릭해서 종료, game over 종료)
pygame.quit()
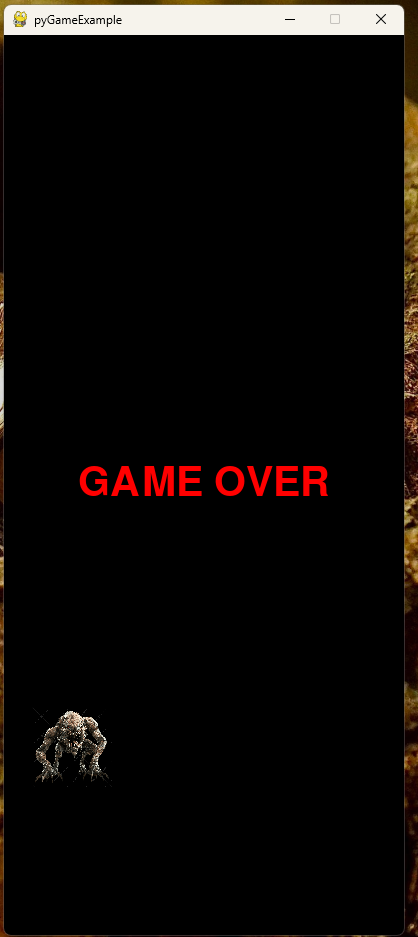
현재까지 처리 상황은 게임 초기화 -> 변수의 구성 => 강사님 코드 + 투사체 생성과 발사 처리 + 적의 생성과 이동(내려오기) + 적에 투사체가 맞으면 사라지기 + 적이 나와 부딪치면 game over
import pygame
import random
1. 초기화 -> 변수의 구성 => 강사님 코드 + 투사체 처리 + game over
pygame.init() #게임의 초기
2. 게임 화면 설정 -> 고정값
size = [400, 900]
screen = pygame.display.set_mode(size)
title = "pyGameExample"
pygame.display.set_caption(title) # 게임 창의 맨 위 제목 표시줄에 이름을 달아줍니다.
3. 게임 내에서의 설정 -> 변수로 처리
clock = pygame.time.Clock() # 게임의 프레임(FPS, 화면 갱신 속도)을 조절할 시계 객체입니다.
색상 변수
color1 = (160, 250, 208)
color2 = (191, 234, 255)
black_color = (0, 0, 0) # 검은색 (빛이 없음)
white_color = (255, 255, 255) # 흰색
이미지 객체 생성하는 클래스를 정의
class Img_Object:
def init(self):
self.x = 0
self.y = 0 # 객체가 처음 만들어질 때 위치를 0, 0으로 기본 설정
def add_Img(self, address):
# 이미지를 불러오는 함수입니다. 배경이 투명한 png 파일은 convert_alpha()로 처리합니다.
    if address[-3:] == "png":
        self.img = pygame.image.load(address).convert_alpha()
    else:
        self.img = pygame.image.load(address)

def change_size(self, width, height):
    # 이미지의 크기를 원하는 가로, 세로 픽셀로 변형합니다.
    self.img = pygame.transform.scale(self.img, (width, height))
    self.width, self.height = self.img.get_size()

def show_Img(self):
    # 설정된 x, y 좌표에 이미지를 화면(screen)에 복사해서 붙여넣습니다 (blit).
    screen.blit(self.img, (self.x, self.y))
주인공(hero) 객체 생성
hero = Img_Object()
hero.add_Img("C:/Users/201/Pictures/pyGame/hero1.png")
hero.change_size(80, 80)
hero.x = round(size[0] / 2) - round(hero.width / 2)
hero.y = size[1] - hero.height - 70
hero.move = 5
적(enermy) 객체 생성
enermy = Img_Object()
enermy.add_Img("C:/Users/201/pyGame/enermy.png")
enermy.change_size(80,80)
enermy.x = random.randint(0, size[0] - 80) # 화면 내의 무작위 숫자의 위치를 잡음
enermy.y = 0 # 적의 세로 위치는 화면 맨 위(0)로 고정합니다.
적의 움직임과 상태를 관리하기 위한 변수들
enermy_speed = 4 # 적이 아래로 내려오는 이동 속도
enermy_alive = True # 적이 살아있는지(화면에 보일지) 확인하는 스위치
게임 오버 상태를 관리하는 변수와 글꼴 설정
game_over = False # 처음에는 게임 오버 상태가 아니므로 False로 시작합니다.
파이게임의 기본 폰트를 사용하여 크기 60짜리 글꼴 객체를 만듭니다.
font = pygame.font.SysFont(None, 60)
키보드 눌림 상태를 저장하는 변수 (좌우 방향키)
left_move = False
right_move = False
투사체 관련 변수
bullets = [] # 투사체 좌표를 담을 리스트
bullet_speed = 5 # 투사체 이동 속도
4. 메인 이벤트
system_exit = 0
while system_exit == 0:
# 4-1. FPS(Frames per Sec) 설정
# 컴퓨터 속도와 상관없이 1초에 while문을 60번만 돌도록 제한(일정한 게임 속도 유지)
clock.tick(60)

# 4-2. 입력(키보드, 마우스)의 감지
# pygame.event.get() 루프는 무조건 하나로 합쳐야 됨
for event in pygame.event.get():
   # 창의 오른쪽 위 'X' 닫기 버튼을 누르면 무한 루프를 끝낼 준비를 합니다.
    if event.type == pygame.QUIT:
        system_exit = 1

    # 키보드를 '누를 때'(이동 시작)
    if event.type == pygame.KEYDOWN:
        if event.key == pygame.K_LEFT:
            left_move = True
        if event.key == pygame.K_RIGHT:
            right_move = True

        # 스페이스바  '누를 때' 투사체 (생성 발사)
        if event.key == pygame.K_SPACE:
            # 게임 오버 상태가 아닐 때만 총을 쏠 수 있게 제한합니다.
            if game_over == False:
                # hero.x의 위치값을 활용하여 적정 위치에서 투사체 생성
                bullet_x = hero.x + (hero.width // 2)
                bullet_y = hero.y  #비행기의 높이 활용
                # 계산된 좌표를 리스트에 추가
                bullets.append([bullet_x, bullet_y])

    # 키보드를 '뗄 때' (이동 정리)
    elif event.type == pygame.KEYUP:
        if event.key == pygame.K_LEFT:
            left_move = False      # 왼쪽 이동 스위치 OFF
        if event.key == pygame.K_RIGHT:
            right_move = False     # 오른쪽 이동 스위치 OFF

# 4-3. 입력, 시간에 따른 변화 업데이트
# 게임 오버가 아닐 때(False)만 주인공과 적이 움직이고, 충돌을 계산합니다.
if game_over == False:

    # 스위치가 ON이면 해당 방향으로 좌표를 이동시킵니다.
    if left_move == True:
        hero.x -= hero.move
        if hero.x <= 0: #정해진 값에서 키보드를 계속 눌러도 0으로 제한 유지
            hero.x = 0
    elif right_move == True:
        hero.x += hero.move
        # 화면 오른쪽 밖으로 뚫고 나가면 강제로 (전체화면 - 내몸통) 크기에 맞춥니다.
        if hero.x >= size[0] - hero.width:
            hero.x = size[0] - hero.width

    # 적이 아래로 내려오게 하는 로직
    if enermy_alive == True:
        enermy.y += enermy_speed  # 속도만큼 Y좌표를 계속 더해주어 아래로 내려오게 합니다.
        # 만약 적이 화면 맨 아래(size[1])를 완전히 벗어나면
        if enermy.y > size[1]:
            enermy.y = -80  # 화면 위쪽 숨겨진 곳(-80)으로 끌어올리고
            enermy.x = random.randint(0, size[0] - enermy.width) # X 위치는 다시 무작위로 바꿉니다.
    else:
        # 적이 파괴된 경우(False), 바로 다시 새롭게 등장 시킵니다.
        enermy_alive = True
        enermy.y = -80
        enermy.x = random.randint(0, size[0] - enermy.width)

    # 나의 비행기(hero)와 떨어지는 적(enermy)의 충돌 처리 (게임 오버 로직)
    if enermy_alive == True:
        # 충돌을 쉽게 계산하기 위해 각각의 이미지 영역을 투명한 사각형(Rect)으로 감쌉니다.
        hero_rect = pygame.Rect(hero.x, hero.y, hero.width, hero.height)
        enermy_rect = pygame.Rect(enermy.x, enermy.y, enermy.width, enermy.height)

        # 주인공 사각형(hero_rect)과 적 사각형(enermy_rect)이 겹쳤는지(colliderect) 확인합니다.
        if hero_rect.colliderect(enermy_rect):
            game_over = True  # 적과 부딪혔으므로 게임 오버 상태를 True로 변경

    # 발사된 투사체 이동 및 적과의 충돌 검사
    # bullets[:]를 쓰면 리스트의 '복사본'을 보면서 원본을 지울 수 있어 안전합니다.
    for bullet in bullets[:]:
        bullet[1] -= bullet_speed  # 총알의 y좌표를 빼서 위로 날려보냅니다.

        if bullet[1] < 0:          # 화면 밖으로 나가면 메모리(리스트)에서 삭제
            bullets.remove(bullet)
            continue               # 아래 코드를 건너뛰고 다음 총알로 넘어감

        # 총알(투사체)이 적에게 맞았는지 확인하는 로직
        if enermy_alive == True:
            enermy_rect = pygame.Rect(enermy.x, enermy.y, enermy.width, enermy.height)
            # 총알의 좌표(bullet[0], bullet[1])가 적의 사각형 안에 들어갔다면?
            if enermy_rect.collidepoint(bullet[0], bullet[1]):
                bullets.remove(bullet) # 1)명중한 총알은 장바구니에서 지우고
                enermy_alive = False   # 2)적도 파괴시킵니다 (화면에서 사라짐)

# 4-4. 전사작업(화면에 그리기)
screen.fill(black_color) # 배경 검은색으로 칠하기

# 게임 오버가 아닐 때만 주인공(hero)을 그려줍니다.
# 부딪히면 내 비행기가 사라진 것처럼 보입니다
if game_over == False:
    hero.show_Img()           # hero 클래스 메서드로 이미지 그리기

# 적이 살아있는 상태일 때만 화면에 이미지를 그립니다.
if enermy_alive == True:
    enermy.show_Img()         # enermy 클래스 메서드로 이미지 그리기

# 리스트에 있는 모든 투사체(빨간 원) 그리기
for bullet in bullets:
    pygame.draw.circle(screen, (255, 0, 0), (bullet[0], bullet[1]), 5)

# 게임 오버 상태일 때 화면 정중앙에 "GAME OVER" 문구 띄우기
if game_over == True:
    # 빨간색(255, 0, 0) 글씨로 GAME OVER 텍스트 이미지를 만듭니다.
    game_over_text = font.render("GAME OVER", True, (255, 0, 0))
    # 글씨를 화면 정중앙 좌표에 맞게 감쌉니다.
    text_rect = game_over_text.get_rect(center=(size[0] // 2, size[1] // 2))
    # 화면에 그려줍니다.
    screen.blit(game_over_text, text_rect)

# 4-5. 화면 업데이트 (그린 내용을 실제 모니터에 반영)
pygame.display.flip()
5. 종료
pygame.quit()