이 글은 기존 운영했던 WordPress 블로그인 PyxisPub: Development Life (pyxispub.uzuki.live) 에서 가져온 글 입니다. 모든 글을 가져오지는 않으며, 작성 시점과 현재 시점에는 차이가 많이 존재합니다.
작성 시점: 2019-07-15
디스코드 음악봇, MusicBot를 Docker로 올리기
고향 동창과 디스코드를 애용하고 있는데, 최근까지만 해도 S.A.T.8-Bot라는 어떤 게임의 캐릭터를 모티브로 한 봇을 사용하고 있었다.
다만 언제서부턴가 끊김이 발생하거나 계속 연결 <-> 연결 중지를 반복하는 바람에 사용하지 못하게 되었고, 그 대신 개인 서버를 이용하여 올리기로 했다.
따라서 이 글에서는 https://github.com/Just-Some-Bots/MusicBot 를 올리는 과정에 대해 간략하게 정리하려고 한다.
사양
사양은 Vultr 1Core 1GB (월 $5)로 구성했다. 봇만 굴릴 것이기 때문에 그다지 높은 사양은 필요로 하지 않을 것이다.
OS는 Ubuntu 18.04 기준으로 한다.
최소 구성요소 설치
설치할 요소는 Docker-CE와 Docker-compose이다.
 sudo apt-get update
 sudo apt-get install apt-transport-https ca-certificates curl gnupg-agent software-properties-common git
 curl -fsSL https://download.docker.com/linux/ubuntu/gpg | sudo apt-key add -
 sudo apt-key fingerprint 0EBFCD88
 sudo add-apt-repository "deb [arch=amd64] https://download.docker.com/linux/ubuntu $(lsb_release -cs) stable"
 sudo apt-get update
 sudo apt-get install docker-ce docker-ce-cli containerd.io

sudo curl -L "https://github.com/docker/compose/releases/download/1.24.0/docker-compose-$(uname -s)-$(uname -m)" -o /usr/local/bin/docker-compose
sudo chmod +x /usr/local/bin/docker-compose
Git Clone & docker-compose 파일 생성
git clone https://github.com/Just-Some-Bots/MusicBotGit Clone를 받은 다음, 해당 폴더에 진입하여 docker-compose.yml 파일을 생성한다.
version: '2.4'
services:
  musicbot:
    build:
      context: .
      dockerfile: Dockerfile
    restart: always
    volumes:
      - "/home/{USERNAME}/musicbot:/usr/src/musicbot/config"
    container_name: musicbot
    command: -update
이 때, volumes 에서 config 폴더를 설정해주게 되는데 이 경로를 실제로 생성해서 파일들을 수동으로 넣어야 한다.
Git clone 받은 폴더 안에 config 폴더를 복사해서 volumes에 매핑한 경로에 붙여넣기 하면 된다.
즉, /home/{USERNAME}/musicbot 내부에 MusicBot/config 내부에 있는 파일들이 존재하면 된다. (example_alias 나 i18n, example_options 등)
)
디스코드 봇 정보 가져오기
설정을 본격적으로 하기 전에 두 가지 정보가 필요한데, 하나는 Bot Token이고 하나는 UserId 이다.
Bot Token
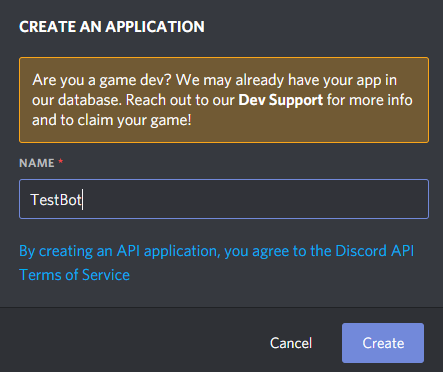
https://discordapp.com/developers/applications/ 에 접속하여 New Application 을 눌러 새로운 Application을 작성한다.
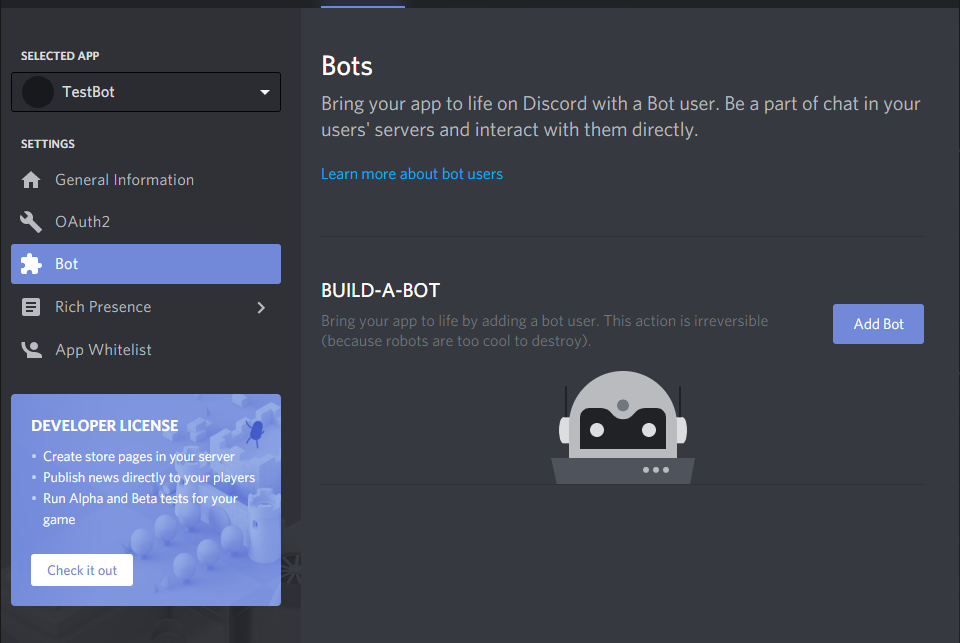
좌측의 Bot를 클릭하여 Add Bot를 클릭한다.
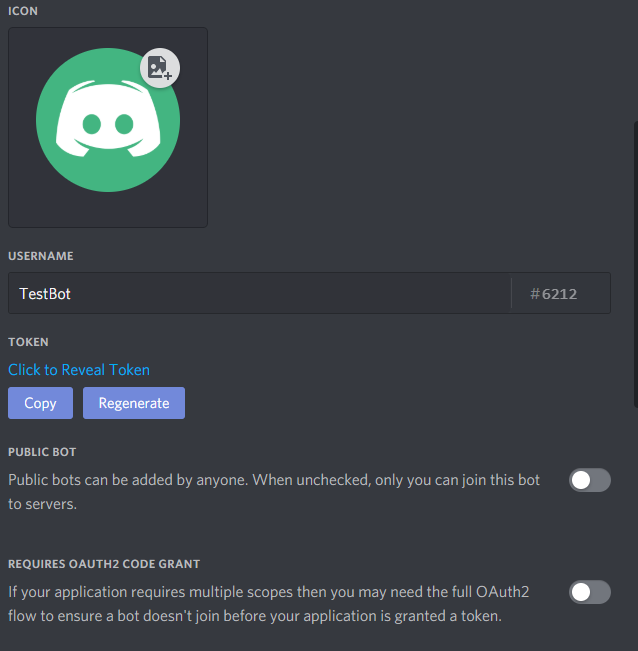
아이콘과 유저 이름을 설정하고, 밑의 체크박스 두 개를 모두 해제한다. 마지막으로 Click to Reveal Token을 눌러 토큰을 발급받은 뒤, 메모장 등에 저장한다.
UserId 가져오기
디스코드 채팅방에서 자신의 닉네임을 검색하여 선택하면 @Pyxis#1324 가 메세지 창에 표시되는데, 맨 앞에 \를 붙이고서 전송 버튼을 누른다.
이 때, 채팅창에 <@ 로 시작하는 숫자가 나오게 되는데, 이 id가 user id이다.

설정 파일 작성하기
아까 생성한 musicbot 폴더 내에 example_options.ini를 options.ini로 복사하거나, 아래 내용을 참고해서 options.ini를 설정한다.
# This is the configuration file for MusicBot. You need to edit this file
# to setup the bot. Do not edit this file using Notepad as it ruins the
# formatting - use Notepad++ or a code editor like Visual Studio Code.

# For help, see: https://just-some-bots.github.io/MusicBot/

# To get IDs, enable Developer Mode (Options -> Settings -> Appearance)
# on Discord and then right-click the person/channel you want to get the
# channel of, then click 'Copy ID'. You can also use the 'listids' command.
# (http://i.imgur.com/GhKpBMQ.gif)


; HOW TO GET VARIOUS IDS:
; http://i.imgur.com/GhKpBMQ.gif
; Enable developer mode (options, settings, appearance), right click the object you want the id of, and click Copy ID
; This works for basically everything you would want the id of (channels and users).  For roles you have to right click a role mention.


[Credentials]
# This is your Discord bot account token.
# Find your bot's token here: https://discordapp.com/developers/applications/me/
# Create a new application, with no redirect URI or boxes ticked.
# Then click 'Create Bot User' on the application page and copy the token here.
Token = {봇 ID}

# The bot supports converting Spotify links and URIs to YouTube videos and
# playing them. To enable this feature, please fill in these two options with valid
# details, following these instructions: https://just-some-bots.github.io/MusicBot/using/spotify/
Spotify_ClientID =
Spotify_ClientSecret =

[Permissions]
# This option determines which user has full permissions and control of the bot.
# You can only set one owner, but you can use permissions.ini to give other
# users access to more commands.
# Setting this option to 'auto' will set the owner of the bot to the person who
# created the bot application, which is usually what you want. Else, change it
# to another user's ID.
OwnerID = {자신의 User  ID}

# This option determines which users have access to developer-only commands.
# Developer only commands are very dangerous and may break your bot if used
# incorrectly, so it's highly recommended that you ignore this option unless you
# are familiar with Python code.
DevIDs =

[Chat]
# Determines the prefix that must be used before commands in the Discord chat.
# e.g if you set this to *, the play command would be triggered using *play.
# 봇을 호출할 명령어 앞에 붙는 접두사 설정. !play 나 !queue 등
CommandPrefix = !

# Restricts the bot to only listening to certain text channels. To use this, add
# the IDs of the text channels you would like the bot to listen to, seperated by
# a space.
BindToChannels =

# Changes the behavior of BindToChannels. Normally any messages sent to a channel not in
# BindToChannels will be ignored. This option allows servers that do not have any bound
# channels while other server have some defined to still use commands in any channel with
# the Music Bot. Setting this to yes when there are no bound channels does nothing.
AllowUnboundServers = no

# Allows the bot to automatically join servers on startup. To use this, add the IDs
# of the voice channels you would like the bot to join on startup, seperated by a
# space. Each server can have one channel. If this option and AutoSummon are
# enabled, this option will take priority.
AutojoinChannels =

# Send direct messages for now playing messages instead of sending them into the guild. They are
# sent to the user who added the media being played. Now playing messages for automatic entries
# are unaffected and follows NowPlayingChannels config. The bot will not delete direct messages.
DMNowPlaying = no

# Disable now playing messages for entries automatically added by the bot, via the autoplaylist.
DisableNowPlayingAutomatic = no

# For now playing messages that are unaffected by DMNowPlaying and DisableNowPlayingAutomatic,
# determine which channels the bot is going to output now playing messages to. If this is not
# specified for a server, now playing message for manually added entries will be sent in the same
# channel that users used the command to add that entry, and now playing messages for automatically
# added entries will be sent to the same channel that the last now playing message was sent to if
# this is not specified for a server if possible. Specifying more than one channel for a server
# forces the bot to pick only one channel from the list to send messages to.
NowPlayingChannels =

# The bot would try to delete (or edit) previously sent now playing messages by default. If you
# don't want the bot to delete them (for keeping a log of what has been played), turn this
# option off.
DeleteNowPlaying = yes

[MusicBot]
# The volume of the bot, between 0.01 and 1.0.
DefaultVolume = 0.25

# Only allows whitelisted users (in whitelist.txt) to use commands.
# WARNING: This option has been deprecated and will be removed in a future version
# of the bot. Use permissions.ini instead.
WhiteListCheck = no

# The number of people voting to skip in order for a song to be skipped successfully,
# whichever value is lower will be used. Ratio refers to the percentage of undefeaned, non-
# owner users in the channel.
# 자신이 올린 곡이 아닌 곡을 스킵하려 할 때 요청할 투표의 갯수
SkipsRequired = 4
SkipRatio = 0.5

# Determines if downloaded videos will be saved to the audio_cache folder. If this is yes,
# they will not be redownloaded if found in the folder and queued again. Else, videos will
# be downloaded to the folder temporarily to play, then deleted after to avoid filling space.
# 비디오의 스토리지 저장. 용량이 신경쓰이면 no로 하는 것이 좋다.
SaveVideos = yes

# Mentions the user who queued a song when it starts to play.
NowPlayingMentions = no

# Automatically joins the owner's voice channel on startup, if possible. The bot must be on
# the same server and have permission to join the channel.
AutoSummon = yes

# Start playing songs from the autoplaylist.txt file after joining a channel. This does not
# stop users from queueing songs, you can do that by restricting command access in permissions.ini.
# example_autoplaylist.txt 나 autoplaylist 안에 있는 재생목록을 자동으로 재생한다.
UseAutoPlaylist = no

# Sets if the autoplaylist should play through songs in a random order when enabled. If no,
# songs will be played in a sequential order instead.
AutoPlaylistRandom = no

# Pause the music when nobody is in a voice channel, until someone joins again.
AutoPause = yes

# Automatically cleanup the bot's messages after a small period of time.
DeleteMessages = yes

# If this and DeleteMessages is enabled, the bot will also try to delete messages from other
# users that called commands. The bot requires the 'Manage Messages' permission for this.
DeleteInvoking = no

# Regularly saves the queue to the disk. If the bot is then shut down, the queue will
# resume from where it left off.
PersistentQueue = no

# Determines what messages are logged to the console. The default level is INFO, which is
# everything an average user would need. Other levels include CRITICAL, ERROR, WARNING,
# DEBUG, VOICEDEBUG, FFMPEG, NOISY, and EVERYTHING. You should only change this if you
# are debugging, or you want the bot to have a quieter console output.
DebugLevel = INFO

# Specify a custom message to use as the bot's status. If left empty, the bot
# will display dynamic info about music currently being played in its status instead.
# 상태 메세지 커스텀
StatusMessage =

# Write what the bot is currently playing to the data/<server id>/current.txt FILE.
# This can then be used with OBS and anything else that takes a dynamic input.
WriteCurrentSong = no

# Allows the person who queued a song to skip their OWN songs instantly, similar to the
# functionality that owners have where they can skip every song instantly.
AllowAuthorSkip = yes

# Enables experimental equalization code. This will cause all songs to sound similar in
# volume at the cost of higher processing consumption when the song is initially being played.
UseExperimentalEqualization = no

# Enables the use of embeds throughout the bot. These are messages that are formatted to
# look cleaner, however they don't appear to users who have link previews disabled in their
# Discord settings.
UseEmbeds = yes

# The amount of items to show when using the queue command.
QueueLength = 10

# Remove songs from the autoplaylist if an error occurred while trying to play them.
# If enabled, unplayable songs will be moved to another file and out of the autoplaylist.
# You may want to disable this if you have internet issues or frequent issues playing songs.
RemoveFromAPOnError = yes

# Whether to show the configuration for the bot in the console when it launches.
ShowConfigOnLaunch = no

# Whether to use leagcy skip behaviour. This will change it so that those with permission
# do not need to use "skip f" to force-skip a song, they will instead force-skip by default.
LegacySkip = no

# Leave servers if the owner is not found in them.
LeaveServersWithoutOwner = no

# Use command alias defined in aliases.json.
UseAlias = yes

[Files]
# Path to your i18n file. Do not set this if you do not know what it does.
i18nFile =
일부 자주 사용하는 옵션의 경우 한글로 코멘트를 달아놓았으나, 자세한 설명은 https://just-some-bots.github.io/MusicBot/using/configuration/ 를 참고한다.
봇 실행
options.ini 까지 만들었으면, 다시 clone 받은 폴더로 들어가서 아래 명령어를 실행한다.
docker-compose up -d --build이 과정을 통해 docker-compose가 선언된 Dockerfile를 가지고 이미지를 만들 것이고, 이 이미지를 사용하여 컨테이너를 올릴 것이다.
이 후, 로그를 보면 어떤 채널과도 연결되지 않았습니다. 아래 url로 채널에 가입하세요 라는 메세지가 나오게 된다.
해당 url를 브라우저에 복사하면 해당 봇을 디스코드 채널 등에 추가할 수 있다.
차후에 이 url를 다시 보기 위해서는 채널에서 !joinserver 를 발동하면 된다.
몇 가지 기능 소개
- !play {URL 또는 검색어} : 유투브 (또는 다른 소스) 에서 해당 링크 또는 검색했을 때 나오는 첫 번째 항목을 재생한다
- !search [불러올 갯수] {검색어} : 유투브 (또는 다른 소스) 에서 검색했을 때 나오는 n개의 리스트를 불러오고, 사용자가 재생할 음악을 선택하게 한다. 불러올 갯수는 지정하지 않으면 3이 기본이다.
- !np : 현재 재생중인 음악의 이름, 요청한 사람, 재생바, 재생 시간 등을 표시한다.
- !queue : 재생할 음악들의 대기열을 보여준다. options.ini에서 표시할 대기열의 숫자를 지정할 수 있다.
- !skip: 현재 재생중인 음악을 스킵한다.
- !volume [숫자] : 볼륨을 조정할 수 있다. +10 등으로 상대적으로 키울 수 있으며, 숫자를 입력하지 않을 경우 현재 볼륨을 출력한다.
- !shufle : 대기열을 셔플한다.
- !clear: 대기열을 초기화한다.
- !pause / !resume : 현재 음악을 일시중지 / 재개한다.
- !remove [숫자] : (어드민용 기능) 해당 위치에 있는 queue를 제거한다.
- !save : 현재 대기열을 autoplaylist에 저장한다.
나머지 기능들에 대해서는 https://just-some-bots.github.io/MusicBot/using/commands/를 참조하면 된다.