TIL day 10 getElementById vs querySelector (DOM control)
HTML element 가져오기
JavaScript로 html element를 제어 할 수 있다. 이를 DOM control이라고 한다. 방법은 크게 두 가지로 'getElementById'와 'querySelector'가 있다.
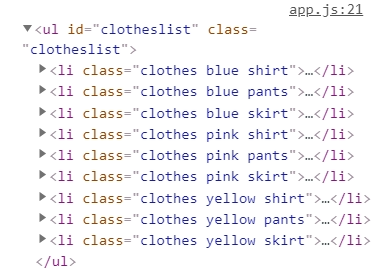
예시 HTML
<ul id="clotheslist" class="clotheslist">
    <li class="clothes blue shirt">티셔츠, 파랑</li>
    <li class="clothes blue pants">바지, 파랑</li>
    <li class="clothes blue skirt">치마, 파랑</li>
    <li class="clothes pink shirt">티셔츠, 분홍</li>
    <li class="clothes pink pants">바지, 분홍</li>
    <li class="clothes pink skirt">치마, 분홍</li>
    <li class="clothes yellow shirt">티셔츠, 노랑</li>
    <li class="clothes yellow pants">바지, 노랑</li>
    <li class="clothes yellow skirt">치마, 노랑</li>
</ul>
1. getElementById
HTML element의 id를 이용해 제어하는 방법이다.
const clothesList1 = document.getElementById('clotheslist');
console.log(clothesList1);
펼치면
리턴 값은 HTMLUlElement이다.
2. getElementsByClassName
HTML element의 class를 이용해서 제어하는 방법이다.
const clothesList2 = document.getElementsByClassName('clothes');
console.log(clothesList2);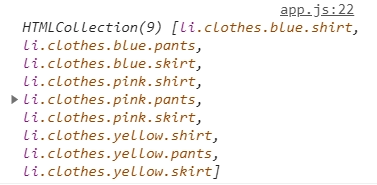
리턴 값은 HTMLCollection이다. 배열처럼 보이지만 배열이 아니다.
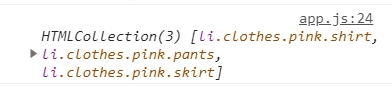
3. getElementsByClassName(className 복수)
const clothesList3 = document.getElementsByClassName('clothes pink');
console.log(clothesList3);
getElementsByClassName를 이용해서 'clothes'와 'pink'라는 두 가지 classname을 가진 element를 가져 올 수 있다.
4. querySelectorAll
const clothesList4 = document.querySelectorAll('.clothes');
console.log(clothesList4);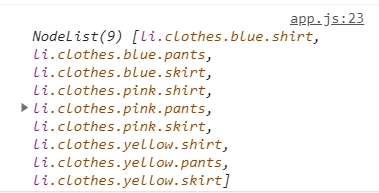
queryselectorAll은 CSS 선택자를 이용해서 HTML element를 제어 할 수 있다. 해당 선택자에 해당하는 모든 element를 가져온다.
getElementBy 와 다르게 리턴 값은 Nodelist이다. 배열과 비슷해보이나 배열은 아니다.
5. querySelectorAll(className 복수)
const clothesList5 = document.querySelectorAll('.clothes pink');
console.log(clothesList5);
getElementsByClassName(복수)와 다르게 복수의 classname을 가진 element를 가져오지 못한다. 빈 Nodelist만 반환한다.
6. querySelector(className 복수)
const clothesList6 = document.querySelector('.clothes pink');
console.log(clothesList6);
querySelector는 복수의 classname을 가진 element를 제어하지 못 한다. null 값이 나온다.
7. querySelector(element 복수)
const clothesList7 = document.querySelector('.clothes');
console.log(clothesList7);
같은 className을 가진 element가 여러개 있을 때 querySelector는 가장 상위의 element 하나만 반환한다.
getElementByID, ClassName
- 리턴 값: HTMLCollection
(name, id, index number로 HTMLCollection의 항목(itmes)들에 접근가능) - 처리 속도: 빠름(querySelector보다 1.2배)
querySelector
- 리턴 값: Nodelist
(index Number로만 NodeList의 항목(items)들에 접근가능) - 처리 속도: 느림
- 인접 tag의 상대적 위치를 비교하며 가져오고 싶을 때 사용가능
그 외
getElementsByName ()
- 리턴 값: Nodelist
getElementsByTagName ()
- 리턴 값: HTMLCollection
추후 공부 할 것
- HTMLCollection과 Nodelist
- DOM tree