0. 시작하기
이번 API사용 방법에서는 Spring Boot, RestTemplate, jQuery, ajax, mariadb(mysql), mybatis, thymeleaf를 사용한다.
1. Service Key 발급
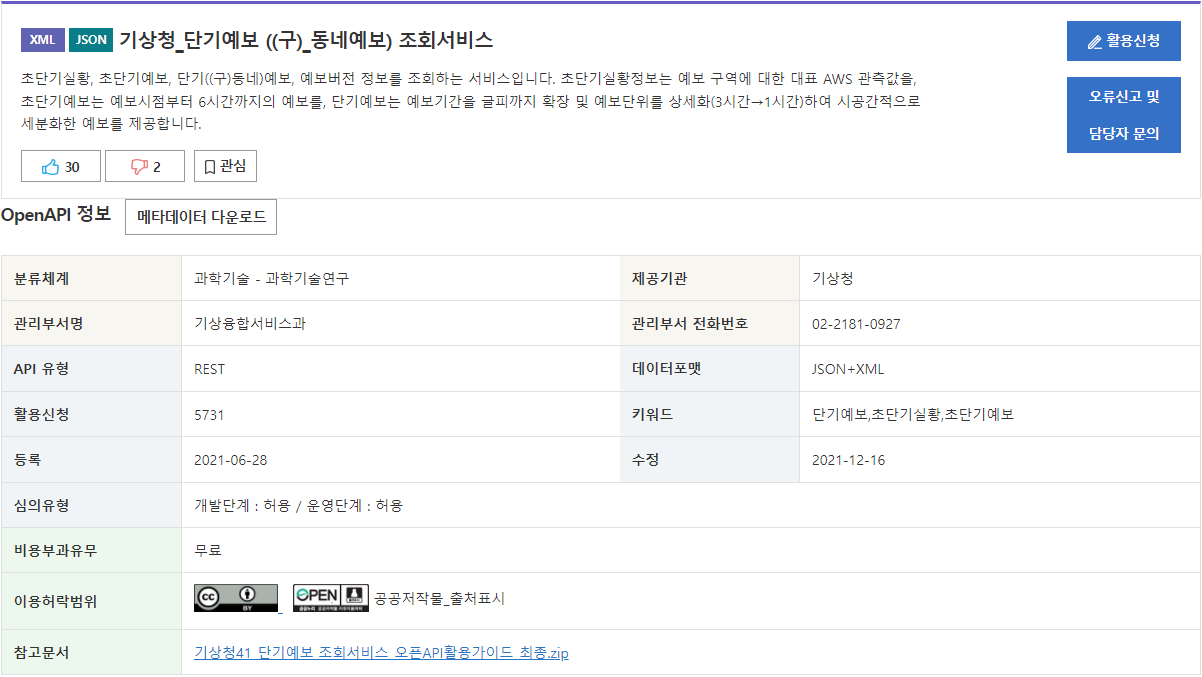
공공데이터포털에 접속하여 API를 사용하기 위한 Service Key를 발급해야 한다.
활용신청 버튼을 누르고 로그인 후 키를 발급받기
발급 후 마이페이지의 승인된 API 목록을 클릭하면 개발계정 상세보기 페이지의 아래 사진의 Encoding, Decoding Service Key가 발급됨

서비스키를 발급 받으면 약 1시간 후 부터 API요청을 할 수 있다.
1시간이 지난 후 스크롤을 내리면 간단하게 API요청을 할 수 있는 기능이 있는데 테스트를 한다.
초단기 실황조회 API를 이용할 것이고 하루에 최대 10000회의 요청만 가능하다.
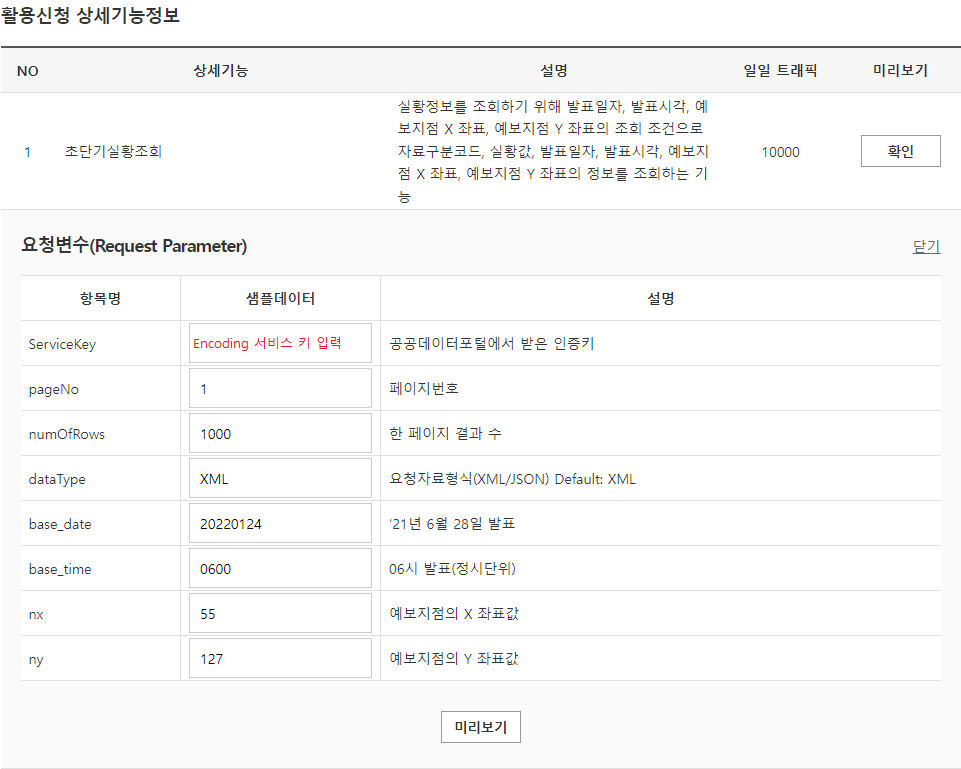
요청 변수에 아까 위에서 발급받은 Service Key(이때 Encoding 키를 넣어야 함)를 항목에 알맞게 복붙 후 base_date를 오늘 날짜로 변경하여 요청한다.(초단기실황은 현재시간으로부터 최대 1일간의 자료만 제공하기 때문에 24시간 이전의 결과값에서 더 이전값은 제공되지 않음)
미리보기 버튼을 클릭하면 새 창이 뜨면서 결과값이 나온다.
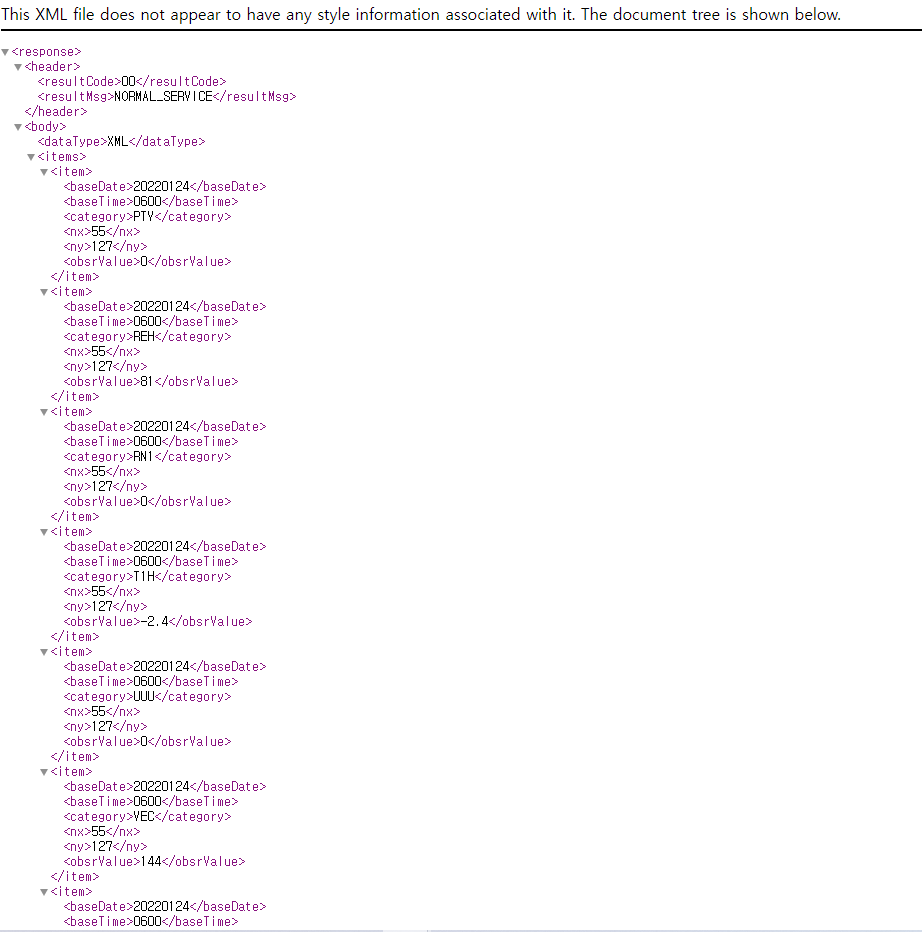
결과값이 나오는데 해당 값들이 무엇을 의미하는것인지는 인증키 부분에 위에 있는 참고문서(활용가이드 zip)파일을 열어 워드 파일에 상세 명세등이 적혀있다.
또한 해당 파일에는 API요청시 사용할 수 있는 엑셀 형식의 격자 위 경도(nx, ny)값들이 들어있다.
만약 결과값이 안나오면 서비스키를 제대로 입력하였는지, 사용신청 후 1시간 이후가 지났는지 확인하면 된다.
2. Controller 작성
@Controller
public class WeatherController
{
    @GetMapping(value = "/board/weather.do")
    public String openWeatherPage()
    {
        return "/weather/weather";
    }
Spring boot 프로젝트에 클래스 생성 후 Controller에 html 페이지의 위치를 매핑해준다.
(localhost:8080/board/weather.do에 접속 시 spring프로젝트의 src/main/resources/template 경로 하위의 /weather/weather.html을 open한다.)
3. html 작성
<!DOCTYPE html>
<html xmlns:th="http://www.thymeleaf.org"
	xmlns:layout="http://www.ultraq.net.nz/thymeleaf/layout"
	layout:decorator="board/layout/defaultLayout">

<th:block layout:fragment="title">
	<title>Weather</title>
</th:block>

<th:block layout:fragment="content">

	<label>날씨</label>

	<form class="form-horizontal">
		<div class="form-group">
			<select id="step1" class="emptyCheck" title="시/도">
				<option id="city" value="">시/도</option>
			</select>

			<select id="step2">
				<option id="county" value="">시/군/구</option>
			</select>

			<select id="step3">
				<option id="town" value="">읍/면/동</option>
			</select>

			<span>날짜 선택: <input type="text" id="datepicker" disabled="disabled" class="emptyCheck" title="날짜"></span>

			<select id="time" class="emptyCheck" title="시간">
				<option value="" selected>시간</option>
				<option th:each="i : ${#numbers.sequence(0,23)}" th:value="${i}" th:text="${i} + 시"></option>
			</select>

			<button type="button" class="btn btn-primary waves-effect waves-light" th:onclick="getWeather()">
				<span>실행</span>
			</button>

			<div>
				<table id="resultWeather" class="table"></table>
			</div>
		</div>
	</form>

</th:block>
</html>
html 속성의 layout:decorator의 경우 본인이 만든 레이아웃을 불러와서 사용하면 되고 없으면 미작성(기본 백지화면에서 뿌려주게 됨, 미작성할 경우 th:block 태그를 사용하지 말고 기존대로 <head></head>와 <body></body>를 사용하여 작성)
Controller에서 설정해준 url 경로로 접속하면 아래와 같은 칸이 나타남

- 시/도, 시/군/구, 읍/면/동 부분은 AJAX를 통해 DB에서 값을 가져와서 동적으로 변경되게 기능을 만들 예정이다.
(서울특별시를 선택 시 시군구가 서울의 시군구로만 바뀌고, 경기도로 선택 시 경기도의 시군구만 나올 수 있게) - 날짜(달력) 선택 박스는 jQuery의 datepicker를 사용할 것이고, 날짜값이 직접 달력 선택이 아닌 숫자 입력으로 입력 시 글자가 입력되는 등 예외사항등이 발생할 우려가 있기 때문에 disabled 옵션으로 칸을 비활성화 시킴
- 시간 select box는 타임리프를 이용하여 0부터 23까지의 숫자를 증가시키면서 option box에 입력하는 방식으로 설정
- 실행 버튼 클릭 시
getWeather()함수가 실행되어 AJAX로 API요청을 한 후 결과값을 해당 페이지에 비동기로 뿌려주게 될 것이다.
4. jQuery datepicker 설정
<script src="http://code.jquery.com/jquery-latest.min.js"></script>
<script src="https://code.jquery.com/ui/1.13.0/jquery-ui.js"></script>
기본적으로 jQuery를 사용하기 위해서는 jquery-latest.min.js(최신버전이지만 직접 jquery 다운로드 후 프로젝트의 resources/static/js 폴더 생성 후 작성해도 됨)를 필수적으로 선언해야하고 datepicker를 사용하기 위해서는 jquery-ui.js 스크립트 링크를 html의 <body>에 넣는다.
<link rel="stylesheet" href="//code.jquery.com/ui/1.13.0/themes/base/jquery-ui.css">해당 코드는 datepicker 사용 시 ui부분의 css이다. 해당 코드를 html의 <head>에 입력한다.
<th:block layout:fragment="script">
	<script th:inline="javascript">
		/*<![CDATA[*/
		window.onload = function() {
			$('#datepicker').datepicker({
				showOn: 'button',
				buttonImage: 'http://jqueryui.com/resources/demos/datepicker/images/calendar.gif',
				buttonImageOnly: true,
				showButtonPanel: true,
				dateFormat: 'yymmdd',
				minDate: "-1D",
				maxDate: 0,
				closeText: "닫기",
				currentText: "오늘",
				prevText: '이전 달',
				nextText: '다음 달',
				monthNames: ['1월', '2월', '3월', '4월', '5월', '6월', '7월', '8월', '9월', '10월', '11월', '12월'],
				monthNamesShort: ['1월', '2월', '3월', '4월', '5월', '6월', '7월', '8월', '9월', '10월', '11월', '12월'],
				dayNames: ['일', '월', '화', '수', '목', '금', '토'],
				dayNamesShort: ['일', '월', '화', '수', '목', '금', '토'],
				dayNamesMin: ['일', '월', '화', '수', '목', '금', '토'],
				weekHeader: "주",
				yearSuffix: '년',
				showMonthAfterYear: true
			});
		};
        	/*]]>*/
	</script>
</th:block>
페이지가 처음 불러와졌을 때, datepicker를 설정하기 위한 코드(<script> 태그 부분에 작성)
minDate -1D : 최소 선택가능 날짜는 오늘로부터 -1일(어제)까지, API요청 시 최근 1일간의 자료만 요청할 수 있기 때문에 이전 값을 선택해서 요청해도 값이 나오지 않음
maxDate 0 : 최대 선택가능 날짜는 오늘까지로 설정, 이후 날짜는 아직 데이터가 없기 때문에 오류가 날 것임.
기본 datepicker는 영어로 되어 있어서 한글화를 하기 위한 설정도 포함되어 있음
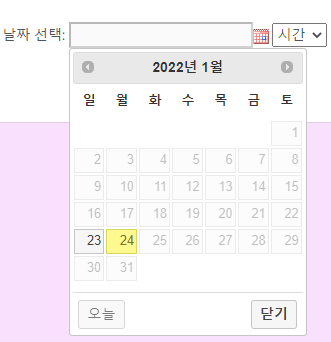
datepicker 설정 후 화면
5. 시간 select box 동적 변경
시간 선택 select box는 처음 html을 표시할 때에는 타임리프로 0~23까지 숫자를 증가시키면서 option에 추가하였다.
이번에는 날짜를 선택하였을 때 현재시간보다 이전의 시간만 선택가능하게 만들고,
어제 날짜를 선택했을 때는 현재 시간 -24시간까지 표시할 수 있도록 동적으로 변경하기 위한 스크립트를 만든다.
$('#datepicker').on("change", function(){
	$('#time option:eq(0)').prop("selected", true);
	var now = new Date();
	var currentHour = now.getHours();
	var month = (now.getMonth()+1) < 10 ? "0" + (now.getMonth()+1) : (now.getMonth()+1);
	var nowDate = now.getDate() < 10 ? "0" + now.getDate() : now.getDate();
	var today = now.getFullYear() + "" + month + "" + nowDate;
	var datepickerValue = $(this).val();

	/* 오늘 날짜라면 */
	$('#time').children('option:not(:first)').remove();
	var html = '';
	if (datepickerValue == today ){
		for (var i=0; i<=currentHour; i++){
			html += '<option value="'+ i +'">'+ i +'시</option>';
		}
	}
	/* 어제였다면 */
	else{
		if (currentHour != 23){
			for (var i=currentHour + 1; i<24; i++){
				html += '<option value="'+ i +'">'+ i +'시</option>';
			}
		}
		else{
			alert(datepickerValue + " 날짜의 제공 가능한 날씨 데이터가 없습니다.")
			$(this).val('');
		}
	}
	$('#time').append(html);
});
datepicker의 값이 변경될 때 마다(=달력에서 날짜를 선택할 때 마다) 코드를 실행하는 스크립트이다.
- id가 time인 select box의 맨 첫번째 option("시간" 이라는 글자)을 selected로 바꾸고
현재날짜를 가져온 후, 월(Month)은 0~11값만 있기 때문에 +1을 해야하고, 1월~9월의 경우 포맷 형태가 01이 아니기 때문에 한자리 달은 0을 붙히기 위해 삼항연산자를 이용하였다. - 일(date) 또한 1일~9일은 0이 없기 때문에 0을 붙혀줬다.
- id가 time인 태그의 children(자식들, 첫번째 빼고) 모두를 지우고, 현재 선택한 날짜가 스크립트로 계산한 오늘과 동일하면, 0부터 현재 시간까지 1씩 더해가면서 option box를 html에 추가한다.
- 선택한 날짜가 어제이고, 23시가 아니라면, 현재시간 +1부터 23시까지 option box를 추가한다.
- 선택한 날짜가 어제이고, 23시라면, 현재시간은 오늘 23시 이후이기 때문에 0시~23시까지 최근 1일에 대한 데이터 값은 오늘만 출력될 것이기 때문에 alert으로 API요청 전에 값이 없다고 알리고, 선택된 date값은 공백으로 남긴다.
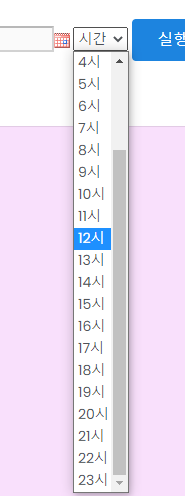
달력 선택 안했을 시(기본값)
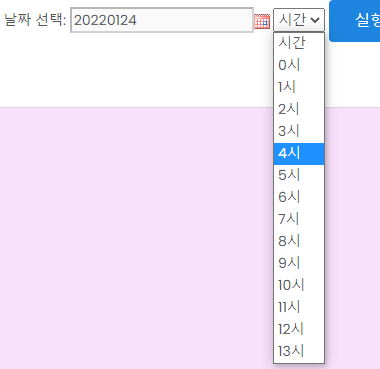

현재시간 2022-01-24 13:40분 기준으로 selectbox가 동적으로 변경됨
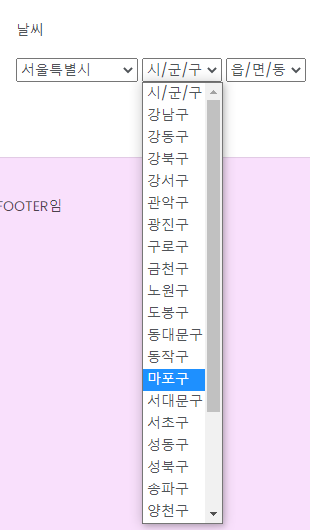
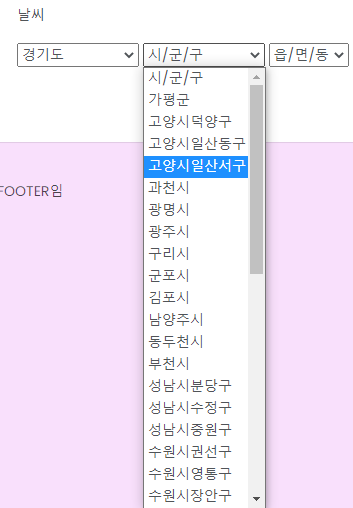
6. 지역정보 DB에서 가져와서 동적으로 시/군/구 바꾸기
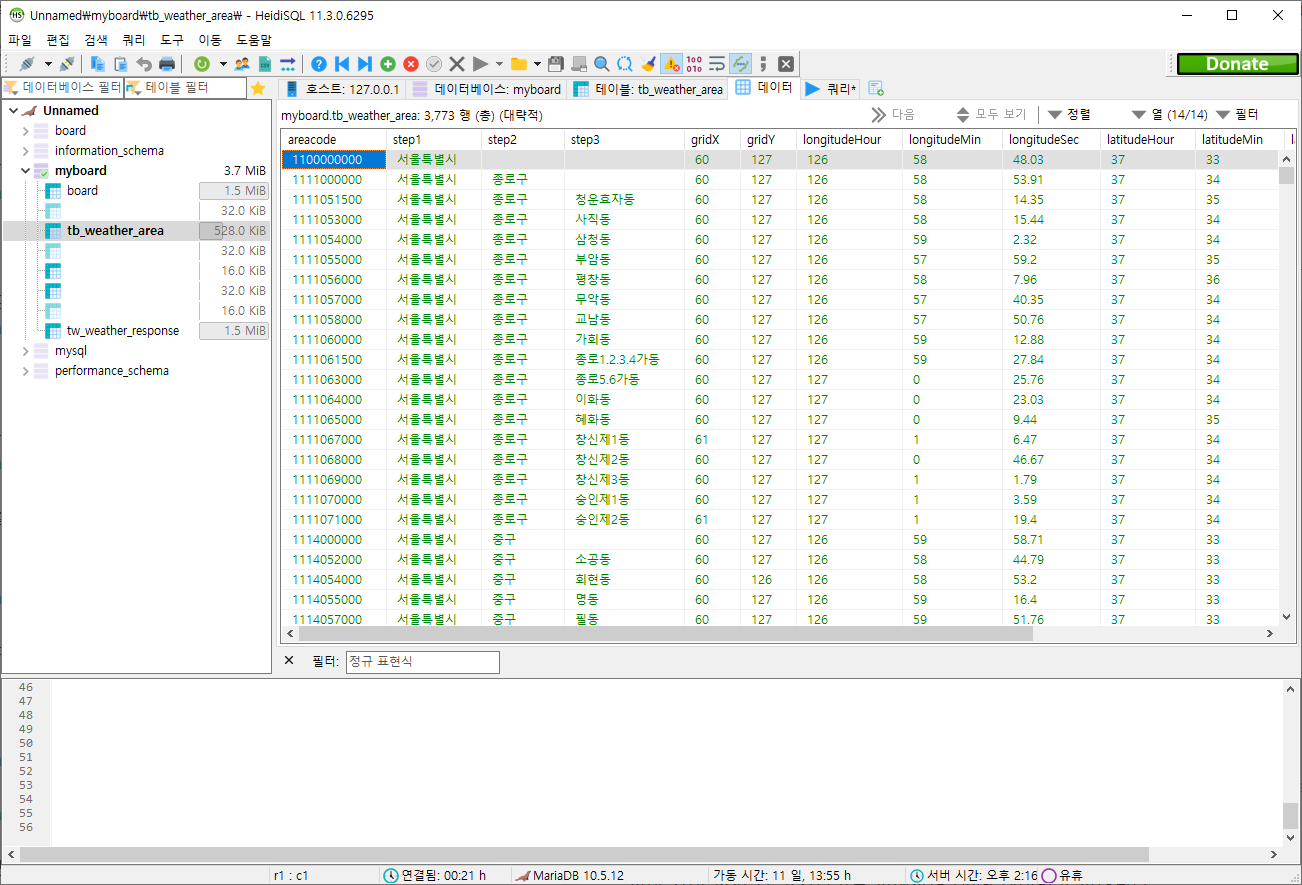
먼저 Service Key를 발급받은 부분에서 서비스정보의 참고문서(활용가이드.zip)의 파일 중, 위/경도 격자 좌표가 있는 Excel파일을 DB에 저장해야 한다.
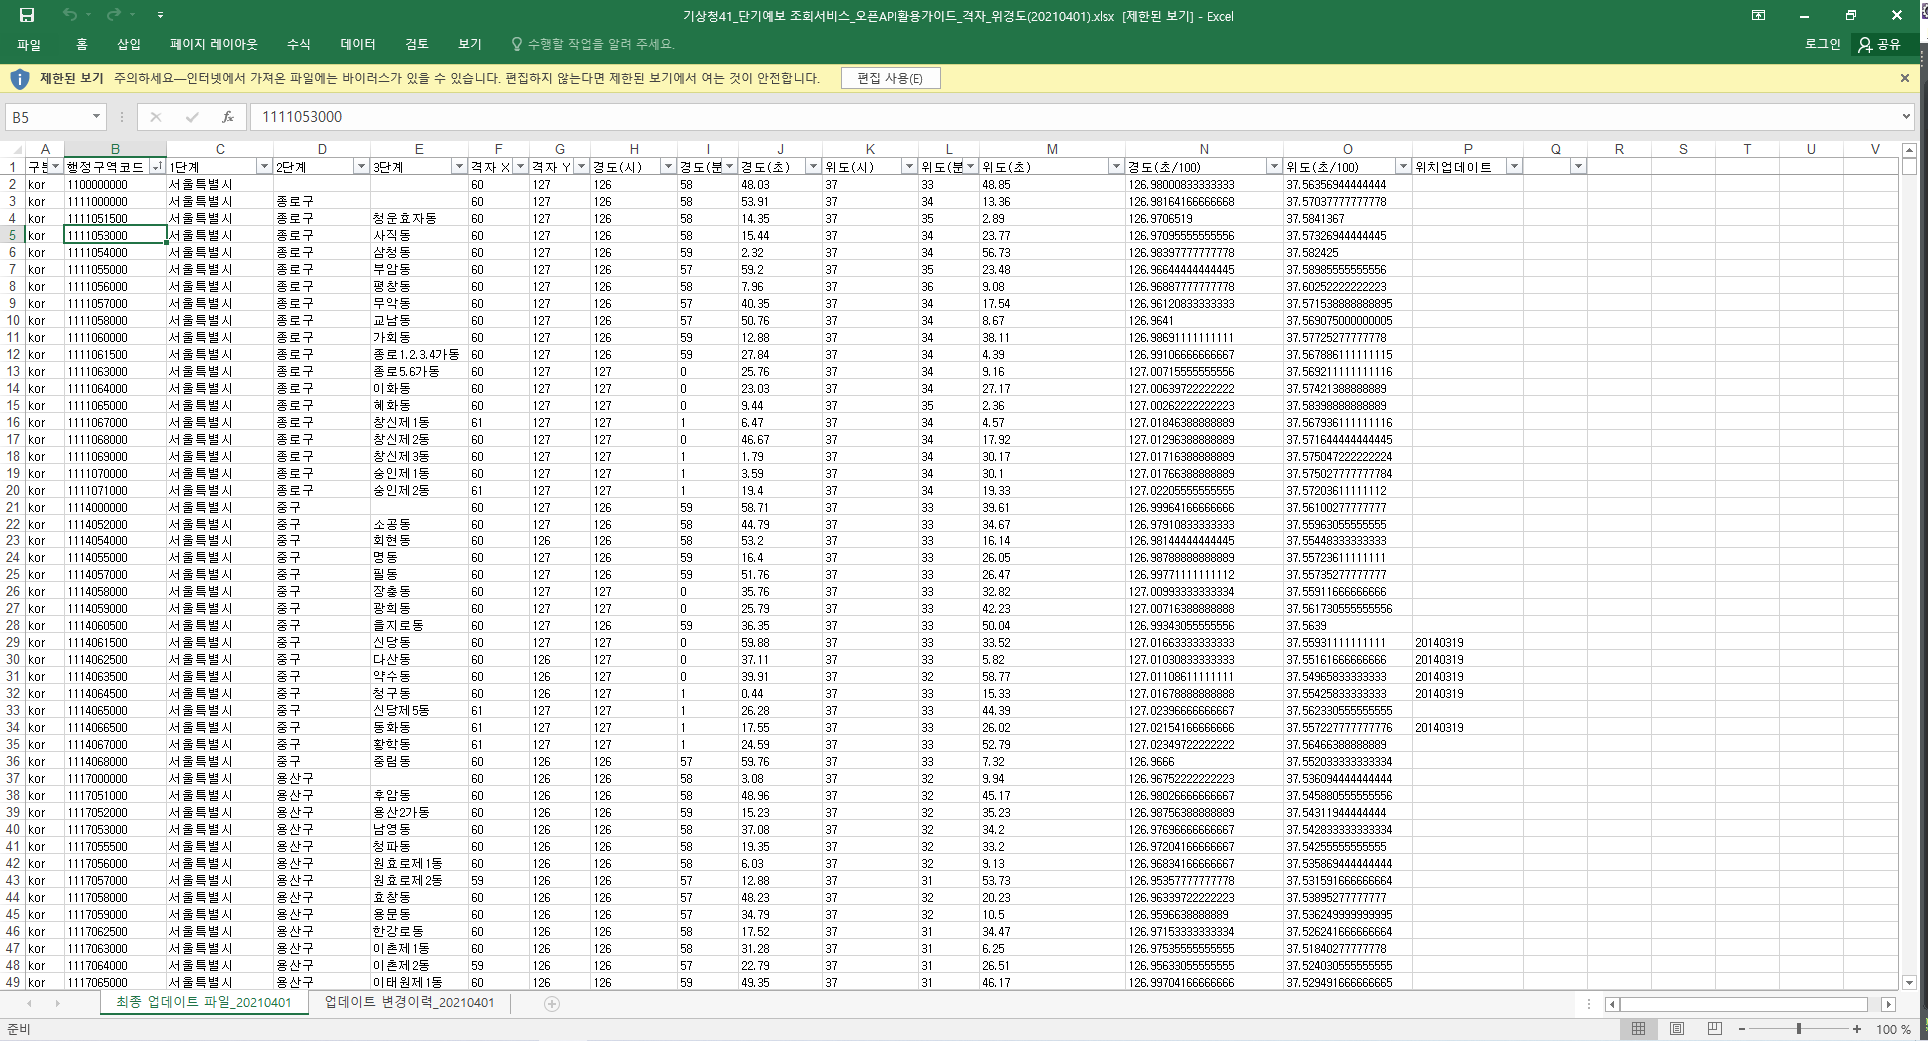
여기에서 실제 사용할 값은 행정구역코드, 1단계, 2단계, 3단계, 격자X, 격자Y만 사용할 것이다. DB에 저장할 때는 추후 위 경도값도 알 수 있을지 몰라서 구분(kor) 열과 위치업데이트 열을 제외한 모든 값들을 DB에 저장할 것이다.
사용할 DB는 mariadb(mysql) 이고 dbms는 아무거나 사용하여도 무방함(여기서는 heidisql을 사용)
CREATE TABLE `tb_weather_area` (
	`areacode` VARCHAR(50) NOT NULL COMMENT '행정구역코드' COLLATE 'utf8_general_ci',
	`step1` VARCHAR(50) NOT NULL COMMENT '시도' COLLATE 'utf8_general_ci',
	`step2` VARCHAR(50) NULL DEFAULT NULL COMMENT '시군구' COLLATE 'utf8_general_ci',
	`step3` VARCHAR(50) NULL DEFAULT NULL COMMENT '읍면동' COLLATE 'utf8_general_ci',
	`gridX` VARCHAR(50) NOT NULL COMMENT '격자X' COLLATE 'utf8_general_ci',
	`gridY` VARCHAR(50) NOT NULL COMMENT '격자Y' COLLATE 'utf8_general_ci',
	`longitudeHour` VARCHAR(50) NOT NULL COMMENT '경도(시)' COLLATE 'utf8_general_ci',
	`longitudeMin` VARCHAR(50) NOT NULL COMMENT '경도(분)' COLLATE 'utf8_general_ci',
	`longitudeSec` VARCHAR(50) NOT NULL COMMENT '경도(초)' COLLATE 'utf8_general_ci',
	`latitudeHour` VARCHAR(50) NOT NULL COMMENT '위도(시)' COLLATE 'utf8_general_ci',
	`latitudeMin` VARCHAR(50) NOT NULL COMMENT '위도(분)' COLLATE 'utf8_general_ci',
	`latitudeSec` VARCHAR(50) NOT NULL COMMENT '위도(초)' COLLATE 'utf8_general_ci',
	`longitudeMs` VARCHAR(50) NOT NULL COMMENT '경도(초/100)' COLLATE 'utf8_general_ci',
	`latitudeMs` VARCHAR(50) NOT NULL COMMENT '위도(초/100)' COLLATE 'utf8_general_ci'
)
COMMENT='Excel 파일의 값들을 DB화 한 테이블'
COLLATE='utf8_general_ci'
ENGINE=InnoDB
;
위의 sql create table문을 사용해서 본인이 넣고싶은 DB에 쿼리를 실행한다.
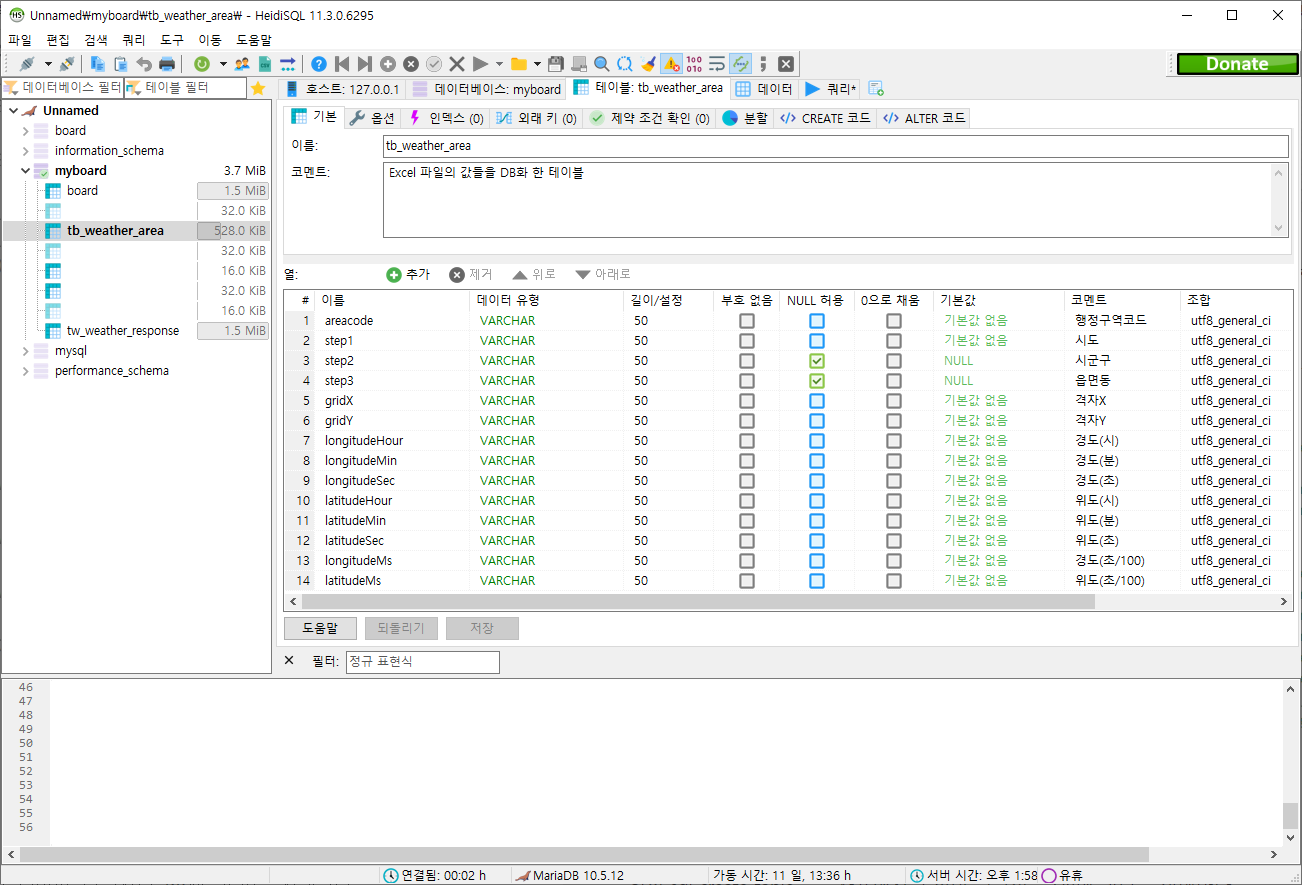
실행 후 위와 같은 테이블이 생성되면 Excel파일을 CSV로 변환하여 데이터를 입력하면 된다.
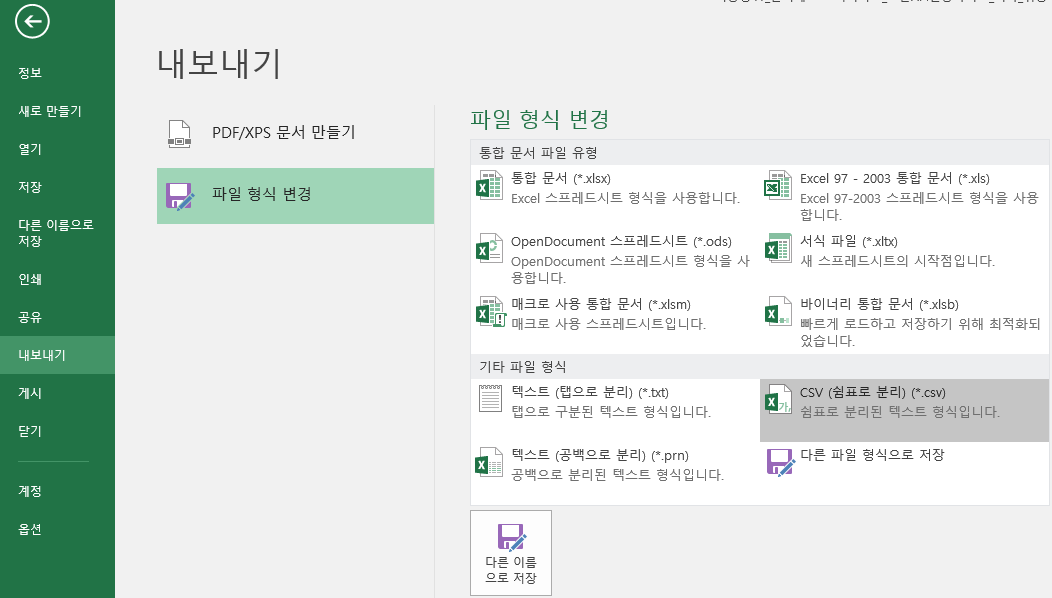
엑셀 파일에서 구분, 위치 업데이트 열을 삭제 후, 파일 -> 내보내기 -> 파일 형식 변경에서 CSV(쉼표로 분리) 를 눌러 CSV로 변환한다.
변환 시, 아래와 같은 경고메세지가 나오는데 전부 확인, 예 버튼을 누르면 된다.

위 경고창은 현재 위치한 시트 1개(엑셀 하단의 이름, 최종 업데이트 파일_20210401)만 CSV로 전환된다는 뜻
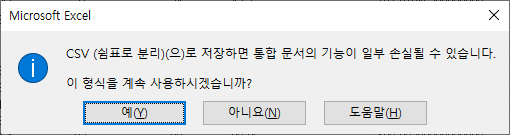
위 경고창은 엑셀에 지정되어 있는 함수들(필터, SUM 등등)의 기능이 제거되고 순수 문자만 저장된다는 뜻
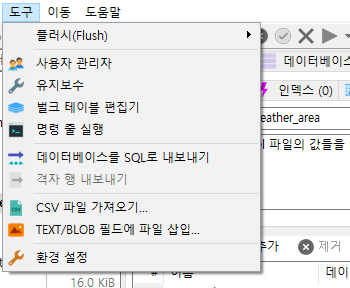
CSV로 변환이 완료되면 dbms에서 CSV 파일 가져오기를 눌러서 가져온다.
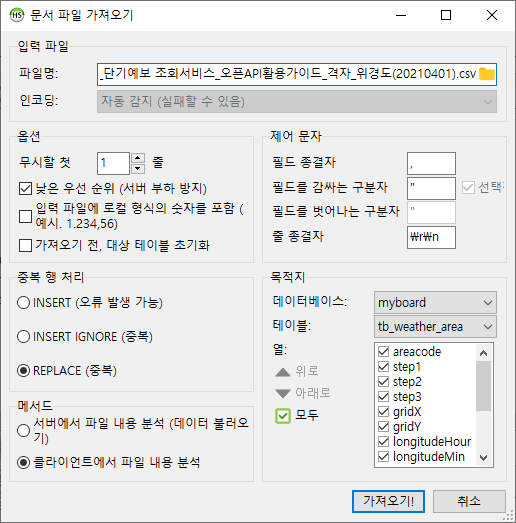
위와 같이 설정 후 가져오기를 실행하면 DB에 데이터가 입력된다.
이후 아래의 코드를 <script>태그에 작성한다.
window.onload = function() {
	$('#datepicker').datepicker({
		showOn: 'button',
		buttonImage: 'http://jqueryui.com/resources/demos/datepicker/images/calendar.gif',
		buttonImageOnly: true,
		showButtonPanel: true,
		dateFormat: 'yymmdd',
		minDate: "-1D",
		maxDate: 0,
		closeText: "닫기",
		currentText: "오늘",
		prevText: '이전 달',
		nextText: '다음 달',
		monthNames: ['1월', '2월', '3월', '4월', '5월', '6월', '7월', '8월', '9월', '10월', '11월', '12월'],
		monthNamesShort: ['1월', '2월', '3월', '4월', '5월', '6월', '7월', '8월', '9월', '10월', '11월', '12월'],
		dayNames: ['일', '월', '화', '수', '목', '금', '토'],
		dayNamesShort: ['일', '월', '화', '수', '목', '금', '토'],
		dayNamesMin: ['일', '월', '화', '수', '목', '금', '토'],
		weekHeader: "주",
		yearSuffix: '년',
		showMonthAfterYear: true
	});
		// 추가된 코드
		loadArea('city');
};

$('#step1').on("change", function() {
	loadArea('county', $(this));
});

$('#step2').on("change", function() {
	loadArea('town', $(this));
});

function loadArea(type, element) {
	var value = $(element).find('option:selected').text();
	var data = {type : type, keyword : value};

	console.log(data);
	$.ajax({
		url: "/board/weatherStep.do",
		data: data,
		dataType: "JSON",
		method : "POST",
		success : function(res){
			if (type == 'city'){
				res.forEach(function (city) {
					$('#step1').append('<option value="'+city.areacode+'">'+city.step1+'</option>')
				});
			}
			else if(type == 'county'){
				$('#county').siblings().remove();
				$('#town').siblings().remove();
				res.forEach(function (county) {
					$('#step2').append('<option value="'+county.areacode+'">'+county.step2+'</option>')
				});
			}
			else{
				$('#town').siblings().remove();
				res.forEach(function (town) {
					$('#step3').append('<option value="'+town.areacode+'">'+town.step3+'</option>')
				});
			}
		},
		error : function(xhr){
			alert(xhr.responseText);
		}
	});
}
loadArea 함수는 type(시/도, 시/군/구 등), element(select box에서 선택 된 지역 명 text)를 가지고 DB를 조회하여 다음 step의 요소들을 뿌려주기 위한 함수이다.
siblings()는 해당 id의 형제요소를 선택하는 메서드이고 remove를 통해 형제요소를 삭제한다.
(step1값이 경기도이고, step2가 고양시, 김포시, 성남시 등등 나올 때, step1이 서울특별시로 변경되면 step2도 구로구, 영등포구, 동대문구 등 내용이 전부 바뀌어야 하고, step3는 값이 없는 상태로 바뀌어야 하기 때문에 사용)
Controller 수정
@Controller
public class WeatherController
{
    @Autowired
    private WeatherService weatherService;

    @GetMapping(value = "/board/weather.do")
    public String openWeatherPage()
    {
        return "/weather/weather";
    }

    @PostMapping(value = "/board/weatherStep.do")
    @ResponseBody
    public List<AreaRequestDTO> getAreaStep(@RequestParam Map<String, String> params)
    {
        return this.weatherService.getArea(params);
    }
}
Controller에 위 코드를 추가한다.
Service 작성
Service
public interface WeatherService
{
    List<AreaRequestDTO> getArea(Map<String, String> params);
}
ServiceImpl
@Service
public class WeatherServiceImpl implements WeatherService
{
    @Autowired
    private WeatherMapper weatherMapper;

    @Override
    public List<AreaRequestDTO> getArea(Map<String, String> params)
    {
        return this.weatherMapper.selectArea(params);
    }
}
Mapper 작성
여기서는 mybatis를 사용한다. DAO를 작성하지 않고 바로 Mapper xml에 쿼리문을 작성한다.
Mapper 작성
@Mapper
public interface WeatherMapper
{
    List<AreaRequestDTO> selectArea(Map<String, String> params);
}
XML Query 작성
<?xml version="1.0" encoding="UTF-8"?>
<!DOCTYPE mapper PUBLIC "-//mybatis.org//DTD Mapper 3.0//EN" "http://mybatis.org/dtd/mybatis-3-mapper.dtd">
<mapper namespace="com.my.board.mapper.WeatherMapper">

	<select id="selectArea" resultType="AreaRequestDTO" parameterType="Map">
		<choose>
			<when test="type == 'city'">
				SELECT
					areacode, step1
				FROM
					tb_weather_area
				WHERE
					step2 = "" AND step3 = ""
				ORDER BY
					step1
			</when>

			<when test="type == 'county'">
				SELECT
					areacode, step2
				FROM
					tb_weather_area
				WHERE
					step1 = #{keyword} AND step3 = "" AND step2 != ""
				ORDER BY
					step2
			</when>

			<when test="type == 'town'">
				SELECT
					areacode, step3
				FROM
					tb_weather_area
				WHERE
					step2 = #{keyword} AND step3 != ""
				ORDER BY
					step3
			</when>
		</choose>
	</select>
</mapper>
쿼리문의 테이블 명은 본인이 직접 네이밍한 테이블명을 사용해야 한다.
DTO 작성
import lombok.Data;

@Data
public class AreaRequestDTO
{
    // 행정구역코드
    private String areacode;

    // 시도
    private String step1;

    // 시군구
    private String step2;

    // 읍면동
    private String step3;

    // 발표 일자
    private String baseDate;

    // 발표 시각
    private String baseTime;

    // 예보지점 X좌표
    private String nx;

    // 예보지점 Y좌표
    private String ny;
}
API요청을 위한 파라미터 변수들과 도시 정보를 가져오기 위한 step들이 선언되어 있는 DTO를 만든다.
다 작성 하고 다시 페이지로 돌아와서 시도를 선택하면 시군구가 나오고, 시군구를 선택하면 읍면동이 나온다.
글이 길어져서 다음편에서 계속


안녕하세요. Kipris open api 조회해서 다운받으려고 하는데요 1개 테스크 코드는 되었는데 function으로 코드 돌려보니 막혀서요ㅜ 따로 에러메시지는 없도 ++표시가 나오면서 다운로드가 되지 않고 있네요. 한 번 여쭤봐도 될까요..?