Yalco님의 강의를 기반으로 실습을 진행했습니다.
1. MongoDB 연결하기
models/index.js
const mongoose = require('mongoose');
const { DB_USER, DB_PASSWORD, DB_NAME } = process.env;

const MONGO_URL = `mongodb+srv://${DB_USER}:${DB_PASSWORD}@cluster0.2y6a8.mongodb.net/${DB_NAME}?retryWrites=true&w=majority`;
// Connect to mongoDB
module.exports = () => {
    mongoose.connect(MONGO_URL, {
        useNewUrlParser: true,
        useUnifiedTopology: true
    }).then(() => {
        console.log('MongoDB Connected')
    }).catch(err => {
        console.log(err);
    });
}
먼저 mongoDB에 가입하여 자신의 클러스터를 만들고 데이터베이스를 만든다.
index.js
...
const dbConnect = require('./models');
dbConnect();
...
const people = require('./resolvers/people');
const content = require('./resolvers/content');

...

const typeDefs = require('./schema');
const resolvers = [
    people.resolvers,
    content.resolvers
]

const server =  new ApolloServer({typeDefs, resolvers,playground: true})

server.listen().then(({url}) => {
    console.log(`🚀  Server ready at ${url}`)
})
만약 db가 잘 연결되었다면 MongoDB Connected 라는 메시지가 terminal에 뜰것이다.
2. typeDefs와 resolvers 작성하기
typeDefs
schema/index.js
const {gql} = require('apollo-server');
const typeDefs = gql`
  type Query {
    contents:[Content]
  }
  type Content {
    _id:ID
    title:String
    content:String
    createdAt:String
  }
  input ContentInput {
    title:String
    content:String
  }
  type Mutation{
    createContent(contentInput: ContentInput): Content!
    editContent(_id:ID,contentInput:ContentInput):Content!
  }
`;

module.exports = typeDefs;
typeDef는 graphQL 명세에서 사용될 데이터, 요청의 타입을 지정한다. gql로 생성된다.
스키마 대부분은 일반 객체 타입이지만 스키만 내에는 특수한 2가지 타입이 있다.
schema {
	query:Query
    mutation:Mutation
}
이러한 타입은 일반 객체 타입과 동일하지만 모든 GraphQL 쿼리의 진입점(entry point) 을 정의하므로 특별하다.
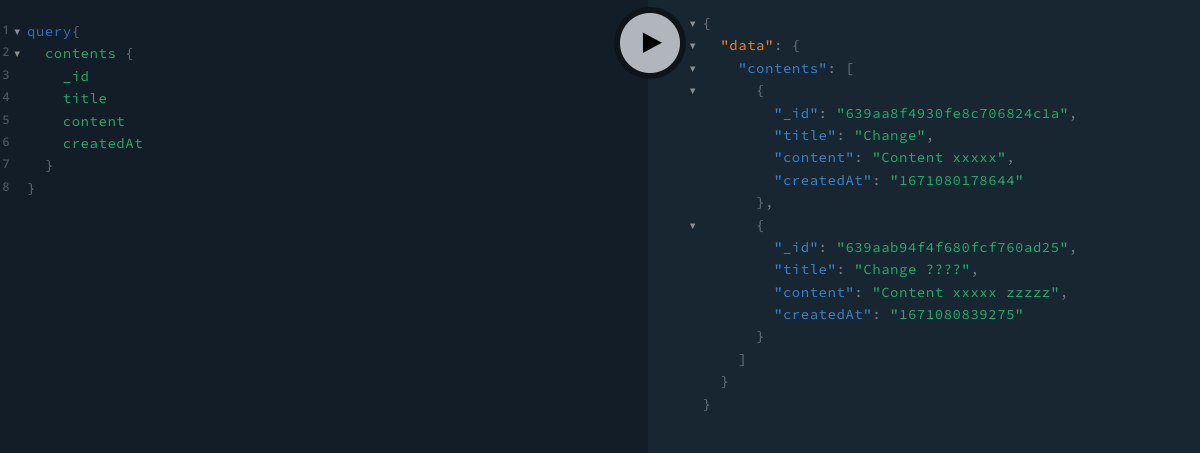
graphQL 데이터 요청시
query{
contents {
_id
title
content
createdAt
}
}
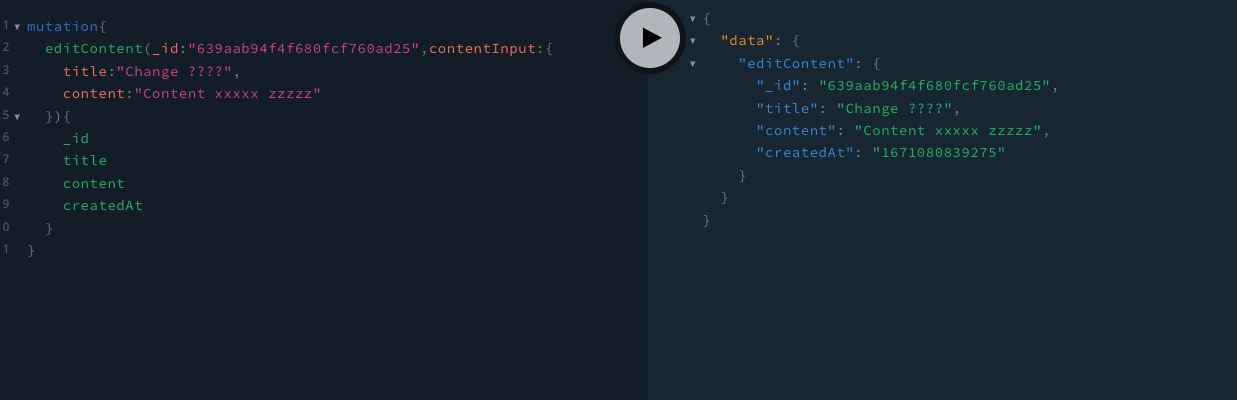
mutation{
editContent(_id:"639aab94f4f680fcf760ad25",contentInput:{
title:"Change ????",
content:"Content xxxxx zzzzz"
}){
_id
title
content
createdAt
}
}타입에 대한 다양한 정보 확인은 여기에 잘 설명되어있다. 👍😎
resolvers
resolvers/content.js
const Content = require('../models/content');

const resolvers = {
    Query: {
        async contents(_,args) {
            try {
                const contents = await Content.find();
                return contents;
            } catch (err) {
                console.log(err);
                throw err;
            }
        }
    },
    Content: {
        _id(_,args) {
            return _._id
        },
        title(_,args) {
            return _.title
        },
        content(_,args) {
            return _.content;
        },
        createdAt(_,args) {
            return _.createdAt;
        }
    },
    Mutation: {
        async createContent(_, args) {
            try {
                const content = new Content({
                    ...args.contentInput
                })
                const result = await content.save();
                return result;
            } catch (err) {
                console.log(err);
                throw err;
            }
        },
        async editContent(_,args) {
            try{
                const {contentInput,_id} = args;
                const content = await Content.findOneAndUpdate({_id}, contentInput);
                return content;

            } catch (err) {
                console.log(err);
                throw err;
            }
        }
    },
}

module.exports = {
    resolvers: resolvers
}
resolver는 서비스의 액션들을 함수로 지정한다. 요청에 따라 데이터를 반환, 입력, 수정, 삭제 역할을 수행한다.
await content.save();와
await Content.findOneAndUpdate({_id}, contentInput);
같은 문법은 MongoDB에서 제공하는 문서를 확인하면된다.
추가적으로 하나의 스키마 마다 다양한 액션함수가 들어가서 코드가 길어지는 특징때문에 스키마별로 코드를 모듈화 하였다. 위 resolver 파일은 Content 스키마를 담고 있다. 다른 파일을 만든다면
이렇게 구성하면 된다.
3. Playground에서 데이터 확인하기
query
mutation
후기
기존 코드를 따라하고 학습해서 어떤면에서 좋은지 현재 프로젝트에 적용하면 어떤면이 좋아지는지 추가로 생각해보고 분석해 봐야겠다. 🤔🤔
출처