
업로드 날짜 : 2022-11-22
업데이트 : 2023-04-25
- cargo add를 사용하여 interoptopus dependencies 추가
- 단계별 설명 추가
목표
c#으로 .net 어플리케이션을 제작하고 rust 언어도 같이 사용하여 적용할겸 하여 이 포스트를 작성하였습니다.
rust dll 만들기
- rust dll 프로젝트 이름을 정하여 cargo를 사용하여 만들어 줍니다.
cargo new [생성할 rust 프로젝트 이름]
cargo new example1
/example1/Cargo.toml 파일을 수정하여 줍니다.
[package]
name = "example_library_ffi"
version = "0.1.0"
edition = "2021"

[lib]
crate-type = ["cdylib", "rlib"]

[dependencies]
interoptopus = "0.14.15"
interoptopus_backend_csharp = "0.14.15"
[lib]
[lib] - Library target setting
라이브러리로 만들 준비를 해줍니다.
default file name : src/lib.rs
[dependencies]
dependencies의 interoptopus와 interoptopus_backend_charp은 최신의 버전으로 사용해주면 됩니다.
cargo add를 사용하여 interoptopus와 interoptopus_backend_charp를 넣어주겠습니다.
src 폴더에는 main.rs 파일이 있는데 사용하지 않으니 삭제하거나 남겨두셔도 됩니다.
대신 lib.rs라는 파일을 만들어 줍니다.
- lib.rs 파일을 다음과 같이 작성합니다.
use interoptopus::{ffi_function, ffi_type, Inventory, InventoryBuilder, function};

#[ffi_type]
#[repr(C)]
pub struct Vec2 {
    pub x: f32,
    pub y: f32,
}

#[ffi_function]
#[no_mangle]
pub extern "C" fn my_function(input: Vec2) -> Vec2 {
    input
}

pub fn my_inventory() -> Inventory {
    InventoryBuilder::new()
        .register(function!(my_function))
        .inventory()
}
ffi는 외부 함수 인터페이스의 약자입니다.
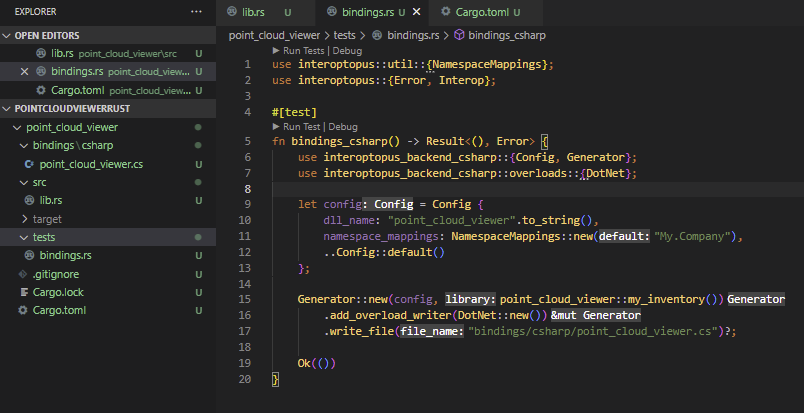
- tests 폴더를 만들고
bindings.rs라는 파일을 만듭니다.(/tests/bindings.rs)
이것은 유닛 테스트를 위한 것입니다.
예시 cs 파일을 만드는데 유용하게 사용할수 있습니다.
파일 경로 :tests/bindings.rs
use interoptopus::util::NamespaceMappings;
use interoptopus::{Error, Interop};

#[test]
fn bindings_csharp() -> Result<(), Error> {
    use interoptopus_backend_csharp::{Config, Generator};
    use interoptopus_backend_csharp::overloads::{DotNet, Unity};

    let config = Config {
        dll_name: "example_library_ffi".to_string(),
        namespace_mappings: NamespaceMappings::new("My.Company"),
        ..Config::default()
    };

    Generator::new(config, example_library_ffi::my_inventory())
        .add_overload_writer(DotNet::new())
        //.add_overload_writer(Unity::new())
        .write_file("작성하기 원하는 파일의 경로/FFI.cs")?;

    Ok(())
}
write_file()의 경로는 미리 만들어져 있어야 합니다.
그렇지 않으면 ---- bindings_csharp stdout ---- Error: IO(Os { code: 3, kind: NotFound, message: "The system cannot find the path specified." }) 다음과 같은 에러가 발생합니다.
작성한 후 cargo test를 해당 폴더 내에서 실행하시면
다음과 같은 결과와 전에 지정한 파일 경로에 .cs 파일이 만들어 진 것을 확인하실 수 있습니다.
warning: unused import: `Unity`
 --> tests\bindings.rs:7:58
  |
7 |     use interoptopus_backend_csharp::overloads::{DotNet, Unity};
  |                                                          ^^^^^
  |
  = note: `#[warn(unused_imports)]` on by default

warning: `example_library_ffi` (test "bindings") generated 1 warning
    Finished test [unoptimized + debuginfo] target(s) in 0.09s
     Running unittests src\lib.rs (target\debug\deps\example_library_ffi-0a3bdf0a33f24296.exe)

running 0 tests

test result: ok. 0 passed; 0 failed; 0 ignored; 0 measured; 0 filtered out; finished in 0.00s

     Running tests\bindings.rs (target\debug\deps\bindings-f5bd2cf3e40fcc20.exe)

running 1 test
test bindings_csharp ... ok

test result: ok. 1 passed; 0 failed; 0 ignored; 0 measured; 0 filtered out; finished in 0.00s

   Doc-tests example_library_ffi

running 0 tests

test result: ok. 0 passed; 0 failed; 0 ignored; 0 measured; 0 filtered out; finished in 0.00s
예시 이미지
자동 생성된 .cs 파일 예시(FFI.cs)
// Automatically generated by Interoptopus.

#pragma warning disable 0105
using System;
using System.Collections;
using System.Collections.Generic;
using System.Runtime.InteropServices;
using My.Company;
#pragma warning restore 0105

namespace My.Company
{
    public static partial class Interop
    {
        public const string NativeLib = "example_library_ffi";

        static Interop()
        {
        }


        [DllImport(NativeLib, CallingConvention = CallingConvention.Cdecl, EntryPoint = "my_function")]
        public static extern Vec2 my_function(Vec2 input);

    }

    [Serializable]
    [StructLayout(LayoutKind.Sequential)]
    public partial struct Vec2
    {
        public float x;
        public float y;
    }


    public class InteropException<T> : Exception
    {
        public T Error { get; private set; }

        public InteropException(T error): base($"Something went wrong: {error}")
        {
            Error = error;
        }
    }

}
cargo build --release혹은cargo build를 사용하여 dll을 target 폴더 내에 만듭니다.

여기서 생성된 .dll 파일을 사용해 주면 됩니다.
dll 넣기
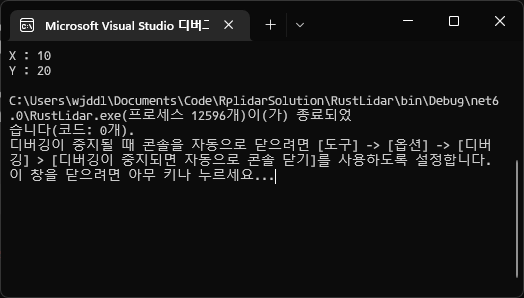
예시로 콘솔 프로젝트를 만들어서 위에서 만들어진 FFI.cs 파일을 프로젝트에 넣고 Program.cs 에 다음과 같이 명령어를 추가하였습니다.
using My.Company;

Vec2 vec;
vec.x = 10;
vec.y = 20;
Vec2 output = Interop.my_function(vec);
Console.WriteLine("X : " + output.x);
Console.WriteLine("Y : " + output.y);
그런후 dll을 추가하여 주었습니다.
참조 추가를 통해 넣으려면 서비스가 잘못되었거나 지원되지 않습니다 라는 오류창이 뜹니다.
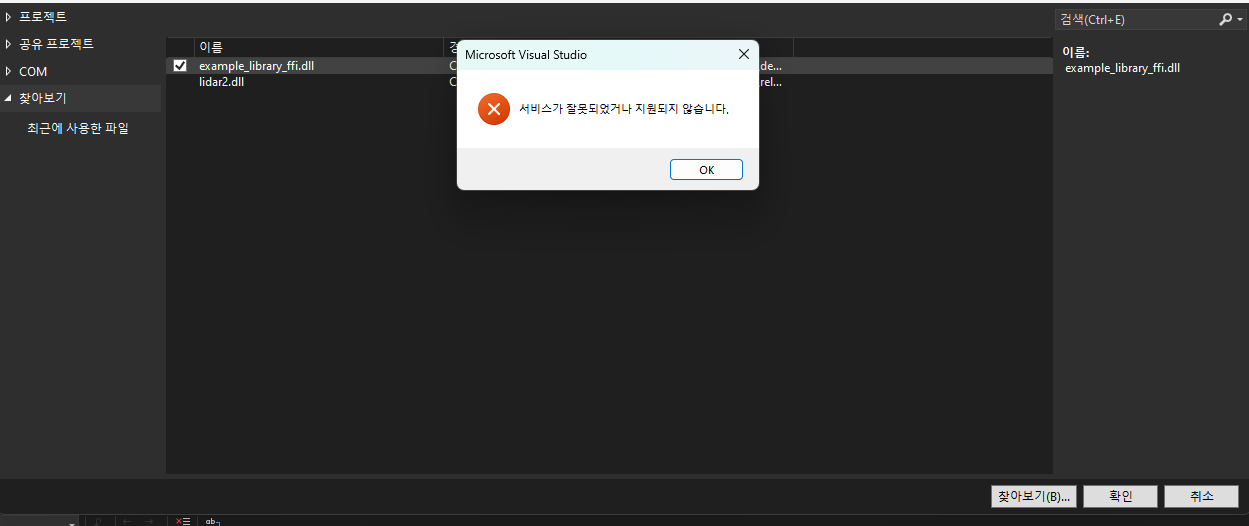
그렇기 때문에 다음과 같이 dll을 직접 옮겨줍니다.
-
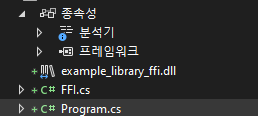
rust로 만든 dll은 다음과 같이 프로젝트안에 옮겨 줍니다
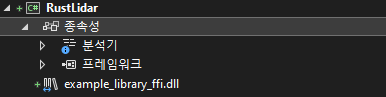
옮기는 방법은 기존 항목으로 dll을 선택하여 추가하거나, 파일을 마우스로 끌어서 옮깁니다. -
dll을 오른 클릭하여 속성에서 출력 디렉터리로 복사 항목을 항상복사로 변경하여 사용, 출력 폴더에 dll이 복사될수 있도록 해줍니다.
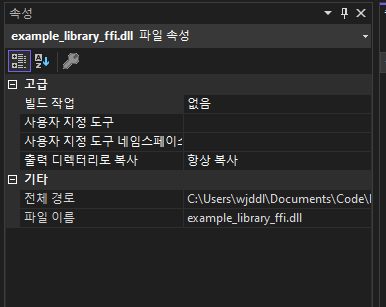
항상 복사를 체크하지 않으면 dll을 찾지 못하는 에러가 발생합니다.
결과
프로젝트 구조
실행 창
참조
https://www.loekvandenouweland.com/content/using-rust-code-from-csharp.html
https://crates.io/crates/interoptopus_backend_csharp