1. SVN -> GIT 마이그레이션 방법
1.1. git svn clone 명령어를 이용하여 타겟 SVN URL (브랜치 포함) 을 적는다.
이 단계에서 오랜 시간이 소요될 수 있다. (본인은 4시간 걸림)
git svn clone {SVN URL} -T {SVN URL}예를들어,
git svn clone http://svn.xxx.com/xxx/branches/BRANCH_v1.0 -T http://svn.xxx.com/xxx/branches/BRANCH_v1.0이렇게 설정했다면, 폴더 명 BRANCH_v1.0로 clone된 것을 확인할 수 있다.
1.2. 새로운 리모트 GIT 저장소를 생성한다.
1.3. clone한 폴더명을 2번에서 생성한 저장소 이름으로 변경한다.
예를 들어, 1번에서 clone한 결과 폴더 명이 BRANCH_v1.0 였고, 새로운 리모트 저장소 명은 BRANCH_v2.0 라면, BRANCH_v1.0 폴더명을 BRANCH_v2.0로 변경한다.
1.4. 원격 저장소를 연결한다.
PS D:\> git remote add origin http://github.com/BRANCH_v2.0
# 잘 되었는지 확인한다.
PS D:\> git remote -v
origin  http://github.com/BRANCH_v2.0 (fetch)
origin  http://github.com/BRANCH_v2.0 (push)
1.5. 원격 저장소에 push 한다.
PS D:\> git push -f origin master1.6. 다른 위치에서 원격 저장소를 clone 하여 확인한다.
> git branch -a
* master
  remotes/origin/HEAD -> origin/master
  remotes/origin/master
2. SVN 의 여러 저장소 -> 하나의 GIT 저장소의 여러 브랜치로 마이그레이션
다음과 같이 SVN의 여러 저장소를 하나의 GIT 저장소의 여러 브랜치로 만드려고 한다. 예시를 들어 설명하는게 알아보기 쉬우므로 예시를 사용한다.
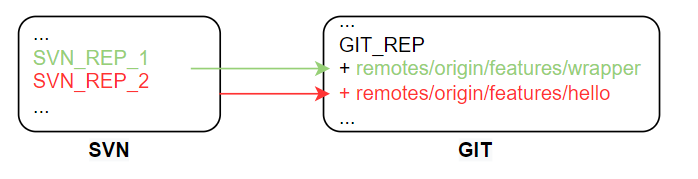
1. SVN_REP_1 저장소를 GIT_REP 저장소의 remotes/origin/features/wrapper 로 마이그레이션 한다.
"1. SVN -> GIT 마이그레이션 방법"에 적어둔 것을 참고하여 하나의 SVN 저장소 -> 하나의 GIT 저장소로 마이그레이션 한다.
그 후 새로운 로컬 브랜치 'features/wrapper' 를 생성하고 remote로 푸시한다.
2. SVN_REP_2 저장소를 GIT_REP 저장소의 remotes/origin/features/hello 로 마이그레이션 한다.
SVN_REP_2 를 저장할 테스트용 GIT 리모트 저장소가 필요하다.
테스트용 리모트 저장소를 TEST_GIT_REP라고 하고, 1번과 같은 방법으로 SVN_REP_2를 SVN -> GIT 으로 마이그레이션한다.
PS D:\> git svn clone http://svn.xxx.com/xxx/branches/SVN_REP_2 -T http://svn.xxx.com/xxx/branches/SVN_REP_2

PS D:\> git remote add origin http://github.com/TEST_GIT_REP
PS D:\> git remote -v
origin  http://github.com/TEST_GIT_REP (fetch)
origin  http://github.com/TEST_GIT_REP (push)
PS D:\> git push -f origin master
3. GIT_REP 저장소의 디렉토리로 이동한다.
PS D:\> cd GIT_REP4. TEST_GIT_REP 의 내용을 fork 한다.
PS D:\GIT_REP> git remote add fork http://github.com/TEST_GIT_REP
PS D:\GIT_REP> git fetch fork master
5. fork 된 내용을 새로운 로컬 브랜치(features/hello)로 옮긴다.
PS D:\GIT_REP> git checkout -b features/hello fork/master6. 로컬 브랜치를 리모트로 푸시한다.
PS D:\GIT_REP> git push origin features/hello7. fork 브랜치를 삭제해준다.
PS D:\GIT_REP> git remote rm fork
:)