
OpenLayer :
OpenLayers
。웹페이지에 동적인 형태의 다양한 형태의 지도 데이터를 표시하고 시각화, 분석 기능을 제공하면서 웹 지도 서비스를 구축하는 Front-End OpenSourceJavaScript라이브러리.
。국내의 많은 지도 API도Openlayer를 바탕으로 생성됨.
。map은 view / Layer / Interaction로 구성된다.
=> 해당 3개의 요소로 Map을 구축.
View : ol.view
。new ol.View({})를 통해 객체를 생성.
。View객체는 지도상에서 2차원 view로서 표현된다.
。Web Page에서 표현될 Map을.js파일상에서 설정.
。사용자가 현재 map을 보는 방식의 정보를 제공.
。center,resolution,rotation
▶ 해당 3요소가 View의 기본적인 요소이며 이 외에도 추가적인 옵션이 존재.
。import ol from '../v10.3.1-package/dist/ol.js'가 사전에 HTML 파일에<script src="">로서 import되어야 한다.
- View의 생성자 옵션
var view = new ol.View({
	projections: 'EPSG:32643',
	center: [342926.187301568, 3117461.3200207334],
  zoom: 20,
})
center:center:[경도,위도]
。View객체의 Map에서 시작 시 표현될 초기 중심좌표resoultion단위:pixel
。view객체의 초기 설정될 resolution.
▶zoomoption으로 대체가 가능.rotation:단위:rad
。view객체의 초기 설정될 rotationzoom:
。Map의 Zoom 레벨
。resolution이 정의가 되지 않은 경우 사용.extent:View의 지도상에서 시각화 될 범위를 제한.projection: Map에서 정의될 좌표계 등을 정의.
▶ 해당 구문은 생략이 가능하며 default 값은EPSG:3857(spherical mercator)
- EPSG 좌표계 정보 EPSG.io
- js상에 좌표계간 상호변환 또는 새로운 좌표계 정의하기
。proj4js:
서로 다른 기준타원체 간 Datum변환 기능 및 좌표계간 상호변환 기능을 포함하는js라이브러리.
。jquery:
HTML의 요소들을 쉽게 조작하고 편리하게 사용할 수 있게 만든 라이브러리로js를 미리 작성<script src="https://cdnjs.cloudflare.com/ajax/libs/proj4js/2.4.4/proj4.js"></script> <script src="webjars/jquery/3.6.0/jquery.min.js"></script>▶ 해당 구문을 html의
<header>태그 내에 정의하여<body>태그 내에서<script>로 연결된js파일에서 사용되도록 설정.
。이후 epsg.io에서 사용할 좌표계의 정보를proj4js코드로 복사 및js파일 내에 정의하여 해당 불러온 좌표계 정보를View에 정의한다.proj4.defs("EPSG:32643","+proj=utm +zone=43 +datum=WGS84 +units=m +no_defs +type=crs"); var view = new ol.View({ projection : 'EPSG:32643', center : [0,0], zoom : 10, })
- View 메소드
。주로map객체.getView().메소드()를 통해 map과 interaction시 활용.
View객체.getCenter():
해당 ID의 container 상에 표시된 지도의 중심좌표를 return.
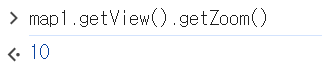
View객체..getZoom():
해당 ID의 container의 zoom level을 return.
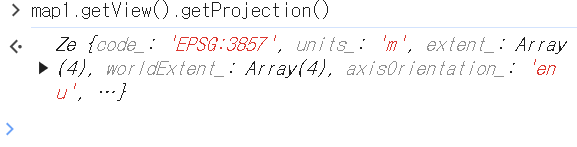
View객체.getProjection():
해당 ID의 container 상에 표시된 지도의 좌표계 정보를 return.
View객체.calculateExtent():
해당 ID의 container 상에 표시된 화면의[minX, minY, maxX, maxY]정보를 제공.
View객체.fit(geometry 범위 , options):
。특정 geometry 영역을 html element의 범위(viewport)에 맞추도록 조정하는 기능을 제공.
▶ 이를 통해 지정한 geometry 범위를 Map객체의 View에 맞게 확대, 축소가 가능.
geometry 범위 :[minX, minY, maxX, maxY]var extent = dragBox.getGeometry().getExtent(); map1.getView().fit(extent,{duration:500})fit method의 option
size:[width, height]
。viewport 크기 설정
。default : html element에 정의된 viewport 크기duration:
。애니메이션 시간(밀리초) 설정
。default : 애니메이션 없이 바로 적용.padding:padding : [top, right, bottom, left], px단위
。여백 설정.maxZoom:
。최대 Zoom level 제한


Layer :
。지도에 표현할 raster, vector data들과 feature들을 의미.
▶ layer 내부에는 layer를 구성하는 다른 패킷들로 구성됨.
- layer 객체 종류
- Tile layer 객체 (
WMTS) ol.layer.tile
new ol.layer.Tile({}):
。Tile map layer 객체를 생성.
。사전 렌더링되어 zoom level 또는 resolution을 통해 정의하는 grid tiled image를 제공.
。동적 로딩을 지원하여 static인 image layer에 비해 로딩의 지연의 정도가 원활함.
- Image layer 객체 ol.layer.image
new ol.layer.image({})
。Tile이 아닌 static Image layer 객체를 생성.
- Vector layer 객체 ol.layer.Vector
ol.layer.Vector()
。client-side에서 사전에 rendering된 Vector data를source로서 정의하는 Vector Layer 객체를 생성.
- HeatMap Layer 객체 ol.layer.Heatmap
new ol.layer.Heatmap()
。Vector data(point)를 heatmap으로 표현하는 Heatmap Layer 객체를 생성.
。기존에pointvector source로 생성된ol.layer.Vector의 layer를 변환하여 생성이 가능.
blur: pixel 단위의 blur size를 설정. (default : 15)
radius: pixel 단위의 radius size를 설정. (default : 8)
gradient: heatmap의 경사에 따른 색상을 설정. (default :['#00f', '#0ff', '#0f0', '#ff0', '#f00'])
- Graticule Layer 객체 ol.layer.Graticule
new ol.layer.Graticule()
。좌표계의 Grid가 렌더링된 layer 객체 생성.
▶ 현재 graticule은EPSG:4326의 좌표계상에서만 지원.
map: Graticule을 표현할EPSG:4326의 Map객체를 지정.
。`graticule객체.setMap(Map객체)를 통해 지정가능.
▶ol.Map생성자 내map:map객체설정 시 해당 map 객체에 graticule이 표현됨.
showLabels: map에 표현된 각각의 위도선, 자오선에 label을 렌더링.
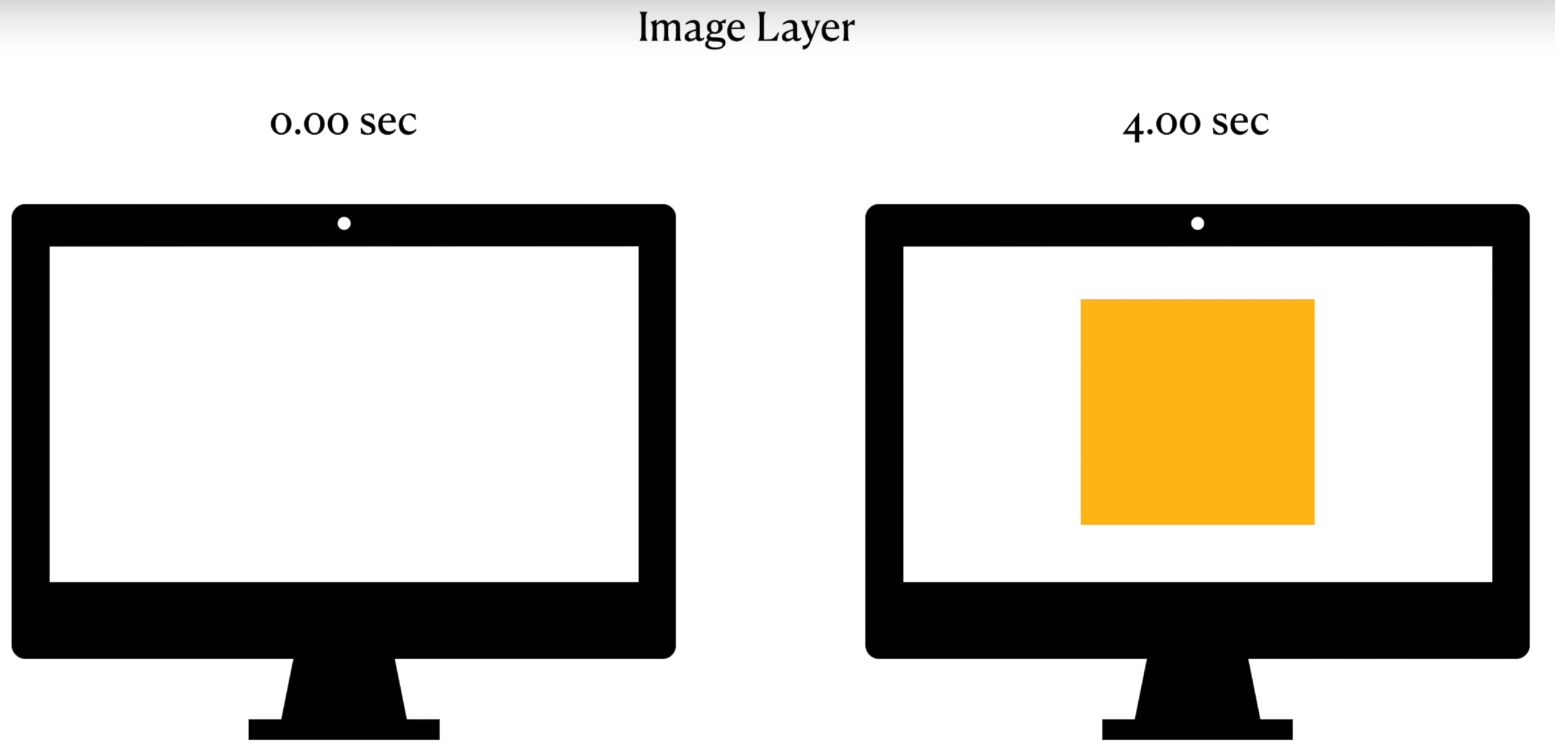
- Image layer과 Tile layer의 차이
- Image layer
。단일 단위로 배치된 이미지파일 (JPEG, PNG)로 구성.
。타일링이 필요하지 않은 정적 시각적 개체에 가장 적합.
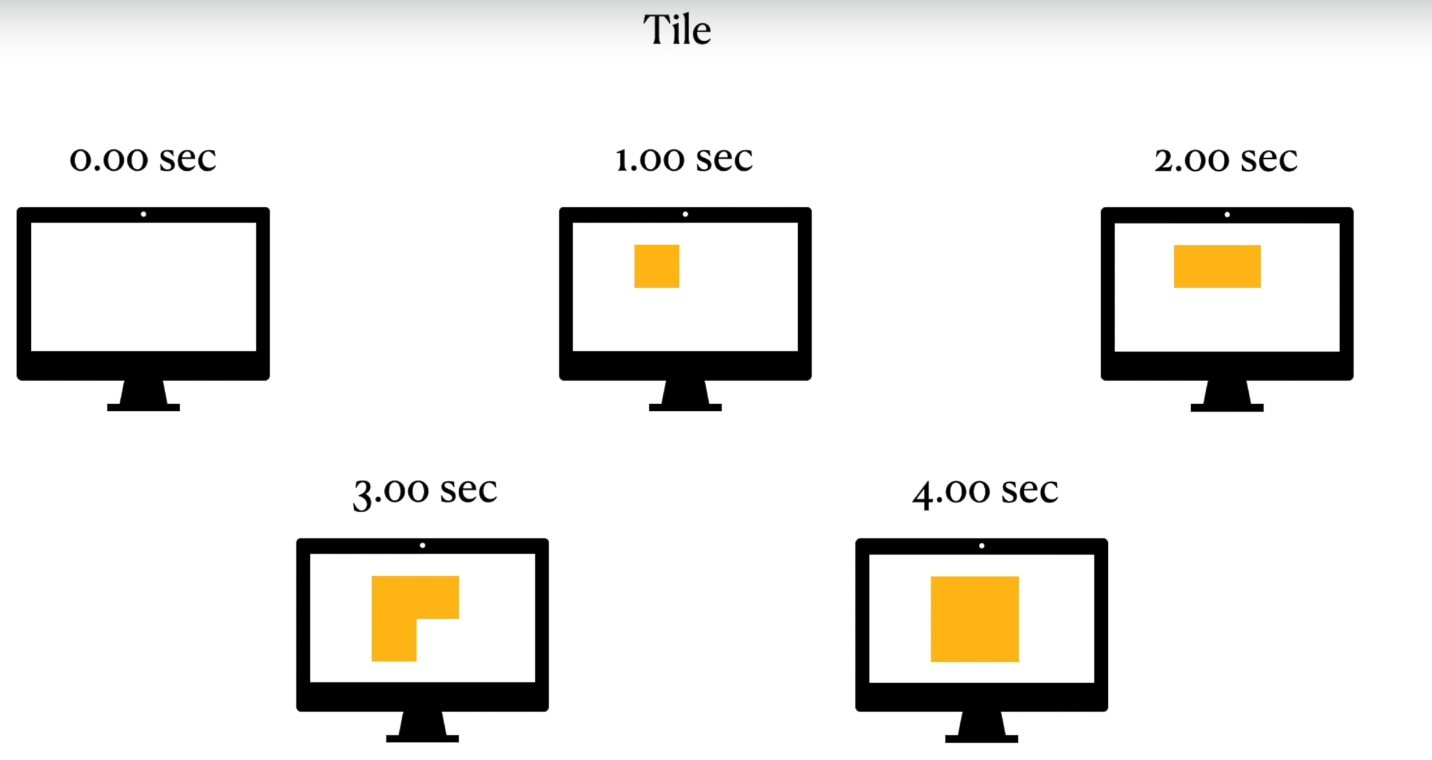
- Tile layer
。Tile layer는 지도를 형성하는 여러 개의 정사각형 이미지의 작은 tile로 구성.
▶ 지도, 게임 등의 넓은 영역을 효율적으로 처리해야하는 application에 자주 사용.
ex) Google 지도는 Tile layer를 사용하여 지리정보를 표현.
Tile layer 특징
。성능 저하 없이 크기 조정 및 확대/축소 가능.
。동적 로딩을 지원하여 보이는 영역의 tile만 우선적으로 load되게 한다.
▶ image layer보다 가볍고 렌더링에 최적화됨.
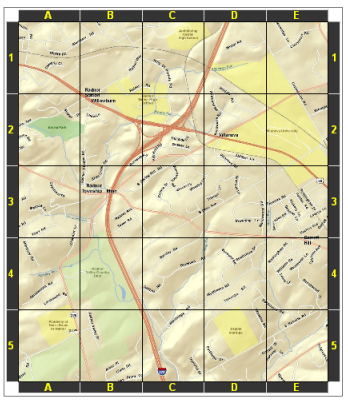
- Grid와 Graticule의 차이
- Grid :
。2D map에서 특정위치를 파악하기위해 사용되는 동등한 간격으로 평행한 수직선과 수평선의 격자 network.
。map을 특정 grid type에 따라 특정 갯수의 행과 열로 분리하여 사용가능하며 해당 grid type의 행과 열의 label을 통해 특정 위치의 index를 파악 할 수 있다.
▶ 해당 map의 경우 각각 5개의 행과 열로 분리됨.
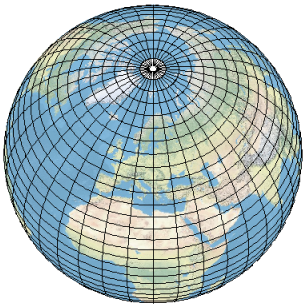
- Graticule :
。지구상에서 자오선(경도)과 위도선(위도)을 이용한 격자 network.
。Graticule은 위치를 동등한 간격의 위도, 경도에 따라 설정된 자오선과 위도선을 이용해 특정 위치의 index를 표현한다.
▶ 해당 graticule의 경우 유럽을 5도의 위도와 10도의 경도 단위로 graticule 격자로 표현한 지도.
- Layer 객체의 생성자 옵션 :
source:
。 layer의 data source 설정.properties
。임의속성 ▶get() , set()으로 조작이 가능minZoom
。최소 표시 줌 레벨maxZoom
。최대 표시 줌 레벨zIndex
。우선순위 (높을수록 layer 순서 중 위로 표시됨. 1과 3중 3이 먼저 표현.)
。중복되면 안된다.preload
。지정한 레벨까지 저해상도 Tile을 preload.
▶preload:0은 미사용style
。ol.style.Style객체를 지정
- Layer 객체 메소드 종류
。Layer객체.getSource(): Layer 객체가 사용하는 DataSource 객체를 return.
source:
。 layer의 data source. ( SHP, GeoJSON 등 )
。주로 osm 또는 vworld의 WMTS의 사전에 렌더링된 Basemap을 가져올 때 사용.
ex :source:new ol.source.OSM()
▶OSM의 WMTS BaseMap 을 layer source로서 가져오기.
- DataSource 종류
- ol.source.OSM() ol/source/OSM
new ol.source.OSM()
。OSM의 Tile data를 LayerSource로서 사용되는 source 객체를 생성
。ol.source에 미리 OSM이 구현되있으므로, 사용이 편리하다.
- 예시
var TileOSM = new new ol.layer.Tile({
  source: new ol.source.OSM()
});
- ol.source.XYZ() ol/source/XYZ
new ol.source.XYZ({})
。URL형태로 제공되는 tile data를 Layer source로서 사용되는 source 객체를 생성.
▶ 해당 URL은 XYZ format으로 정의된 URL의 Template 형식으로 설정됨.
。x=0 ,y=0 이 TopLeft인 Google grid 형식을 따른다.
▶x=0 ,y=0 이 BottomLeft인 경우의 TMS 형식은 URL Template에서 placeholder를{-y}로 설정.new ol.source.XYZ({ url : 'https://api.vworld.kr/req/wmts/1.0.0/{key}/Base/{z}/{y}/{x}.png' })。url template는 다음과 같으며
{x}, {y}, {z}의 placeholder를 반드시 포함해야한다.
- ol.source.ImageStatic() ol/source/ImageStatic
new ol.source.ImageStatic({})
。단일 static image를 layer source로서 사용되는 source 객체 생성
url: image url
▶ 상대경로로도 사용 가능."./aa.png"
attribution: image에 대한 설명으로 사용되는 문구.
ex)attribution:<b>이미지 설명</b>
imageExtent: image를 표현한 map 좌표계에 대한 image의 범위좌표를 설정.
imageExtent : [minX, minY, maxX, maxY]
projection: default 는 view의 projection으로 설정됨.
- ol.source.Vector() ol/source/Vector
new ol.source.Vector()
。Vector layer의 layer source로서 사용되는 source 객체 생성.
features:ol.Feature()로 생성된 feature객체를 Collection(배열)으로 받는다.
▶features : [Feature1,Feature2,...]
format:
。XHR loader를 이용하여ol.format의 객체 (ex :ol.format.GeoJSON())를 통해 format을 지정.
。사전에url속성이 정의되어야 하며 그러지 아니한 경우 무시됨.
url:
。해당 url을 source로 지정하여XHR loader를 이용하여 feature를 load하도록 설정.
strategy:loading strategy를 정의. ol/loadingstrategy
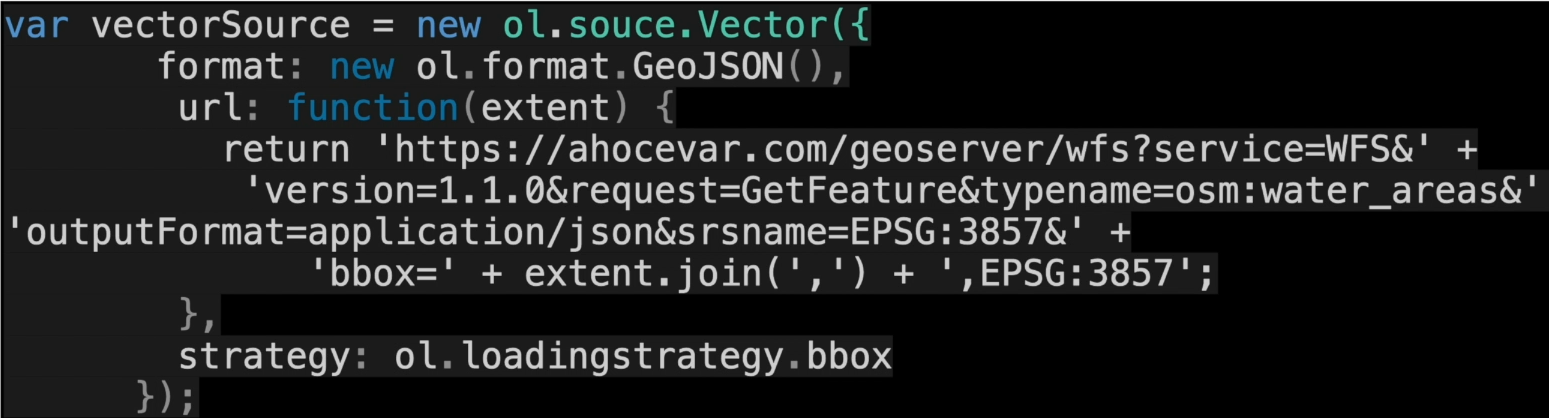
▶Server에서WFS를 통해 layer를 전달받을경우, layer의 Feature 수가 많은 경우 원활한 작용을 위해bbox를 정의하여 사용하는 방식.strategy:ol.loadingstrategy.bbox
getClosestFeatureToCoordinate(coordinate, filter)ol/source/vector
。Vector Source에 속한 제공된 좌표에 가장 가까운 feature 객체를 가져오는 method.
▶ 마우스 포인터를 클릭해서 가져오는 Method로 사용.
- ol.source.TileWMS() ol/source/TileWMS
new ol.source.TileWMS()
。Client가 Tile 단위로 Request를 보내고, WMS Server가 Request에 따라 Tile을 생성하여 제공한 데이터를 source로 생성 후Tile Layer생성.
▶ 주로GeoServer의 WMS를 받아올 때 사용.
url: WMS Service의 URL
params: WMS의 Request parameter를 정의
▶LAYERSparameter이 반드시 정의.
ex)params: {'LAYERS': 'tiger:poly_landmarks'}
▶TILED: Tile Map 여부 정의
serverType: 원격 WMS server의 type을 지정. ex)mapserver, geoserver... etc
crossOrigin:CORS(Cross-Origin Resource Sharing)를 처리하는 역할을 수행.
▶ client가 WMS Server에 Tile map을 Request 할 경우 쿠키 또는 Http authentication header 등의 포함여부를 제어.
crossOrigin:null:CORS이 지정되지 않고, Http Request에 자격증명이 포함되지 않으며 가져온 resource에 대해 access가 제한될 수 있음.
crossOrigin:anonymous: resource 접근 시 Server가 인증을 요구하지 않고,CORS를 지원할때 사용되는 방식으로 Http Request에 자격증명이 포함되지 않음.
crossOrigin:use-credentials: Request에 자격증명이 포함하여 인증이 필요한 resource에 접근 시 사용.
- 예시
。해당 코드는 geoserver로부터 받는다.var TileWMS = new ol.layer.Tile({ source: new ol.source.TileWMS({ url: 'http:localhost:8080/geosercer/store/wms', params:{'LAYERS':'store:layer','TILED':true}, serverType:'geoserver', }) })
- ol.source.ImageWMS() ol/source/ImageWMS
new ol.source.ImageWMS()
。Client가 전체 Image를 하나의 WMS Request로 보내고, WMS Server가 해당 Request에 따라 해상도와 크기를 조정하여 Image를 생성하여 source로 생성 후Image Layer생성.
。Image를 하나의 파일로 제공하므로 부하가 크기에 오래 걸린다.
- 예시
。해당 코드는 geoserver로부터 받는다.var chak_1_land_layer = new ol.layer.Image({ source: new ol.source.ImageWMS({ url:'http:localhost:8080/geosercer/store/wms', params:{'LAYERS':'store:layer'}, serverType:'geoserver', crossOrigin:'anonymous', }) })
TileWMS,ImageWMS의 메소드 :
getFeatureInfoUrl(coordinate, resolution, projection, params): ol/source/ImageWMS
。TileWMS,ImageWMS의 메소드
▶ImageWMS객체.getFeatureInfoUrl(coordinate, resolution, projection, params)
。WMS Request를 통해 특정 지점의 속성정보를 가져오는 함수.
▶ 해당 함수는 사용자가 브라우저의 Map에서 특정 지점을 클릭 시 해당 지점의 좌표, Map의 View의zoom level등을 기반으로GetFeatureInfo Request URL을 생성한다.
▶ 생성한 URL은 서버에 전송하여 WMS Server는 특정좌표의 속성정보를JSON,XML등의 format으로 return.
。WMS Server가 Client에 제공한WMS Map Layer은Image Layer로서 속성정보를 포함하고 있지 않지만, 해당 Image Layer의 특정 좌표를WMS Server에 전송하면서 해당 좌표의 속성정보를 받아오는 방식임.
coordinate: 사용자가 click한 지점의 좌표
resolution: Map의 해상도.
▶ 보통map객체.getView().getResolution()을 통해 현재 map 해상도를 가져옴.
projection:SRS를 정의.
▶ 보통WMS Layer와 동일한EPSG코드를 지정.
params: WMS Request에 관련된 Parameter.
INFO_FORMAT: 서버에서 지원하는 Response format으로 주로JSON,XML을 정의.
▶'application/json','text/xml'
QUERY_LAYERS:
。WMS Map Layer의 이름을 지정.
- DataSource의 메소드 종류
datasource객체.clear():
。source의 모든 feature를 삭제.
datasource객체.getFeatures():
。source의 모든 feature를 배열로 반환.
ex)datasource객체.getFeatures()[5]
Interaction :
ol/interaction
。지도와의 상호작용 요소
ol.interaction.Draw,ol.interaction.Link... 등의 기능이 존재.
- Map 상호작용 요소
map객체.on('fire옵션',트리거 함수): map 객체에서 특정 interaction을 통해 fire option 조건 충족 시 해당fucntion(evt){ 작동코드 }의 트리거함수가 내부에 정의된 코드를 실행.
ol/Map
- Interaction :
ol.interaction.DragBox()... 등의 Interaction 객체.- Overlays : Map에 표시할 요소
Mapol/Map
new ol.Map({})으로Map객체를 생성.
。OpenLayer library의 핵심 component.
。View,Layer등을 html 페이지의 Container(div등) element를 지정하여 지도상에 렌더링하는 역할을 수행.
。map객체.addLayer(layer객체)를 통해 기존 layer 객체를 넣을 수 있다.
Map생성자 옵션
target
。map을 표현할 HTML의 container element의 ID를 지정.layers
。ol.layer로 생성된layer객체를 지도상에 rendering.
。복수의layer를 배열형태로 받아야한다.layers:[layer]view
。ol.View로 생성된view객체를 지도상에 rendering.controls
。ol.control.defaults.defaults()로 생성된 control 객체를 지도상에 버튼으로 rendering.
Map메소드 :
。보통 크롬브라우저의 검사-console에서 입력하여 활용 가능하며 주로 map과 interaction하는 함수 구현시 활용
map객체.getView():
。해당 map에서 사용되는 View 객체를 return.
ex)map1.getView().fit(extent,map1.getSize())
map객체.getLayers():
。해당 map에서 사용되는 Layer 객체 배열을 return.
map객체.getLayers().array_[1]: map객체에서 사용되는 첫번째 Layer 객체를 반환.
map객체.getLayers().item(index): 해당 map객체에서 index 순번에 해당하는 layer를 가져오는역할을 수행.
map객체.getSize(): 해당 map의 연결된 html element의 viewport size를 return.
map객체.forEachFeatureAtPixel( pixel객체, callback함수, options ):
。map의Viewport에서 특정 pixel과 교차하는 feature를 발견 후callback함수의 매개변수로 전달.
。 pixel 객체의 경우,map객체.on('click',function(evt))의evt.pixel를 주로 활용한다.
- ol.pixel ol/pixel
new ol.pixel({ pixel 기준 x좌표, y좌표 })
。Viewport의 pixel 기준 특정 좌표의 pixel 객체 return.
map객체.removeLayer(Layer객체)
。map객체에 포함된layer객체를 삭제.
map객체.removeLayer(map객체.getLayers().item(1)): map객체에 포함된 포함된 2번쨰 layer를 삭제.
Featureol/Feature
。new ol.Feature()으로feature객체를 생성.
。geometry와 다른 속성정보를 이용하여 표현가능한 vector object
。ol.source.Vector()의 구성요소로 사용한다.
。Style을 통한 스타일링이 가능!
▶GeoJSON과 유사한 vector file format을 가진다.
Feature생성자 옵션
geometry
。해당 feature 객체의 geometry 정보를 포함.geometry 구축하기 :
new ol.geom.Point([x좌표,y좌표])
。점 Geometry 생성style: ol/style/Style
。Feature에 styling할ol.style.Style()을 통해 정의된 style 객체를 지정.
。Feature객체.setStyle(style객체)를 이용해 style 객체를 지정 가능.Feature메소드
feature객체.get('key이름'):
。feature의 property에서 key이름에 해당하는 value를 return.
feature객체.getProperties():
。해당 feature의Properties객체를 반환
- Properties 객체
。geoJSON형식의 feature의 dictionary 형태로 정의한 metadata의 정보를 가져올 수 있다.
ex:feature객체.getProperties().metadata의 특정키
feature객체.getGeometry()
。해당 feature 객체의 Geometry 객체를 반환.Geometry 객체
Geometry객체.getExtent():
。geometry 객체의[minX, minY, maxX, maxY]좌표 return.
Geometry객체.getCoordinates():
。geometry 객체를 정의하는 point의 모든 좌표를 각각 배열로 return.
feature객체.setProperties({key : value}):
。해당feature객체의Properties객체에{key : value}쌍의 Property를 추가
。Property를 추가하거나 기존의Properties에 존재하는 Property의 수정만 가능하며 삭제는 안됨.
▶ Feature의 기존 Property의 value를 수정하거나 Property를 추가할 수 있다.Styleol/style/Style
new ol.style.Style()
。vector feature의 Styling을 위한Style속성들의 container.
Style생성자 옵션
image:
。image의 style을 지정.
▶ol.style.Icon객체를 해당 속성에 지정이 가능
。image의src는 반드시CORS정책 의해 외부 사이트의 이미지 링크로 설정해야하며, PC내 이미지 사용 시public폴더내에 image파일을 저장하여 절대경로로서 참조.
stroke:
。ol.style.Stroke객체를 해당 속성에 지정이 가능fill:
。ol.style.Fill객체를 해당 속성에 지정이 가능.Iconol/style/Icon
new ol.style.Icon()
。vector feature를 위한 icon style을 image로 설정.
Icon생성자 옵션
anchor: icon의 center 좌표를 지정. default : [0.5,0.5]src: 삽입할 image의 URL을 입력.
。image의src는 반드시CORS정책 의해 외부 사이트의 이미지 링크로 설정해야하며, PC내 이미지 사용 시public폴더내에 image파일을 저장하여 절대경로로서 참조.
scale: 삽입할 image의 scale을 지정. default : 1Strokeol/style/Stroke
new ol.style.Stroke()
。Vector feature를 위한 stroke(Line)의 style을 지정.
Stroke생성자 옵션
。color:stroke의 color를 지정.
。width:stroke의 너비를 지정.
。lineDash:stroke의 선의 형태를 지정.Fillol/style/Fill
new ol.style.Fill()
。vector feature(Polygon)를 위한 fill style을 지정.
Fill생성자 옵션
。color:
Polygon의 내부 color를 지정. (+ rgba도 지정가능)


- ol.control.defaults.defaults() ol/control/defaults
new ol.control.defaults.defaults(옵션)
。기본적으로Map에 포함되어있는control들의 집합.ol.control.defaults.defaults().extend([new RotateNorthControl()])
.extends([Control 함수])를 통해 defaults 객체에 새로운 control을 추가.
활용례
var map = new ol.Map({
  controls: ol.control.defaults.defaults().extend([new RotateNorthControl()]),
  layers: [OSMBaseLayer],
  target: 'map',
  view: View
});
새로운control버튼이 추가됨.ol.control.Controlol/control/Control
。map객체에 대한 사용자 정의 control을 생성 및 관리하기위한 기반을 제공.
。map의 interaction에 관련된 DOM 요소를 관리하도록 설계됨.
▶ol.control.Control을 상속하는 class를 구축 및 내부에eventlistener와 사용자정의 logic을 구현하여 사용자정의 control을 생성.
。ol.control.Control는 map에 원활하게 통합 및 map의 API를 이용하여 interaction이 가능.
- ol.control.Control의 생성자 옵션
element:HTMLElementtype
。Control의DOM element를 정의. (ex :'button','div'등의 HTML container)target:HTMLElementtype
。Control의 targetDOM element를 정의.
▶ 해당 요소 정의 시, control은 해당 target element를 default map container보다 우선시하여 rendering.className:stringtype
。해당Control의 style을 수행할 css class 이름을 설정.- 사용례
class RotateNorthControl extends ol.control.Control {
  constructor(opt_options) {
    const options = opt_options || {};
    const button = document.createElement('button');
    button.innerHTML = 'N';
    const element = document.createElement('div');
    element.className = 'rotate-north ol-unselectable ol-control';
    element.appendChild(button);
    super({
      element: element,
      target: options.target,
    });
    button.addEventListener('click', this.handleRotateNorth.bind(this), false);
    button.addEventListener('touchstart', this.handleRotateNorth.bind(this),false);
  }
  handleRotateNorth() {
    this.getMap().getView().setRotation(0);
  }
}
Web GIS 서비스 표준 종류 :
OGC Web Service
。OGC에서 제정한 서비스표준으로서 Web상에서 Geospatial data를 효과적으로 공유 및 활용하기 위해 구분됨.
▶ Geospatial Data를WFS,WMS,WCS,WPS등의 서비스 표준에 따라 구분하여 서비스하여 데이터를 관리할 수 있는 Web Interface 제공.
▶ 해당 서비스표준은 모두 GIS 분야에서 지리정보를 공유 및 다양한 서비스와 SW를 활용하기위해 사용됨.
OGC(Open Geospatial Consortium):
。GIS와 관련된 표준을 개발하는 국제기구
。Geospatial data와 서비스의 상호운용성을 향상시키기 위한 다양한 서비스 표준을 제공.
▶ 해당 서비스표준은 공간데이터 교환 및 처리, Web 기반 GIS서비스 구축 법 등을 규정.
WMS( Web Map Service )
。OGC(Open Geospatial Consortium)에 의해 정의된 지도 이미지 interface 표준.
。GIS Data에 접근하기 위한 interface로서 데이터를 사용하기 위해 Map Server에서 생성된 지도 이미지를 Web을 통해 제공하기 위한 표준 Interface.
▶ Data Server에 저장된 layer 또는 분석을 통해 생성된 layer를 시각화하는 서비스를 수행
。Map data를 제공하는 서비스로서, WMS 방식에는 Map Engine이 반드시 필요하므로, 보통 각 회사에서 개발한 Map Engine( ex.GeoServer)같은 프로그램을 설치하여 사용.
▶ Map engine으로 WMS 구축 시 Map service request에 필요한 map data를 가공하여 return.
。TMS방식과 비교 시 상대적으로 Map Service 속도가 떨어진다.
。WMS Request에 대한 Response는 이미지(JPEG, PNG)로 제공
WFS(Web Feature Service)
。Web을 통해 Vector data를 제공하기위한 표준 Interface
。data server에 저장된 vector layer를 공간 및 속성조건을 통해 feature로서 불러오거나 feature를 추가,수정,삭제 하기 위한 서비스.
。client는 관심 layer, layer 요청범위, 좌표체계, layer에 대한 filter, 요청 format등을 정의 후 server에 request하여 해당 Server는 Client의 Request에 맞게 인코딩하여 반환.
WCS(Web Coverage Service) :
。Web을 통하여 Raster data를 제공하기 위한 표준 Interface.
WPS( Web Processing Service )
。공간데이터에 대한 공간처리 기능을 Web 상에서 서비스하기위한 표준 Interface.
。모든 OGC 서비스표준과 상호호환성을 가진다.
WMTS( Web Map Tile Service ) :
。인터넷을 통해 미리 렌터링된 Map tile을 제공하기위한 표준 Interface.
▶ 서버단에서 미리 정의된 Tile Map형식의 Map Image를 제공하는 방식.
▶ BaseMap 용 Tile Map 제공 시 해당 표준인 경우가 많다.
。국내에서는 Vworld이 활용됨.
TMS(Tile Map Service) Layer :
。Tile 형식으로 구역별 X,Y,Z 축으로 나누어진 가공된 지도 Image를 이용해 그대로 Image를 반환.
。이미 가공된 Image를 return하므로,WMS방식보다 빠르다
KML( Keyhole Markup Language ) :
。Google Map,Google Earth등의 Web 기반 2차원, 3차원 브라우저에서 Geospatial Data의 주기와 가시화를 위한XML기반의 Schema.
GML( Geography Markup Language ) :
。지리적 특성을 표현하기위한XML문법으로서 공간데이터 송수신을 위한 format임과 동시에 GIS를 위한 모델링 언어로서도 사용이 가능.
。문서의 설명부분과 데이터부분으로 분할됨.
OpenLayers(
OL) 활용하기.
- html 페이지 작성하기
- openlayers 공홈에서 관련 라이브러리 다운로드 후 html문서에 경로 설정
Openlayers library 다운로드 경로<link rel="stylesheet" href="../v10.3.1-package/ol.css" type="type/css"> <script src="../v10.3.1-package/dist/ol.js"></script>▶ 다음 다운로드된
js,css코드를 html 문서의 header에 포함시킨다.<!DOCTYPE html> <html lang="ko"> <head> <meta charset="UTF-8"> <meta name="viewport" content="width=device-width, initial-scale=1.0"> <link rel="stylesheet" href="../v10.3.1-package/ol.css"> <script src="../v10.3.1-package/dist/ol.js"></script> <link rel="stylesheet" href="./style.css"> <title>Project1</title> </head> <body> <h1>OpenLayers Map</h1> <div id="map" class="map"></div> <script src="./main.js"></script> </body> </html>- css 페이지 작성
.map{
  width:100%;
  height:600px;
}
- js 페이지 작성하기
var view = new ol.View({
  projection : 'EPSG:4326',
  center : [127.05994054600626, 37.58400223316397],
  zoom : 10,
})
var OSMBaseMap = new ol.layer.Tile({
  source: new ol.source.OSM()
})
var layerArray = [OSMBaseMap]
var map = new ol.Map({
  target : 'map',
  layers : layerArray,
  view : view,
})
View객체 생성하기 ol/view
。View를 생성하는 이유? : layer를new ol.layer.Tile({})를 통해 여러개를 불러올때, 해당 코드를 중복작성 시 길이가 길어지면서 복잡해지는 등의 불필요한 코드의 반복(WET)를 방지하기위해View를 생성.
。EPSG:4326의 경우 경도,위도 좌표를 사용하므로center설정 시 해당 좌표값으로 설정한다.var view = new ol.View({ projection : 'EPSG:3857', center : [14144152.655679686, 4520798.25980481], zoom : 17, })
- .
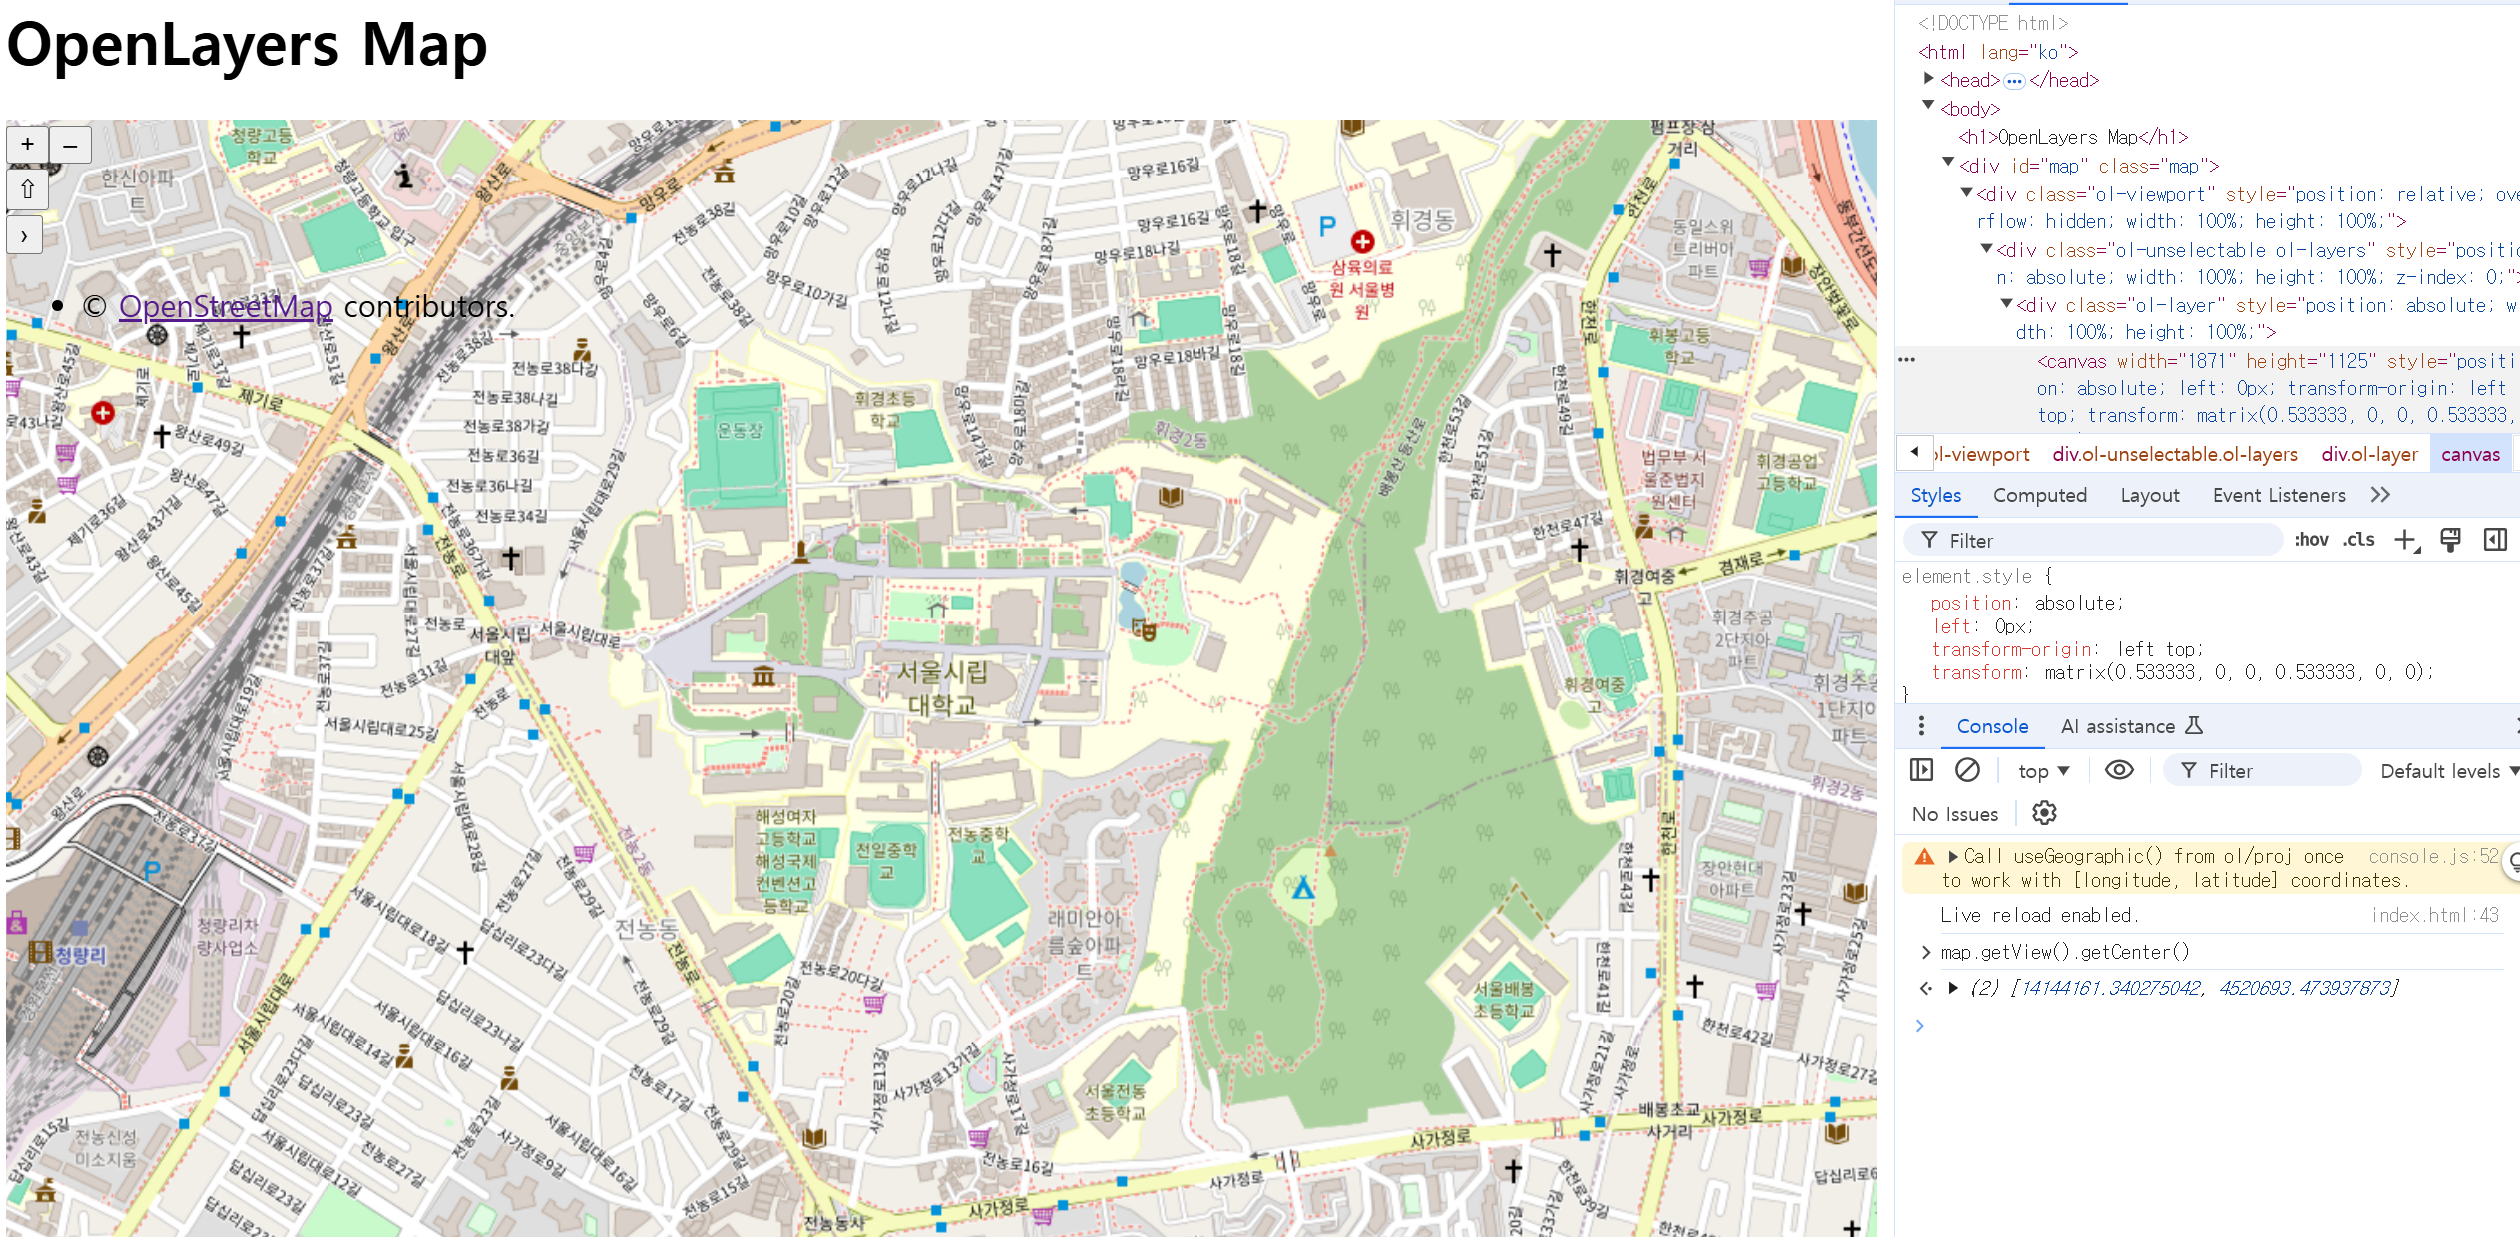
center지정을 위해 중심좌표 찾기
。html의 container element와js의Map객체가 ID로 연결된 경우, chrome의 inspection에 console창에 해당 id를 이용하여 js코드를 입력하여 중심좌표를 획득할 수 있다.
▶ chrome 은 javascript 엔진을 이용하므로.
map객체.getView().getCenter(): 해당 ID의 container 상에 표시된 지도의 중심좌표를 return.
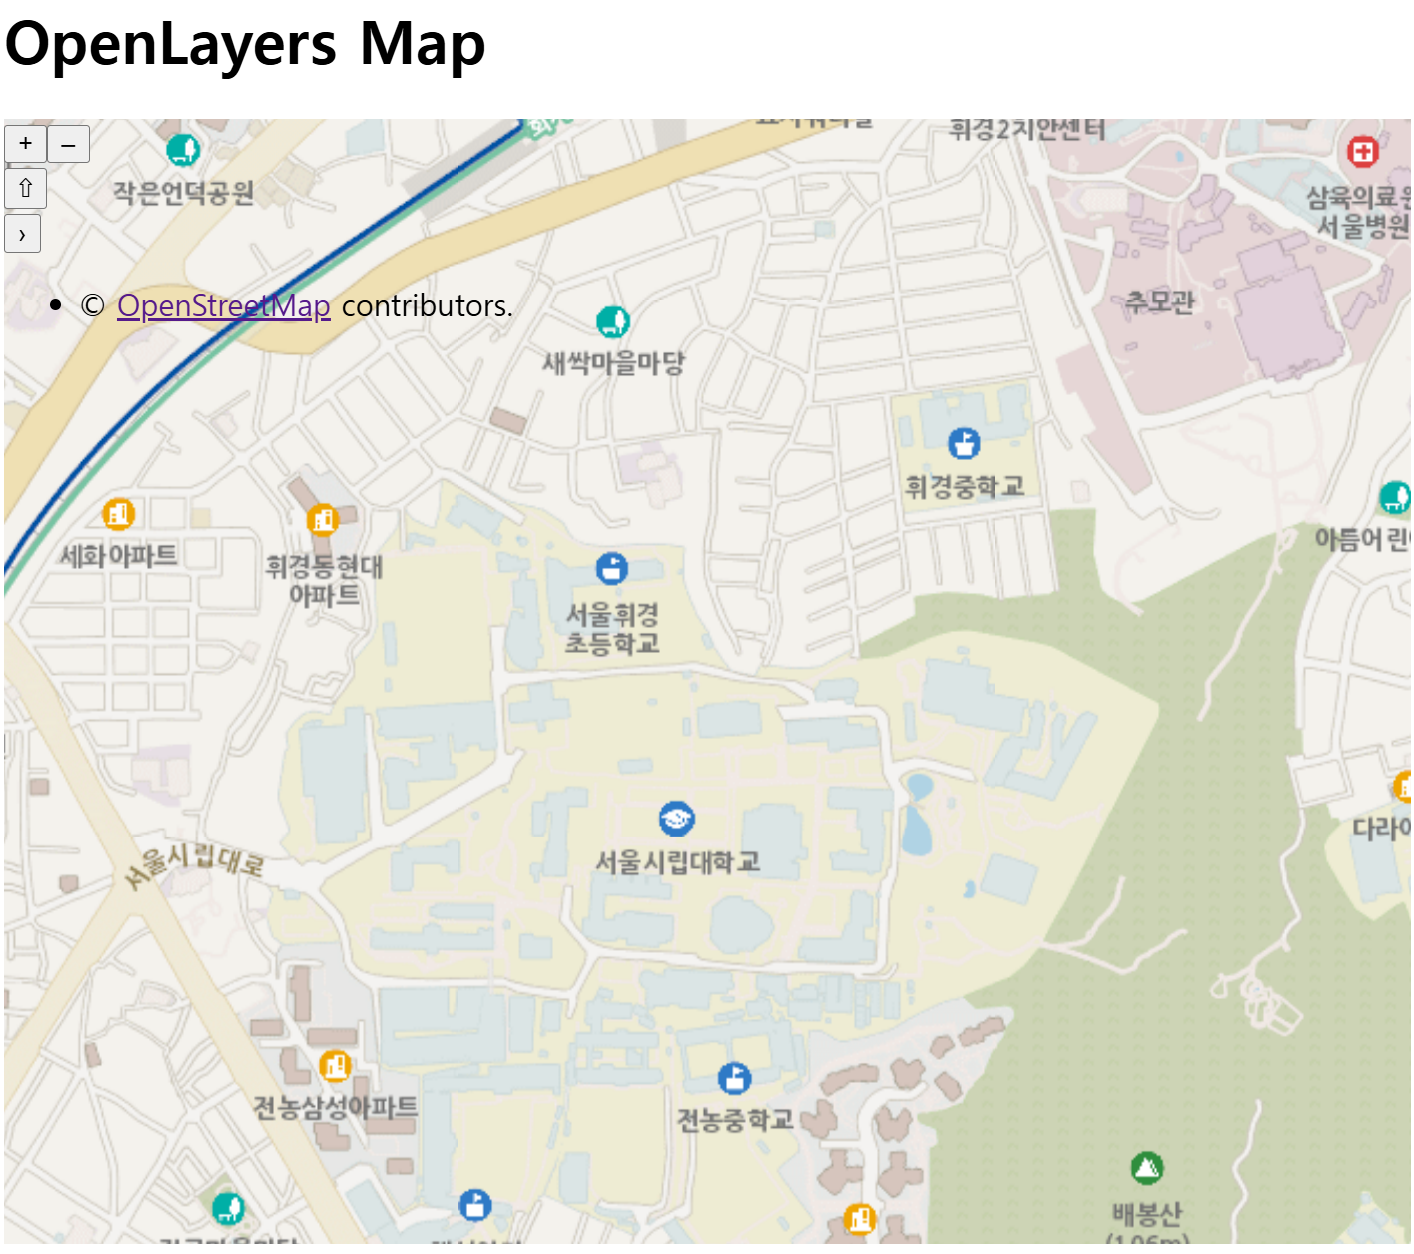
layer객체로서 basemap 정의하기 ol/layer/Tile
。GIS상의 Base map과 동일한 의미이며Tile layer형식으로 생성.
▶ Static image layer로 생성 시 원활하게 로딩이 되지 않으므로.
。bing, mapbox, OpenStreetMap, Stamen , Vworld에서 제공하는 basemap이 존재.OSM WMTS 지도 가져오기 ol/source/osm
。ol.source에 미리OSM이 함수로서 구현되있으므로, 사용이 편리하다.var OSMBaseMap = new ol.layer.Tile({ source: new ol.source.OSM(), zIndex:0, })。
zIndex=0: 최하단에서 표현하기 위해 값이 가장 작아야한다.
source로서OSM으로 배경지도 구축. 그러나 국내 서비스용 지도로 사용이 어렵다.
VWorld WMTS 지도 가져오기 번째 알파카의 개발 낙서장
。source로서 활용되는 BaseMap의 경우, OSM같은 경우ol.source.OSM()으로 OpenLayers에서 자체적으로 구현을 하여 손쉽게 활용이 가능하지만, VWorld의 Base map을 활용하기 위해서ol.source.XYZ()을 이용해 VWorld BaseMap source를 구축해야한다.
- Layer 객체 생성
。Vworld BaseMap(기본지도)를 정의한 XYZ객체를 Layer source로 담을 Layer 객체 생성.var vworldBaseMap = new ol.layer.Tile({ source : new ol.source.XYZ({ url : "https://api.vworld.kr/req/wmts/1.0.0/{키}/Base/{z}/{y}/{x}.png" }), properties : {name:'base-vworld-base'}, minZoom:5, maxZoom:19, zIndex:2, # 최상단에서 표현하기 위해 가장 값이 커야함. preload:Infinity, })
- View 생성
。Vworld 의 WMTS Base Map을 표현하도록EPSG:3857로 설정하여 표현한다.var view = new ol.View({ projection : 'EPSG:3857', center : [14144152.655679686, 4520798.25980481], zoom : 17, })
- VWorld 지도 :
。공간정보진흥원에서 제공하는 서비스 및 OSM보다 국내 지리에 특화.
。API서비스를 통해 URL 형태로 배경지도를 제공하여 OpenLayers와 호환성이 좋다.
。기본지도(Base) , 백지도(white: 일반지도의 흑백 ) , 야간지도(midnight: 어두운 배색을 사용해 야간 가시성을 높임 ) , 위성지도(Satellite: 실사지도 ) , 하이브리드 지도(Hybrid: 도로, 지명만을 강조한 확장용 지도 ) 가 존재.https://api.vworld.kr/req/wmts/1.0.0/{key}/{layer}/{tileMatrix}/{tileRow}/{tileCol}.{tileType}ex) https://api.vworld.kr/req/wmts/1.0.0/{key}/Base/11/793/1746.png
。인증키를 사용하여 해당 요청 URL을 서버에 전송 시WMTS를 통해 고품질 배경지도 제공.
parameter description value key 발급받은 API Key layer 요청 서비스의 버전 Base, white, midnight, Hybrid, Satellite tileMatrix 지도 레벨 Base, Hybrid , Satellite : 6~19 / white , midnight : 6~18 tileRow Google Index Y좌표값 tileCol Google Index X좌표값 tileType Tile 확장자 Base, white, midnight, Hybrid : png / Satellite : jpeg
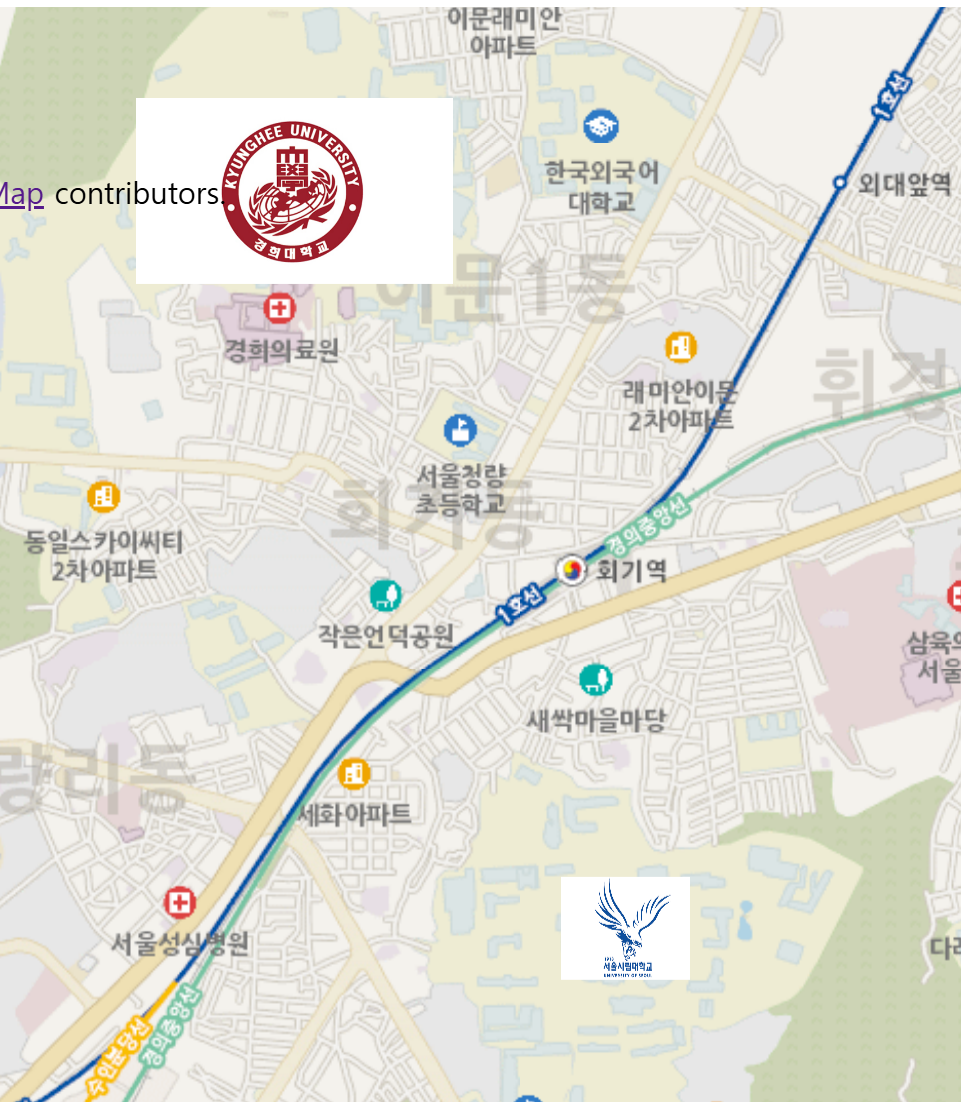
- layer 객체로서 Image를 정의하기 ol/layer/image
。지도상에 특정 Static Image를 삽입.image 삽입1 : image를 data source로서 Image Layer로 지도에 삽입
。해당 방식으로 설정 시 map의 scale를 조절 시에도 image 크기는 고정.
- 범위를 설정하여 Static image을
source로 생성.
。Image Layer의source를new ol.source.imagestatic()으로 생성한다.
。범위는 검사페이지 console을 통해map객체.getView().calculateExtent()를 통해 획득.var imageSource1 = new ol.source.ImageStatic({ attribution:'<b>uosmark</b>', url:'uos.png', imageExtent:[14144002.881334957, 4520678.599875599, 14144302.430024415, 4520917.919734022], })。해당 image source는 View의 좌표계를 기준으로 표현된다.
。imageExtent:map객체.getView().calculateExtent()로 설정 시 해당 map 객체의 View의 초기 zoon level에 따른 extent로 image크기가 설정됨.
- 해당 ImageStatic source를 갖는 Layer 객체 생성
。Layer 객체를new ol.layer.Image()으로 생성.var uosImageLayer = new ol.layer.Image({ source : imageSource1, properties : {name : 'uos-image'}, zIndex:4 })
image 삽입2 : 좌표를 기반으로 image를 vector data로 Vector Layer로서 지도에 삽입.
。해당 방식으로 설정 시 static이 아닌, map의 scale 대비 image 크기도 비례하여 변화
Icon객체를 image로서 포함한Style객체 생성var Style1 = new ol.style.Style({ image : new ol.style.Icon({ anchor : [0.5,0.5], scale : 0.3, src:'kuh.png', }) })。
Icon객체의anchor은 default값으로 설정.
▶ scale는 원본 이미지 대비 0.3 비율을 유지한다.
Style객체를 style로서 포함한Feature객체 생성
。geometry은geom객체를 생성하여 정의.
。생성자함수를 통해geometry를 정의 후Feature객체를 생성하여Feature객체.setStyle(Style객체)를 통해 Feature의 Style을 지정.var Feature1 = new ol.Feature({ geometry : new ol.geom.Point([14143381.781341175, 4522514.565585259]) }) Feature1.setStyle(Style1)
Feature객체를 feature로서 포함한 vectorSource 객체 생성.
。해당ol.source.Vector()객체는 feature 객체를 collection로서 input됨.var vectorSource1 = new ol.source.Vector({ features:[Feature1] })
- VectorSource 객체를 포함하는 Vector layer 생성하기.
var vectorLayer = new ol.layer.Vector({
  source : vectorSource1,
  zIndex:6
})
。이후 해당 layer 객체를 map객체에 input하여 지도에 이미지를 삽입
- layerArray 정의하기
。ol.Map에서 활용되도록 복수의 layer를 표함하는 배열 생성
var layerArray = [OSMBaseMap,vworldBaseMap,uosImageLayer]
map객체 정의하기var map1 = new ol.Map({ target : 'map', layers : layerArray, view : view, }) map1.addLayer(kuhImageLayer)。
target속성은html의 tag element의 id로 지정한다.
。map객체.addLayer(layer객체)를 통해 image layer 객체를 넣어서 활용할 수 있다.

Vector Layer 시각화하기
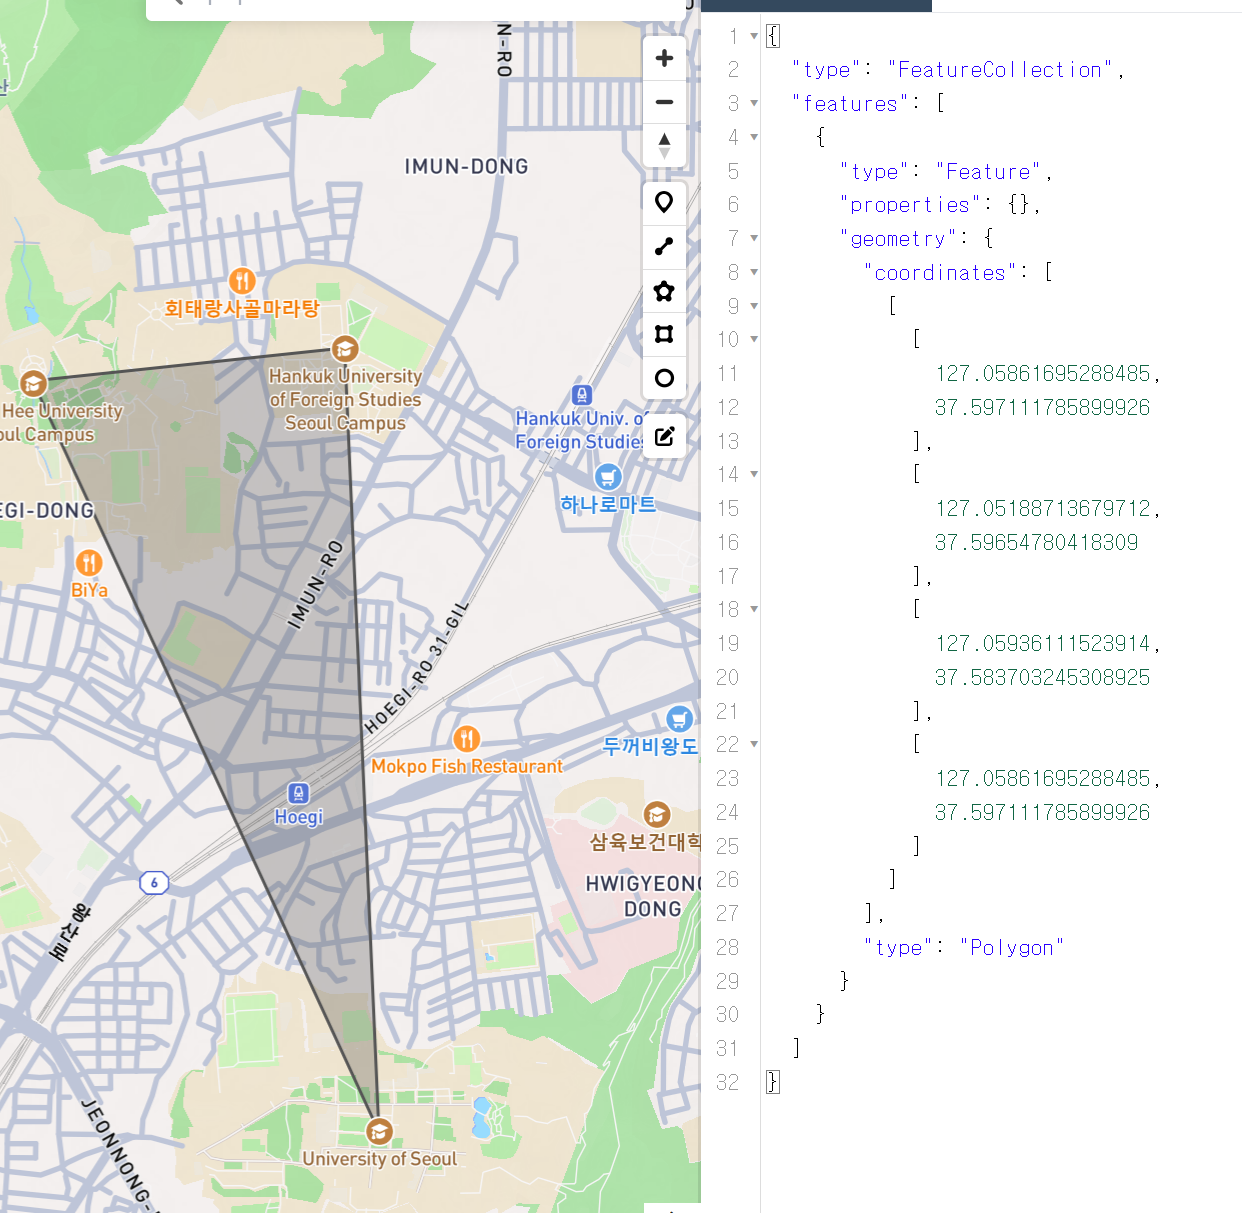
。GeoJSON객체를 이용하여 feature를 생성 및 궁극적으로 Vector layer 생성.
EPSG:4326으로 정의된 View 생성.
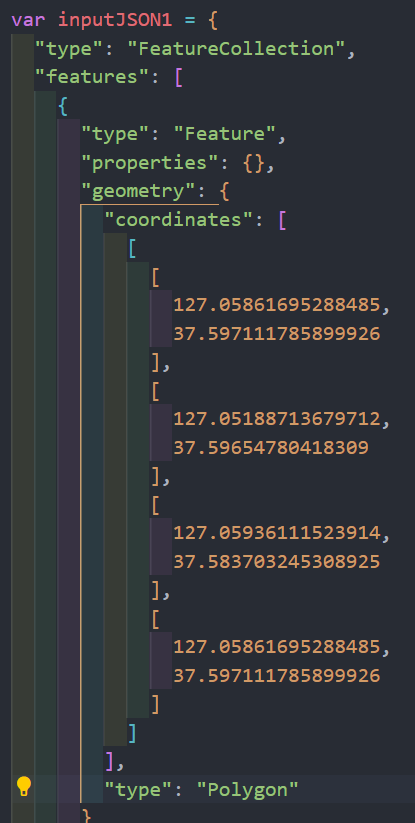
。geojson.io에서 좌표가 경도,위도로 반환되므로EPSG:4326설정.var view = new ol.View({ projection : 'EPSG:4326', center : [127.05909661903263, 37.582873772672315], zoom : 17, })
- geojson.io에서 vector data 생성 geojson
。해당 사이트에서 point, line, polygon으로 vector data를 생성 시 GeoJson 형식으로 반환.
var inputJSON1 = {
  "type": "FeatureCollection",
  "features": [
    {
      "type": "Feature",
      "properties": {},
      "geometry": {
        "coordinates": [
          [
            [
              127.05861695288485,
              37.597111785899926
            ],
            [
              127.05188713679712,
              37.59654780418309
            ],
            [
              127.05936111523914,
              37.583703245308925
            ],
            [
              127.05861695288485,
              37.597111785899926
            ]
          ]
        ],
        "type": "Polygon"
      }
    }
  ]
}
。다음 polygon이 해당 GeoJson 형식으로 반환됨.
- GeoJSON 형식 객체를 feature로 생성 후 VectorSource 생성하여 VectorLayer로 표현하여 Map 객체에 포함.
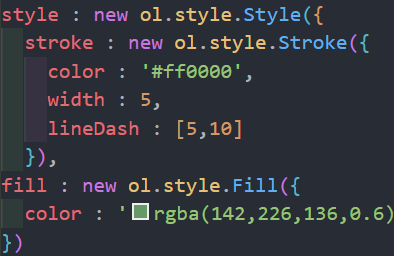
。OpenLayers의 map에 GeoJSON 객체를 Vector Source로서 표현.var vectorSource = new ol.source.Vector({ features : [ (new ol.format.GeoJSON().readFeature(inputJSON1)) ] }) var vectorLayer1 = new ol.layer.Vector({ source : vectorSource1, zIndex : 3, style : new ol.style.Style({ stroke : new ol.style.Stroke({ color : '#ff0000', width : 5, lineDash : [5,10] }) }) }) var map1 = new ol.Map({ target : 'map', layers : [OSMBaseMap], view : view, }) map1.addLayer(vectorLayer1)。Vector layer 생성 시 Vector line (stroke)에 대해서 style을
ol.style.Style객체를 생성하여 디자인을 지정.
。다음처럼 map상에 임의의 style이 적용된 polygon이 생성됨을 확인 가능.
- ol.format.GeoJSON() : ol/format/GeoJSON
new ol.format.GeoJSON({})
。GeoJSON 형식의 data를 읽고 수정하기 위한 feature format.
。해당 불러올 GeoJSON 형식 data를 map에 맞는 좌표계로 projection하는 작업을 수행해야한다.
dataProjection: import한 GeoJSON feature의 좌표계를 설정.
▶ default :EPSG:4326
featureProjection: 현재 map의 좌표계를 지정.
extractGeometryName: 특정 GeoJSON provider은 생성한 GeoJSON feature에geometry_namefield를 포함하므로,true로 설정한 경우, GeoJSON Reader가 geometry name을 지정하기위해 해당 field를 찾는다
GeoJSONFormat객체.readFeature(GeoJSON 데이터,opt_options)
。GeoJSON 객체를 전달 받아 GeoJSON format으로Feature객체를 생성.
▶ 생성한Feature는Source에Source객체.addFeature(Feature객체)로 전달.var feature1 = (new ol.format.GeoJSON()).readFeature(GeoJsonObj) vectorSource.addFeature(feature1).
- GeoJSON
。위치정보를 갖는 점을 기반으로 체계적으로 지형을 표현하기 위해 설계된 개방형 공개표준형식.
▶ 지리적 특징(점,선,면)과 해당 특징에 관한 속성데이터를 dictionary 형태의 JSON 형식으로 담을 수 있으며 Web에서 지리정보를 표현 및 공유하는데 널리 사용.
"type" ::
。GeoJSON 객체의 유형을 정의.
。"type" : "Feature": 단일 Feature를 포함하는 객체
。"type" : "FeatureCollection": 여러개의 Feature를 포함하는 객체.
。"type" : "Geometry": 단일 Geometry 형태 ( point, linestring, polygon )
。"type" : "GeometryCollection": 여러개의 Geometry를 포함하는 객체.
"features" ::
。FeatureCollection의 GeoJSON 객체에 포함된 개별 Feature 객체들의 배열.
。각 Feature는geometry와 관련properties를 지시.
"properties":
。특정 Feature에 대한 메타데이터를 담는 속성."properties": { "name": "Park", "area": 150 }.
"geometry":
。특정 Feature에 대한 지리적 형태를 정의.
"type": 형태에 대한 유형 (point , linestring, polygon)
"coordinates": 해당 형태의 좌표 배열
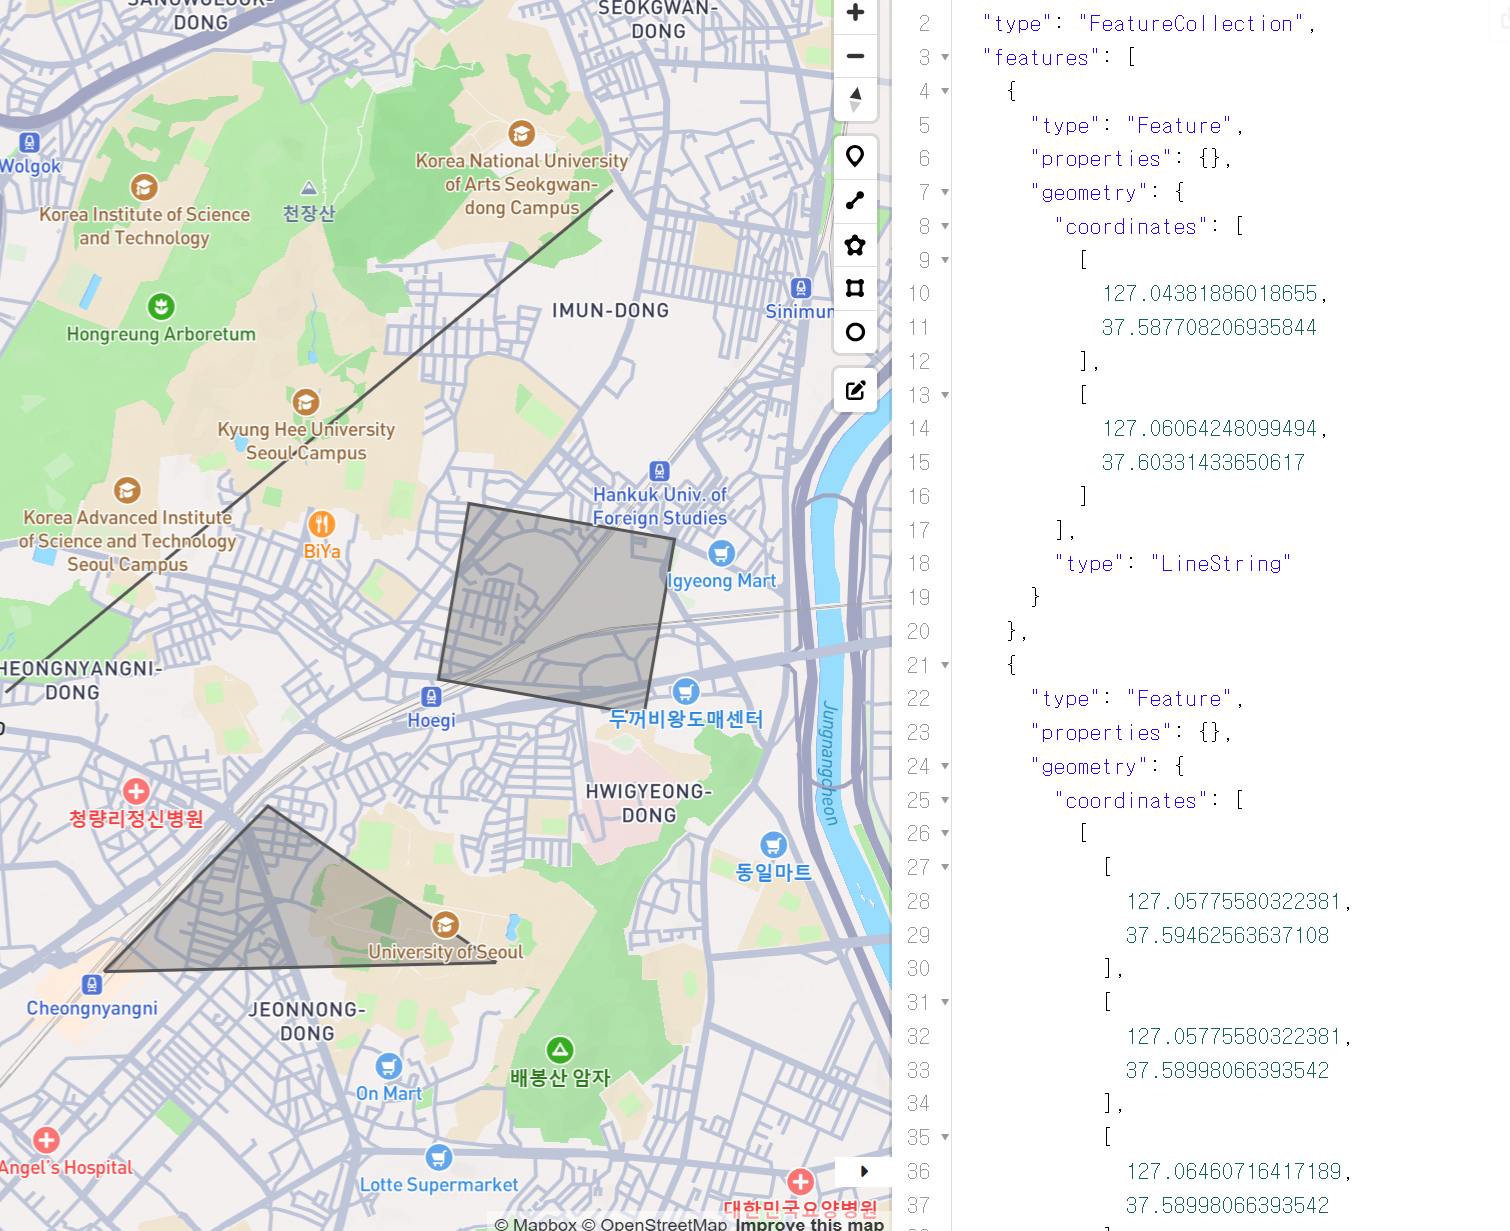
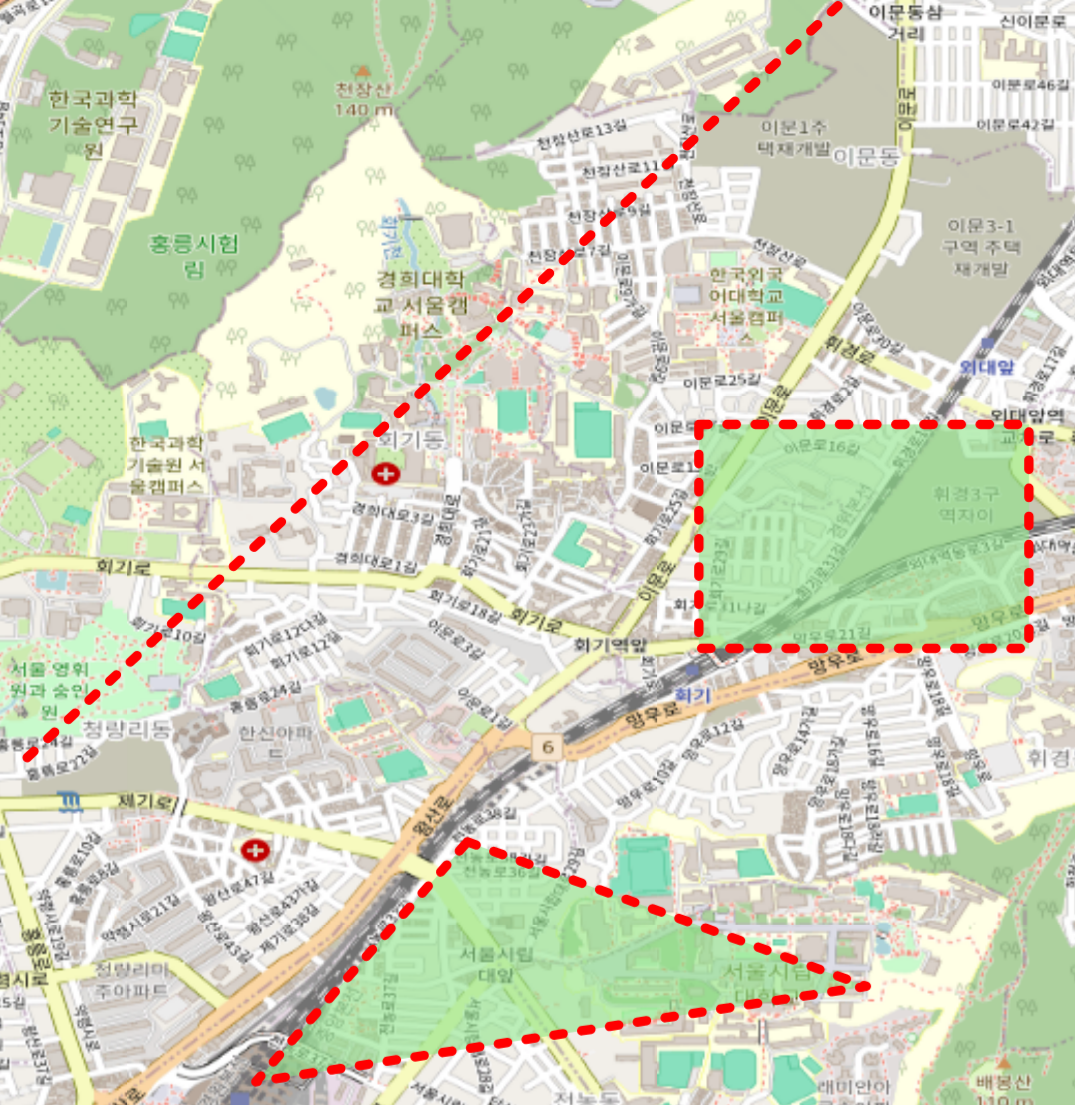
- GeoJSON에서 복수의 feature를 포함하는 GeoJSON 객체 생성 후 반영하기.
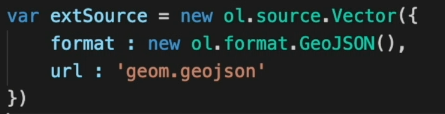
.geojson확장자의 geojson 파일을 생성하여 해당 GeoJSON의 코드를 저장 및 js파일에 vector layer로서 불러오기.
。해당 geojson 파일의 URL을 이용하여 Vector source의url,format속성을 이용하여 불러온다.
▶ 해당 기법을 이용하여 REST API와 활용이 가능.var extSource = new ol.source.Vector({ format : new ol.format.GeoJSON(), url : './geom.geojson', })。이후 위 과정처럼 다음 vector layer 생성 및 map 객체에 추가하는 과정을 거칠 경우 다음처럼 복수의 feature가 반영되게 된다.
var extLayer = new ol.layer.Vector({
  source : extSource,
  zIndex : 3,
  style : new ol.style.Style({
    stroke : new ol.style.Stroke({
      color : '#ff0000',
      width : 5,
      lineDash : [5,10]
    }),
  fill : new ol.style.Fill({
    color : 'rgba(142,226,136,0.6)'
  })
})
map1.addLayer(extLayer)
rgba(142,226,136,0.6)에서 마지막 parameter는 투명과 관련.
- GeoJSON에서 각각의 feature의 metadata를 기준으로 styling하기
。vector layer에서 style을 지정 시 feature의 metadata("properties")를 기준으로 각 feature의 loop를 돌면서 일일이 styling을 수행.
- 각 GeoJSON 파일 내
"features"에 포함된 각각의feature객체의"properties"속성에 구분할 metadata를 설정하기.
var vectorSource = new ol.source.Vector({
  format : new ol.format.GeoJSON(),
  url:'./practice.geojson'
})
。이후 해당 geojson을 Vector layer로서 import하여 map1 객체에 추가한 후 크롬 브라우저의 검사페이지에서 다음 구문을 입력 시
map객체.getLayers().array_[해당 layer index].getSource().getFeatures()[feature의 index].getProperties().KEY객체
위에서 정의한 dictionary 형태로 정의한 metadata의 정보를 가져올 수 있다.
ex)map1.getLayers().array_[1].getSource().getFeatures()[5].getProperties().prop
- loop를 돌면서 feature를 매개변수로서 input 시 feature의 metadata에 따라 style을 지정하는 함수 생성.
。해당 함수는 특정 feature에 따른ol.style.Style객체를 생성하여 return하는 함수.
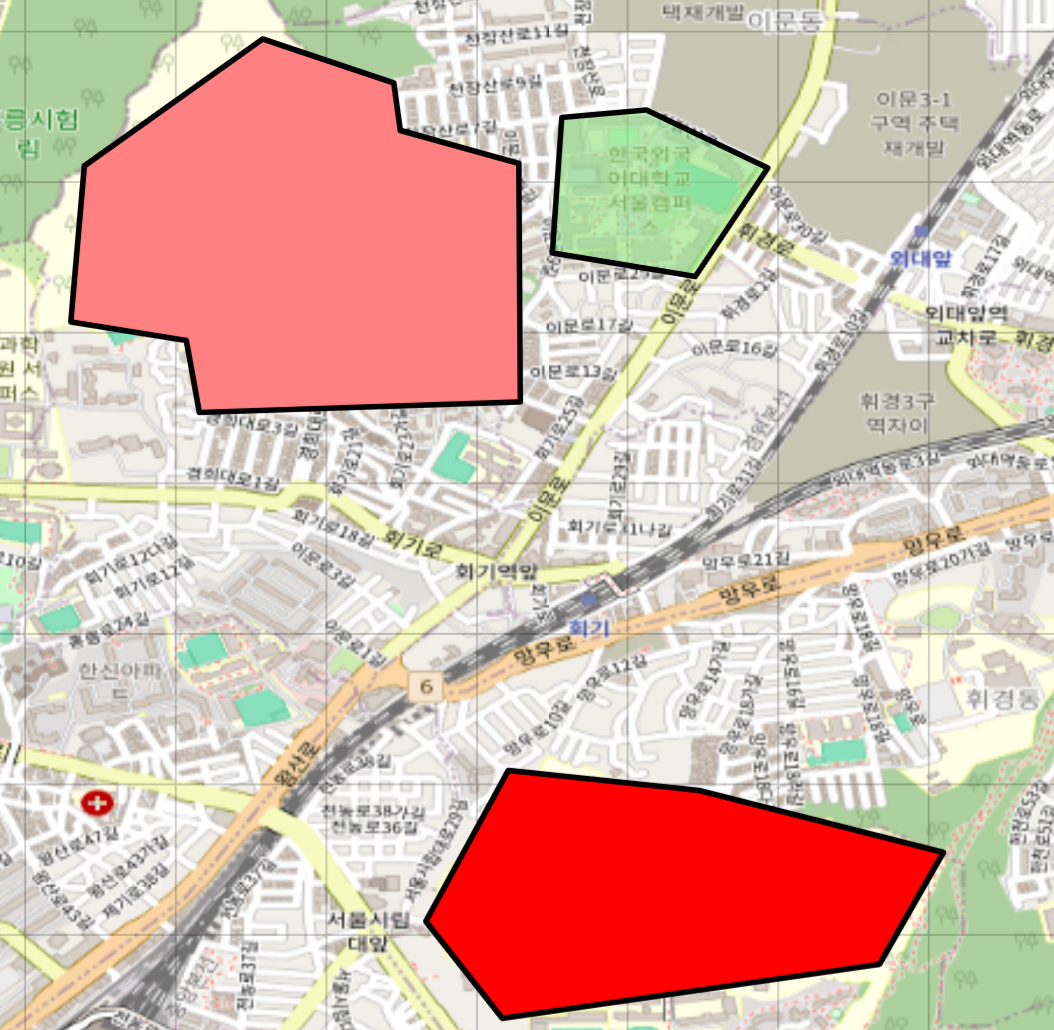
feature.getProperties().key객체: 지정 시 해당 feature 객체의"properties"에서 정의된 해당 key의 value를 return.var vectorLayer = new ol.layer.Vector({ source:vectorSource, zIndex:5 , style : function(feature){ if(feature.getProperties().prop=='polygon_khu'){ return new ol.style.Style({ fill : new ol.style.Fill({ color: '#ff8080' }), stroke : new ol.style.Stroke({ color:'#000000', width:3 }) }) } else if (feature.getProperties().prop=='polygon_hufs'){ return new ol.style.Style({ fill : new ol.style.Fill({ color: 'rgba(142,226,136,0.6)', }), stroke : new ol.style.Stroke({ color:'#000000', width:3 }) }) } else if (feature.getProperties().prop=='polygon_uos'){ return new ol.style.Style({ fill : new ol.style.Fill({ color: '#ff0000', }), stroke : new ol.style.Stroke({ color:'#000000', width:3 }) }) } else{} } })

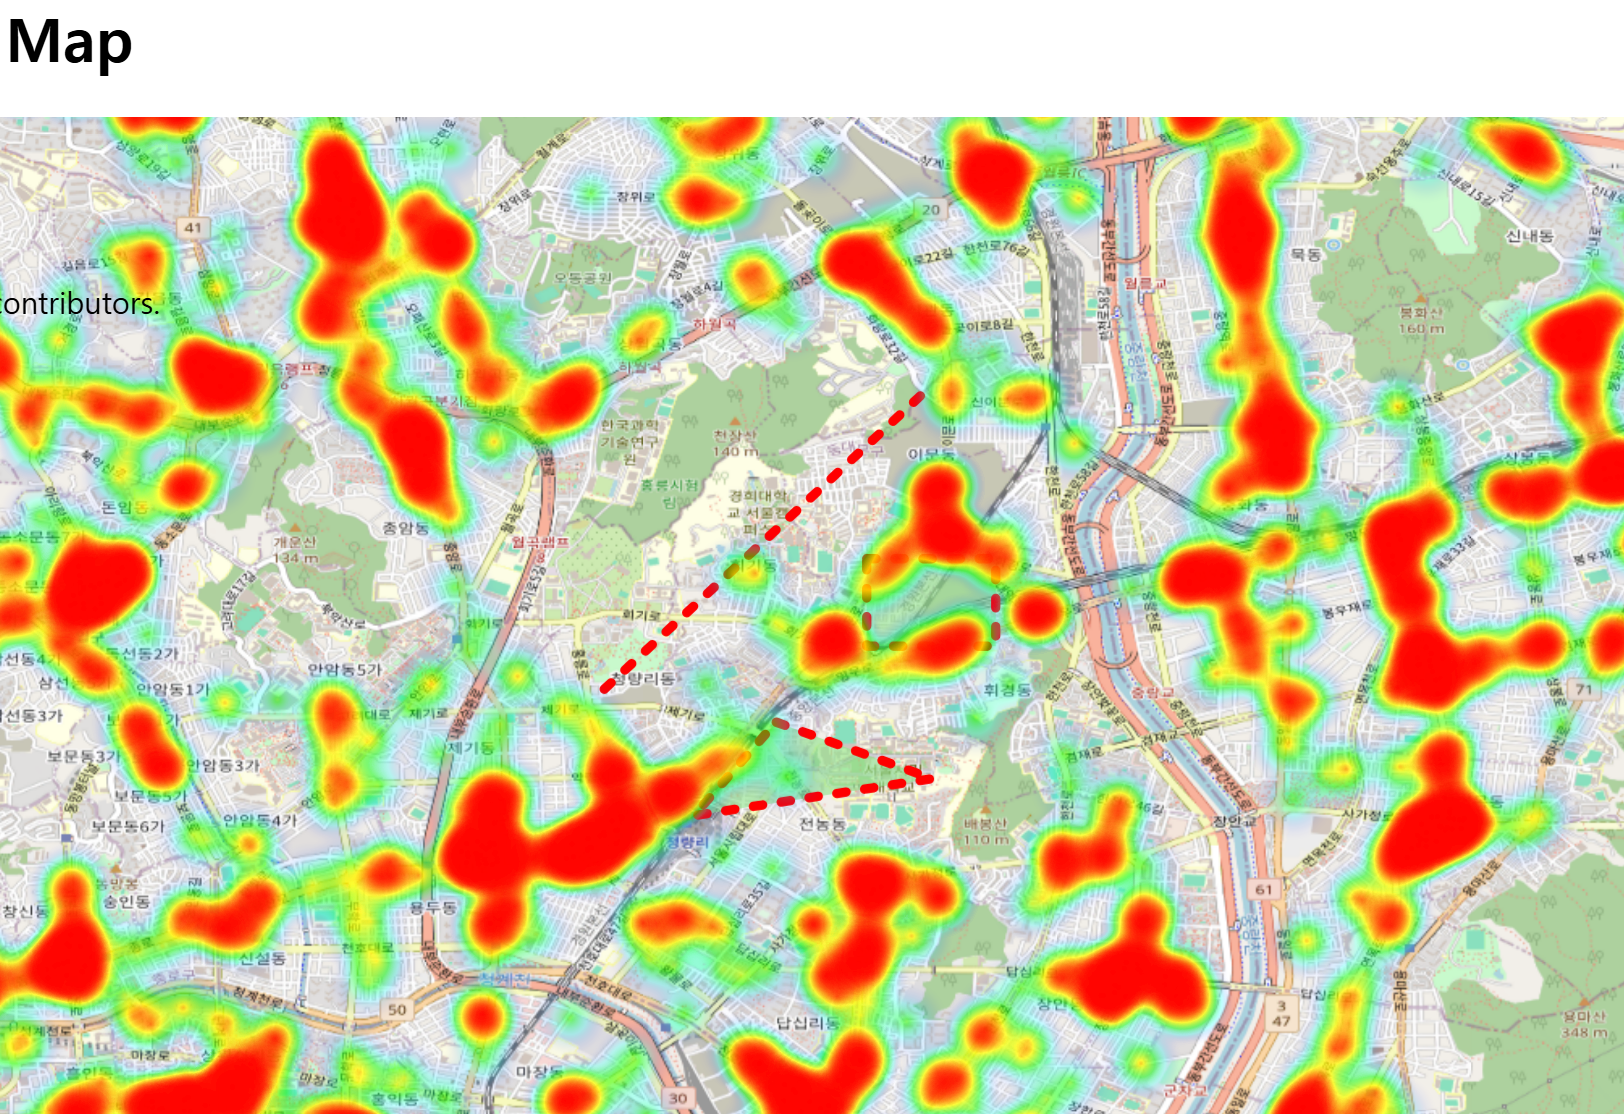
HeatMap(열원지도) Layer 객체 시각화하기 ol/layer/Heatmap
。Vector data(point)를 heatmap으로 표현하는 layer.
.geojson파일로 Vector Source 생성 후 Heatmap Layer 생성하기.var heatmapSource = new ol.source.Vector({ format : new ol.format.GeoJSON(), url : './hospit_posi.geojson' }) var heatmapLayer = new ol.layer.Heatmap({ source : heatmapSource, zIndex : 4, }) map1.addLayer(heatmapLayer)
。다음처럼 지도상에 열원지도로 도출되며 해당 데이터를 Vector data로 추가하여 표현 시 다음처럼 도출됨을 확인 가능.var heatmapLayer = new ol.layer.Heatmap({ source : heatmapSource, zIndex : 4, blur : 20, gradient : ['#ffffff','#ffbfbf','#ff8080','#ff4040','#ff0000'] })。다음처럼 추가적으로 속성을 추가하여 다음처럼 heatmap의 표현을 수행 가능.

Graticule Layer 객체 시각화하기.
。위도선, 자오선을 기준으로 지구타원체를 격자로 표현.
- Graticule Layer 객체 생성하기.
。view의 Projection이EPSG:4326으로 설정된Map객체를 이용하여 Graticule Layer 객체를 생성.var gridmapLayer = new ol.layer.Graticule({ map:map1, showLabels:true, zIndex:4 })。html에 표현되고있는 해당
map객체에 graticule을 설정하는 방식이므로, 다른 layer처럼 별도의 메소드로 따로 map 객체에 넣을 필요는 없음.
zoom in, out을 할때마다 표현되는 위도선, 자오선의 단위가 변경됨.
Map Interaction
。ol.Map()으로 생성된 map 객체와 상호작용하는 기능 생성하기.
。map객체.addInteraction(interaction객체): interaction을 생성 후 특정 map객체에 정의하는 역할을 수행.
。map객체.on('fire옵션',callback 함수): map 객체에서 특정 interaction을 통해 fire option 조건 충족 시 해당fucntion(evt){ 작동코드 }의 callback 함수가 내부에 정의된 코드를 실행.
。map객체.un('fire옵션',callback 함수): map 객체에서 특정 callback함수, fire와 함께 정의된 interaction을 종료하는 역할을 수행.
ol.interaction.DragBox:
new ol.interaction.DragBox(options)
。Map 상에서 클릭 및 드래깅으로 vector box를 그릴 수 있는 기능으로 주로 map상의 특정 영역의 영역을 zooming 할때 사용.
。주로 보통ol.events.condition와 함께 사용되기도 하여 특정 키를 누르고 함께 드래그 시 해당 dragbox 기능이 작동되도록 설정이 가능.
- 생성자 옵션 : dragbox의 모든 옵션에는 default가 정의되어있어 따로 정의하지않아도됨.
。condition: 해당ol.events.condition기능을 설정.
。minArea: pixel 단위의 DragBox의 최소 영역을 정의.
。className: DragBox의 css styling을 지정.
▶ defaults :className : 'ol-dragbox': css 파일 내ol-dragboxclass 이름으로 지정됨.
- Fires :
dragBox객체.on('fire옵션', trigger함수 )를 통해 적용.
。boxcancel:DragBox취소 시 동작
。boxdrag:DragBox시작 시 드래그 할때 동작.
。boxend:DragBox종료 시 동작
。boxstart:DragBox시작 시 동작
。change
。error: error 발생 시 동작
。propertychange: property 변경 시 동작.
- DragBox 메소드
。dragbox객체.getGeometry(): dragbox기능을 통해 드래그한 범위의 Geometry 객체 return.
- 활용코드
var dragBox = new ol.interaction.DragBox({})
dragBox.on('boxstart',function(evt){
  console.log('DragBox active')
})
map1.addInteraction(dragBox)
。다음처럼DragBoxInteraction이 시작되면서 트리거함수function(evt)에 정의된 기능이 시작됨.
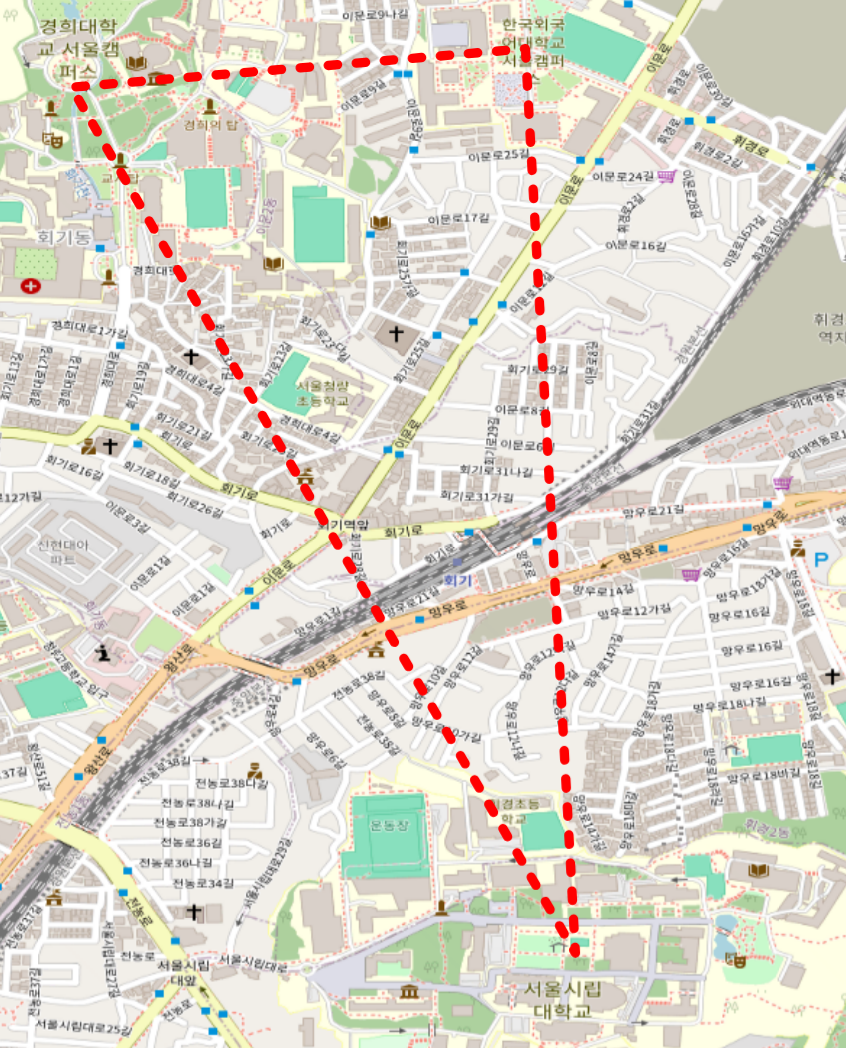
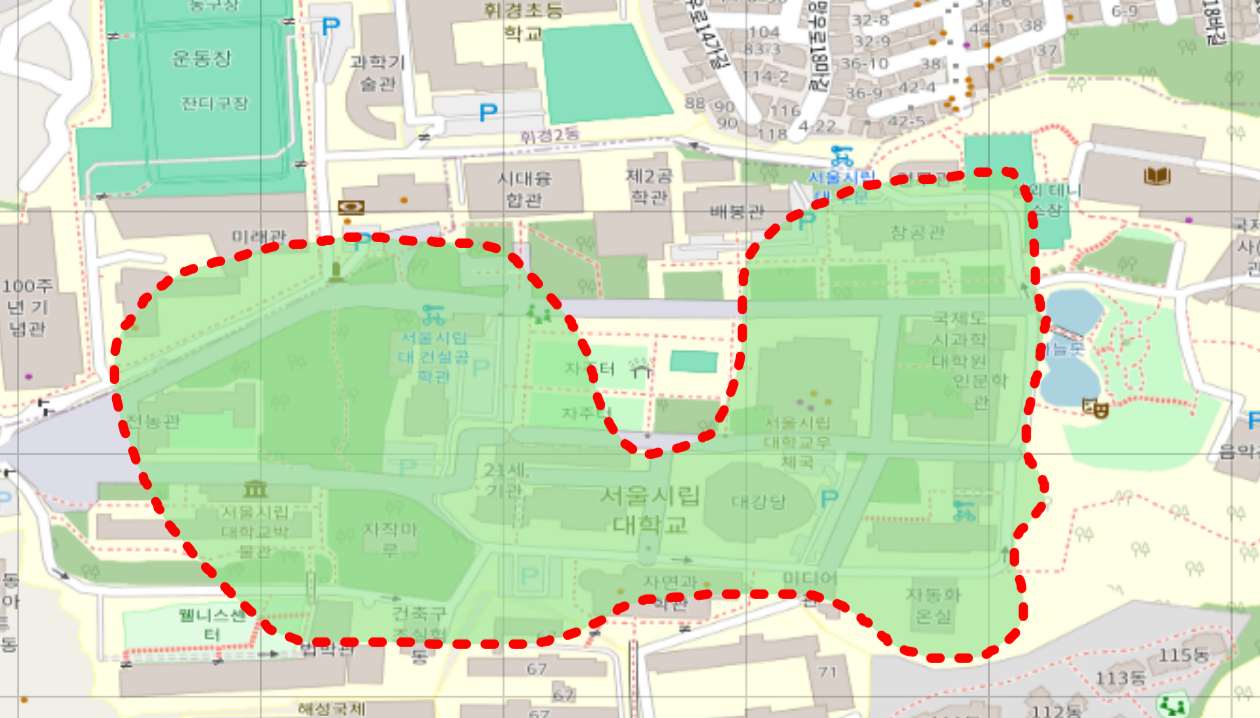
- Drag 한 영역만큼 Zoom하는 기능 구현하기.
。DragBox객체 정의 후 드래그 한 후 검사페이지-console 창에DragBox객체.getGeometry().getExtent()를 입력 시 드래그 한 범위만큼의 [minX, minY, maxX, maxY] 좌표가 도출.
dragBox.on('boxend',function(evt){
  console.log('DargBox ended');
  var extent = dragBox.getGeometry().getExtent();
  map1.getView().fit(extent,{duration:500})
})
。다음처럼 추가적으로
boxendfire를 정의하여DragBox객체.getGeometry().getExtent()을 통해 드래그 한 범위를 도출한 후map객체.getView().fit(드래그범위,option)을 정의.
▶View객체.fit(geometry범위, option)메소드 활용.
▶ 해당 메소드의duration옵션 정의 시 전환 애니메이션이 부드럽게 설정.
ol.interaction.DragAndDrop
new ol.interaction.DragAndDrop(option)
。외부 vector data 파일을 viewport로 drag and drop하여 map에 추가.
▶KML, GeoJSON형식의 Vector data를 map 객체에 drag and drop으로 추가하는 기능.
▶ 사전에 추가될 vector data format을 정의할 Vector source와 Vector layer를 정의해야한다.
- 생성자 옵션 :
。formatConstructors: Drag And Drop할 Vector data의 format 종류를 array로서 정의.
▶formatConstructors:[ol.format.GeoJSON , ol.format.KML...etc]
。source: vector data가 추가될 vector source를 설정.
。projection: default : map 객체의 view 좌표계로 설정.
。target: drop이 될 타겟장소.
▶ default : html element viewport로 정의.
- Fires :
DragAndDrop객체.on('fire옵션', trigger함수 )
。addfeatures: Vector data가 feature로서 추가 시 동작.
。change
。error: error 발생 시 동작.
。propertychange: property 변경 시 동작.
- 활용코드
- vector source 및 vector layer 정의
var dragSource = new ol.source.Vector()
var dragLayer = new ol.layer.Vector({
  source : dragSource,
  zIndex:3,
  style : function(feature){
    if(feature.getProperties().prop=='polygon_khu'){
      return new ol.style.Style({
        fill : new ol.style.Fill({
          color: '#ff8080'
        }),
        stroke : new ol.style.Stroke({
          color:'#000000',
          width:3
        })
      })
    }
  }
})
map1.addLayer(dragLayer)
。vector layer에 style을 지정하여 추가될 vector data에 대한 styling을 수행할 수 있다.
- DragAndDrop 객체 정의
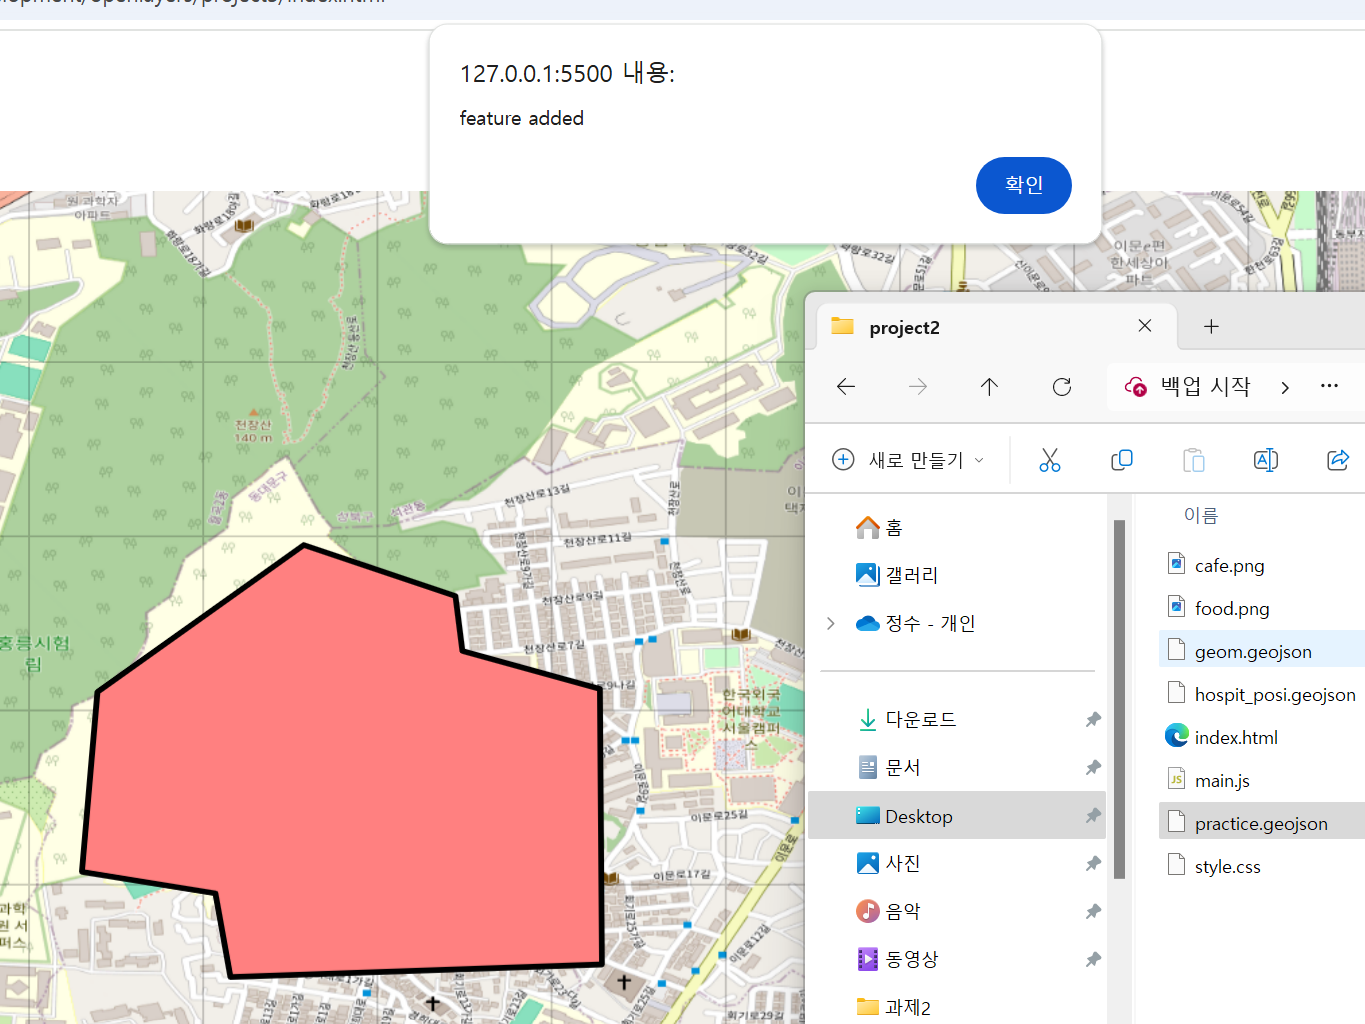
。fire를 통해 vector feature 추가 시 메세지가 나오도록 설정하기.var dragnDrop = new ol.interaction.DragAndDrop({ formatConstructors:[ol.format.GeoJSON], source:dragSource, }) dragnDrop.on('addfeatures', function(evt){ alert('feature added') }) map1.addInteraction(dragnDrop)
。이후.geojson확장자의 파일을 map의 viewport에 드래그 시 다음처럼 vector data가 추가되는것을 확인 가능.
▶ styling은 vector layer에서 정의.
ol.interaction.Draw
new ol.interaction.Draw()
。Map 상에 feature의 Geometry를 그려서 표현하는 기능을 수행.
。사전에 drawing될 vector data를 정의할 Vector source와 Vector layer를 정의해야한다.
- 생성자 옵션
。source: vector data가 추가될 vector source를 설정.
。type: drawing 할 data의 Geometry type을 설정.
'Point' , 'LineString' , 'Polygon' , 'MultiPoint' , 'MultiLineString' , 'MultiPolygon' or 'Circle'
。minPoints:Polygon또는LineString의 Geometry를 그릴때 최소로 반드시 지정해야하는 Point의 갯수 정의.
defaults :Polygon: 3개,LineString: 2개
。freehand:freehand mode를 설정.freehand : true
freehand mode: 직선이 아닌, 연속적으로 그려지게 설정.
- Fires :
Draw객체.on('fire옵션', trigger함수 )
。drawend: feature가 그려졌을 경우, 작동
。drawstart: feature가 그려지기 시작할때, 작동
▶ 주로 커서모양 지정 시 사용.
。drawabort: feature가 그려지다가 중단 시, 작동
。error: error 발생 시 동작.
。propertychange: property 변경 시 동작.
- 활용코드
- vector source 및 vector layer 정의
var drawSource = new ol.source.Vector()
var drawLayer = new ol.layer.Vector({
  source:drawSource,
  zIndex:4,
  style : new ol.style.Style({
    stroke : new ol.style.Stroke({
      color : '#ff0000',
      width : 5,
      lineDash : [5,10]
    }),
  fill : new ol.style.Fill({
    color : 'rgba(142,226,136,0.6)'
  })
})
})
map1.addLayer(drawLayer)
- Draw 객체 정의
var draw = new ol.interaction.Draw({
  source : drawSource,
  type : 'LineString',
  minPoints : 4
})
map1.addInteraction(draw)
。다음처럼 map상에LineStringfeature 이 추가됨을 확인 가능.
。minPoints:4이므로 , 최소 4개점을 지정해야Linestringfeature 이 정의됨.
- freehand mode 설정
var draw = new ol.interaction.Draw({
  source : drawSource,
  type : 'Polygon',
  minPoints : 3,
  freehand:true,
})
map1.addInteraction(draw)
。freehand:true설정 시 다음처럼 직선이 아닌 임의의 곡선으로 그려서Linestring및Polygonfeature 생성이 가능.
- feature를 다시 그렸을때, 기존에 그려진 feature를 삭제하는 기능 정의
。firedrawend정의.
。source객체.clear()메소드 사용.
▶ source의 모든 feature 삭제.draw.on('drawend',function(evt){ drawSource.clear(); })。다음 fire를 정의할 경우, polygon을 그린 후 다음 polygon을 그렸을 때 기존의 polygon이 삭제됨.
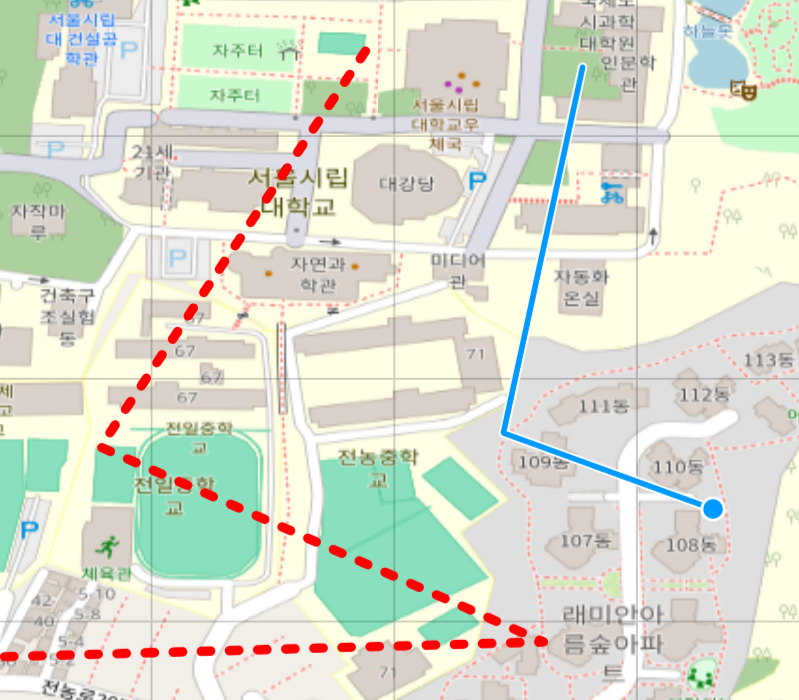
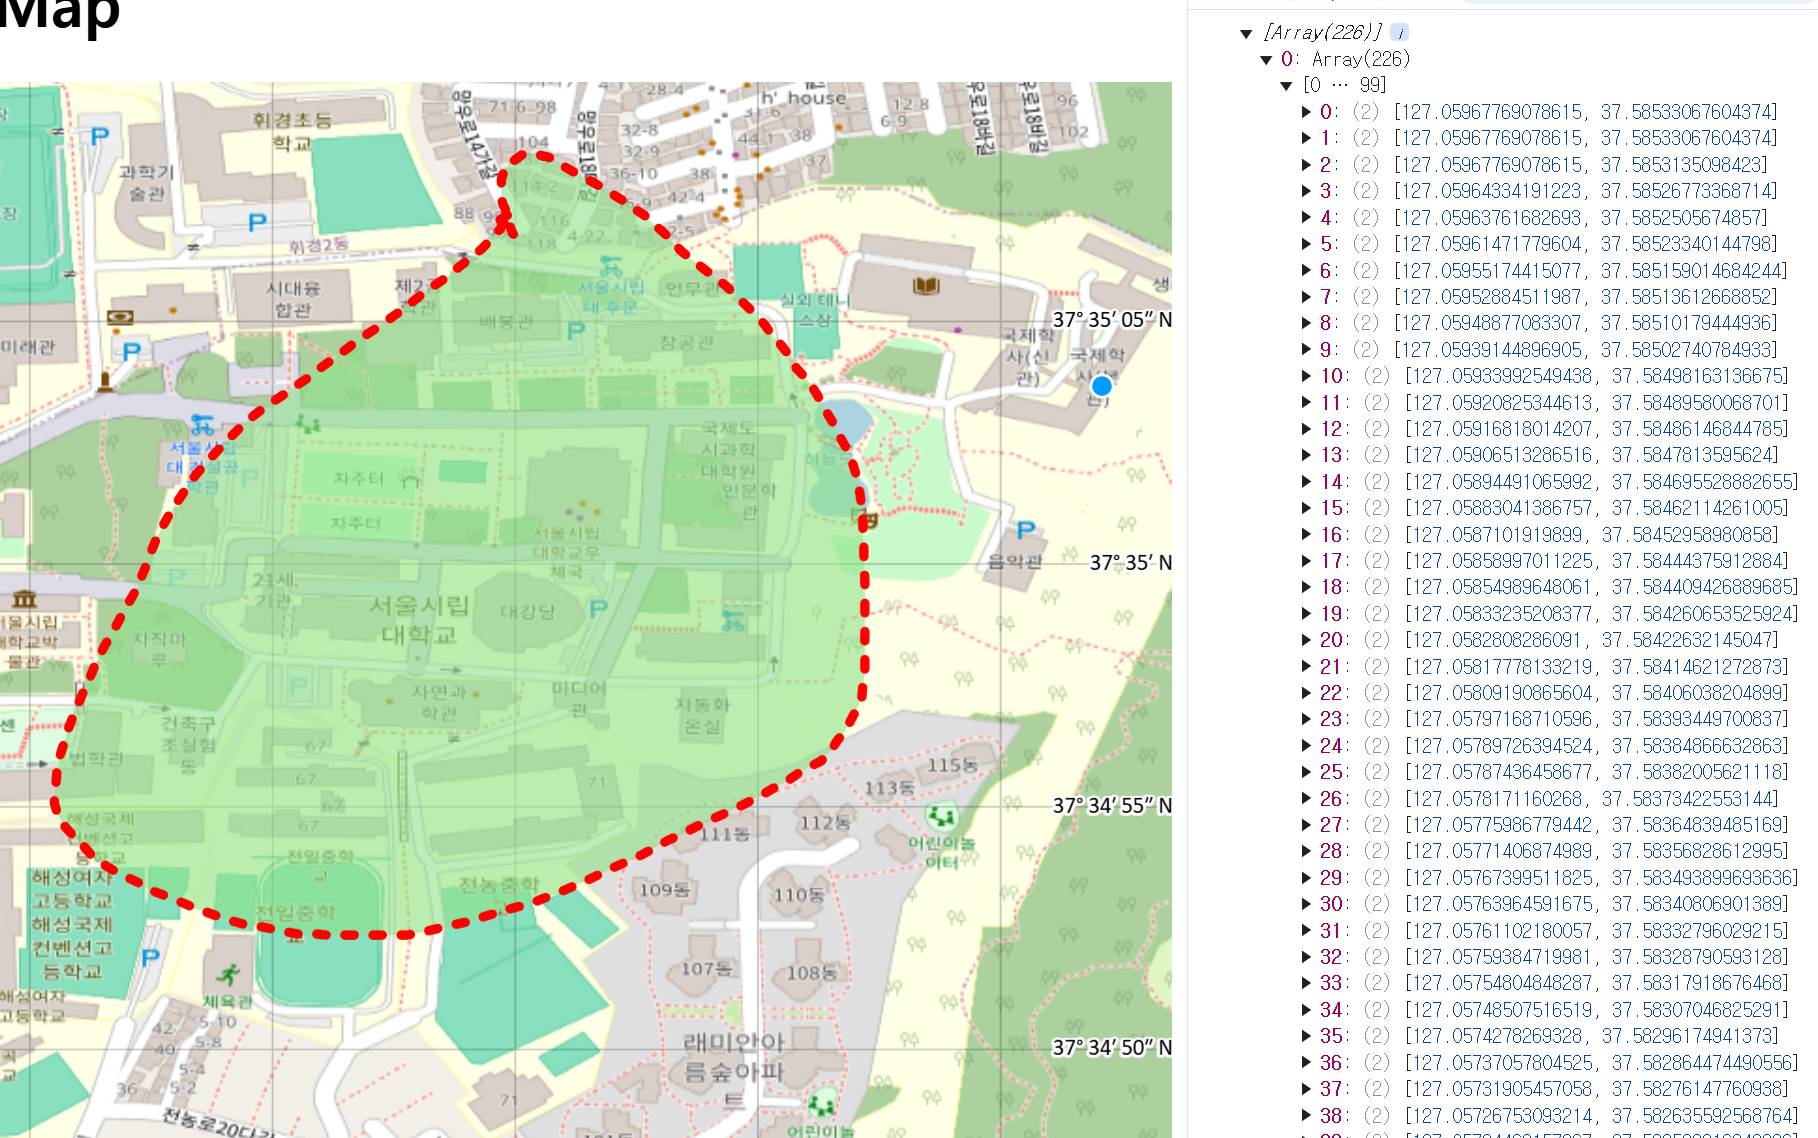
- 그려진 Geometry의 좌표값 얻기.
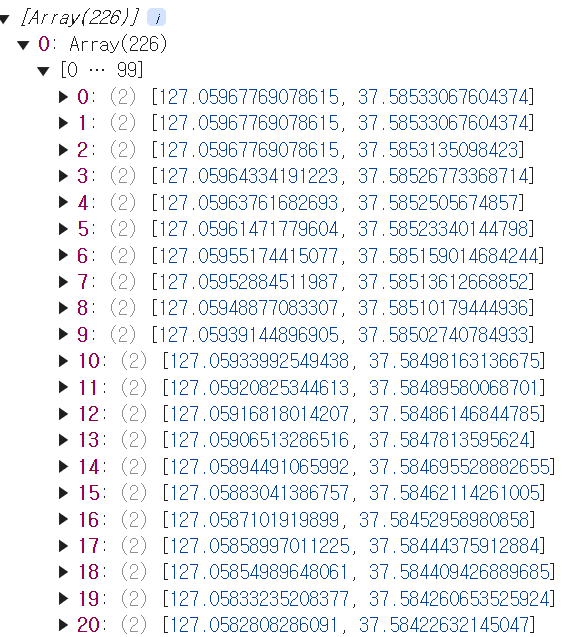
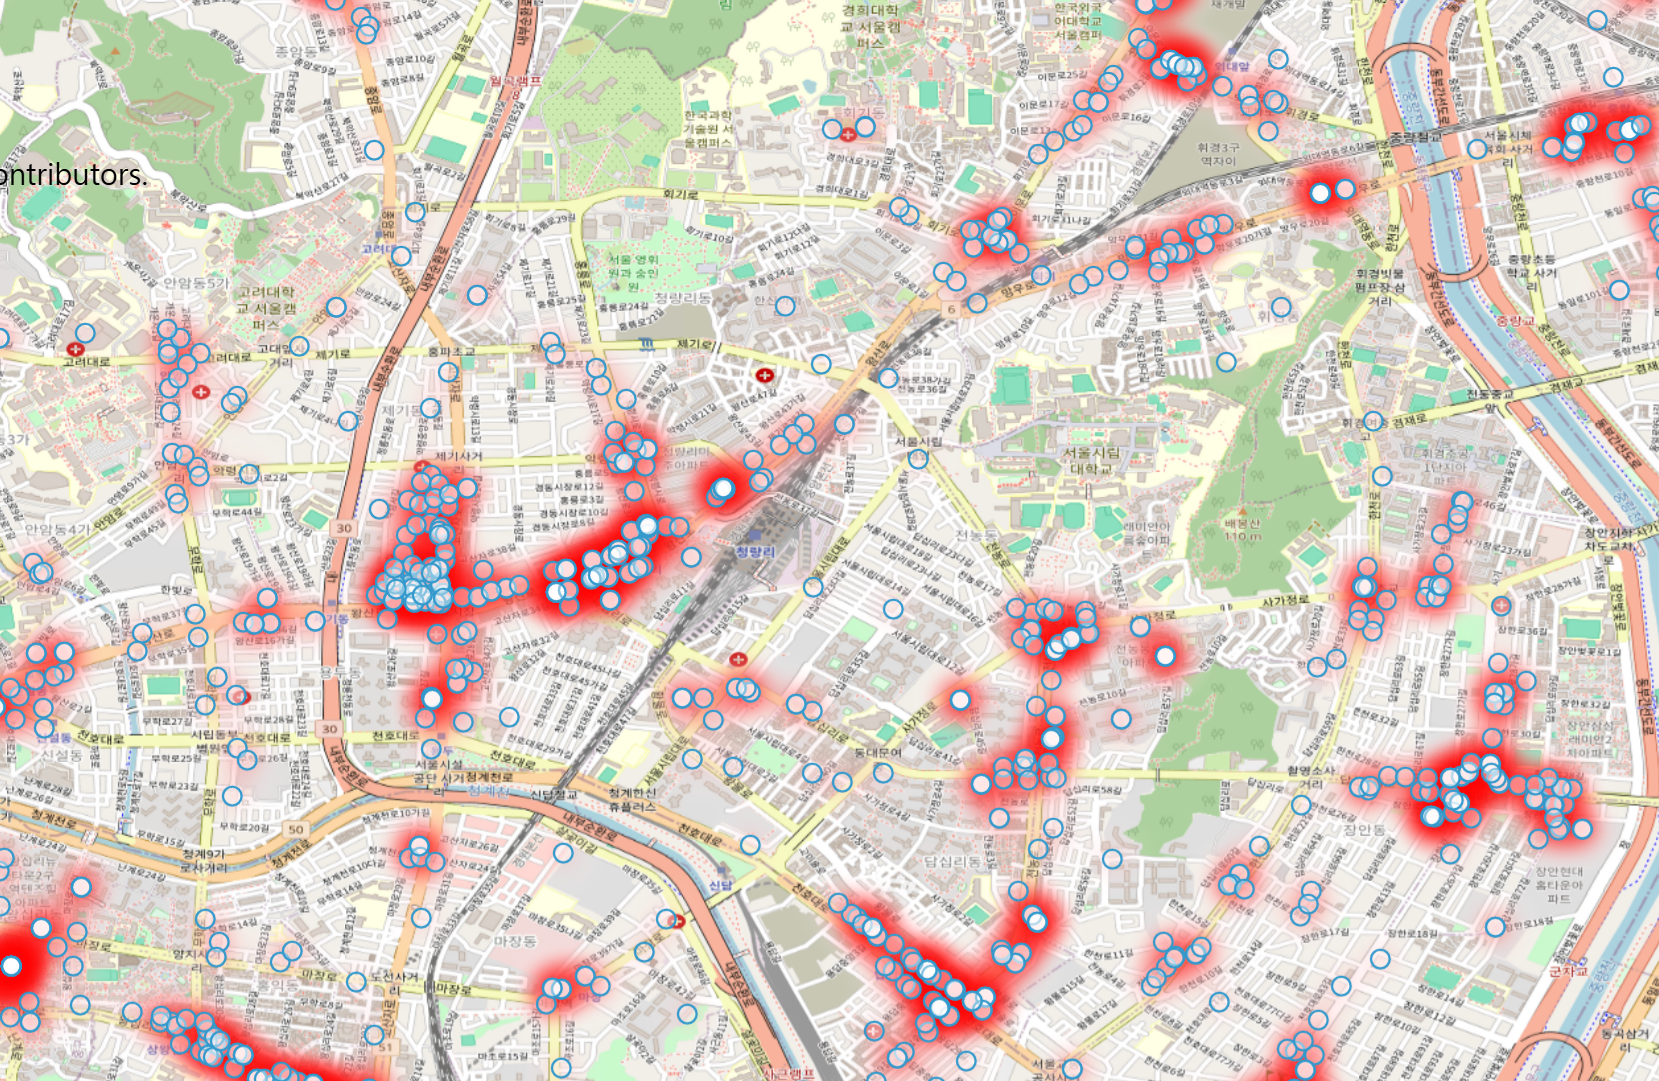
。evt.feature.getGeometry().getCoordinates()를 통해 좌표값 획득 가능.
▶ 그려진Feature객체의Geometry객체의getCoordinate()메소드를 통해 좌표값 획득.draw.on('drawend',function(evt){ drawSource.clear(); var coord = evt.feature.getGeometry().getCoordinates() console.log(coord) })
。해당 Polygon feature는 총 226개의 point로 정의되어있음.

Map 내부에 custom control 생성하기.
。ol.control.Control을 정의.
- Rotate된 Map을 진북방향으로 정렬하는 버튼 생성.
- 코드 정의
- css 코드
.map{
  width:100%;
  height:600px;
}
.rotate-north {
  top: 65px;
  left: .5em;
}
.ol-touch .rotate-north {
  top: 80px;
}
。map이 회전한 상태로 초기 설정 지정.
- JS 코드
class RotateNorthControl extends ol.control.Control {
  constructor(opt_options) {
    const options = opt_options || {};
    const button = document.createElement('button');
    button.innerHTML = 'N';
    const element = document.createElement('div');
    element.className = 'rotate-north ol-unselectable ol-control';
    element.appendChild(button);
    super({
      element: element,
      target: options.target,
    });
    button.addEventListener('click', this.handleRotateNorth.bind(this), false);
    button.addEventListener('touchstart', this.handleRotateNorth.bind(this),false);
  }
  handleRotateNorth() {
    this.getMap().getView().setRotation(0);
  }
}
var View = new ol.View({
  center: [0, 0],
  projection:'EPSG:4326',
  zoom: 17,
  rotation: 1,
})
var OSMBaseLayer = new ol.layer.Tile({
  source:new ol.source.OSM(),
  zIndex:1
})
var map1 = new ol.Map({
  controls: ol.control.defaults.defaults().extend([new RotateNorthControl()]),
  layers: [OSMBaseLayer],
  target: 'map',
  view: View
});
- class 해석 : 해당 class는
ol.control.Control을 상속받음.class RotateNorthControl extends ol.control.Control { constructor(opt_options) { const options = opt_options || {}; const button = document.createElement('button'); button.innerHTML = 'N'; const element = document.createElement('div'); element.className = 'rotate-north ol-unselectable ol-control'; element.appendChild(button); super({ element: element, target: options.target, }); button.addEventListener('click', this.handleRotateNorth.bind(this), false); button.addEventListener('touchstart', this.handleRotateNorth.bind(this),false); } handleRotateNorth() { this.getMap().getView().setRotation(0); } }。DOM : HTML요소를 JavaScript 객체처럼 조작할 수 있는 Model
。const options = opt_options || {};: opt_options가false값( null, undefined, false, 0, NaN, 빈 문자열("") )인 경우, 오른쪽 return.
。document.createElement(DOM요소이름):JS코드를 이용하여 HTML element 객체를 생성하여 return.
。DOM요소.innerHTML = "문자열": HTML 문서 상의 HTML 요소 객체의 내부 내용을 지정.
。DOM요소.className = "문자열": HTML 요소 객체의 class 이름 지정.
▶ css를 통해 styling시 사용.
handleRotateNorth() {
    this.getMap().getView().setRotation(0);
  }
}
。해당
Map객체에서 View 객체를 가져온 후 rotation을 0으로 설정(=진북으로 설정)하는 함수
。element.appendChild(button): DOM tree 상에서 DOM요소인 element의 하위요소로 DOM요소 button을 추가
super({
      element: element,
      target: options.target,
    });
。
super(): Javascript에서 부모 class(ol.control.Control)의 생성자를 호출하여 해당생성자옵션에 인수를 전달.
。해당 super는 부모 class 생성자에 DOM요소를 인수로 전달.
。ol.control.Control의 생선자 옵션은element, target ,className이 존재.
DOM요소.addEventListener('click', 함수, false)
。지정한 유형의 이벤트(ex:'click')를 DOM요소가 수신할 때마다 호출할 함수를 설정
。'click': 사용자가 버튼을 클릭 시 실행될 event
。'touchstart': 터치디바이스에서 버튼 터치 시 실행될 event
。false: 이벤트 캡처링 단계를 비활성화.
。특정method.bind(this): 현재 class의 instance에 binding하여 method 내부에서 올바른 this가 정의되도록 설정.- 해당 코드를 이용하여 버튼을 누르면 Draw 기능이 작동되도록 설정하기.
- draw 기능 먼저 구현.
var drawSource = new ol.source.Vector({})
var drawLayer = new ol.layer.Vector({
  source:drawSource,
  zIndex:4,
})
map1.addLayer(drawLayer)
var draw = new ol.interaction.Draw({
  source : drawSource,
  type : 'LineString',
})
- 함수 내
addInteraction구현하기.
。DOM요소.addEventListener('click', 함수, false)에 사용되는 함수 내부에 구현.handleRotateNorth() { this.getMap().getView().setRotation(0); map1.addInteraction(draw) } }
。버튼을 누르면map1.addInteraction(draw)에 의해 draw 기능이 실행됨.
GeoServer에서 데이터를 가져올때 CORS 오류 발생 시
。C:\Program Files (x86)\GeoServer\webapps\geoserver\WEB-INF\web.xml에 다음 내용을 추가.<filter> <filter-name>cross-origin</filter-name> <filter-class>org.eclipse.jetty.servlets.CrossOriginFilter</filter-class> <init-param> <param-name>allowedOrigins</param-name> <param-value>*</param-value> <!-- 모든 도메인 허용 --> </init-param> <init-param> <param-name>allowedMethods</param-name> <param-value>GET,POST,PUT,DELETE,OPTIONS</param-value> </init-param> <init-param> <param-name>allowedHeaders</param-name> <param-value>Content-Type</param-value> </init-param> </filter> <filter-mapping> <filter-name>cross-origin</filter-name> <url-pattern>/*</url-pattern> </filter-mapping>
React&Openlayers연동 Context 분리 참고
。npm install ol을 통해 OpenLayers Dependency를 정의import React ,{useContext} from 'react' export const MapContext = React.createContext({}); export const useMapContext = ()=>{ return useContext(MapContext) }▶
Openlayers의Map객체를Global State로서 관리하기 위한Context생성.import React, { useEffect,useState, useReducer} from 'react'; import 'ol/ol.css'; import { Map, View } from 'ol'; import { Tile } from 'ol/layer'; import { XYZ } from 'ol/source' import '../css/all4runner.css' import { MapContext } from '../Context/MapContext' import { Graticule ,Vector as VectorLayer} from 'ol/layer' const MapComponent = ({children})=>{ const [map,setMap]= useState() // state update 함수 => useReducer 적용용도 const reducer = (state,action)=>{ switch(action.type){ case "returnmap": console.log(map) return map // graticule 설정정 case "setgraticule": const gridMapLayer = new Graticule({ map:map, showLabels:true, zIndex:4 }); default: return undefined; } } // useReducer State 비동기 해결용용 const [mapstate, mapdispatch]=useReducer(reducer,undefined) // 구조분해로 받기 useEffect(() => { const Mapinstance = new Map({ target: 'map', // 하위 요소 중 id 가 map 인 element가 있어야함. layers: [ new Tile({ source : new XYZ({ url : "https://api.vworld.kr/req/wmts/1.0.0/45C98863-0CE9-39F9-881C-ED4E6DB5B3EE/Base/{z}/{y}/{x}.png" }), zIndex:0 }) ], view: new View({ projection : 'EPSG:4326', center: [127.05994054600626, 37.58400223316397], // 맵의 초기 위치 zoom: 10, // 초기 줌 레벨 }), }) setMap(Mapinstance) mapdispatch({type:"setgraticule"}) return () => Mapinstance.setTarget(undefined) }, []); return ( <MapContext.Provider value={{mapstate,mapdispatch}}> {children} </MapContext.Provider> )}; export default MapComponent;。
useState()를 활용한 비동기적State관리가 아닌,useReducer()함수를 이용해 동기적으로map객체를 Context로 전달하는 역할을 수행.
▶useState()가 비동기적으로 동작함으로 인해 발생됐던 문제들을 해결.
(ex. 자식 Component쪽에서는undefined로 전달받는다.)
▶ 본인 시도에서useEffect()등의 Hook로 비동기 문제를 해결하려고 했음에도 해결이 힘듬.
。useReducer()를 통해MapComponent에서만 사용될State를Context를 통해 하위 Component에 대해서만Global State가 작용하여 전역적으로 관리를 수행.
