19.1 : 리덕스란 무엇인가
리덕스 : Cross Component or App Wide State의 상태를 위한 상태 관리 시스템.
Cross Compoent ??? App Wide State ??? 그게 뭔데
useState()를 사용하던, useReducer()를 사용하던 상태는 세가지의 종류가 있다.
- local State : 상태가 하나의 컴포넌트에만 영향을 끼치는경우
- Cross-Component State : 상태가 다수의 컴포넌트에 영향을 끼치는 경우.
(보통 props를 사용하여 전달 한다.) - App-Wide State : 상태가 어플리케이션의 거의 대부분에 쓰이는 경우.
(이것 역시 props를 사용하여 전달 한다.)
여기서 Croos-Component State 또는 App-Wide State를 주목해야 한다. 상태가 다양한 컴포넌트에서 쓰일경우 props를 통하여 전달하거나, 리액트 컨택스트를 사용하여 중앙관리 시스템 역할을한다.
그렇다면 이미 학습해보았던 리액트 컨텍스트를 사용하여 쉽게 관리하면 되는거 아닌가?
이미 중앙관리 같은 역할을 하기도하고 사용하기도 괜찮지않나?
확실히 중앙관리한다는 점에서는 공통점이 될 수 있지만, 단점이 존재한다.
1. 프로젝트가 커질경우 리액트 컨텍스트는 감당하기 힘들어진다.
보기 안좋은 코드.jsx
return (
     <AuthContextProvider>
       <ThemeContextProvider>
         <MultiStepFormContext>
           <UserRegistration/>
         </MultiStepFormContext>
       </ThemeContextProvider>
     </AuthContextProvider>
   );
그럼 그냥 하나의 컨텍스트로 사용하면되는거아님?
return (
<AllContext.Provider>

</AllContext.Provider>
)
보기에는 매우 편안해보이지만 하나의 컨텍스트에는 매우많은 로직과 상태들이 담겨 있을 것이다.
이는 관리하기 불편해지고 유지보수하는데 어려움을 줄 수 있는 가능성을 내포한다는 뜻이다.
2.성능이 좋지 않다.
테마를 변경하거나, 인증 같은 저빈도 업데이트 같은경우에는 리액트 컨텍스트를 사용해도 무방하다.
하지만 데이터가 자주 변경되는 경우는 적합하지 않고 성능면에서도 좋지 않기 때문이다.
그럼 리덕스는 어떻게 상태를 관리하길래 저런 단점들을 보완할수 있는걸까?
19.2 : 리덕스 작동방식
이제 리덕스 작동방식에 대해서 알아보자.
리액트는 애플리케이션에서 “하나의 중앙 데이터 저장소” 라고 할 수 있다.
이 저장소에서는 전체 애플리케이션의 모든 상태를 저장한다.
어?? 그렇다면 하나의 저장소에 모든 상태를 저장한다면 관리하기 힘들지 않을까?
다행히 저장소 전체를 항상 직접 관리할 필요는 없다. 지금부터 그 이유를 학습해보자.
리덕스가 작동하는 전체적인 흐름도
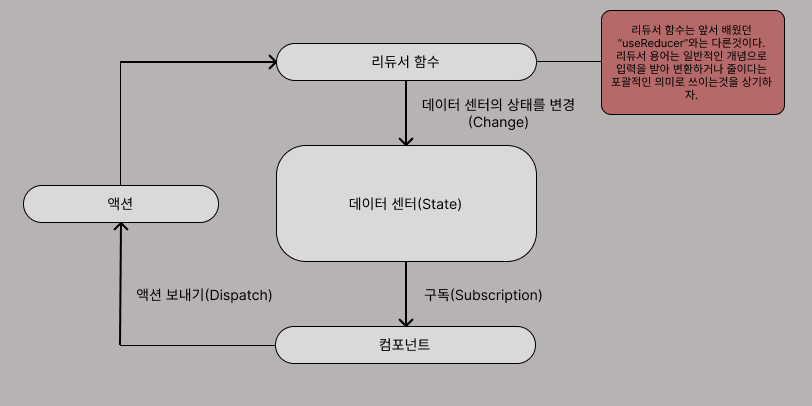
데이터 센터에서는 말 그대로 데이터를 담는 상태를 저장한다. 그런데 데이터는 대부분의 상황에서는 고정되어 있지 않고 가변적이다. 이 데이터를 바꾸고자 한다면 어떻게 바꿔 줄 수 있을까?
일단 절대로 데이터 센터에서 데이터를 직접 조작 하지 않는다.
먼저 컴포넌트들은 데이터센터와 구독(Subscription)을 하여 연결을 맺은뒤,
리듀서라는 개념을 사용하여 리듀서 함수를 활용한 데이터의 변형을 담당한다.
그러면 컴포넌트에서 리듀서 함수를 어떻게 트리거 시켜줄 수 있는것일까?
바로 컴포넌트가 리듀서 함수에게 액션을 보내는것이다.
액션이라고 해서 거창한것이 아니다. 액션 자체는 객체고 객체안에 어떤 행동의 타입을 할것인지 보내는것이다.
여기까지 왔으면 리듀서는 새로운 상태를 뱉어내고 중앙 데이터 저장소의 기존 상태를 대체하게 된다. 이 데이터 저장소의 상태가 업데이트 되면 구독 중인 컴포넌트들은 알림을 받게되고 UI를 업데이트하게 된다는것이다.
19.3 : 핵심 리덕스 개념 탐색하기
이번에는 실제로 어떻게 사용하는지 직접 코드를 짜보자.
참고로 리덕스는 리액트에만 국한된것이 아니다. 어떤 자바스크립트 프로젝트에서도 사용이 가능하다.
다음 예시 코드들은 리액트를 사용하지 않는 바닐라 JS로 리덕스를 사용한 예시문이다.
redux-demo.js
// 기본 노드 JS import 구문.
// 조금 이상해보일지 몰라도,
// 이 구문으로 리덕스 패키지로부터 리덕스를 import한다.
const redux = require("redux");

// 리듀서 만들기
// 리듀서 함수는 표준 자바스크립트 함수지만
// 리덕스 라이브러리에 의해 호출된다.
// 2개의 입력 (기존의 상태, 발송된 액션)을 받고 새로운 상태를 출력
// 순수 함수이어야 한다. 어떠한 부수적 효과가 없을것.
// 기본값을 설정하여 초기에 실행할때 오류가 나지 않도록 설정한다.

// 기본값을 설정하지 않는다면 저장소가 초기화될때 리덕스가 리듀서들을 처음으로
// 실행한다는것이 문제다. 이 시점에서는 상태가 정의되어 있지 않기때문에 오류가 발생

const counterReducer = (state = { counter: 0 }, action) => {
   // 증가 액션
   if (action.type === "increment") {
    // 상태의 출력은 이론적으로 어떠한 값의 유형도 될 수 있지만,
    // 일반적으로는 대부분 객체다.
   return {
    counter: state.counter + 1,
   };
  }

   // 감소 액션
  if (action.type === "decrement") {
   return {
    counter: state.counter - 1,
   };
 }

   // 디폴트 초기화 액션
  return state;

};

// 저장소 만들기
// 저장소에는 리듀서를 넣어서 데이터를 조작하는 리듀서 함수가
// 어떤 함수인지 알아야한다.
const store = redux.createStore(counterReducer);

// 구독 함수
// 상태가 변경될 떄마다 트리거된다.
const counterSubscriber = () => {
  // getState() 메소드는 업데이트 된 후에 최신 상태 스냅샷을 제공한다.
  const latestState = store.getState();
  console.log(latestState);
};

// 상태가 변경될때마다 구독 함수를 실행하게끔 해줘.
store.subscribe(counterSubscriber);

// 액션을 발송하는 메소드 dispatch
store.dispatch({ type: "increment" });	// 1
store.dispatch({ type: "decrement" });	// 0
19.4 : 리액트용 리덕스 만들기
이제 실전으로 들어가서 리액트에서 어떻게 리덕스를 사용하는지 살펴보자.
리액트용 리덕스 패키지를 설치하기.
npm install readct-redux
19.4.1 : 리액트용 리덕스 스토어 만들기
중앙 저장소를 담당하는 리덕스 스토어를 만들자.
보통 src/store/index.js 이런식으로 store폴더 내에 index.js라는 파일로 컨벤션처럼 사용되고 있다.
파일을 만들었으면 리듀서 함수를 만들고, 스토어에서 리듀서 함수를 포인트 하여 인식하게끔 한다.
중앙저장소 역할인 store/index.js
// redux 모듈로부터 가져오자.
import {createStore} from 'redux';
// 리듀서 함수
const counterReducer = (state ={counter : 0} , action) => {
   if (action.type ==='increment') {
     return {
       counter : state.counter + 1
     };
   }

   if (action.type ==='decrement') {
     return {
       counter : state.counter -1
     };
   }

   return state;
};

// 스토어에서 함수를 가리킨다.
const store = createStore(counterReducer);

export default store;
19.4.2 : 리덕스 스토어를 제공하기
앱 전체가 저장소에 액세스 하기를 원한다면 모든 컴포넌트의 최상단 루트인 index.js로 가서 저장소를 제공해야 한다.
최상단 루트의 index.js
import React from 'react';
import ReactDOM from 'react-dom/client';

// 'react-redux'로부터 모듈을 가져온뒤 Provider컴포넌트를 import 한다.
import {Provider} from 'react-redux';


import './index.css';
import App from './App';

// 아까 서술한 store를 import하여 저장소를 제공한다.
import store from './store/index'

const root = ReactDOM.createRoot(document.getElementById('root'));

// store를 props로 전달하여 이제 모든 하위 컴포넌트들은 저장소에 도달할 수 있다.
root.render(<Provider store={store}><App /></Provider>);
19.4.3 : 리액트 컴포넌트에서 리덕스 데이터 사용하기
자 이제 실제 컴포넌트들이 리덕스 데이터를 사용하는 방법에 대해서 알아보자.
counter.js
import classes from './Counter.module.css';

// useStore도 가능하지만, useSelector가 좀더 편하다. 저장소가 관리하는 상태를
// 우리가 자동으로 선택 할 수 있기 때문이다.
// 이 의미는 react-redux는 리액트 컴포넌트를 위해 리덕스 저장소에 자동으로 구독을 설정한다는것을 의미한다.
// 어쨋든 useSelector를 가져오게 됨으로써 저장소가 관리하는 데이터를 액세스 할 수 있게 되었다.
import { useSelector } from 'react-redux';

const Counter = () => {

// useSelctor를 사용할때 함수를 서술하면된다.
// state(관리된 데이터를 통하여) => state.counter(필요로 하는 상태를 받을게요)
  const counter = useSelector(state => state.counter);
  const toggleCounterHandler = () => {};

  return (
   <main className={classes.counter}>
    <h1>Redux Counter</h1>
    <div className={classes.value}>{counter}</div>
    <button onClick={toggleCounterHandler}>Toggle Counter</button>
   </main>
  );
};

export default Counter;
19.4.4 : 내부 컴포넌트에서 액션을 보내기
컴포넌트에서 액션을 보내려면 dispatch hook을 사용하자.
counter.js
// useDispatch hook은 액션을 보내는 역할을 한다.
import { useSelector, useDispatch } from 'react-redux';

import classes from './Counter.module.css';

const Counter = () => {
  const dispatch = useDispatch();
  const counter = useSelector(state => state.counter);

  const incrementHandler = () => {
   dispatch({type:'increment'});
  };
  const decrementHandler = () => {
   dispatch({type:'decrement'});
  };

  const toggleCounterHandler = () => {};

  return (
   <main className={classes.counter}>
    <h1>Redux Counter</h1>
    <div className={classes.value}>{counter}</div>l
    <div>
     <button onClick ={incrementHandler}>Increment</button>
     <button onClick = {decrementHandler}>Decrement</button>
    </div>
    <button onClick={toggleCounterHandler}>Toggle Counter</button>
   </main>
  );
};

export default Counter;
잘 작동한다 !
19.4.5 : 리듀서 함수에 페이로드 전달하기
위에서 알아본 카운터 예시에서 오직 +1과 -1만을 조작할 수 있었다.
더 많은 숫자(+5,-10,-100)로 많은 버튼을 만들어야 한다면 어떻게 해야할까?
추가로, 사용자를 위해 업데이트할 가능성과 확장성을 염두해야한다면 어떻게 해야할까?
즉 다양한 유형을 가져야 하는데 어떻게 해주어야 할까?
일차적으로 생각해 볼 수 있는건 다음과 같다.
리듀서 함수에 직접 정의하면 되는거아니야?
index.js
const counterReducer = (state ={counter : 0} , action) => {
   if (action.type ==='increment') {
     return {
       counter : state.counter + 1
     };
   }

   if (action.type === 'incrementFive') {
     return {
       counter : state.counter + 5
     }
   }

   if (action.type === 'incrementTen') {
     return {
       counter : state.counter + 10
     }
   }

   if (action.type ==='decrement') {
     return {
       counter : state.counter -1
     };
   }

   return state;
};
동작은 할것이다. 다만 이런식으로 하드코딩하는것은 확장가능성과 가독성에 좋지 않다.
사용하고자 하는 컴포넌트에서 리듀서 함수로 액션을 전달할때 추가적인 페이로드를 전달하면 훨씬 확장성 있고 유연한 사용이 가능하다.
페이로드 : 전송되는 ‘순수한 데이터’
Counter.js (컴포넌트)
// 액션객체에 type뿐만이 아니라 number가 5를 가지는 프로퍼티를  페이로드로 전달했다.
// 물론 해당 숫자는 하드코딩이 아니라 사용자 입력이나 특정조건에 따른 유연한 변화도 가능하다.
const increaseHandler = () => {
   dispatch({type:'increase', number :5 });
  };
index.js (리덕스)
// 리듀서 함수
const counterReducer = (state ={counter : 0} , action) => {
...(생략)
   if (action.type === 'increase') {
     return {
       counter : state.counter + action.number,
     }
   }
...(생략)
   return state;
};
19.4.6 : 여러개의 State 작업하기
지금까지 예시로는 counter 단 한개의 State만 관리하였다.
하나의 상태를 추가하여 counter를 보여줄지 안보여줄지 정하는 토글 버튼을 만들어 여러개의 State를 작업한다는것을 학습해보자.
다만, 알아두어야할것이 원래라면 그냥 컴포넌트에서 useState로 토글 버튼을 추가하여 관리하여도 문제는 없다. 그렇게 하는게 맞기도하다. local State라는것이 판단이된다면, 즉 해당 속성이 다른 컴포넌트에서 쓰이지 않는다면 리덕스로 상태를 관리하는것보다 단지 useState를 사용하여 관리하는것이 맞을것이다.
그렇지만, 학습단계이므로 글로벌 State라고 가정하고 배워보자.
index.js (리덕스)
import {createStore} from 'redux';
// 가독성을 위해 초기상태를 따로 정의
const inintialState = {counter:0, showCounter:true};

// 리듀서 함수
const counterReducer = (state = inintialState , action) => {
...(생략)

// 기존의 counter 상태도 같이 반환 해주어야 한다.
   if (action.type ==='toggle') {
     return {
       counter : state.counter,
       showCounter : !state.showCounter
     }
   }

   return state;
};
// 스토어에서 함수를 포인트한다.
const store = createStore(counterReducer);
export default store;
Counter.js
import { useSelector, useDispatch } from 'react-redux';

import classes from './Counter.module.css';

const Counter = () => {
  const dispatch = useDispatch();
  const counter = useSelector(state => state.counter);
  const showCounter = useSelector(state => state.showCounter);

(..생략..)

  const toggleCounterHandler = () => {
   dispatch({type:'toggle'});
  };

(..생략..)

export default Counter;
19.4.7 : 리덕스는 불변성을 유지해야한다. (절때 하지 말것)
리듀서 함수의 일부분인 다음과 같은 코드를
   if (action.type ==='increment') {
     return {
       counter : state.counter + 1,
       showCounter : state.showCounter
     };
   }
이런식으로 바꿔볼 수 있지 않을까?
   if (action.type ==='increment') {
	state.counter++
     return {
       counter : state.counter,
       showCounter : state.showCounter
     };
   }
이런식으로 기존의 State를 조작하여 변형하거나 변경하면 안된다.
(동작은 된다. 다만 복잡한 코드로 넘어갈때는 어떤 일이 일어날지 모른다.)
배열이나 객체는 참조값의 접근 방식을 사용하기 떄문에 객체의 참조를 통해서 상태를 변경하는것은 Redux에서는 절때 하지 말아야 하는 행위이다. 불변성을 해치기 떄문이다.
바닐라 JS로 예시를 보자
example.js
const state = {
    numbers: [1, 2, 3]
};
const newState = state;
newState.numbers.push(4); // 기존 상태를 직접 변경
console.log(state.numbers); // 변경된 값 출력
내가 의도한것은 newState가 독립된 객체로 있다고 생각하여 기존의 state 가 영향받지 않고 새로운 newState만 '4'를 푸쉬하는것이 내 의도이다. 하지만 기존의 state도 영향을 받는다. state, newState모두 동일한 메모리 참조값을 갖고있기 때문이다.
내가 의도한것 :
state = {
    numbers: [1, 2, 3]
};

newState = {
    numbers: [1, 2, 3,4]
};
실제 동작한것 :
state = {
    numbers: [1, 2, 3,4]
};

newState = {
    numbers: [1, 2, 3,4]
};
이렇듯 객체(state)를 직접 조작하여 변형하거나 변경하는것은 다른곳에서
side effect가 일어날 수 있는 가능성이 있기 떄문에 꼭 유의해야 한다.
따라서 올바른 방법은 새로운 객체로 생성하여 불변성을 유지해야 한다.
다른 방법으로는 리덕스 툴킷을 사용하면 훨씬 편리하게 불변성을 유지할 수 있다.
19.5 : 리덕스 툴킷을 사용하여 편리하게 리덕스를 사용하자!
이때까지 리덕스의 기초 개념과 어떻게 리덕스를 사용하는지에 대해서 알아보았다.
하지만 문제점이 있다.
- action의 tpye을 명명할때 오타를 하나라도 내면 안되기 때문에 엄격하다.
- 리듀서 함수내 보일러 플레이트가 심할 수 있다.
- 중첩된 객체나 중첩된 배열등 데이터를 실수로 바꿀수 있는 가능성이 존재한다.
보일러 플레이트 : 별 수정 없이 반복적으로 사용되는 코드
이러한 문제점을 해결할 수 있는 방법이 있다.
리덕스 툴킷 라이브러리를 사용하자!
-
설치하기
npm install @reduxjs/toolkit
-
기존 redux 라이브러리 삭제하기
만약 기존의 redux 라이브러리가 있다면 삭제해주어야한다. 툴킷이 포함하는 내용이다.pacakge.json 파일에있는 해당 코드를 삭제하기 "redux": "^5.0.1",
19.5.1 : 리덕스 툴킷의 State 슬라이스 추가및 연결하기
주석처리 위주로 보자!
index.js (리덕스툴킷사용)
// createSlice는 상태 관리를 보다 쉽게 만들어주는 유틸리티
// configureStore는 단일 스토어에 여러개의 리듀서를 결합하게 해준다.
import { createSlice, configureStore } from '@reduxjs/toolkit';
// 가독성을 위해 초기상태를 따로 정의
const initialState = {counter:0, showCounter:true};

// createSlice는 식별자(name), 초기값(initialState), 리듀서(reducers)를 받고 임의로 변경할수없다.
const counterSlice = createSlice({
   // 식별자 역할을 하는 name 프로퍼티.
   name : 'counter',
   // 초기값 역할을 하는 initialState 프로퍼티.
   initialState,
   // 리듀서 함수의 역할을 하는 reducers 프로퍼티.
   reducers : {
     increment(state) {
       state.counter++;
     },
     decrement(state) {
       state.counter--;
     },
     // createSlice를 사용할경우 액션은 정해진 프로퍼티명(payload)를 사용해야한다.
     increase(state, action) {
       state.counter = state.counter + action.payload
     },
     toggleCounter(state) {
       state.showCounter = !state.showCounter;
     }
   }
})

// 여러개의 상태슬라이스(여러개의 리듀서)를 받을경우 createStore는 적절치 못하다.
// XXX const store = createStore(counterSlice.reducer);
const store = configureStore({
   reducer : counterSlice.reducer
})

// counterSlice의 액션을 내보내기
export const counterActions = counterSlice.actions;

export default store;
사용하기 무난한것같다. 그런데 counterSlice를 정의할때 createSlice부분을 보자.
reducers : {
increment(state) {
state.counter++;
}
이상하지않는가?? 위에서는 상태를 직접 변형하거나 변경할수 없다고했는데 여기서는 했다.
하지만 잘못된것이 아니다. creatSlice를 사용할때만큼은 내부적으로 알아서 원래 상태를 변경하지 못하도록 변환되기 떄문이다. 즉 Side Effect을 걱정할 필요도 없다.
Counter.js(컴포넌트)
// Redux 스토어의 상태를 읽어오는 'useSelector'
// Redux 스토어의 액션을 디스패치 하기 위한 'useDispatch'
import { useSelector, useDispatch } from 'react-redux';

//index.js에서 액션을 export한것을 가져왔다.
import { counterActions } from '../store/index';
import classes from './Counter.module.css';

const Counter = () => {
  const dispatch = useDispatch();
  const counter = useSelector((state) => state.counter);
  const showCounter = useSelector((state) => state.showCounter);

  const incrementHandler = () => {
   dispatch(counterActions.increment());
  };

  const increaseHandler = () => {
   dispatch(counterActions.increase(10));
  };

  const decrementHandler = () => {
   dispatch(counterActions.decrement());
  };

  const toggleCounterHandler = () => {
   dispatch(counterActions.toggleCounter());
  };

  return (
   <main className={classes.counter}>
    <h1>Redux Counter</h1>
    {showCounter &&<div className={classes.value}>{counter}</div>}
    <div>
     <button onClick ={incrementHandler}>Increment</button>
     <button onClick ={increaseHandler}>Increase</button>
     <button onClick = {decrementHandler}>Decrement</button>
    </div>
    <button onClick={toggleCounterHandler}>Toggle Counter</button>
   </main>
  );
};

export default Counter;
19.5.2 : 리덕스 툴킷의 다중 상태 슬라이스 및 사용하기
지금까지의 예시는 오직 한 컴포넌트에서만 사용하고, 한개의 State 슬라이스를 사용했다.
지금부터는 다수의 State 슬라이스를 리덕스에서 정의하고, 여러 컴포넌트에서 사용하는 예시를 학습한다.
예를들어서 로그인 인증에 따라서 메뉴 네비게이션 바가 바뀐다던지,
로그인 인증에 따라서 볼 수 있는 콘텐츠가 달라진다던지,
로그인 인증으로 예시를 드는게 가장 적절해보인다.
다만 로그인의 검증 과정은 해당 Redux단원에서는 필요없으므로 검증 관련 코드는 작성하지 않았다.
사용한 컴포넌트는 다음과 같다.
index.js => 리덕스와 상태 슬라이스를 정의함.
Auth.js => 로그아웃 상태일때 로그인 인증창.
Header.js => 기본적인 로고와 로그인 상태일때만 나타나는 내비게이션 메뉴들.
UserProfile.js => 로그인 상태일때만 나타나는 사용자 프로필 정보.
App.js => 인증여부에 따른 Auth 컴포넌트 or UserProfile 둘중 하나 조건부 출력
가장먼저 인증 슬라이스를 추가해주자!
index.js
import { createSlice, configureStore } from '@reduxjs/toolkit';
const initialCounterState = { counterValue:0, showCounter:true};

// 카운터 슬라이스
const counterSlice = createSlice({
   name : 'counter',
   initialState : initialCounterState,
   reducers : {
     increment(state) {
       state.counterValue++;
     },
     decrement(state) {
       state.counterValue--;
     },
     increase(state, action) {
       state.counterValue = state.counterValue + action.payload
     },
     toggleCounter(state) {
       state.showCounter = !state.showCounter;
     }
   }
})

const initialAuthState = { isAuthenticated : false }

// 인증 슬라이스
const authSlice = createSlice({
   name : 'authentication',
   initialState : initialAuthState,
   reducers : {
     login(state) {
       state.isAuthenticated = true;
     },
     logout(state) {
       state.isAuthenticated = false;
     }
   }
})

// 여러개의 상태슬라이스를 맵으로 정의한다.
const store = configureStore({
   reducer : {counter : counterSlice.reducer , auth : authSlice.reducer}
})

export const authActions = authSlice.actions
export const counterActions = counterSlice.actions;
export default store;
counter슬라이스를 만든것처럼 인증 슬라이스도 똑같은 형식으로 추가해주면 된다. 하지만 store에 저장할때 이제는 여러개의 슬라이스를 reducer로 받으므로 객체로 받아야한다.
reducer : {counter : counterSlice.reducer , auth : authSlice.reducer}
최상위 루트인 App 컴포넌트
App.js ( 최상위 컴포넌트 )
import { Fragment } from "react";
import { useSelector } from "react-redux";
import Counter from "./components/Counter";
import Header from "./components/Header";
import Auth from "./components/Auth";
import UserProfile from './components/UserProfile';

function App() {
  const isAuth = useSelector(state => state.auth.isAuthenticated);
  return (
   <Fragment>
    <Header />
    {/* 인증이 되지 않는다면 인증창 */}
    {!isAuth &&<Auth />}
    {/* 인증이 되었다면 유저프로필 창 */}
    {isAuth &&<UserProfile/>}
    <Counter />
   </Fragment>
  );
}

export default App;
로그아웃 상태일때 나타나는 로그인창(
Auth.js (인증 컴포넌트)
import { useDispatch } from 'react-redux';
import classes from './Auth.module.css';
import { authActions } from '../store/index';
const Auth = () => {
  const dispatch = useDispatch();

  const loginHandler = (event) => {
   // 브라우저가  HTTP 요청을 보내지 않게 하기위해 사용
   event.preventDefault();

   dispatch(authActions.login());
  }
  return (
   <main className={classes.auth}>
    <section>
     <form onSubmit={loginHandler}>
      <div className={classes.control}>
       <label htmlFor='email'>Email</label>
       <input type='email' id='email' />
      </div>
      <div className={classes.control}>
       <label htmlFor='password'>Password</label>
       <input type='password' id='password' />
      </div>
      <button>Login</button>
     </form>
    </section>
   </main>
  );
};

export default Auth;
기본적인 제목(Redux Auth)는 로그인 인증 여부없이 보여주고,
나머지 내비게이션 바는 로그인 인증여부에 따라 조건부 출력하는 Header 컴포넌트
Header.js ( 헤더 컴포넌트 )
import { useSelector,useDispatch } from "react-redux";
import classes from "./Header.module.css";
import { authActions } from "../store/index";
const Header = () => {
  const dispatch = useDispatch();
  const auth = useSelector((state) => state.auth.isAuthenticated);

  const logoutHandler = () => {
   dispatch(authActions.logout());
  }

  return (
   <header className={classes.header}>
    <h1>Redux Auth</h1>
    {auth &&(
     <nav>
      <ul>
       <li>
        <a href="/">My Products</a>
       </li>
       <li>
        <a href="/">My Sales</a>
       </li>
       <li>
        <button onClick={logoutHandler}>Logout</button>
       </li>
      </ul>
     </nav>
    )}
   </header>
  );
};

export default Header;
로그인 상태일때만 보여주는 유저 프로필 컴포넌트
UserProfile.js
import classes from './UserProfile.module.css';

const UserProfile = () => {
  return (
   <main className={classes.profile}>
    <h2>My User Profile</h2>
   </main>
  );
};

export default UserProfile;
19.6 : 코드 분할 하기
다음의 코드를 보자.
index.js
import { createSlice, configureStore } from '@reduxjs/toolkit';
const initialCounterState = { counterValue:0, showCounter:true};


// 카운터 슬라이스
const counterSlice = createSlice({
    name : 'counter',
    initialState : initialCounterState,
    reducers : {
        increment(state) {
            state.counterValue++;
        },
        decrement(state) {
            state.counterValue--;
        },
        increase(state, action) {
            state.counterValue = state.counterValue + action.payload
        },
        toggleCounter(state) {
            state.showCounter = !state.showCounter;
        }
    }
})

const initialAuthState = { isAuthenticated : false }

// 인증 슬라이스
const authSlice = createSlice({
    name : 'authentication',
    initialState : initialAuthState,
    reducers : {
        login(state) {
            state.isAuthenticated = true;
        },
        logout(state) {
            state.isAuthenticated = false;
        }
    }
})


// 여러개의 상태슬라이스를 맵으로 정의한다.
const store = configureStore({
    reducer : {counter : counterSlice.reducer , auth : authSlice.reducer}
})


// 액션 내보내기
export const authActions = authSlice.actions
export const counterActions = counterSlice.actions;

export default store;
조금 난잡해보인다. 좀더 가독성있고 생산성 있게 구성하기 위하여 분할해보자.
index.js에서는 configureStore()만 사용하여 각각의 리듀서들을 매핑하고,
상태 슬라이스와 리듀서를 정의하는것과, 액션들은 각각의 개별 파일로 저장하자.
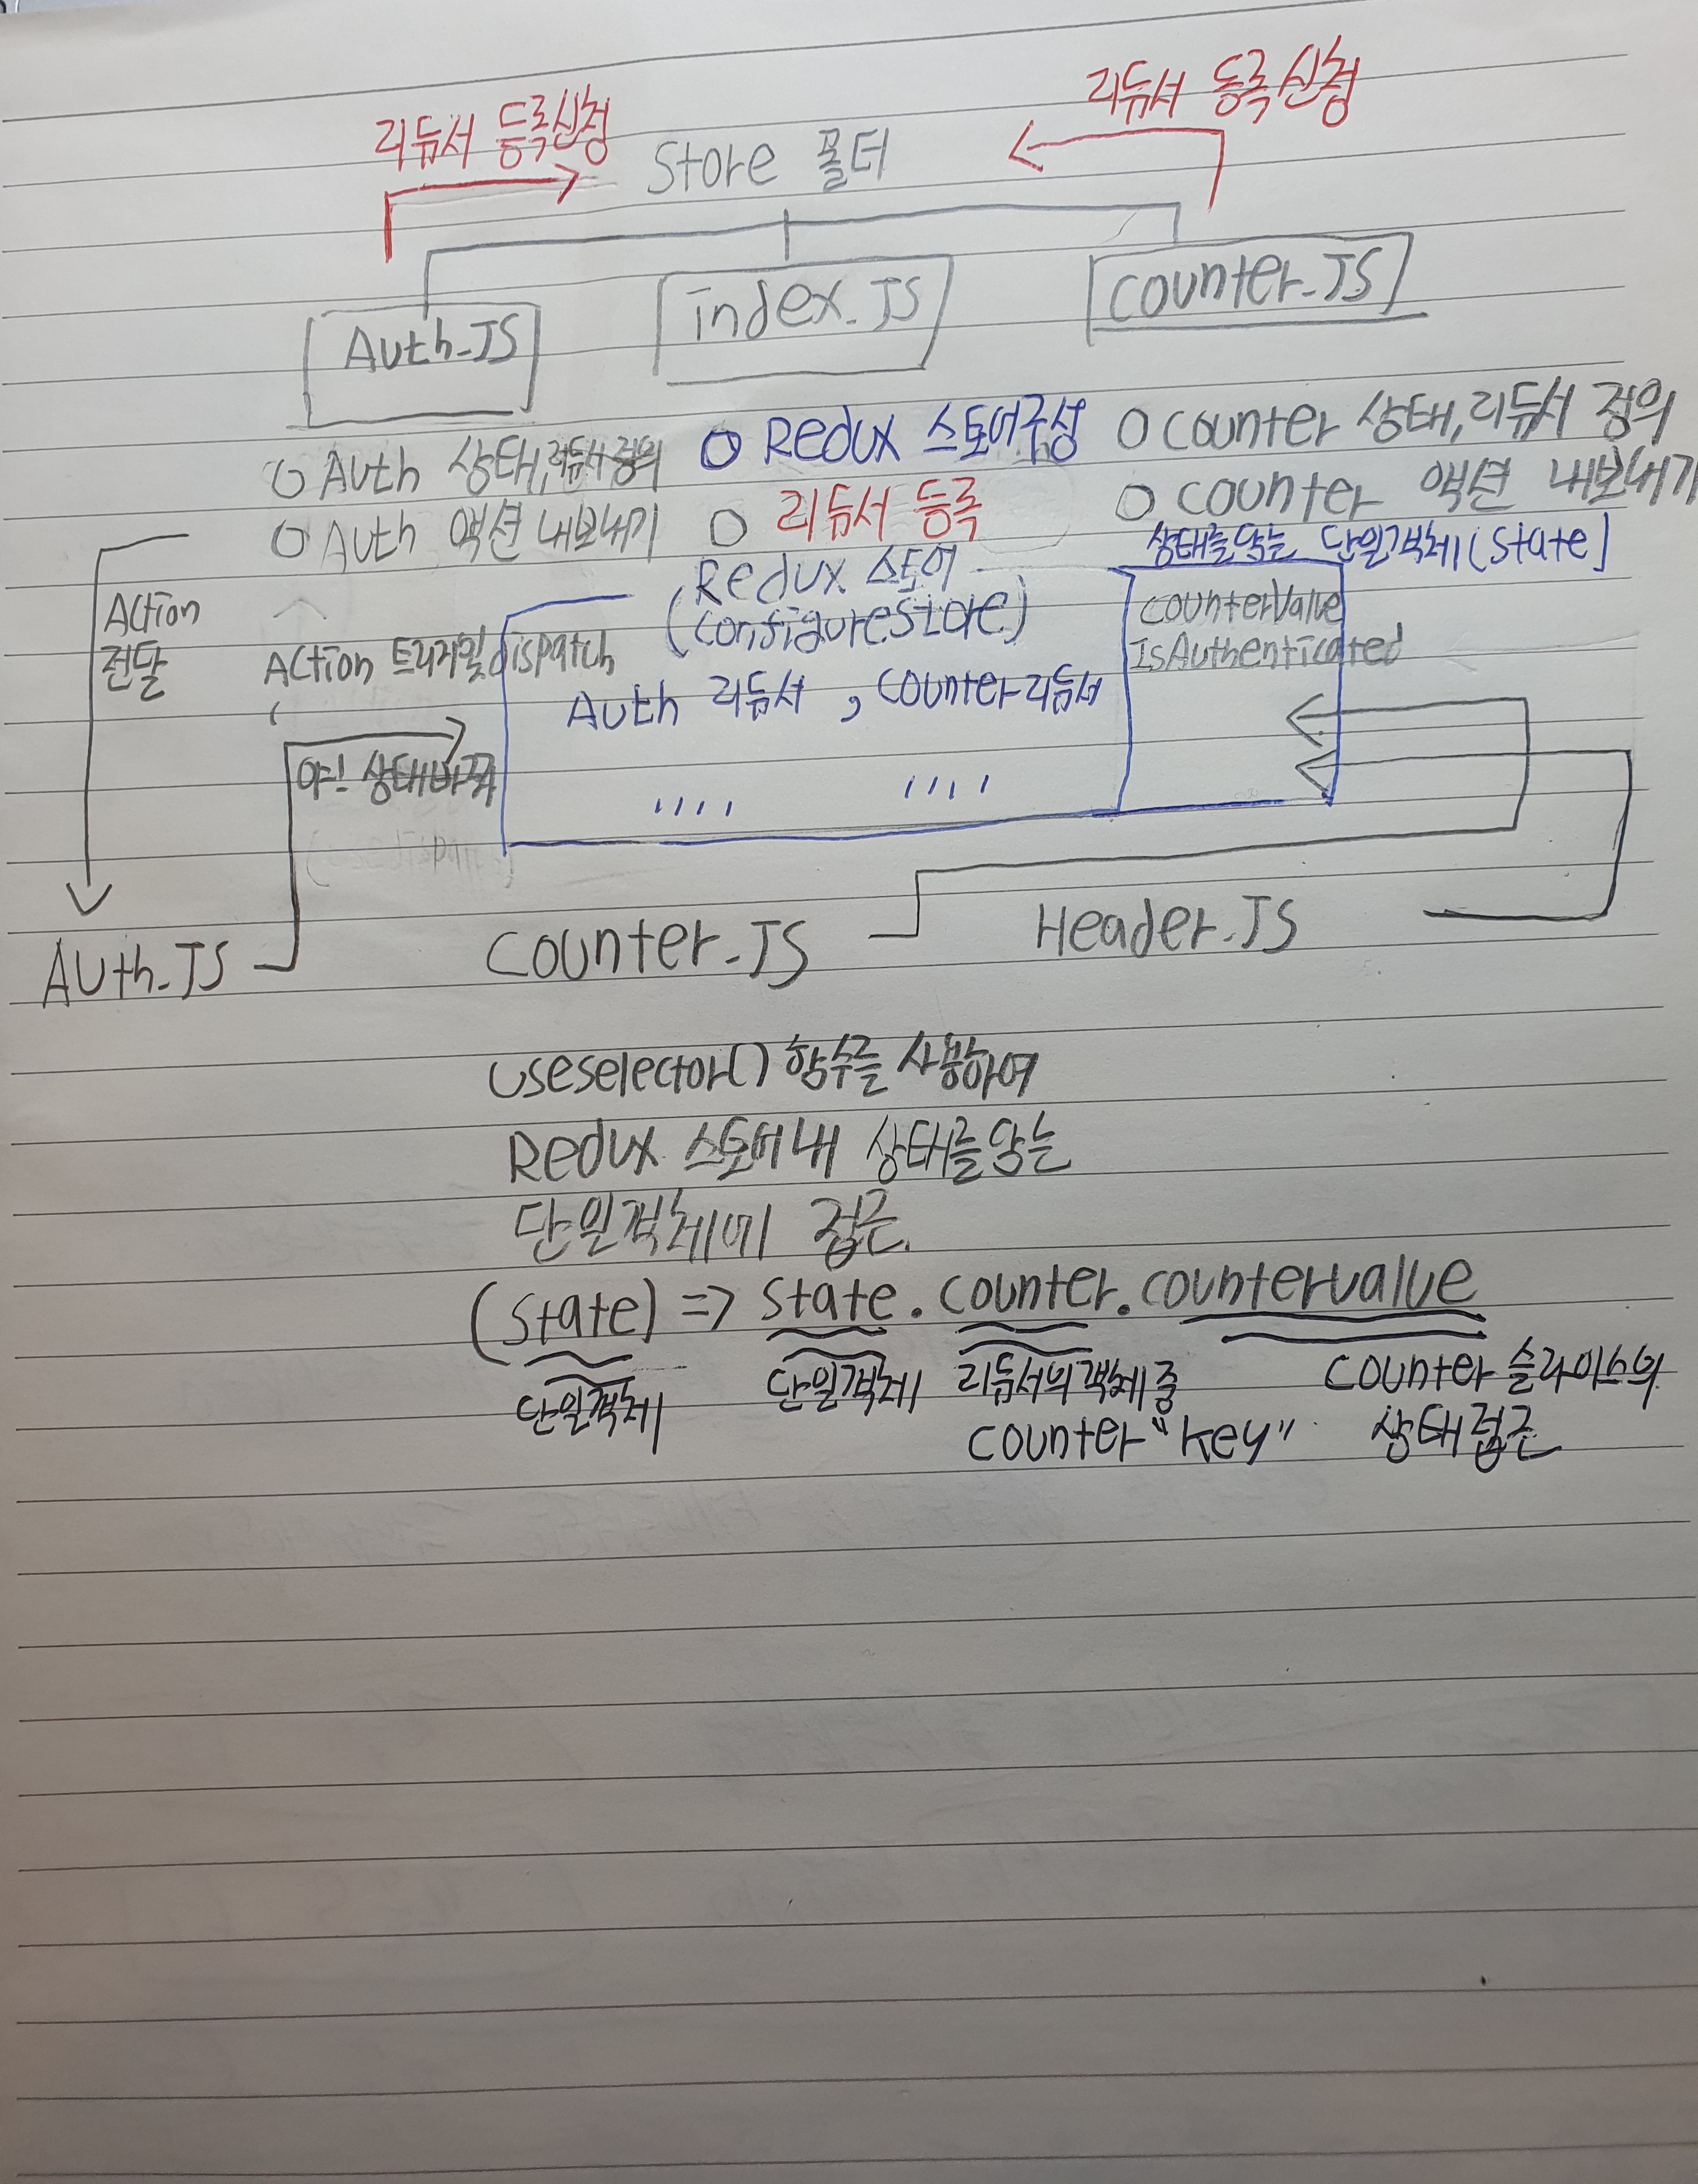
정리하면 다음과 같다.
Store/index.js => 단일 리듀서들을 한곳으로 매핑한다. (with. configureStore)
Store/Auth.js , Store/counter.js => 상태와 리듀서를 정의하고 액션을 내보낸다.
다음과 같이 분할 할 수 있다.
index.js ( 리듀서들을 한곳으로 매핑 )
import { configureStore } from '@reduxjs/toolkit';
import auth from './auth';
import counter from './counter';
const store = configureStore({
   reducer : {counter : counter.reducer , auth : auth.reducer}
})
export default store;

import { createSlice } from "@reduxjs/toolkit";

const initialCounterState = { counterValue:0, showCounter:true};
counter.js (counter 상태및 리듀서 정의, counter 액션을 내보내기)
// 카운터 슬라이스
const counterSlice = createSlice({
   name : 'counter',
   initialState : initialCounterState,
   reducers : {
     increment(state) {
       state.counterValue++;
     },
     decrement(state) {
       state.counterValue--;
     },
     increase(state, action) {
       state.counterValue = state.counterValue + action.payload
     },
     toggleCounter(state) {
       state.showCounter = !state.showCounter;
     }
   }
})

// 액션 내보내기
export const counterActions = counterSlice.actions;
export default counterSlice;
auth.js ( auth 상태및 리듀서 정의, auth 액션 내보내기 )
import { createSlice } from "@reduxjs/toolkit";

const initialAuthState = { isAuthenticated : false }

// 인증 슬라이스
const authSlice = createSlice({
   name : 'authentication',
   initialState : initialAuthState,
   reducers : {
     login(state) {
       state.isAuthenticated = true;
     },
     logout(state) {
       state.isAuthenticated = false;
     }
   }
})
// 액션 내보내기
export const authActions = authSlice.actions

export default authSlice;
이제 상태 슬라이스를 사용하고자 하는 컴포넌트들은 import하는것과 사용하는 방법이 살짝 달라진다.
Counter.js 컴포넌트만 예시를들어서 사용하는 방법을 보자.
Counter.js
import { useSelector, useDispatch } from 'react-redux';
// 이제는 index.js가 아니라 counter에서 가져온다.
import { counterActions } from '../store/counter';
import classes from './Counter.module.css';
const Counter = () => {
  const dispatch = useDispatch();
  const counter = useSelector((state) => state.counter.counterValue);
  const showCounter = useSelector((state) => state.counter.showCounter);

  const incrementHandler = () => {
   dispatch(counterActions.increment());
  };

  const increaseHandler = () => {
   dispatch(counterActions.increase(10));
  };

(...생략)
}
전체적인 흐름도를 정리했다.