서론
바닐라 스크립트를 이용한 ToDo List 프로젝트에서 컴포넌트 단위로 개발하고자 셋팅하는 과정을 정리함
함수 기반 컴포넌트, 모듈 패턴, class를 이용한 웹 컴포넌트 등 여러 방식이 있지만 그중에서 정리할 내용은
함수 기반 컴포넌트
- JavaScript 함수를 활용하여 간단한 컴포넌트를 만들 수 있음
- 함수 내부에서 필요한 HTML을 생성하고, 필요한 이벤트 핸들러를 등록할 수 있음
- 예시
//component.js
function createComponent(text) {
  const element = document.createElement('div');
  element.innerHTML = `
    <p>${text}</p>
    <button id="incrementBtn">Increment</button>
  `;

  const incrementBtn = element.querySelector('#incrementBtn');
  incrementBtn.addEventListener('click', () => {
    // 처리 로직
    console.log('Button Clicked!');
  });

  return element;
}
const myComponent = createComponent('Hello, Function Component!');
document.getElementById('app').appendChild(myComponent);
프로젝트 적용 (1)
- root 디렉토리에 index.html, component.js, main.js를 생성 후, 아래 코드를 구현
- index.html
<!DOCTYPE html> <html lang="en"> <head> <meta charset="UTF-8"> <meta name="viewport" content="width=device-width, initial-scale=1.0"> <title>Component-based Development</title> </head> <body> <div id="app"></div> <script src="component.js"></script> <script src="main.js"></script> </body> </html> - component.js
// component.js function createComponent(text) { const element = document.createElement('div'); element.innerHTML = ` <p>${text}</p> <button id="incrementBtn">Increment</button> `; const incrementBtn = element.querySelector('#incrementBtn'); incrementBtn.addEventListener('click', () => { // 처리 로직 console.log('Button Clicked!'); }); return element; } - main.js
// main.js
document.addEventListener('DOMContentLoaded', () => {
  const appContainer = document.getElementById('app');

  // 함수를 사용하여 컴포넌트 생성
  const myComponent = createComponent('Hello, Function Component!');

  // 생성된 컴포넌트를 DOM에 추가
  appContainer.appendChild(myComponent);
});
- index.html
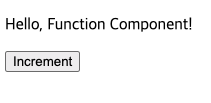
- 결과

프로젝트 적용 (2)
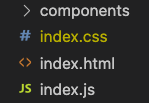
- 위 예제를 응용하여 components 폴더를 만들어 이 폴더 안에 여러 함수형 컴포넌트 파일을 관리
- 디렉토리 구조
- 코드는 다음과 같이 설정
- index.html
<!DOCTYPE html> <html lang="en"> <head> <meta charset="UTF-8"> <meta name="viewport" content="width=device-width, initial-scale=1.0"> <title>Component-based Development</title> </head> <body> <div id="app"></div> <script src="main.js"></script> </body> </html> - component.js
// component.js function createComponent(text) { const element = document.createElement('div'); element.innerHTML = ` <p>${text}</p> <button id="incrementBtn">Increment</button> `; const incrementBtn = element.querySelector('#incrementBtn'); incrementBtn.addEventListener('click', () => { // 처리 로직 console.log('Button Clicked!'); }); return element; } // 모듈로 내보내기 export { createComponent }; - main.js
// main.js
import { createComponent } from './components/component.js';

document.addEventListener('DOMContentLoaded', () => {
  const appContainer = document.getElementById('app');

  // 함수를 사용하여 컴포넌트 생성
  const myComponent = createComponent('Hello, Function Component!');

  // 생성된 컴포넌트를 DOM에 추가
  appContainer.appendChild(myComponent);
});
- index.html
프로젝트 적용 오류 (1)
- index.html 파일을 열면,
Uncaught SyntaxError: Cannot use import statement outside a module라는 오류를 콘솔창에서 맞이할 수 있다. - 오류 발생 이유: 일반적으로 모듈을 사용하려고 할 때 발생하는 오류
- 해결 방안
- 모듈 시스템은
<script type="module">을 사용하여 스크립트를 정의하거나 - 서버에서 모듈 지원을 활성화해야 함
- 모듈 시스템은
- 적용한 해결책
- index.html 파일의
<script> 태그에type= module을 추가해주면 된다.
- index.html 파일의
프로젝트 적용 오류 (2)
- 하지만 또 다른 오류를 마주하게 된다..
- 오류 발생 이유
- 이 오류는 일반적으로 로컬 파일 시스템에서 직접 HTML 파일을 열었을 때 발생하는 문제
- 웹 브라우저의 보안 정책으로 인해 로컬 파일 시스템에서는 Cross-Origin 요청이 허용되지 않음
- 해결 방안
- 로컬 서버 사용
- 적용한 해결책
-
**npx http-server**를 이용하여 로컬 서버 사용- 하지만 얘도 에러 뿜음
-
**npx serve -s** 를 사용 ⇒ 정상 작동
-
이유가 뭘까?
gpt에게 물어본 결과, 둘 다 같은 로컬 서버 실행 명령어지만 몇 가지 차이가 있다고 한다.
- 모듈 지원:
npx http-server: 기본적으로는 CommonJS 모듈 시스템을 사용합니다. 이는.mjs확장자를 사용하지 않은 일반적인 JavaScript 파일을 지원합니다.npx serve -s: ES 모듈 시스템을 기본적으로 지원합니다..mjs확장자를 사용한 ES6 모듈을 지원합니다.
- 커스터마이징 옵션:
npx http-server: 추가적인 옵션을 제공하며,http-server의 설정 파일을 사용하여 서버 동작을 커스터마이징할 수 있습니다.npx serve -s: 간단하게 사용할 수 있는 몇 가지 기본 옵션만을 제공하며,serve의 설정 파일을 사용하여 커스터마이징할 수 있습니다.
- 파일 및 디렉토리 표시:
npx http-server: 디렉토리의 목록을 표시할 때 디렉토리 내의index.html파일을 찾아서 보여줍니다.npx serve -s: 디렉토리의 목록을 표시하지 않고, 디렉토리에index.html파일이 없는 경우 404 오류를 반환합니다.
- ESM(EcmaScript Modules) 지원:
npx http-server: 기본적으로 ESM을 지원하지 않습니다.npx serve -s: ESM을 지원하며,.mjs확장자를 사용하여 ES6 모듈을 작성할 수 있습니다.
4번에서 그 이유를 찾을 수 있었다..!
프로젝트 적용 (2)에서 script type을 module로 설정하였다.
이는 즉, 웹페이지를 ESM(EcmaScript Module)로 처리하겠다는 것이고, **npx http-server 는 ESM을 지원하지 않아서 404 에러를 뿜었던 것이였다.**
고로 ESM을 지원해주는 **npx serve -s**를 통해 로컬 서버를 실행하면 해결!
결과는 프로젝트 적용 (1)의 화면과 같다.
후기
바닐라 스크립트로 함수형 컴포넌트를 만들어 관리하는 방법에 대하여 알아보았다. 페이지 별 개발보다 훨씬 간단할 것으로 예상되지만 실제로 프로젝트를 진행해봐야 알 것 같다.
추가내용
vs code에서 extension으로 live server를 설치 후, 실행 버튼을 누르면 잘 동작한다…

1일 1백준을 목표로