keycloak 설치
apiVersion: v1
kind: PersistentVolume
metadata:
  name: postgres-pv
spec:
  capacity:
    storage: 1Gi
  accessModes:
    - ReadWriteOnce
  persistentVolumeReclaimPolicy: Retain
  hostPath:
    path: /mnt/data/postgres
---
apiVersion: v1
kind: PersistentVolumeClaim
metadata:
  name: postgres-pvc
spec:
  accessModes:
    - ReadWriteOnce
  resources:
    requests:
      storage: 1Gi
---
apiVersion: v1
kind: Service
metadata:
  name: keycloak
  labels:
    app: keycloak
spec:
  type: NodePort
  ports:
    - protocol: TCP
      port: 8080
      targetPort: http
      nodePort: 30080  # 원하는 NodePort 번호로 변경 가능
      name: http
  selector:
    app: keycloak
---
apiVersion: v1
kind: Service
metadata:
  name: keycloak-discovery
  labels:
    app: keycloak
spec:
  type: NodePort
  ports:
    - protocol: TCP
      port: 8080
      targetPort: http
      nodePort: 30081  # 원하는 NodePort 번호로 변경 가능
  selector:
    app: keycloak
  publishNotReadyAddresses: true
  # clusterIP 설정을 제거합니다.
---
apiVersion: apps/v1
# Use a stateful setup to ensure that for a rolling update Pods are restarted with a rolling strategy one-by-one.
# This prevents losing in-memory information stored redundantly in two Pods.
kind: StatefulSet
metadata:
  name: keycloak
  labels:
    app: keycloak
spec:
  serviceName: keycloak-discovery
  # Run with one replica to save resources, or with two replicas to allow for rolling updates for configuration changes
  replicas: 2
  selector:
    matchLabels:
      app: keycloak
  template:
    metadata:
      labels:
        app: keycloak
    spec:
      containers:
        - name: keycloak
          image: quay.io/keycloak/keycloak:26.2.5
          args: ["start"]
          env:
            - name: KC_BOOTSTRAP_ADMIN_USERNAME
              value: "admin"
            - name: KC_BOOTSTRAP_ADMIN_PASSWORD
              value: "admin"
            # In a production environment, add a TLS certificate to Keycloak to either end-to-end encrypt the traffic between
            # the client or Keycloak, or to encrypt the traffic between your proxy and Keycloak.
            # Respect the proxy headers forwarded by the reverse proxy
            # In a production environment, verify which proxy type you are using, and restrict access to Keycloak
            # from other sources than your proxy if you continue to use proxy headers.
            - name: KC_PROXY_HEADERS
              value: "xforwarded"
            - name: KC_HTTP_ENABLED
              value: "true"
            # In this explorative setup, no strict hostname is set.
            # For production environments, set a hostname for a secure setup.
            - name: KC_HOSTNAME_STRICT
              value: "false"
            - name: KC_HEALTH_ENABLED
              value: "true"
            - name: 'KC_CACHE'
              value: 'ispn'
            # Use the Kubernetes configuration for distributed caches which is based on DNS
            - name: 'KC_CACHE_STACK'
              value: 'kubernetes'
            # Passing the Pod's IP primary address to the JGroups clustering as this is required in IPv6 only setups
            - name: POD_IP
              valueFrom:
                fieldRef:
                  fieldPath: status.podIP
            # Instruct JGroups which DNS hostname to use to discover other Keycloak nodes
            # Needs to be unique for each Keycloak cluster
            - name: JAVA_OPTS_APPEND
              value: '-Djgroups.dns.query="keycloak-discovery" -Djgroups.bind.address=$(POD_IP)'
            - name: 'KC_DB_URL_DATABASE'
              value: 'keycloak'
            - name: 'KC_DB_URL_HOST'
              value: 'postgres'
            - name: 'KC_DB'
              value: 'postgres'
            # In a production environment, use a secret to store username and password to the database
            - name: 'KC_DB_PASSWORD'
              value: 'keycloak'
            - name: 'KC_DB_USERNAME'
              value: 'keycloak'
          ports:
            - name: http
              containerPort: 8080
                #startupProbe:
                #httpGet:
                #path: /health/started
                #port: 9000
                #readinessProbe:
                #httpGet:
                #path: /health/ready
                #port: 9000
                #livenessProbe:
                #httpGet:
                #path: /health/live
                #port: 9000
          resources:
            limits:
              cpu: 2000m
              memory: 2000Mi
            requests:
              cpu: 300m
              memory: 900Mi

      #imagePullSecrets:
      #- name: harbor-credential
---
# This is deployment of PostgreSQL with an ephemeral storage for testing: Once the Pod stops, the data is lost.
# For a production setup, replace it with a database setup that persists your data.
apiVersion: apps/v1
kind: Deployment
metadata:
  name: postgres
  labels:
    app: postgres
spec:
  replicas: 1
  selector:
    matchLabels:
      app: postgres
  template:
    metadata:
      labels:
        app: postgres
    spec:
      containers:
        - name: postgres
          image: mirror.gcr.io/postgres:17
          env:
            - name: POSTGRES_USER
              value: "keycloak"
            - name: POSTGRES_PASSWORD
              value: "keycloak"
            - name: POSTGRES_DB
              value: "keycloak"
            - name: POSTGRES_LOG_STATEMENT
              value: "all"
          ports:
            - name: postgres
              containerPort: 5432
          volumeMounts:
            # Using volume mount for PostgreSQL's data folder as it is otherwise not writable
            - name: postgres-data
              mountPath: /var/lib/postgresql
      volumes:
      - name: postgres-data
        persistentVolumeClaim:
          claimName: postgres-pvc
      #imagePullSecrets:
      #- name: harbor-credential
---
apiVersion: v1
kind: Service
metadata:
  labels:
    app: postgres
  name: postgres
spec:
  selector:
    app: postgres
  ports:
    - protocol: TCP
      port: 5432
      targetPort: 5432
  type: ClusterIP
---
apiVersion: networking.k8s.io/v1
kind: Ingress
metadata:
  name: keycloak
spec:
  tls:
    - hosts:
        - keycloak.192.168.56.151.nip.io
  rules:
    - host: keycloak.192.168.56.151.nip.io
      http:
        paths:
          - path: /
            pathType: Prefix
            backend:
              service:
                name: keycloak
                port:
                  number: 8080

#접속1
https:/nodeip:30080

#접속2
https://keycloak.192.168.56.151.nip.io/admin
1. Realm 생성
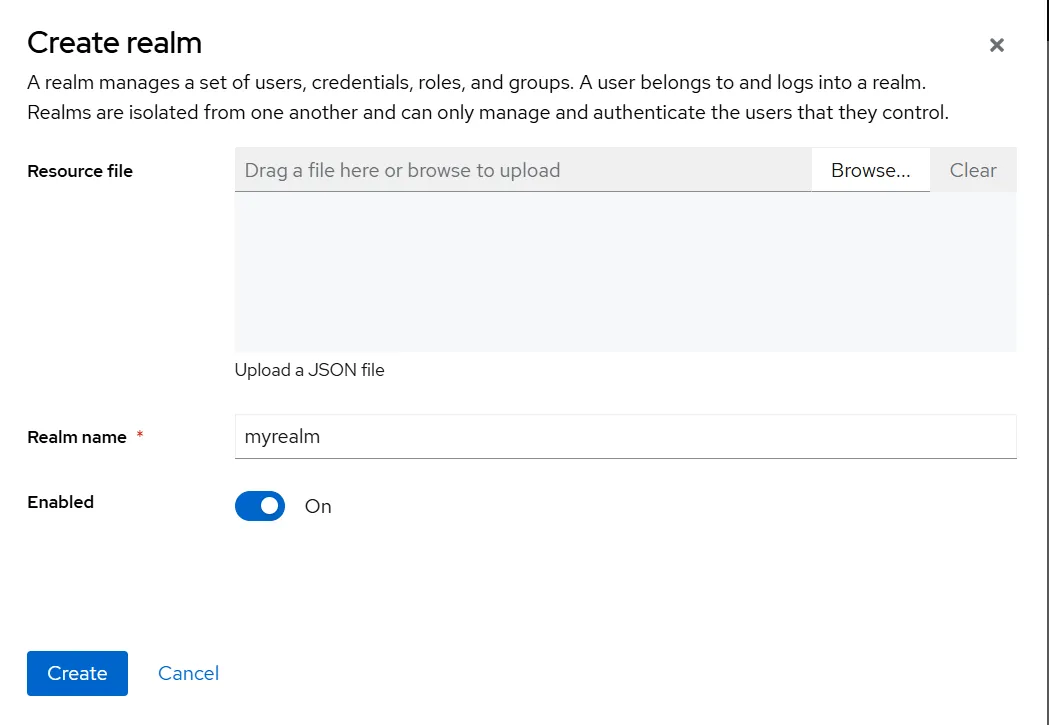
- Realm은 Keycloak에서 하나의 테넌트(tenant) 역할을 함. 각각의 Realm은 애플리케이션과 사용자 그룹을 독립적으로 관리할 수 있음.
- 처음 Keycloak을 설치하면
master라는 기본 realm이 있음.master는 Keycloak 자체 관리용이며, 실제 애플리케이션 관리는 새로운 realm을 생성해서 사용하는 것이 권장됨.
절차:
- Keycloak 관리자 콘솔에 접속
- 상단의
Current realm옆의 "Create Realm" 클릭 - Realm 이름에
myrealm입력 - "Create" 버튼 클릭
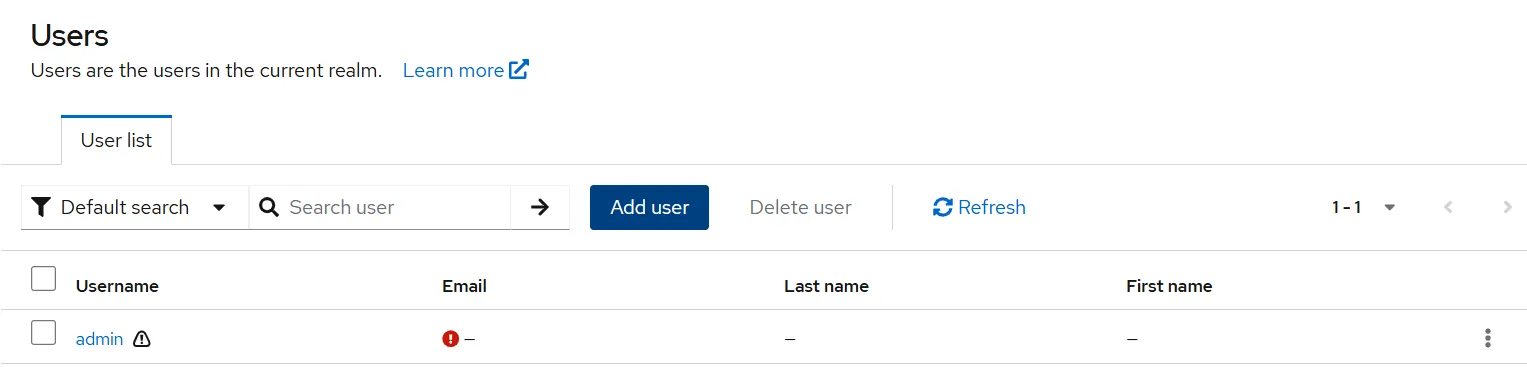
2. 사용자(User) 생성
- 방금 만든
myrealm에는 기본적으로 사용자가 없음 → 직접 생성 필요
절차:
myrealmrealm이 선택된 상태인지 확인 (좌측 상단에서 확인 가능)- 왼쪽 메뉴에서 Users 클릭
- “Add user" 클릭
- 다음과 같이 입력:
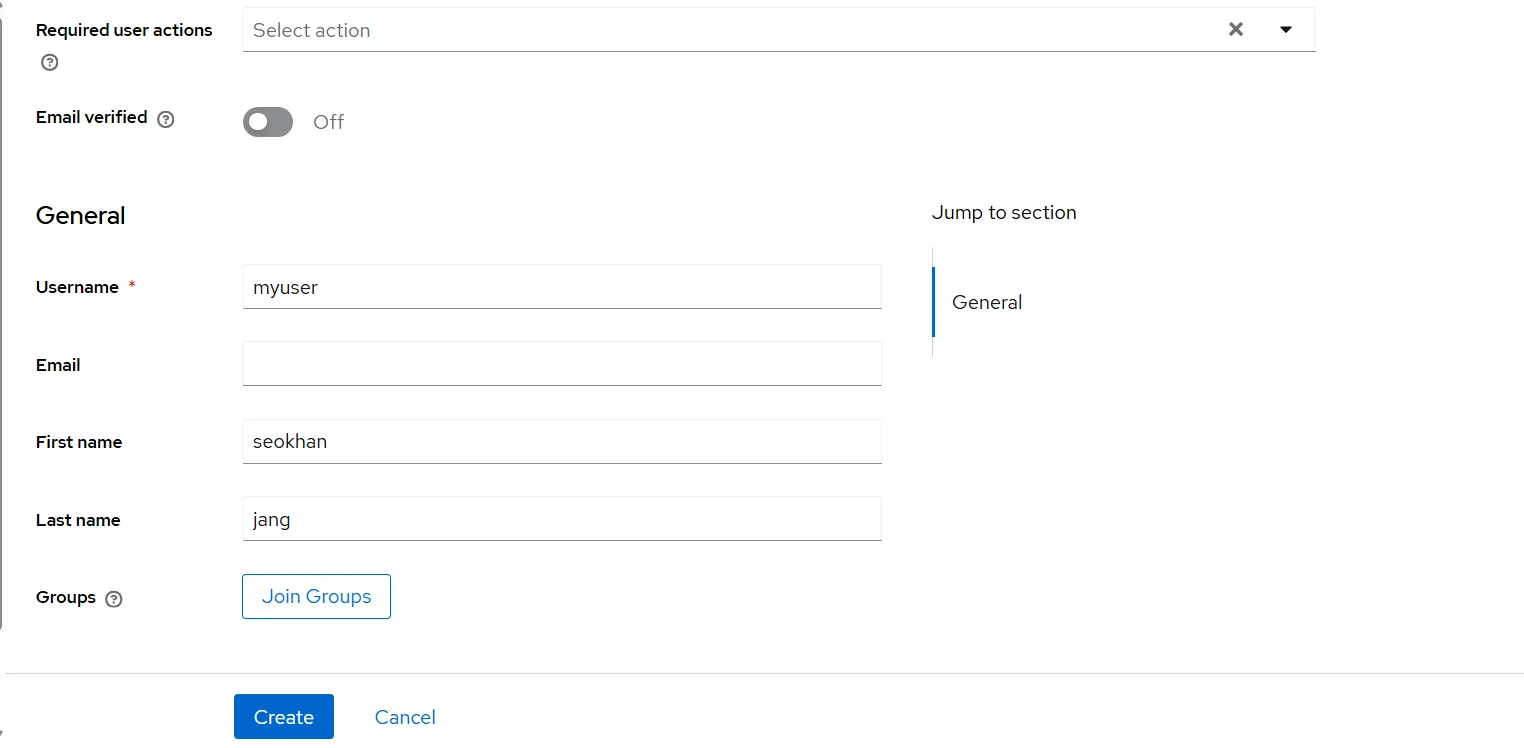
- Username:
myuser - First name: 아무 이름
- Last name: 아무 성
- "Create" 클릭
▶️ 비밀번호 설정:
- 상단 탭에서 Credentials 클릭
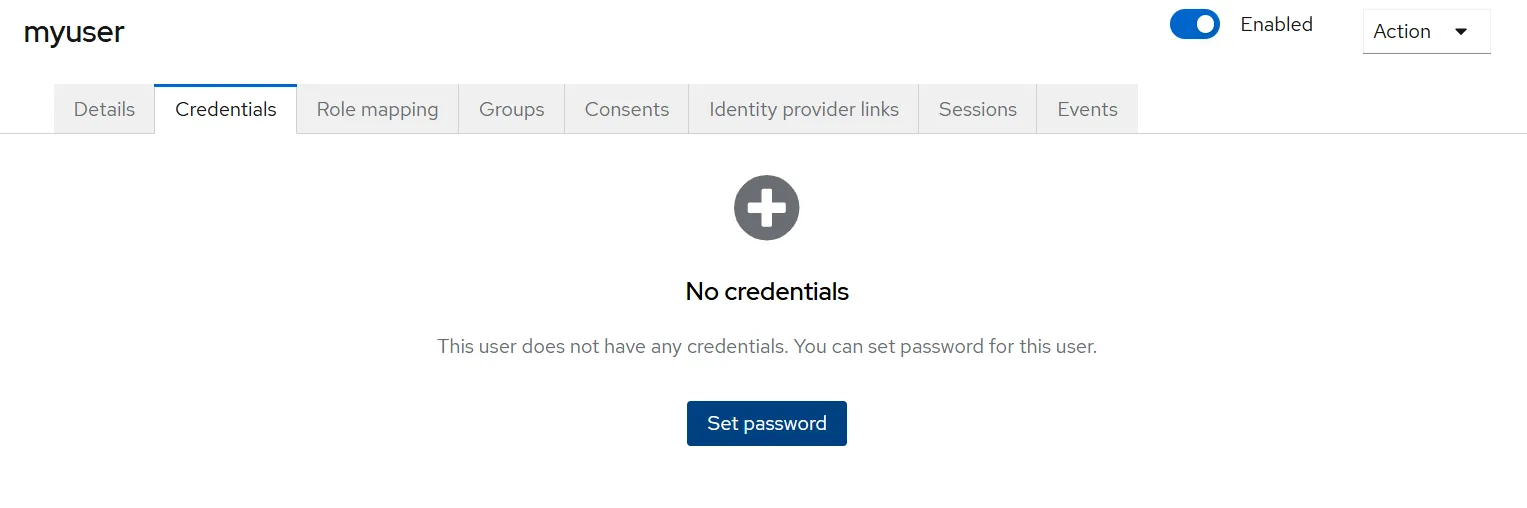
-
원하는 비밀번호 입력
-
Temporary 설정을 Off로 변경
→ 처음 로그인 시 비밀번호 변경 없이 로그인 가능하도록 설정
-
"Set password" 클릭

3. 계정 콘솔 로그인 테스트
- 방금 만든 사용자 계정으로 Keycloak의 Account Console에 로그인하여 정상 설정 확인
절차:
- 브라우저에서 Account Console 주소 열기
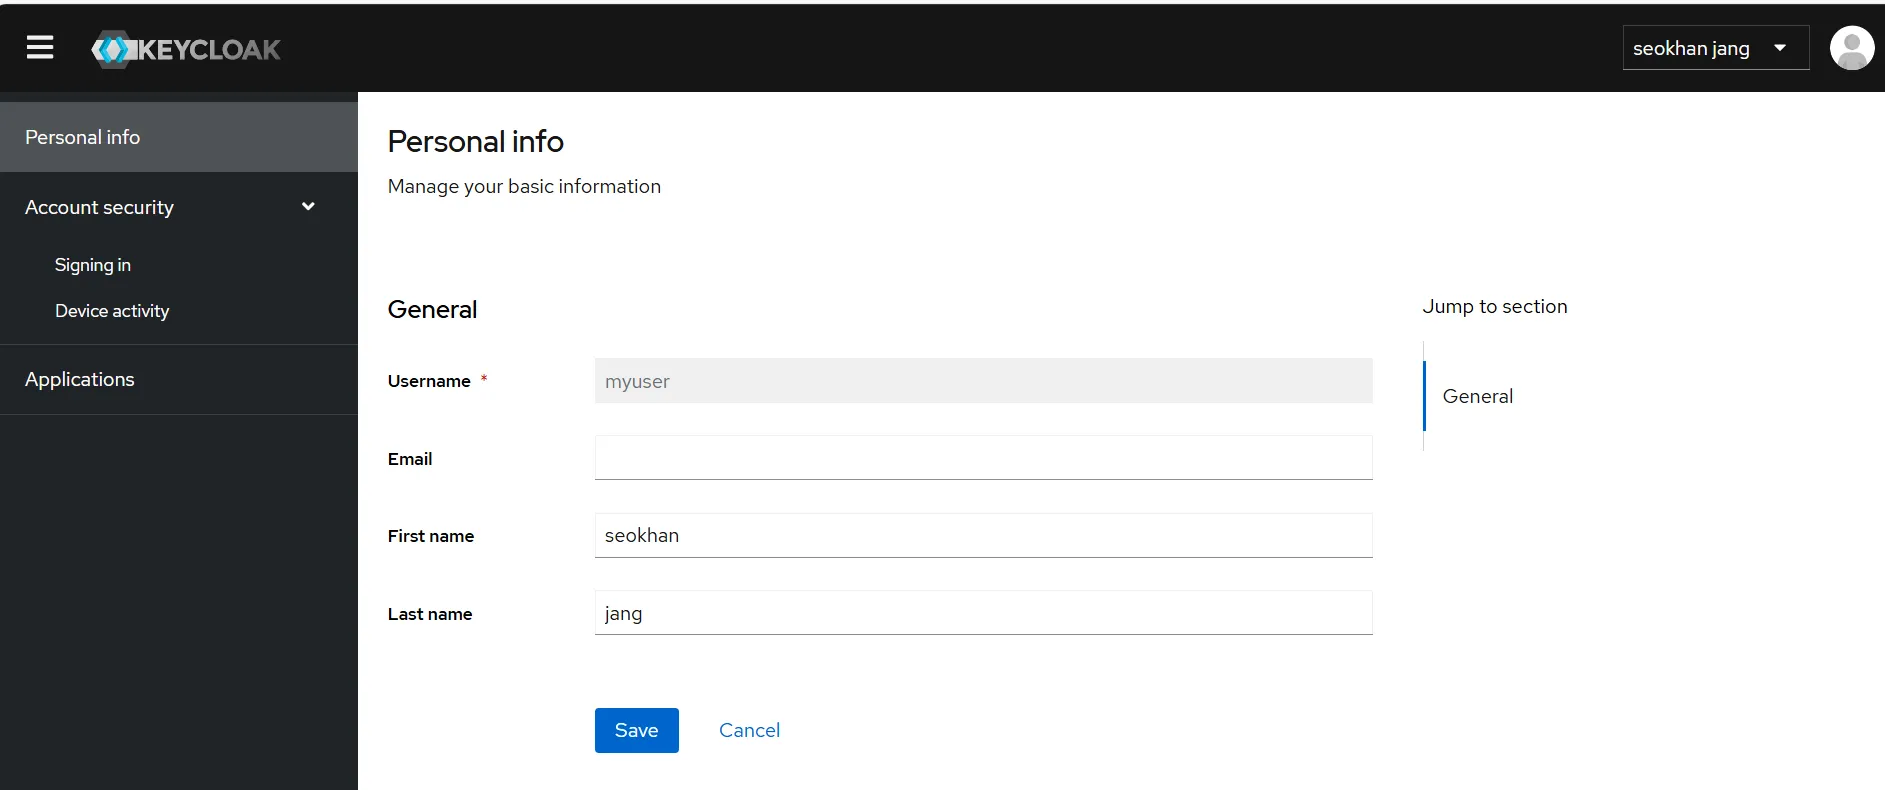
- 사용자 이름
myuser와 설정한 비밀번호로 로그인 - 로그인 후에는 다음 작업 가능:
- 프로필 수정
- 2단계 인증 설정
- 외부 인증 연동
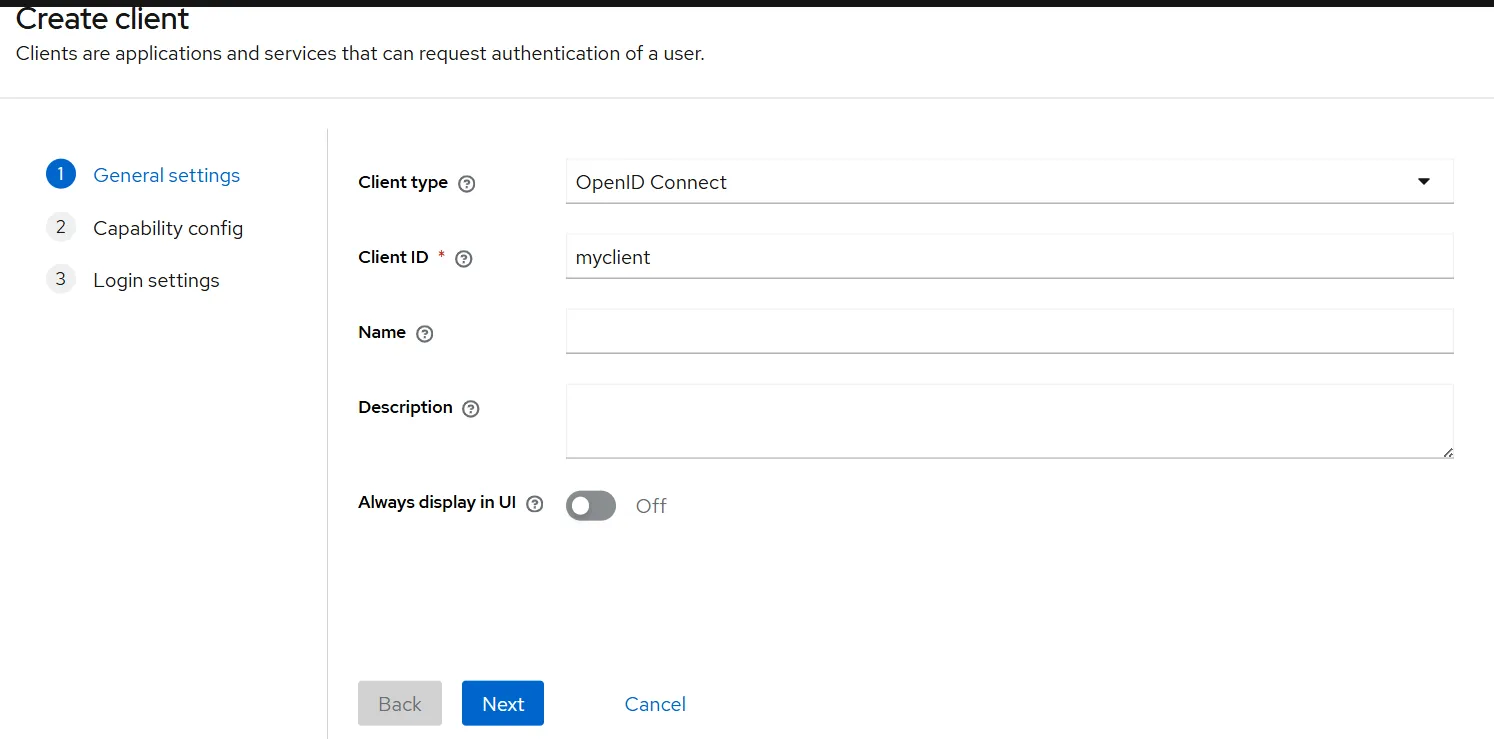
4. 첫 번째 애플리케이션 보호 설정 (클라이언트 등록)
절차:
- Keycloak Admin Console에서 myrealm 선택
- 왼쪽 메뉴에서 Clients 클릭
- "Create client" 클릭

- 다음과 같이 입력:
- Client type:
OpenID Connect - Client ID:
myclient
- Client type:
- "Next" 클릭
- Standard Flow가 활성화된 상태인지 확인
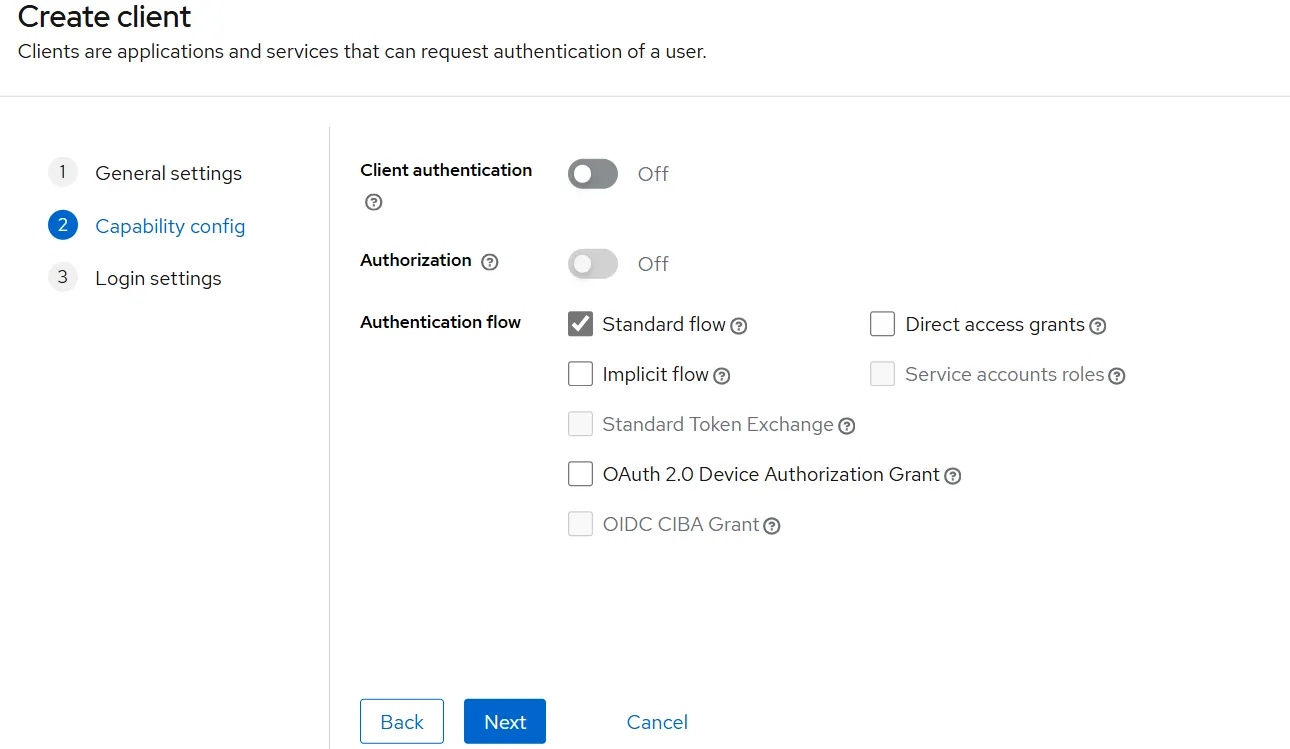
- "Next" 클릭
- 로그인 설정 변경:
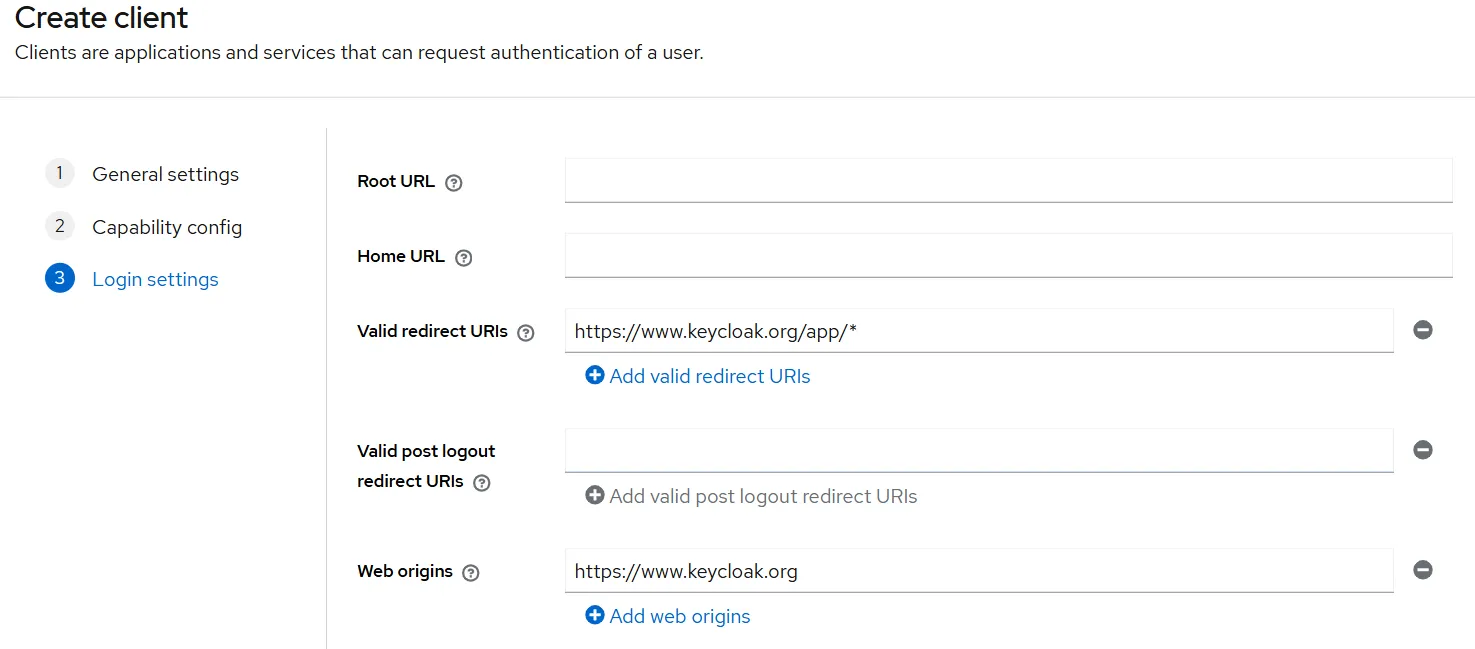
- Valid redirect URIs:
https://www.keycloak.org/app/* - Web origins:
https://www.keycloak.org
"Save" 클릭
5. 클라이언트 정상 등록 확인
- 아래 테스트 사이트에서 클라이언트 연동 확인 가능
절차:
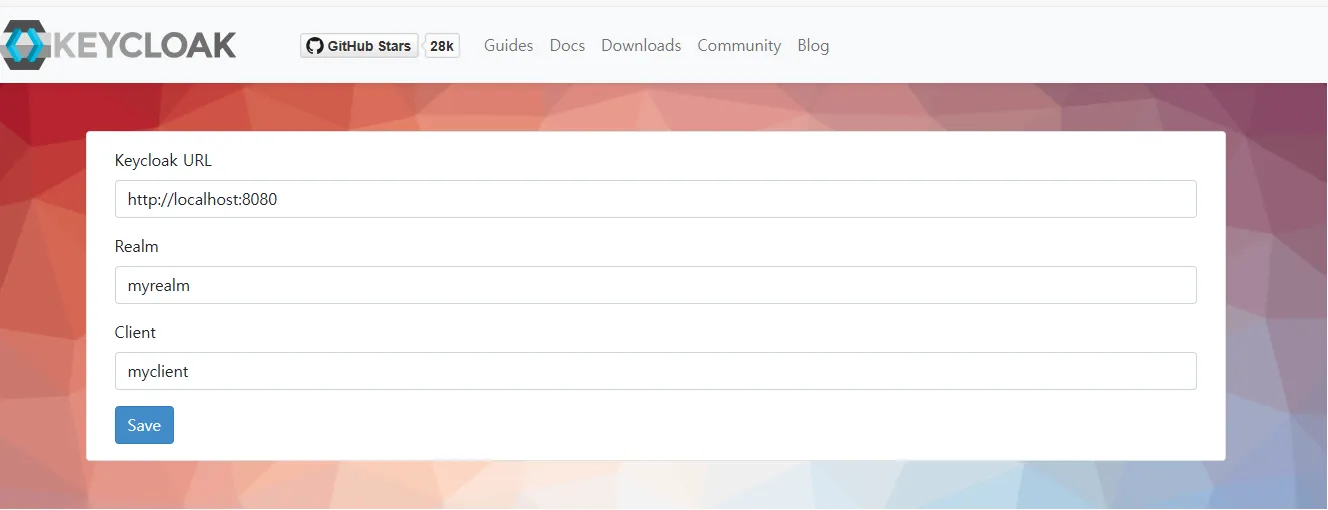
- Keycloak URL을 실제 사용하는 Keycloak 주소로 변경 (예:
http://<IP>:30080) - "Save" 클릭
- "Sign in" 클릭 → Keycloak 로그인 화면이 나오면 설정 성공
테스트용 Node 만들기
Dockerfile
FROM node:24.1-alpine

WORKDIR /app
COPY package*.json ./
RUN npm install

COPY . .
EXPOSE 3000
CMD ["npm", "start"]
app.js
const express = require('express');
const session = require('express-session');
const { Issuer } = require('openid-client');

const app = express();
const port = process.env.PORT || 3000;

// ✅ 외부 접근 가능한 Keycloak Realm URL
const keycloakUrl = process.env.KEYCLOAK_URL || 'http://192.168.56.151:30080/realms/myrealm';
const clientId = process.env.CLIENT_ID || 'myclient';
const redirectUri = process.env.REDIRECT_URI || 'http://192.168.56.151:31000/callback';

// ✅ 세션 설정 (authorization code 재사용 방지)
app.use(session({
  secret: 'oidc-secret',
  resave: false,
  saveUninitialized: true
}));

(async () => {
  const issuer = await Issuer.discover(`${keycloakUrl}/.well-known/openid-configuration`);
  const client = new issuer.Client({
    client_id: clientId,
    redirect_uris: [redirectUri],
    response_types: ['code'],
    token_endpoint_auth_method: 'none' // 🔓 public client용
  });

  // 🔐 로그인 시작
  app.get('/', (req, res) => {
    const url = client.authorizationUrl({
      scope: 'openid profile email'
    });
    res.redirect(url);
  });

  // 🔄 로그인 콜백 처리
  app.get('/callback', async (req, res) => {
    try {
      const params = client.callbackParams(req);
      const tokenSet = await client.callback(redirectUri, params);
      const userinfo = await client.userinfo(tokenSet.access_token);

      req.session.userinfo = userinfo; // ✅ 세션에 저장
      res.redirect('/profile');
    } catch (err) {
      console.error('로그인 실패:', err);
      res.status(500).send('로그인 실패');
    }
  });

  // 👤 프로필 페이지
  app.get('/profile', (req, res) => {
    if (!req.session.userinfo) {
      return res.redirect('/');
    }
    const userinfo = req.session.userinfo;
    res.send(`<h1>환영합니다 ${userinfo.preferred_username}</h1><pre>${JSON.stringify(userinfo, null, 2)}</pre>`);
  });

  // ✅ 서버 시작
  app.listen(port, '0.0.0.0', () => {
    console.log(`OIDC 앱 실행 중: http://0.0.0.0:${port}`);
  });
})();
pakage.json
{
  "name": "keycloak-oidc-demo",
  "version": "1.0.0",
  "main": "app.js",
  "scripts": {
    "start": "node app.js"
  },
  "dependencies": {
    "express": "^4.18.2",
    "express-session": "^1.17.3",
    "openid-client": "^5.4.0"
  }
}
oidc-app-deploy.yaml
apiVersion: v1
kind: Service
metadata:
  name: oidc-app
spec:
  selector:
    app: oidc-app
  ports:
  - port: 3000
    targetPort: 3000
    nodePort: 31000
    protocol: TCP
  type: NodePort
---
# OIDC 앱 배포 (Keycloak 연동)
apiVersion: apps/v1
kind: Deployment
metadata:
  name: oidc-app
spec:
  replicas: 1
  selector:
    matchLabels:
      app: oidc-app
  template:
    metadata:
      labels:
        app: oidc-app
    spec:
      containers:
      - name: oidc-app
        image: jangseokhan123/oidc:test8
        ports:
        - containerPort: 3000
        env:
        - name: KEYCLOAK_URL
          value: "http://192.168.56.151:30080/realms/myrealm"
        - name: CLIENT_ID
          value: "myclient"
        - name: REDIRECT_URI
          value: "http://192.168.56.151:31000/callback"
Kubernetes/AmazonAWS를 위한 나의 기록