오늘은 Java기반의 웹 서버인 서블릿에 대해서 알아보자
스프링 부트 서블릿 환경 구성
@ServletComponentScan
스프링 부트는 서블릿을 직접 등록해서 사용할 수 있도록 @ServletComponentScan 을 지원한다. 다음과 같이 추가하자.
package hello.servlet;
import org.springframework.boot.SpringApplication;
import org.springframework.boot.autoconfigure.SpringBootApplication;
import org.springframework.boot.web.servlet.ServletComponentScan;

@ServletComponentScan //서블릿 자동 등록
@SpringBootApplication
public class ServletApplication {
public static void main(String[] args) {
SpringApplication.run(ServletApplication.class, args);
}
서블릿 등록하기
@WebServlet(name = "helloServlet", urlPatterns = "/hello")
 public class HelloServlet extends HttpServlet {
@Override
     protected void service(HttpServletRequest request, HttpServletResponse
 response)
             throws ServletException, IOException {
         System.out.println("HelloServlet.service");
         System.out.println("request = " + request);
         System.out.println("response = " + response);
         String username = request.getParameter("username");
         System.out.println("username = " + username);
         response.setContentType("text/plain");
         response.setCharacterEncoding("utf-8");
         response.getWriter().write("hello " + username);
    }
}
- name -> servlet의 이름
- urlPatterns -> 라우팅할 url
서블릿 컨테이너 동작 방식
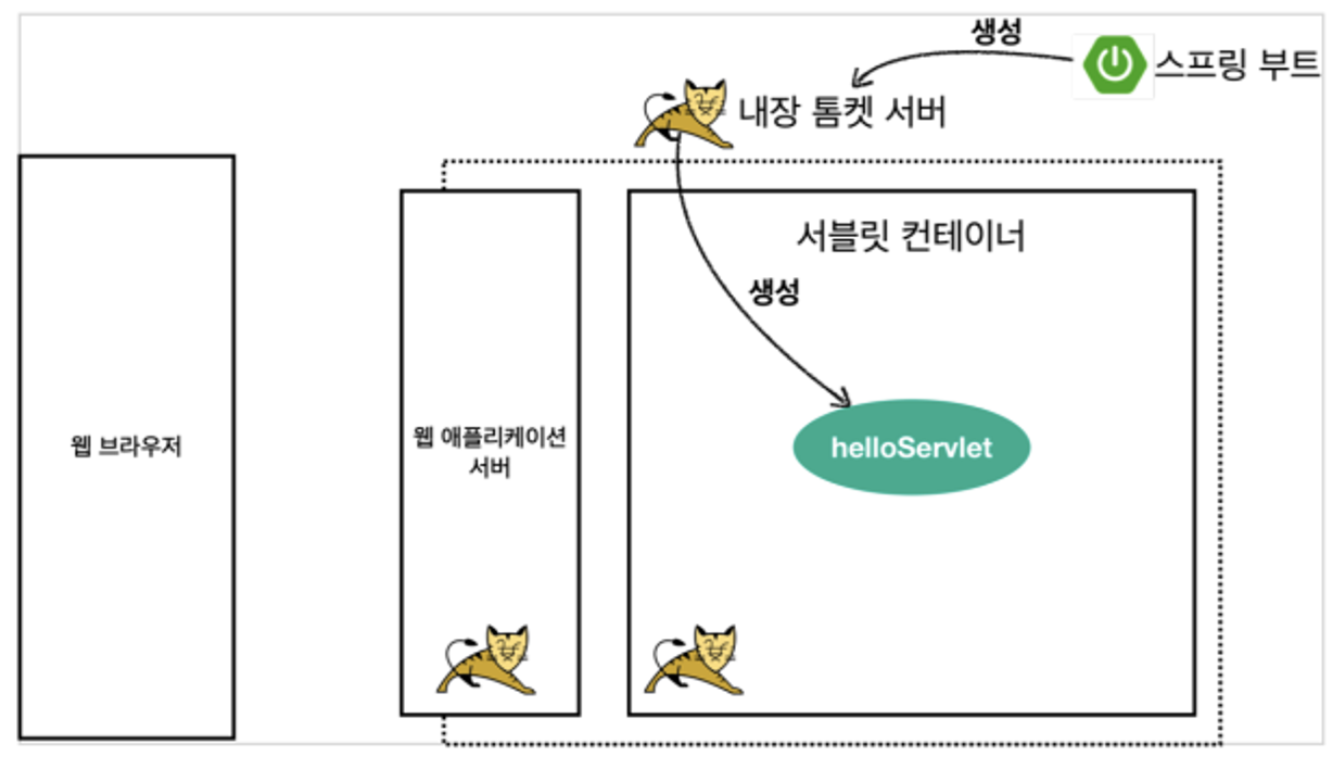
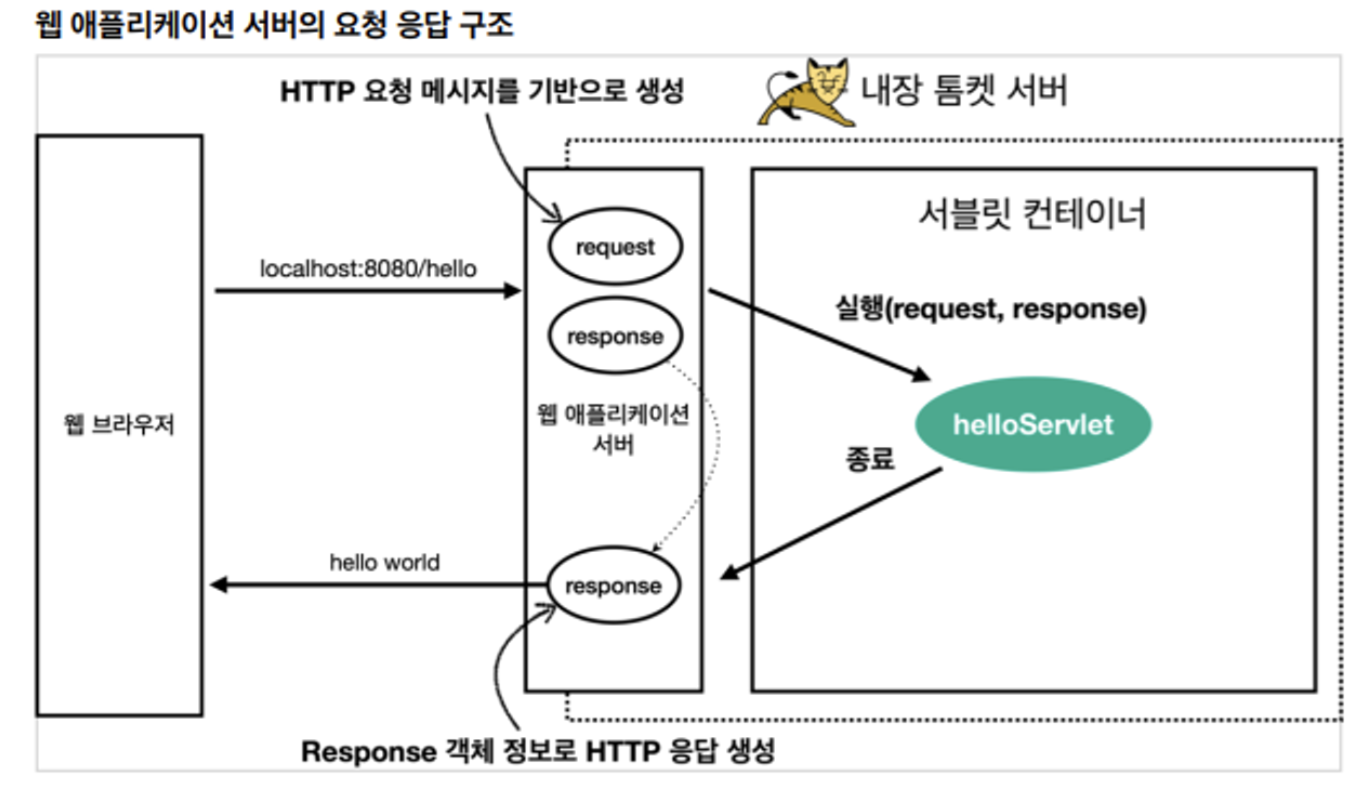
- 서블릿 컨테이너는 개발자가 웹 서버를 생성하기 위하여 소켓을 생성하고, 특정 포트에 리스팅하고, 스트림을 생성하는 등의 복잡한 일들을 할 필요가 없게 해준다.
- 그림을 보면 알 수 있듯이 서블릿 컨테이너가 8080이라는 특정 포트에 리스닝을 진행해주고
- 특정 http request가 왔을 때 개발자가 해당 http message를 파싱할 필요없이 파싱하여 request라는 객체를 만들어 넘겨준다. (http message를 파싱하는 것은 아주 번거로운 일이다. 42seoul에서 web server를 구현하면서 해봤는데 아주 힘들었다...)
- 또한 response 객체를 통하여 쉽게 http 응답 메세지를 전달할 수 있도록 기능을 제공한다.
여기서 servlet container란 무엇일까?
- 서블릿 컨테이너는 서블릿 객체의 생성, 초기화, 호출, 소멸까지의 life cycle을 관리하여 준다.
- 서블릿 컨테이너는 새로운 request가 들어올 때마다 새로운 java 스레드를 만드다.
- 그리고 이 스레드가 servlet를 호출한다.
- 매 요청마다 스레드를 생성하는 것은 비용이 많이 소모되므로 thread pool을 만들어서 관리하도록 되어있고, 사용자가 이 thread pool의 max size를 조절할 수 있도록 되어있다.
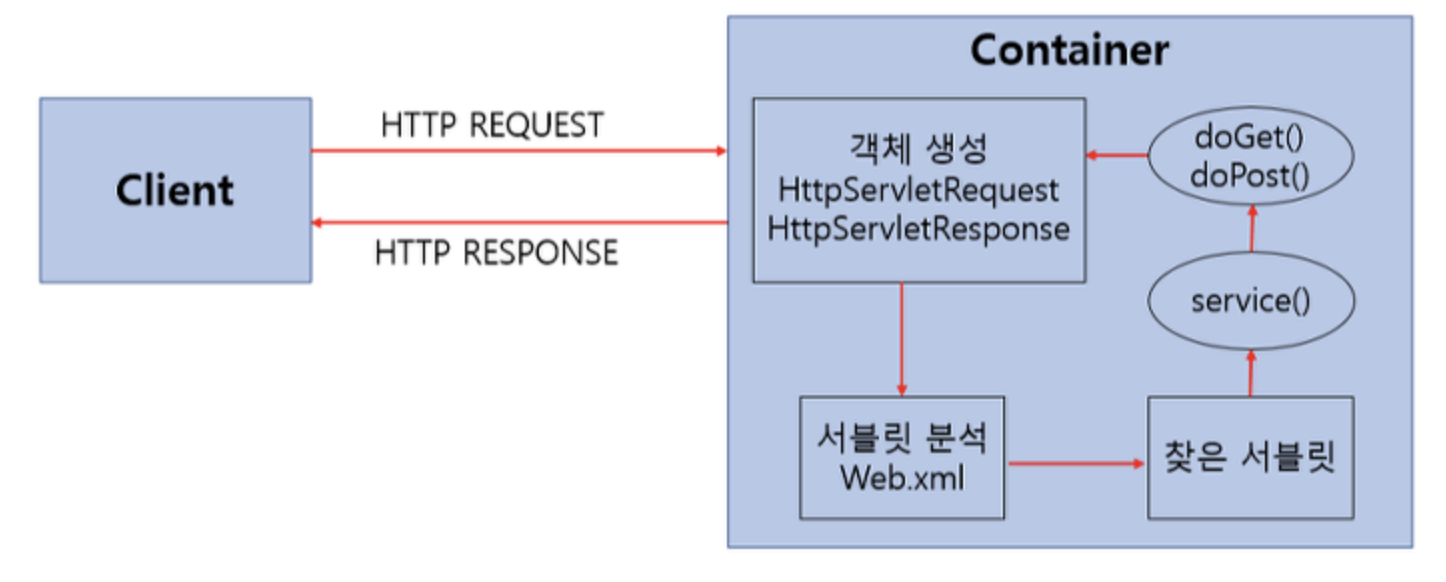
컨테이너의 동작 방식을 좀 더 자세하게 살펴보자
1. 사용자(클라이언트)가 URL을 통해 요청을 보내면 HTTP Request를 Servlet Conatiner가 받도록 bind되어있다.
2. HTTP Request를 전송받은 Servlet Container는 http message를 파싱하여 HttpServletRequest, HttpServletResponse 두 객체를 생성한다.
3. (web.xml은 사용자가) 그 다음에는 요청한 URL을 분석하여 어느 서블릿에 대해 요청을 한 것인지 라우팅한다.
4. 해당 서블릿에서 service메소드를 호출한 후 POST, GET여부에 따라 doGet() 또는 doPost()를 호출.
5. doGet() or doPost() 메소드는 적절한 처리 후 HttpServletResponse객체에 응답을 보냅니다.
6. 응답이 끝나면 HttpServletRequest, HttpServletResponse 두 객체를 소멸시킨다.
서블릿 생명주기(Servlet Lifecycle)
- init(): 서버가 켜질 때 한번만 실행
- service(): 모든 유저들의 요청들을 받는다.
- destroy(): 서버가 꺼질 때 한번만 실행
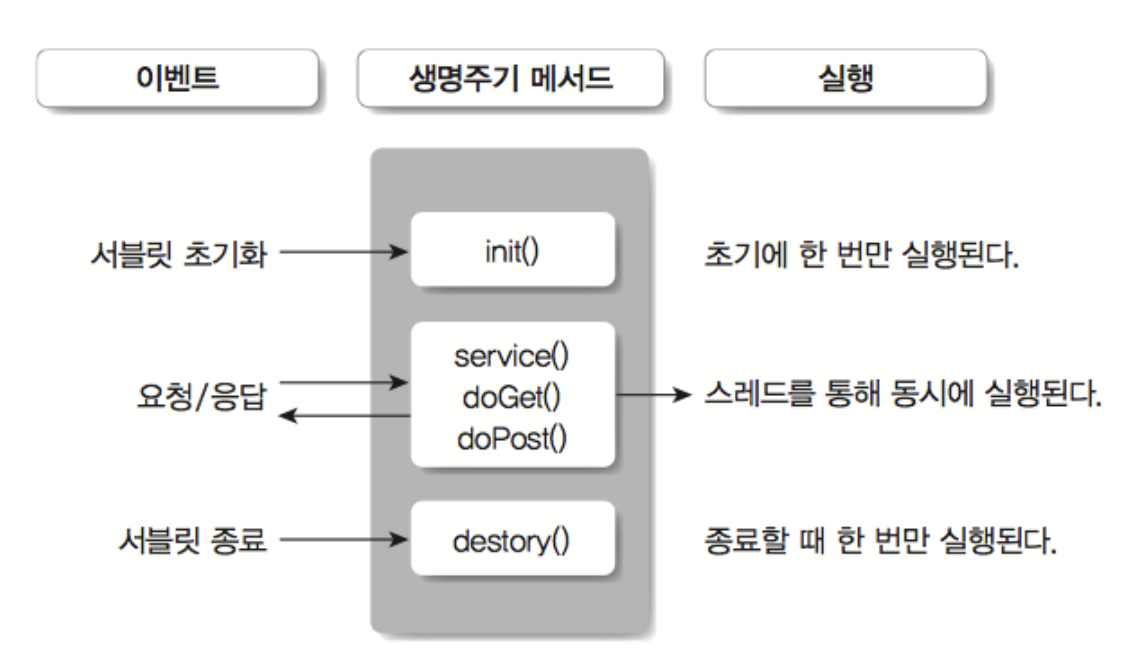
서블릿 컨테이너는 요청이 처음 들어왔을 때 현재 실행할 서블릿이 최초의 요청인지 판단하고 없으면 해당 서블릿을 새로 생성한다. 이 작업은 최초 1회만 일어난다.
- init()이 바로 최초 요청시 호출되는 메소드이다.
- service, doGet, doPost 메소드는 스레드를 통해 동시에 실행된다.
- 서블릿 컨테이너가 종료된다면 사용자 destroy 메소드가 호출된다.
참고