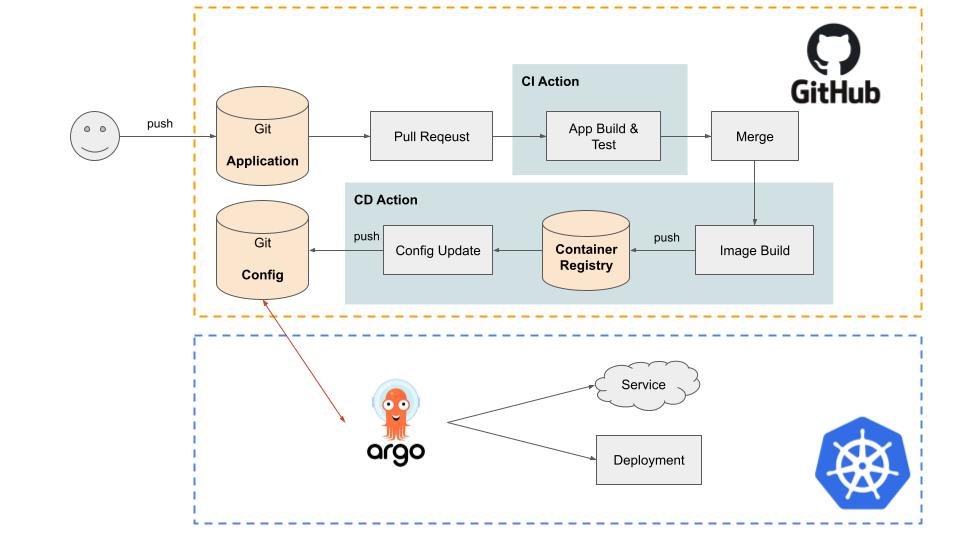
Kubernetes
이전편에서 생성한 애플리케이션 이미지를 kubernetes에 적용시켜보겠습니다.
Kubernetes 는
Kubernetes는 컨테이너화된 워크로드와 서비스를 관리하기 위한 이식성이 있고, 확장가능한 오픈소스 플랫폼이다. 쿠버네티스는 선언적 구성과 자동화를 모두 용이하게 해준다. 쿠버네티스는 크고, 빠르게 성장하는 생태계를 가지고 있다. 쿠버네티스 서비스, 기술 지원 및 도구는 어디서나 쉽게 이용할 수 있다.
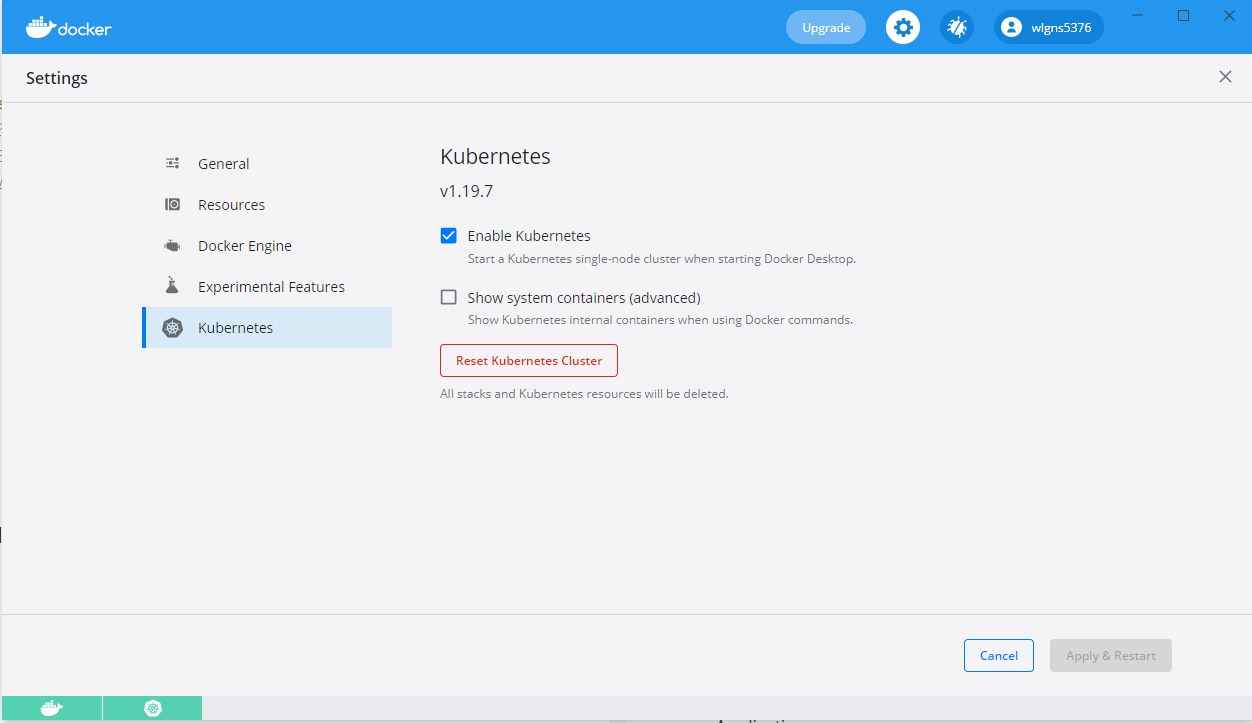
저는 Windows10 WSL2 환경으로 설치된 Docker desktop에서 바로 kubernetes를 활성화 해서 사용했습니다.
Structure
├── configmap.yaml # 설정정보
├── deployment-db.yaml # DB
├── deployment.yaml # Web Server & Application
└── secret.yaml # DB username, password
configmap
configmap.yaml
# Laravel .env
apiVersion: v1
kind: ConfigMap
metadata:
  name: example-app-config
data:
  APP_DEBUG: "false"
  APP_ENV: production
  APP_NAME: "Laravel"
  APP_KEY: "base64:DRW/xYNJlYi2AnfWyMRm4PA3QWqDrz1g3ix/DJGQ/p8="
  APP_URL: http://example-app.localhost
  DB_CONNECTION: mysql
  DB_HOST: "example-app-db"
  DB_PORT: "3306"
  DB_DATABASE: homestead
---
# PHP ini
apiVersion: v1
kind: ConfigMap
metadata:
  name: example-app-php-config
data:
  app.ini: |
    [PHP]
    # Ini customize
---
# NGINX default.conf
apiVersion: v1
kind: ConfigMap
metadata:
  name: example-app-nginx-config
data:
  default.conf: |
    server {
      listen       80;
      listen  [::]:80;
      server_name  _;
      root   /app/public;
      index index.php index.html index.htm;
      location / {
          try_files $uri $uri/ /index.php?$query_string;
      }
      location ~ \.php$ {
          fastcgi_pass 127.0.0.1:9000;
          fastcgi_index index.php;
          fastcgi_buffers 16 16k;
          fastcgi_buffer_size 32k;
          fastcgi_param SCRIPT_FILENAME $document_root$fastcgi_script_name;
          #fixes timeouts
          fastcgi_read_timeout 600;
          include fastcgi_params;
      }
      location ~ /\.ht {
          deny all;
      }
      access_log /dev/stdout;
      error_log /dev/stderr;
    }
secret
secret에는 DB username과 password를 base64로 encoding해서 설정합니다.
secret.yaml
apiVersion: v1
kind: Secret
metadata:
  name: example-app-secret
  labels:
    app: example-app
type: Opaque
data:
  DB_USERNAME: aG9tZXN0ZWFk # echo -n "homestead" | base64
  DB_PASSWORD: c2VjcmV0 # echo -n "secret" | base64
  DB_ROOT_PASSWORD: c2VjcmV0 # echo -n "secret" | base64
deployment
Service + Deployment + PersistentVolume + PersistentVolumeClaim
deployment.yaml
apiVersion: v1
kind: PersistentVolume
metadata:
  name: example-app-storage-pv-volume
  labels:
    type: local
spec:
  storageClassName: manual
  capacity:
    storage: 20Gi
  accessModes:
    - ReadWriteOnce
  hostPath:
    path: "/mnt/example-app/storage"
---
apiVersion: v1
kind: PersistentVolumeClaim
metadata:
  name: example-app-storage-pv-claim
spec:
  storageClassName: manual
  accessModes:
    - ReadWriteOnce
  resources:
    requests:
      storage: 20Gi
---
apiVersion: apps/v1
kind: Deployment
metadata:
  name: example-app
  labels:
    app: example-app
spec:
  selector:
    matchLabels:
      app: example-app
  replicas: 2
  template:
    metadata:
      labels:
        app: example-app
    spec:
      volumes:
        - name: app
          emptyDir: {}
        - name: nginx-vhost
          configMap:
            name: example-app-nginx-config
            items:
              - key: "default.conf"
                path: "default.conf"
        - name: app-php-ini
          configMap:
            name: example-app-php-config
            items:
              - key: "app.ini"
                path: "app.ini"
        - name: share-file
          persistentVolumeClaim:
            claimName: example-app-storage-pv-claim
      initContainers:
        - name: migrate
          image: ghcr.io/wlgns5376/example-app:eb3a4e8a
          command: ["/bin/sh", "-c", "php artisan migrate --force"]
          env:
            - name: DB_USERNAME
              valueFrom:
                secretKeyRef:
                  name: example-app-secret
                  key: DB_USERNAME
            - name: DB_PASSWORD
              valueFrom:
                secretKeyRef:
                  name: example-app-secret
                  key: DB_PASSWORD
          envFrom:
            - configMapRef:
                name: example-app-config
      containers:
        - name: app
          image: ghcr.io/wlgns5376/example-app:eb3a4e8a
          imagePullPolicy: IfNotPresent
          volumeMounts:
            - name: app
              mountPath: /app
            - name: app-php-ini
              mountPath: /usr/local/etc/php/conf.d/app.ini
            - name: share-file
              mountPath: /app/storage
          env:
            - name: DB_USERNAME
              valueFrom:
                secretKeyRef:
                  name: example-app-secret
                  key: DB_USERNAME
            - name: DB_PASSWORD
              valueFrom:
                secretKeyRef:
                  name: example-app-secret
                  key: DB_PASSWORD
          envFrom:
            - configMapRef:
                name: example-app-config
          ports:
            - name: phpfpm
              containerPort: 9000
              protocol: TCP
          lifecycle:
            postStart:
              exec:
                # /app 폴더는 비어있기 때문에 App 코드를 복사합니다.
                command:
                  - /bin/sh
                  - -c
                  - cp -rf /var/www/html/. /app && cd /app && sh deploy.sh && chown -R www-data:www-data storage
        - name: nginx
          image: nginx:1.19-alpine
          ports:
            - name: http
              containerPort: 80
          volumeMounts:
            - name: nginx-vhost
              mountPath: /etc/nginx/conf.d
            - name: app
              mountPath: /app
            - name: share-file
              mountPath: /app/storage
---
apiVersion: v1
kind: Service
metadata:
  name: example-app
spec:
  selector:
    app: example-app
  ports:
    - name: http
      port: 80
      protocol: TCP
    - name: phpfpm
      port: 9000
      protocol: TCP
Application 이미지는 앞서 생성한 Container Registry에 등록된 이미지를 사용합니다.
NGINX에서 App의 public 폴더에 접근하기 위해 app 볼륨을 추가해서 /app 폴더에 mount 했고
ReplicaSet으로 Pod이 2개 이상 생성되게 설정해서 /app/storage를 Pod간에 공유하기 위해 PersistentVolume을 생성해서 mount 했습니다.
초기화 컨테이너에서 migrate 실행이 되게 추가합니다.
DB deployment
deployment-db.yaml
apiVersion: v1
kind: PersistentVolume
metadata:
  name: example-app-db-pv-volume
  labels:
    type: local
spec:
  storageClassName: manual
  capacity:
    storage: 20Gi
  accessModes:
    - ReadWriteOnce
  hostPath:
    path: "/mnt/example-app/db"
---
apiVersion: v1
kind: PersistentVolumeClaim
metadata:
  name: example-app-db-pv-claim
spec:
  storageClassName: manual
  accessModes:
    - ReadWriteOnce
  resources:
    requests:
      storage: 20Gi
---
apiVersion: apps/v1
kind: Deployment
metadata:
  name: example-app-db
  labels:
    app: example-app-db
spec:
  selector:
    matchLabels:
      app: example-app-db
  strategy:
    type: Recreate
  template:
    metadata:
      labels:
        app: example-app-db
    spec:
      containers:
        - image: mariadb:10
          name: mysql
          env:
            # Use secret in real usage
            # - name: MYSQL_ALLOW_EMPTY_PASSWORD
            #   value: 'yes'
            - name: MYSQL_DATABASE
              valueFrom:
                configMapKeyRef:
                  name: example-app-config
                  key: DB_DATABASE
            - name: MYSQL_USER
              valueFrom:
                secretKeyRef:
                  name: example-app-secret
                  key: DB_USERNAME
            - name: MYSQL_PASSWORD
              valueFrom:
                secretKeyRef:
                  name: example-app-secret
                  key: DB_PASSWORD
            - name: MYSQL_ROOT_PASSWORD
              valueFrom:
                secretKeyRef:
                  name: example-app-secret
                  key: DB_ROOT_PASSWORD
          ports:
            - containerPort: 3306
              name: mysql
          volumeMounts:
            - name: mysql-persistent-storage
              mountPath: /var/lib/mysql
      volumes:
        - name: mysql-persistent-storage
          persistentVolumeClaim:
            claimName: example-app-db-pv-claim
---
apiVersion: v1
kind: Service
metadata:
  name: example-app-db
spec:
  ports:
  - port: 3306
  selector:
    app: example-app-db
  clusterIP: None
Create
namespace를 생성하고 파일을 apply 합니다.
kubectl create ns example-app
kubectl apply -f . -n example-app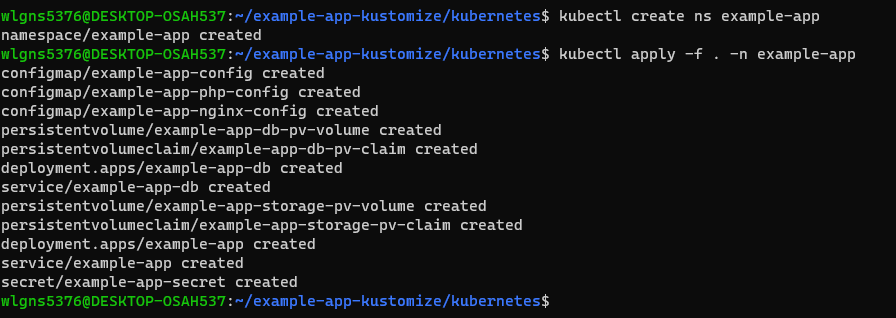
잘 생성되었는지 확인합니다.
kubectl get all -n example-app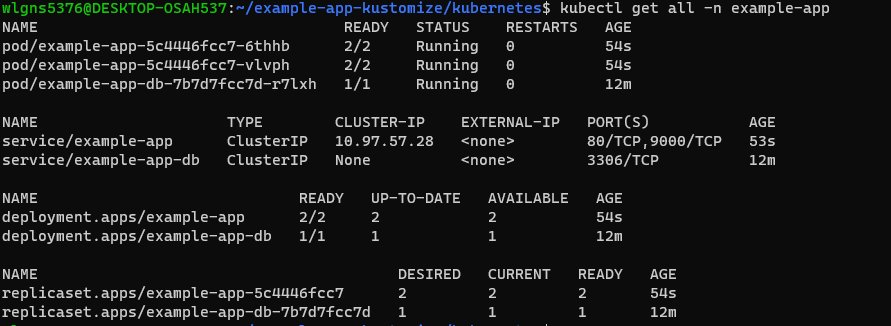
STATUS가 Running이 되었다면 이제 브라우저로 접속하기위해 port-forward 합니다.
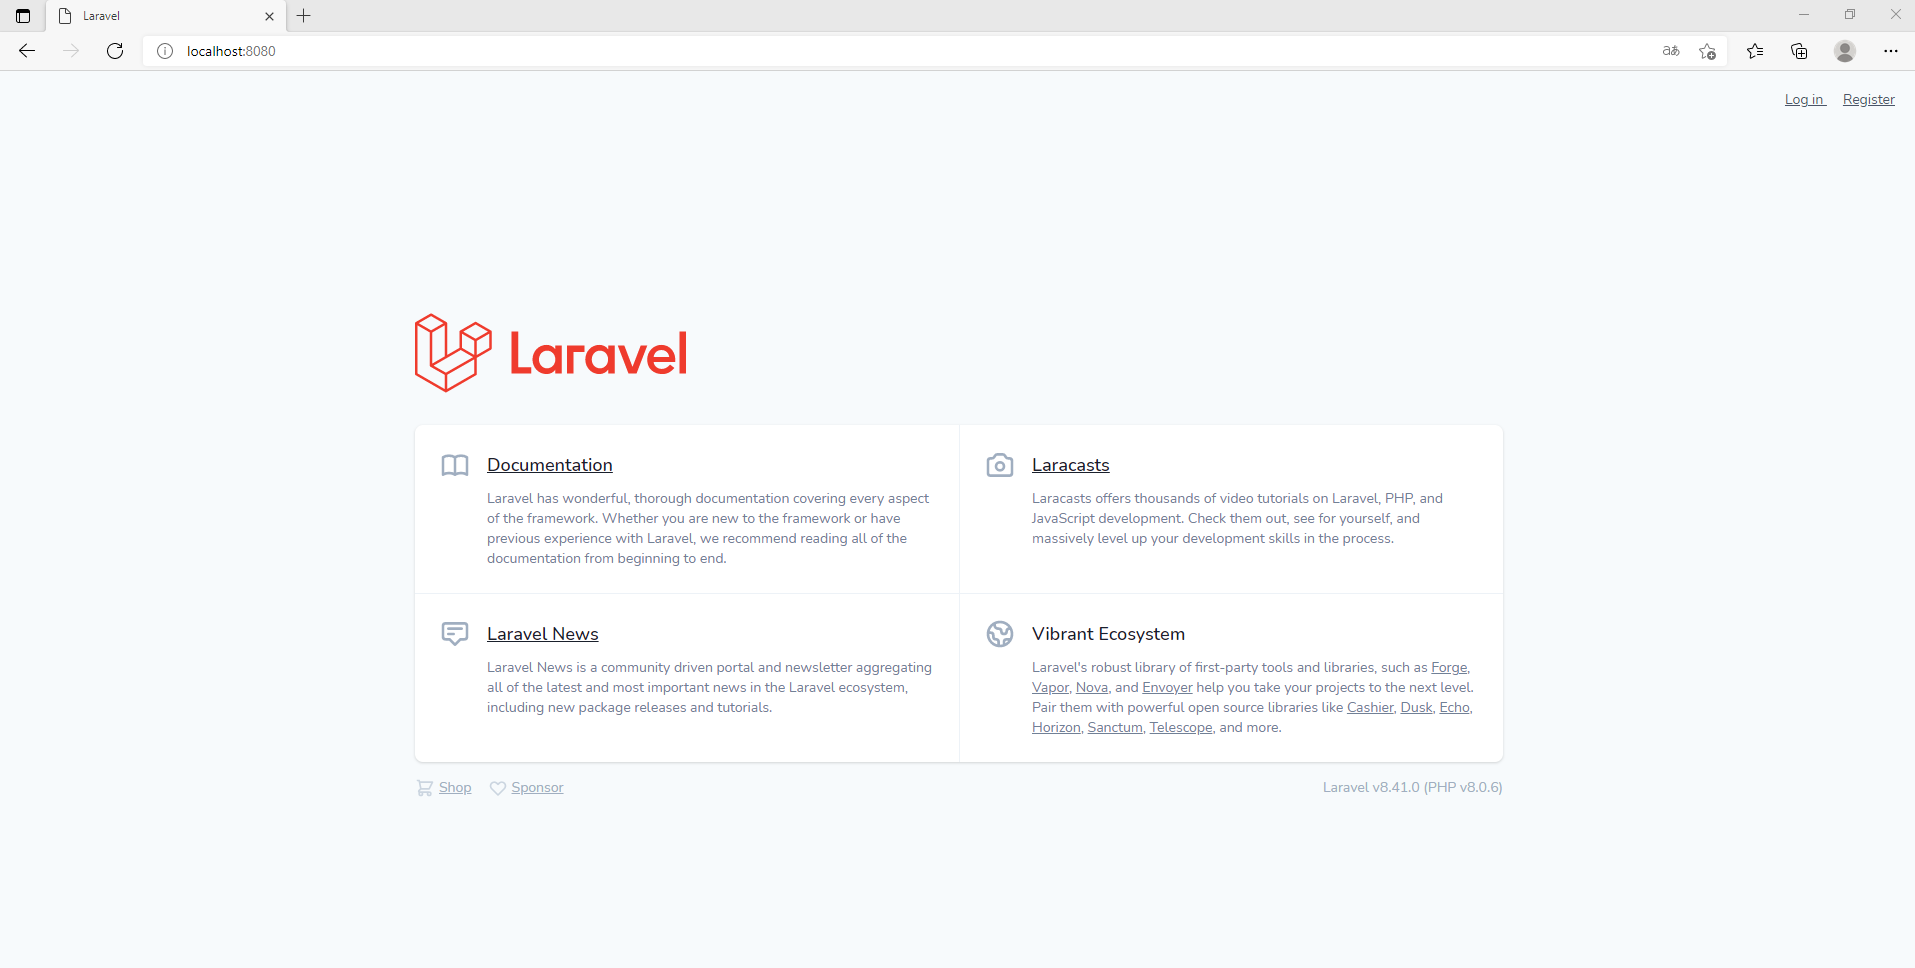
kubectl port-forward -n example-app example-app-5c4446fcc7-6thhb 8080:80localhost:8080으로 접속하면 아래와 같이 나옵니다.
Note
만약 브라우저로 접속했을때 500 에러가 난다면 APP_KEY 가 있는지와 route cache, config cache를 확인해보세요.
Next
다음은 Kustomize로 kubernetes 구성을 사용자 정의화 하고
ArgoCD를 이용해 자동으로 kubernetes에 배포되는 환경을 구성해보겠습니다.
References:
- 쿠버네티스: https://kubernetes.io
- Laravel: https://laravel.com/docs/8.x