
플러터 공부중 FutureBuiler에 관해 궁금한게 많이 생기기도 했고, 많이 헷갈려서 따로 정리
FutureBuilder?
- 플러터에서 사용되는 위젯들 중 하나이다.
- 특별한 점은, Dart의
Future객체와 함께 사용된다.Future 객체란?
Future객체는 아직 생성되지 않았지만, 미래의 어느 시점에 값을 가질 수 있는 객체를 나타낸다
Future에.then,.catchError,.whenComplete등의 메서드를 체인으로 연결하여,Future가 완료될 때 실행될 콜백 함수를 등록할 수 있다. FutureBuilder는 이Future를 받아서,Future가 아직 완료되지 않았을 때, 또는 완료되었을 때 어떤 위젯을 렌더링할지를 결정하는 데 사용된다.- Stateful위젯을
extends해서FutureBuilder자체가 이미 Statful위젯이다. 즉, Stateless위젯 내에서도 혼자 상태변경을 할 수 있는 위젯이다. - 간단한 사용예시
FutureBuilder<String>(
  future: dio.get(url),  // Future 반환하는 비동기 함수
  builder: (BuildContext context, AsyncSnapshot<String> snapshot) {
    if (snapshot.connectionState == ConnectionState.waiting) {
      return CircularProgressIndicator();  // 데이터가 아직 로딩 중인 경우
    } else if (snapshot.hasError) {
      return Text('Error: ${snapshot.error}');  // 에러가 발생한 경우
    } else {
      return Text('Loaded: ${snapshot.data}');  // 데이터 로딩이 완료된 경우
    }
  },
)- 이전에
dio를 사용할 때에는dio선언하고 데이터를 받아오고 빈 리스트나 맵에setState()를 통해서 값을 변경해주는 식으로 여러번의 작업이 필요했다. 또한 데이터를 받아오는 동안 들어오는null처리를 해주는 것도 따로 작업을 해주어야했다. - 그러나
FutureBuilder에서는snapshot을 통해 현재 연결상태에 따라 쉽게 핸들링이 가능하다.
FutureBuilder 함수의 future, builder 파라미터
다른 것들보다 future, builder가 상당히 헷갈렸다.
- future
- 위 예제에서 알 수 있듯이
future파라미터에는 비동기 함수가 들어가야한다.
future: dio.get(url), - 위 예제에서 알 수 있듯이
future에 아무 값도 넣지 않으면connectionState.none이 되고,snapshot의data는null이다.- builder
builder파라미터는context와snapshot을 인자로 받는다
builder: (BuildContext context, AsyncSnapshot<String> snapshot)- 함수 내에서는
future의 상태가 변경되면 다시 build할 코드를 작성한다.
FutureBuilder의 Caching
FutureBuilder는build를 다시 실행해도 바뀌기 전까지 기존 값을 기억하고 있다.- 예시와 실행
import 'dart:math';
import 'package:flutter/material.dart';
class FutureBuilderTest extends StatefulWidget {
const FutureBuilderTest({super.key});
State<FutureBuilderTest> createState() => _FutureBuilderTestState();
}
class _FutureBuilderTestState extends State<FutureBuilderTest> {
Widget build(BuildContext context) {
final textStyle = TextStyle(fontSize: 16.0);
return Scaffold(
body: Padding(
padding: const EdgeInsets.all(8.0),
child: FutureBuilder(
future: getNumber(), // 비동기 함수
builder: (context, snapshot) {
return Column(
mainAxisAlignment: MainAxisAlignment.center,
crossAxisAlignment: CrossAxisAlignment.stretch,
children: [
Text(
'FutureBuilder',
style: textStyle.copyWith(
fontWeight: FontWeight.bold,
fontSize: 20.0,
),
),
Text(
'ConState : ${snapshot.connectionState}',
style: textStyle,
),
Text(
'Data : ${snapshot.data}',
style: textStyle,
),
Text(
'ConState : ${snapshot.error}',
style: textStyle,
),
ElevatedButton(
onPressed: () {
setState(() {});
},
child: Text('Set State'),
),
],
);
},
),
),
);
}
}
// Future<int> 타입을 반환하는 함수
Future<int> getNumber() async {
// 3초 지연
await Future.delayed(
Duration(seconds: 3),
);
final random = Random();
// 0 ~ 100까지의 숫자 중 랜덤으로 하나 생성
return random.nextInt(100);
}
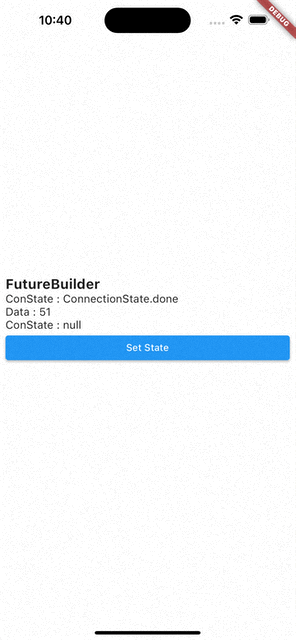
- 코드를 처음부터 다시 실행시키면
ConnectionState.waiting,Data:null - 화면에 보이는 Set State 버튼을 눌러서
setState()를 통해 다시 빌드 시키면Data는 이전 값을 기억하고 있다가ConnectionState.waiting이ConnectionState.done으로 바뀌면 값이 바뀐다.
즉, FutureBuilder는 캐싱 기능이 있다.
만약 아래와 같이 ConnectionState.waiting일 때마다 매번 인디케이터를 보여준다면, 사용자 입장에서는 답답하게 느껴질 수 있다.
이럴 때에 FutureBuilder가 가진 캐싱을 이용하면 제일 처음 빌드할 때에만 인디케이터를 보여주고 이후는 이전 값을 보여주다가, 값이 바뀌면 바뀐 값으로 보여주는 게 나은 선택일 것이다.
if (snapshot.connectionState == ConnectionState.waiting)
              return Center(
                child: CircularProgressIndicator(),
);- 실행
- 수정된 코드
if (!snapshot.hasData)
              return Center(
                child: CircularProgressIndicator(),
              );
데이터가 없을 때(제일 처음 빌드할 때)만 인디케이터를 보여주고, 이후 버튼을 누르면 값만 바꾸어준다.
- 실행


Flutter 개발자가 되어보자!