1. 개발 환경 셋업
-
장고 설치: pip install django
-
상위 폴더에서(cd ..: 경로 삭제) 프로젝트 생성: django-admin startproject 프로젝트이름 -> 프로젝트 open 하기
-
가상환경 세팅: File -> settings -> project이름 -> python interpreter -> add로 가상환경 생성
가상환경 열기: 경로(venv/Scripts)에서 activate -
장고 다시 설치: pip install django
-
python manage.py runserver -> 서버 실행이 가능하다
2. 기본적인 view 만들기
manage.py
1) 서버 실행- python manage.py runserver (서버 끄기: ctrl c)
2) application 만들기- python manage.py startapp 앱이름 (→ setting.py의 installed_apps에 ‘어플리케이션이름’ 추가)
3) DB초기화 및 변경사항 반영- python manage.py migrate
4) 관리자 계정 생성- python manage.py createsuperuser
view 기본적인 작성 방법
python manage.py startapp accountapp
->accountapp 생성 후 accountapp 폴더에 view.py가 생성된다.
- view.py 에서 함수를 만든다.
- project폴더의 urls.py에 앱 접근 url을 만든다.
ex)path('앱이름(주소로 보일)/', include('accountapp.urls')) - account 앱 내부에 urls.py 를 생성하고 url을 연결한다.
ex)path(hello_world(주소로 보일)/, hello_world(함수 이름), name='hello_world') - urls.py에 urlpatterns위에 app name 추가
ex)app_name = "accountapp"
-> render(accountapp:hello_world(name)) 이런식으로 함수에서 간단하게 사용가능
-> 주소로 접근하면 path로 확인하고 함수로 이동 후 리턴한다.
3. Gitignore
- 최상위 폴더에서 .gitignore file 생성
- 붙여넣기
# Covers JetBrains IDEs: IntelliJ, RubyMine, PhpStorm, AppCode, PyCharm, CLion, Android Studio, WebStorm and Rider
# Reference: https://intellij-support.jetbrains.com/hc/en-us/articles/206544839

# User-specific stuff
.idea/**/workspace.xml
.idea/**/tasks.xml
.idea/**/usage.statistics.xml
.idea/**/dictionaries
.idea/**/shelf

# AWS User-specific
.idea/**/aws.xml

# Generated files
.idea/**/contentModel.xml

# Sensitive or high-churn files
.idea/**/dataSources/
.idea/**/dataSources.ids
.idea/**/dataSources.local.xml
.idea/**/sqlDataSources.xml
.idea/**/dynamic.xml
.idea/**/uiDesigner.xml
.idea/**/dbnavigator.xml

# Gradle
.idea/**/gradle.xml
.idea/**/libraries

# Gradle and Maven with auto-import
# When using Gradle or Maven with auto-import, you should exclude module files,
# since they will be recreated, and may cause churn.  Uncomment if using
# auto-import.
# .idea/artifacts
# .idea/compiler.xml
# .idea/jarRepositories.xml
# .idea/modules.xml
# .idea/*.iml
# .idea/modules
# *.iml
# *.ipr

# CMake
cmake-build-*/

# Mongo Explorer plugin
.idea/**/mongoSettings.xml

# File-based project format
*.iws

# IntelliJ
out/

# mpeltonen/sbt-idea plugin
.idea_modules/

# JIRA plugin
atlassian-ide-plugin.xml

# Cursive Clojure plugin
.idea/replstate.xml

# SonarLint plugin
.idea/sonarlint/

# Crashlytics plugin (for Android Studio and IntelliJ)
com_crashlytics_export_strings.xml
crashlytics.properties
crashlytics-build.properties
fabric.properties

# Editor-based Rest Client
.idea/httpRequests

# Android studio 3.1+ serialized cache file
.idea/caches/build_file_checksums.ser

venv/

.env

db.sqlite3

__pycache__/
SECRET_KEY 숨기기
- 프로젝트에 settings.py에 있는 SECRET_KEY를 숨긴다.
- pip install django-environ로 설치
- settings.py에 추가
import environ
import os

env = environ.Env(
    # set casting, default value
    DEBUG=(bool, False)
)

# Build paths inside the project like this: BASE_DIR / 'subdir'.
BASE_DIR = Path(__file__).resolve().parent.parent

#reading .env file
environ.Env.read_env(
    env_file=os.path.join(BASE_DIR, '.env')
)

# Quick-start development settings - unsuitable for production
# See https://docs.djangoproject.com/en/4.1/howto/deployment/checklist/

# SECURITY WARNING: keep the secret key used in production secret!
SECRET_KEY = env('SECRET_KEY')
- 프로젝트에 .env file을 새로 만든다.
- .env에 추가
DEBUG=on
SECRET_KEY=your-secret-key
DATABASE_URL=psql://user:un-githubbedpassword@127.0.0.1:8458/database
SQLITE_URL=sqlite:///my-local-sqlite.db
CACHE_URL=memcache://127.0.0.1:11211,127.0.0.1:11212,127.0.0.1:11213
REDIS_URL=rediscache://127.0.0.1:6379/1?client_class=django_redis.client.DefaultClient&password=ungithubbed-secret- setting.py에 secret key 지우고
SECRET_KEY = env('SECRET_KEY')입력
4. git 활성화
- tool바에 vcs -> Enable version control ... -> Git
- git bash에서 git add . 하고 git commit -m "first commit"
git 상태 보기: git status
(app에 있는 pycache폴더 다 삭제)
삭제 후 add commit 필수
5. Django Template
html연결하기
view의 함수에서 html로 연결하려면
settings.py에 TEMPLATES에 'DIRS': [os.path.join(BASE_DIR, 'templates')],
return render(request, 'template이름.html')
html 뼈대 만들기
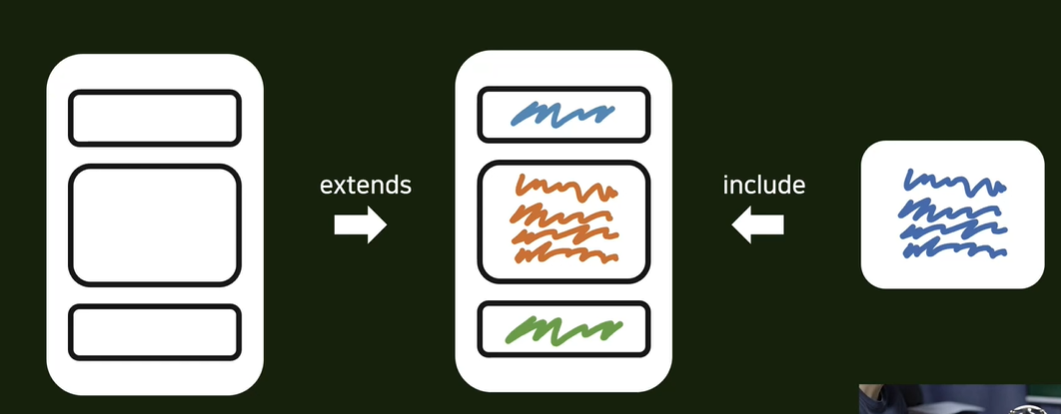
제일 상위 폴더인 프로젝트 폴더에 templates 폴더를 추가한다.
(-> templates폴더에는 base.html, head.html, header.html, footer.html이 들어간다)
TEMPLATES 폴더에 base.html을 만든다
TEMPLATES에 head.html을 만들어 base.html의 head부분을 include 해준다
{% include 'head.html' %}
TEMPLATES에 header.html을 만들어 base.html의 body의 윗부분에 header.html을 include 해준다
{% include 'head.html' %}
바뀌는 content 부분을 block처리 해준다
{% block content %}
{% endblock %}
header.html과 마찬가지로 TEMPLATES에 footer.html을 만들어 base.html의 body의 아래부분에 footer.html을 include 해준다
{% include 'head.html' %}
-> header와 footer는 웹페이지 전체의 포멧을 같게 해준다.
이로써 base.html을 사용해 html의 기본 뼈대를 만들 수 있다
app 안에서 html을 따로 만들어 사용하기
accountapp에서 templates폴더를 만들고 accountapp폴더를 하나 더 생성한다 (-> 가독성을 높이기 위한 과정)
html을 생성하고 base.html을 상속받는다
{% block content %}
  <div style="height: 20rem; background-color: #38df81; border-radius: 1rem; margin: 2rem;">

  </div>
{% endblock %}
-> block 처리한 부분만 변경하여 쉽게 사용 가능
(view에서 base.html말고 사용하는 content가 담긴 html로 변경:accountapp/hello_world.html)
