목적
로그인 기능은 대부분의 애플리케이션에서 필수적으로 사용돼요. 요즘은 웹 뿐만 아니라 모바일에서도 사용 할 수 있고 Stateless 한 서버 구현을 위해 JWT를 사용하려고 해요. 많이 사용되고, 주된 기능인만큼 꼭 한 번은 제대로 여러 자료를 참고하여 공부하고 싶어 직접 구현하며 정리하는 내용이에요.
(스프링 시큐리티 동작 과정을 이해하기 위한 글이에요.)
Spring Seucurity 동작 과정
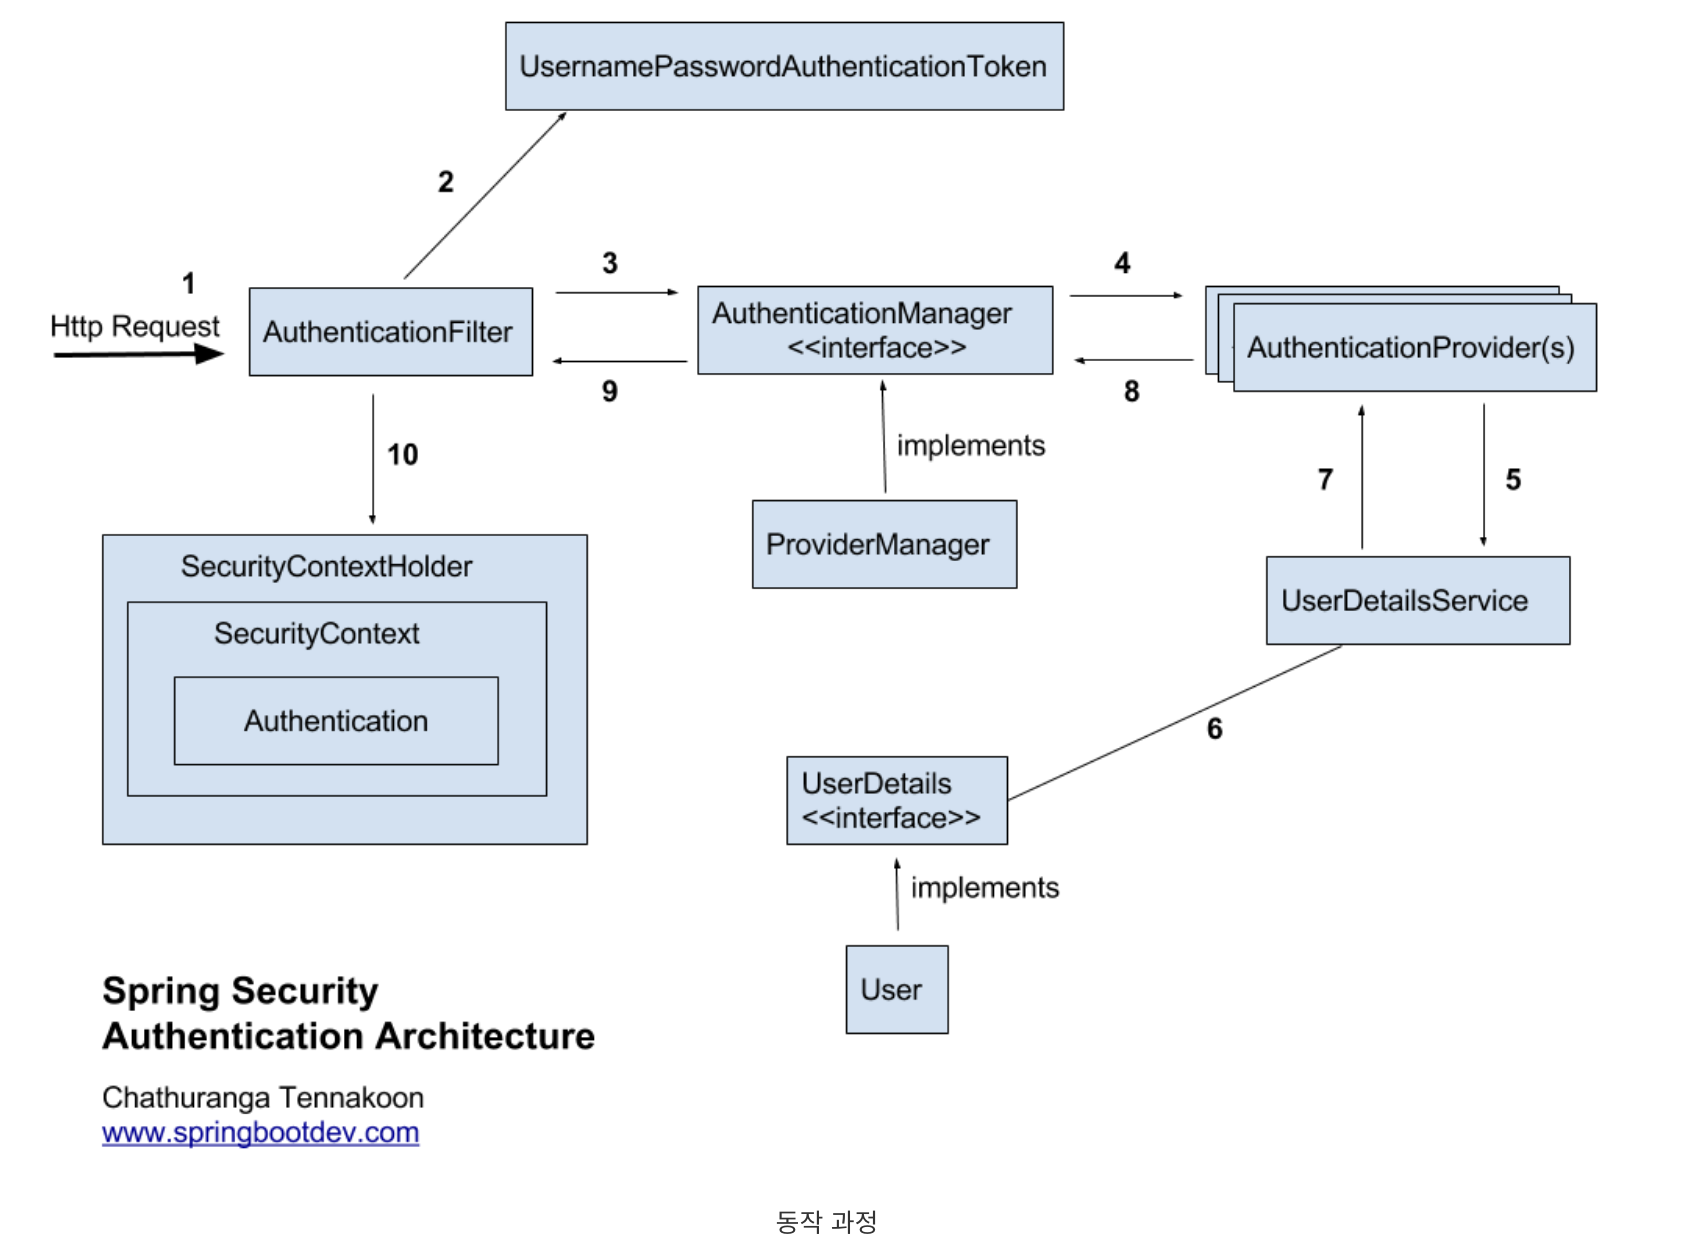
Spring Security는 기본적으로 인증 절차를 거친 후에 인가 절차를 진행하게 되요. 인가 과정에서 해당 리소스에 대한 접근 권한이 있는지를 확인하게 되는 거에요. 이러한 인증과 인가를 위해 Principal을 아이디로, Credential을 비밀번호로 사용하는 인증 방식을 사용해요.
Http 요청 수신
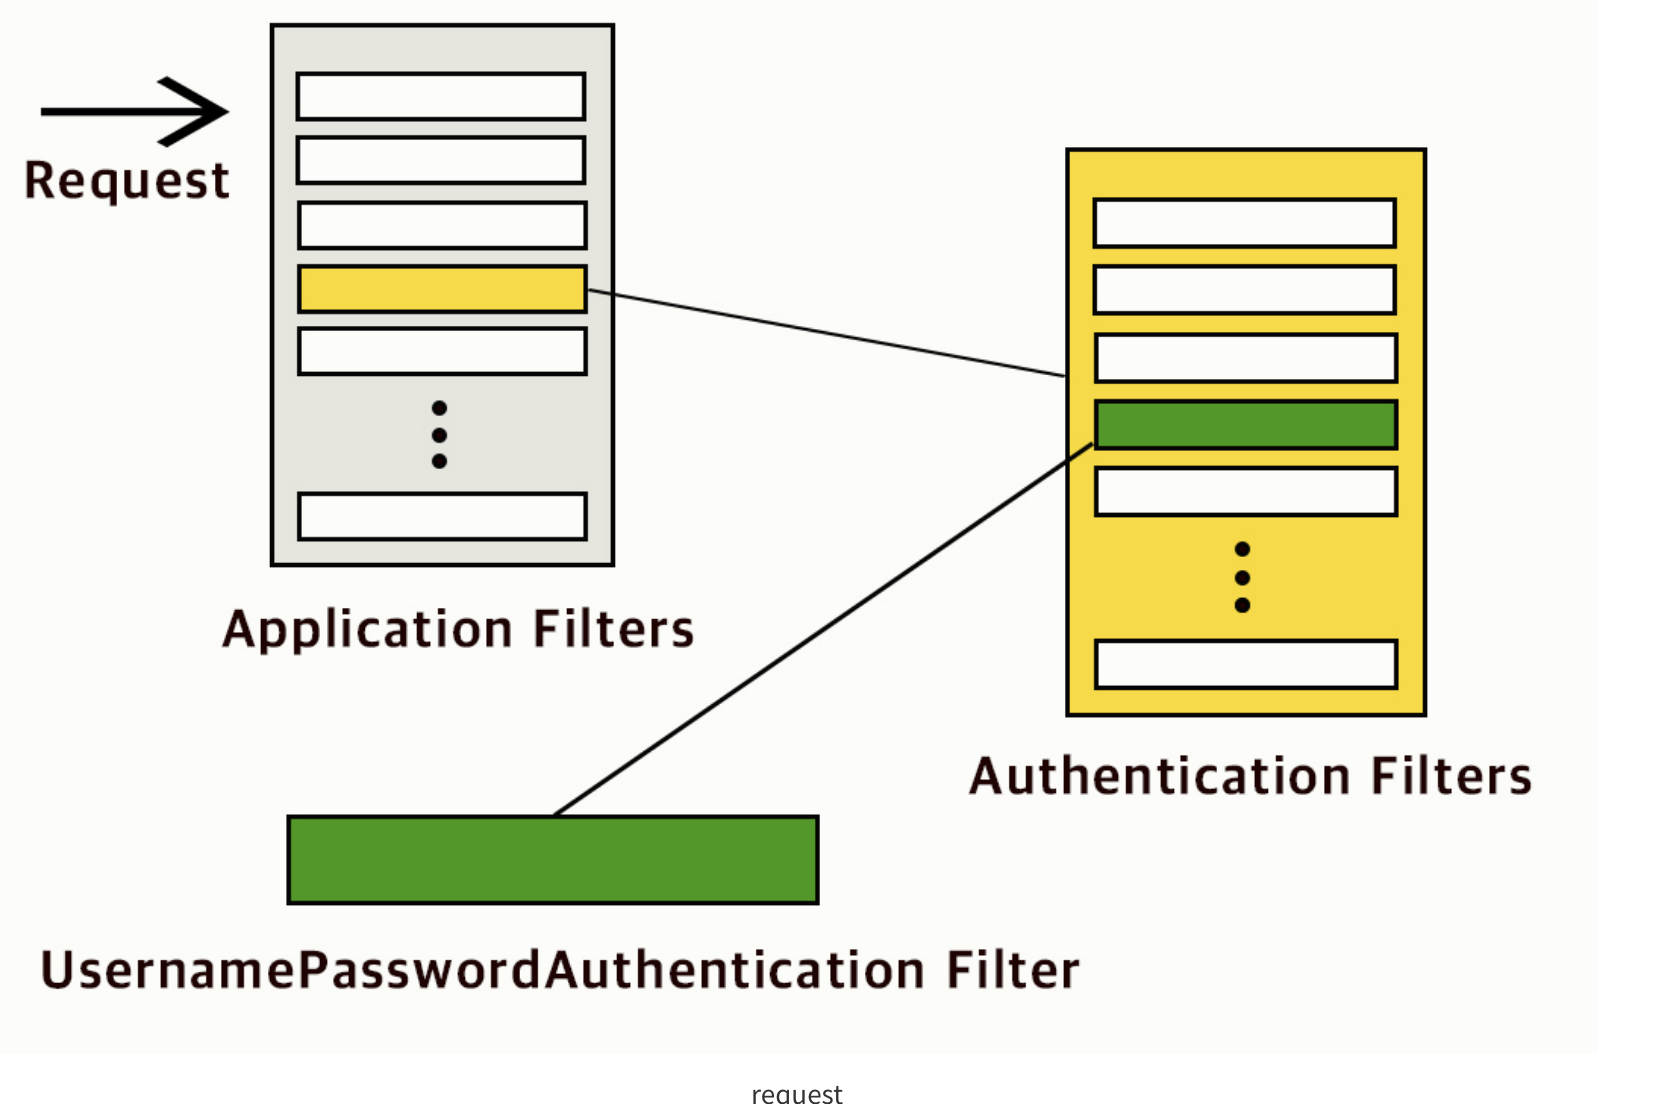
Security에는 일련의 필터 체인이 있어요. 그래서 클라이언트(웹)로 부터 요청(Request)이 들어오면 인증 및 권한 부여 목적으로 일련의 필터를 거치게 되요.
일반적으로 ID, PASSWORD 기반의 인증이라고 할 경우 가장 먼저 Application Filters라는 필터 뭉치에 도달해요. 그 필터들 중 Authentication Filters라는 필터 뭉치에 다시 도달해요. username, password를 사용하는 form 기반 인증을 처리하는 필터인 UsernamePasswordAuthenticationFilter에 도착하게 되요.
id, password가 아닌 OAuth2.0 인증이나 JWT를 이용한 인증을 하려고 할 때는 해당 필터가 아닌 다른 필터를 지나가요.
(ex : OAuth2ClientAuthenticationProcessingFilter)
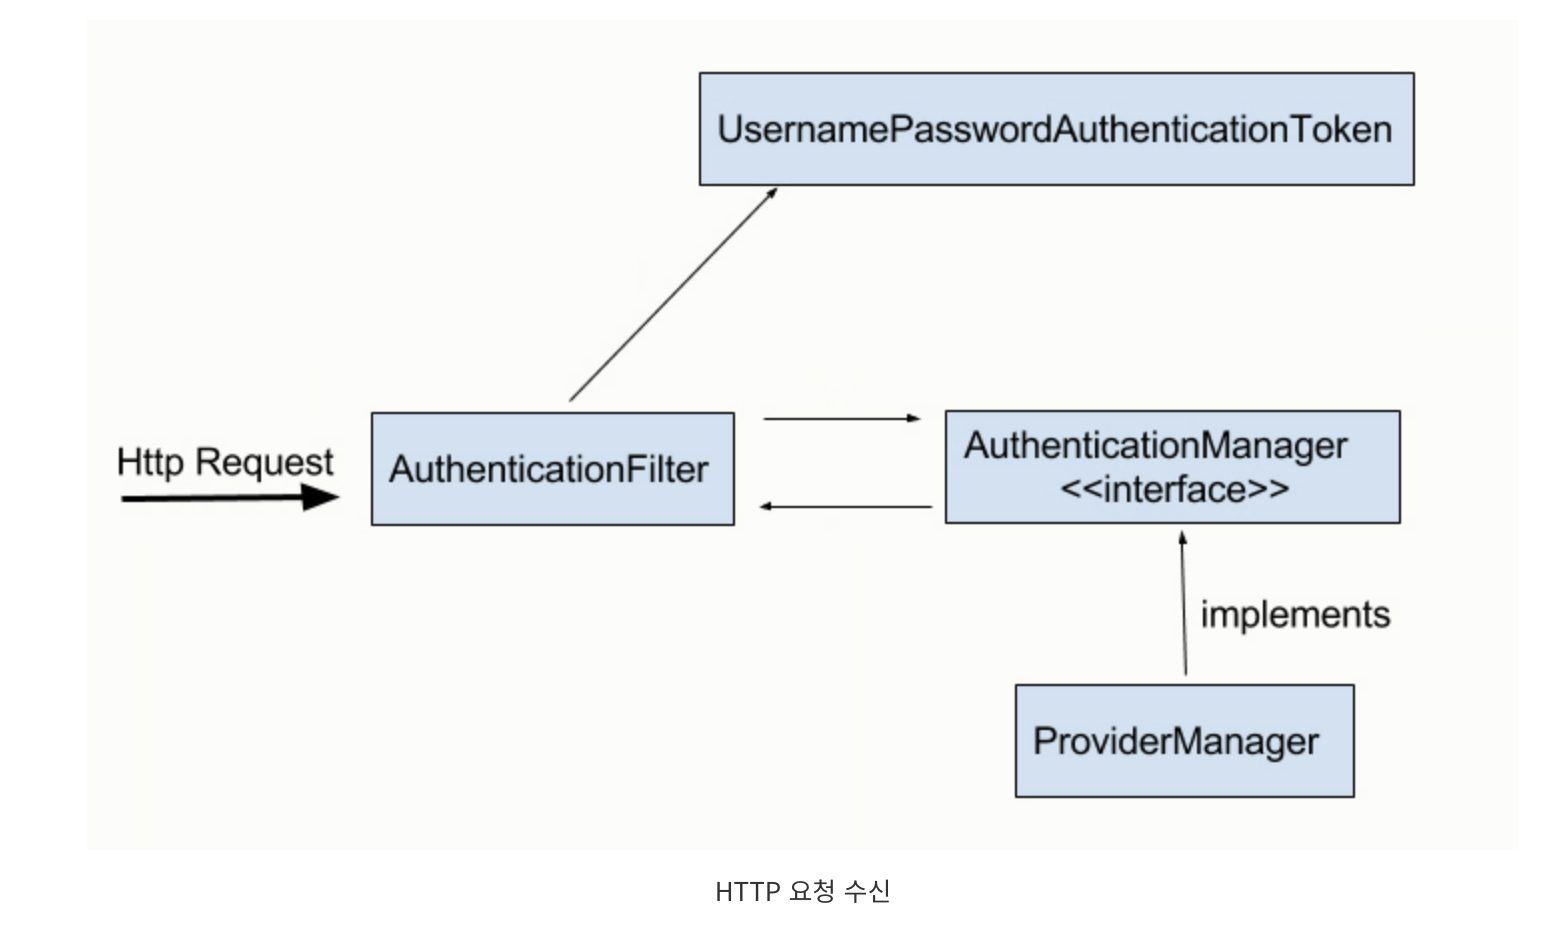
UsernamePasswoardAuthenticationFilter에 요청이 도착하면 해당 클래스의 attempAuthentication(request, response) 메서드가 동작해요. 이 메서드는 request로부터 username, password를 가지고 와서 사용자 자격 증명을 기반으로 한 UsernamePasswordAuthenticationToken(Authentication)을 생성해요.
이어서 생성된 UsernamePasswordAuthenticationToken(Authentication)을 가지고 AuthenticationManager (실질적으로는 구현체인 ProviderManager)에게 인증을 위임시켜요.
UsernamePasswordAuthenticationToken은 Authentication 인터페이스의 구현체입니다. 객체 간의 구조를 뜯어보면 UsernamePasswordAuthenticationToken이 AbstractAuthenticationToken을 상속하고, AbstractAuthenticationToken은 Authentication을 구현 하는 구조를 찾을 수 있어요.
- 모든 접근 주체는 Authentication을 생성해요. 이것은 최종적으로 SecurityContext에 보관되고 사용되요.
AuthenticationManager, AuthenticationProvicer(s), ProviderManager
AuthenticationManager (Interface)
public interface AuthenticationManager {
	Authentication authenticate(Authentication authentication) throws AuthenticationException;
}
Authentication 객체를 받아 인증하고, 인증되었다면 인증된 Authentication 객체를 돌려주는 authenticate() 메서드를 구현하도록 하는 인터페이스에요. 이 메서드를 통해 인증이 되면 isAuthenticated(boolean) 값을 true로 바꿔줘요.
ProviderManager (Class)
public class ProviderManager implements AuthenticationManager, MessageSourceAware, InitializingBean {
	...
  for (AuthenticationProvider provider : getProviders()) {
      if (!provider.supports(toTest)) {
          continue;
      }
      if (logger.isTraceEnabled()) {
          logger.trace(LogMessage.format("Authenticating request with %s (%d/%d)",
                  provider.getClass().getSimpleName(), ++currentPosition, size));
      }
      try {
          result = provider.authenticate(authentication);
          if (result != null) {
              copyDetails(authentication, result);
              break;
          }
      }
      catch (AccountStatusException | InternalAuthenticationServiceException ex) {
          prepareException(ex, authentication);
          throw ex;
      }
      catch (AuthenticationException ex) {
          lastException = ex;
      }
  }
}
AuthenticationManager의 구현체로 스프링에서 인증을 담당하는 클래스에요. 스프링 시큐리티가 생성, 등록하고 관리하는 스프링 빈이기 때문에 직접 구현할 필요는 없어요.
ProviderManager 클래스는 인증을 담당하고 있지만 실제로 직접 인증 과정을 진행하는 게 아니에요. 멤버 변수로 가지고 있는 AuthenticationProvider(s)에게 인증을 위임하고 그중에서 인증 처리가 가능한 AuthenticationProvider 객체가 인증 과정을 거쳐서 인증에 성공하면 요청에 대해 ProviderManager가 인증이 되었다고 알려주는 방식 이에요.
인증이 되었다고 알려주는 건 AuthenticationManager 인터페이스의 authenticate() 메서드의 리턴 값인 Authentication 객체 안에 인증 값을 넣어주는 것으로 처리해요.
- 위 코드는 authenticate() 메서드의 일부로 for문을 통해 provider를 하나씩 가지고 와서 supports() 메서드로 해당 provider가 인증 처리를 할 수 있는지 확인하고 result != null 때까지 반복하는 것을 볼 수 있어요.
AuthenticationProvider (Interface)
public interface AuthenticationProvider {

	Authentication authenticate(Authentication authentication) throws AuthenticationException;

	boolean supports(Class<?> authentication);
}
AuthenticationManager와 같은 authenticate() 메서드를 통해 인증 과정이 진행되요.
boolean supports(Class<?>) 메서드는 앞에서 필터를 통해 보내준 Authentication 객체를 이 AuthenticationProvider가 인증 처리가 가능한 클래스인지를 확인하는 메서드에요.
지금까지의 내용을 정리해보면
-
ID, PASSWORD 기반의 인증 요청을 UserPasswordAuthenticationFilter에서 가로채가요.
-
UsernamePasswordAuthenticationToken(Authentication) 객체를 AuthenticationManager에 넘겨요.
(실질적으로는 AuthenticationManager 인터페이스를 구현한 ProviderManager) -
ProviderManager는 여러 AuthenticationProvider를 순회하면서 UsernamePasswordAuthenticationToken을 처리해줄 AuthenticationProvider를 찾습니다.
그 다음 과정인 AuthenticationProvider은 인터페이스이기 때문에 해당 인터페이스를 구현하는 클래스를 만들어서 인증 처리를 하는 로직이 구현되면 되요.
스프링 시큐리티 동작 과정 내용이 길어져 나누어 진행할게요.
참고자료
https://docs.spring.io/spring-security/reference/servlet/architecture.html
스프링부트 핵심가이드
