쿠버네티스 소개
쿠버네티스(Kubernetes)란?
- 줄여서 k8s라고 표기하는 것을 자주 보게됨
- 컨테이너 오케스트레이션 솔류션
- 다수의 컨테이너들을 관리하면서
- 자동배포, 배포된 컨테이너의 동작 보증, 부하에 따른 동적 확장 등의 기능을 담당
- 도커와 잘 어울리는 실행 환경 구성 도구
- 도커 컨테이너들을 클러스터 내에 실행하고 관리하는데 적합
- 지속적 통합과 인도(CI/CD)에 유효하게 적용할 수 있음
- 컨테이너는 포드(pod)라고 불리는 K8s 오브젝트와 연관하여 실행(포드 위에서 실행한다고 대강 표현)
서비스 개발 및 운용 방식
마이크로서비스 아키텍처(microservice architecture; MSA)
- 응용 시스템 개발 및 구성을 위한 아키텍처 스타일의 하나
- 이에 비교하여 전통적인 방식의 아키텍처를 모놀리식(monolithic) 아키텍처라고 부르기도 함
- 애플리케이션이 서비스 모음으로 개발되어 각 마이크로서비스는 특정한 기능을 수용하고 개별 작업을 처리, 이 서비스들이 서로 연결되어 전체 응용을 구성
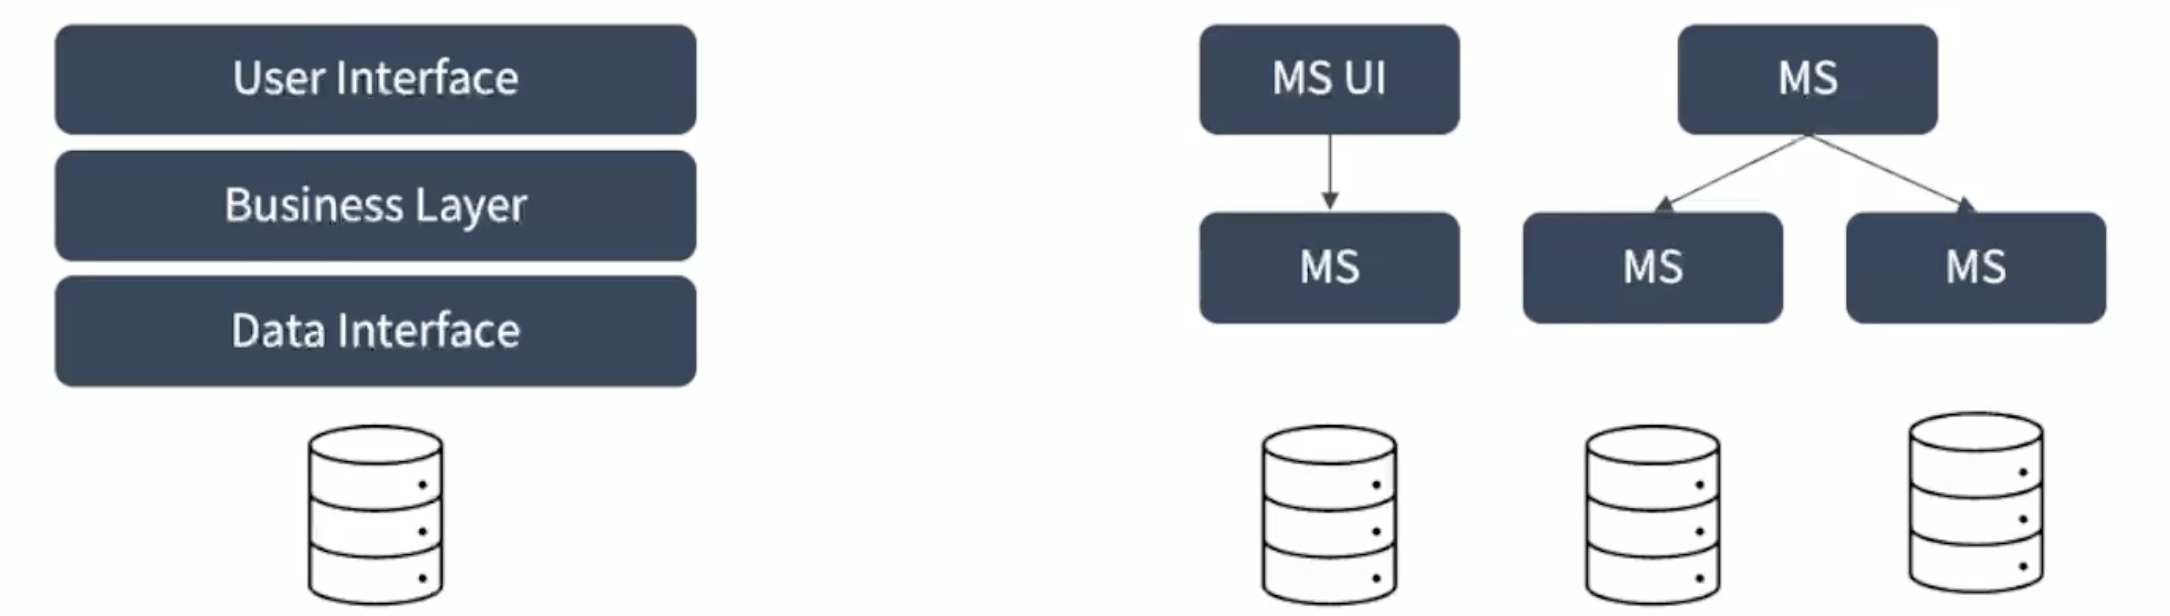
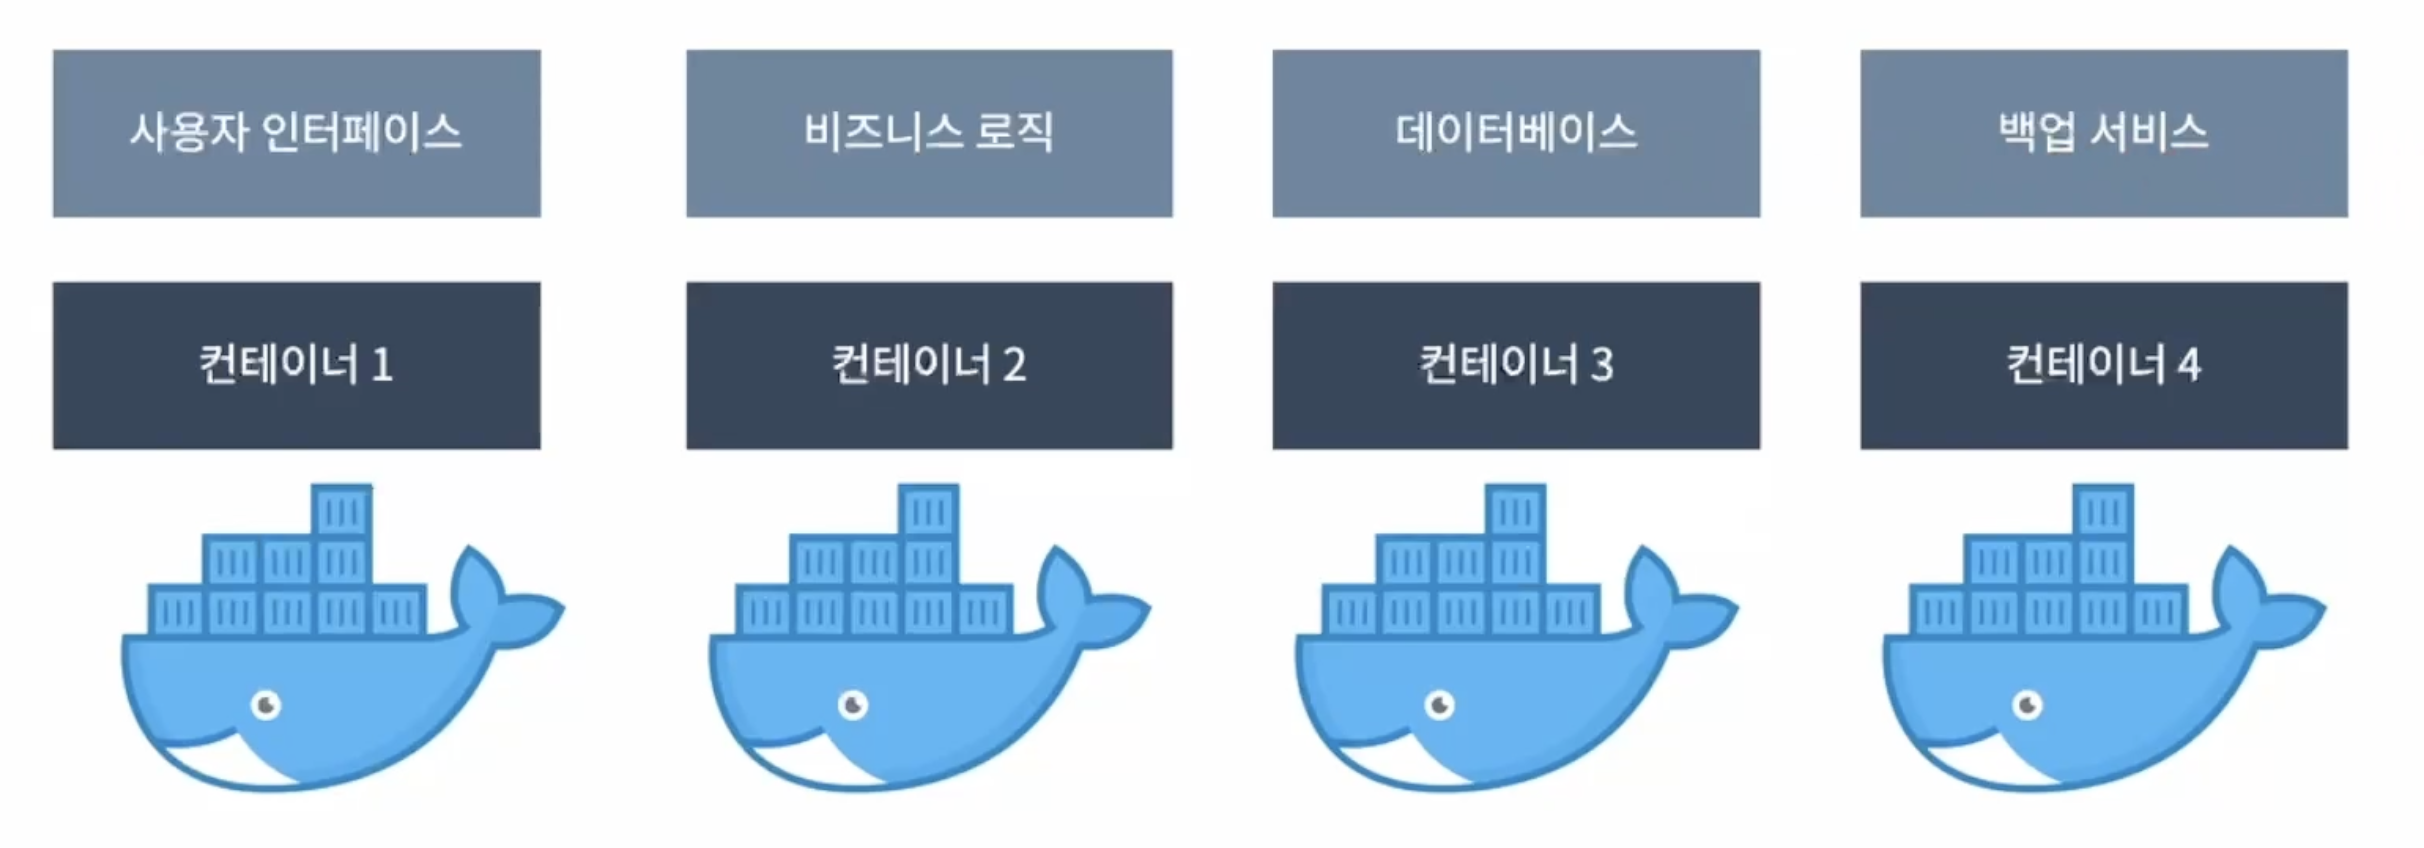
컨테이너 인프라 환경의 적용
컨테이너 모델은 마이크로서비스를 구현하기에 적합
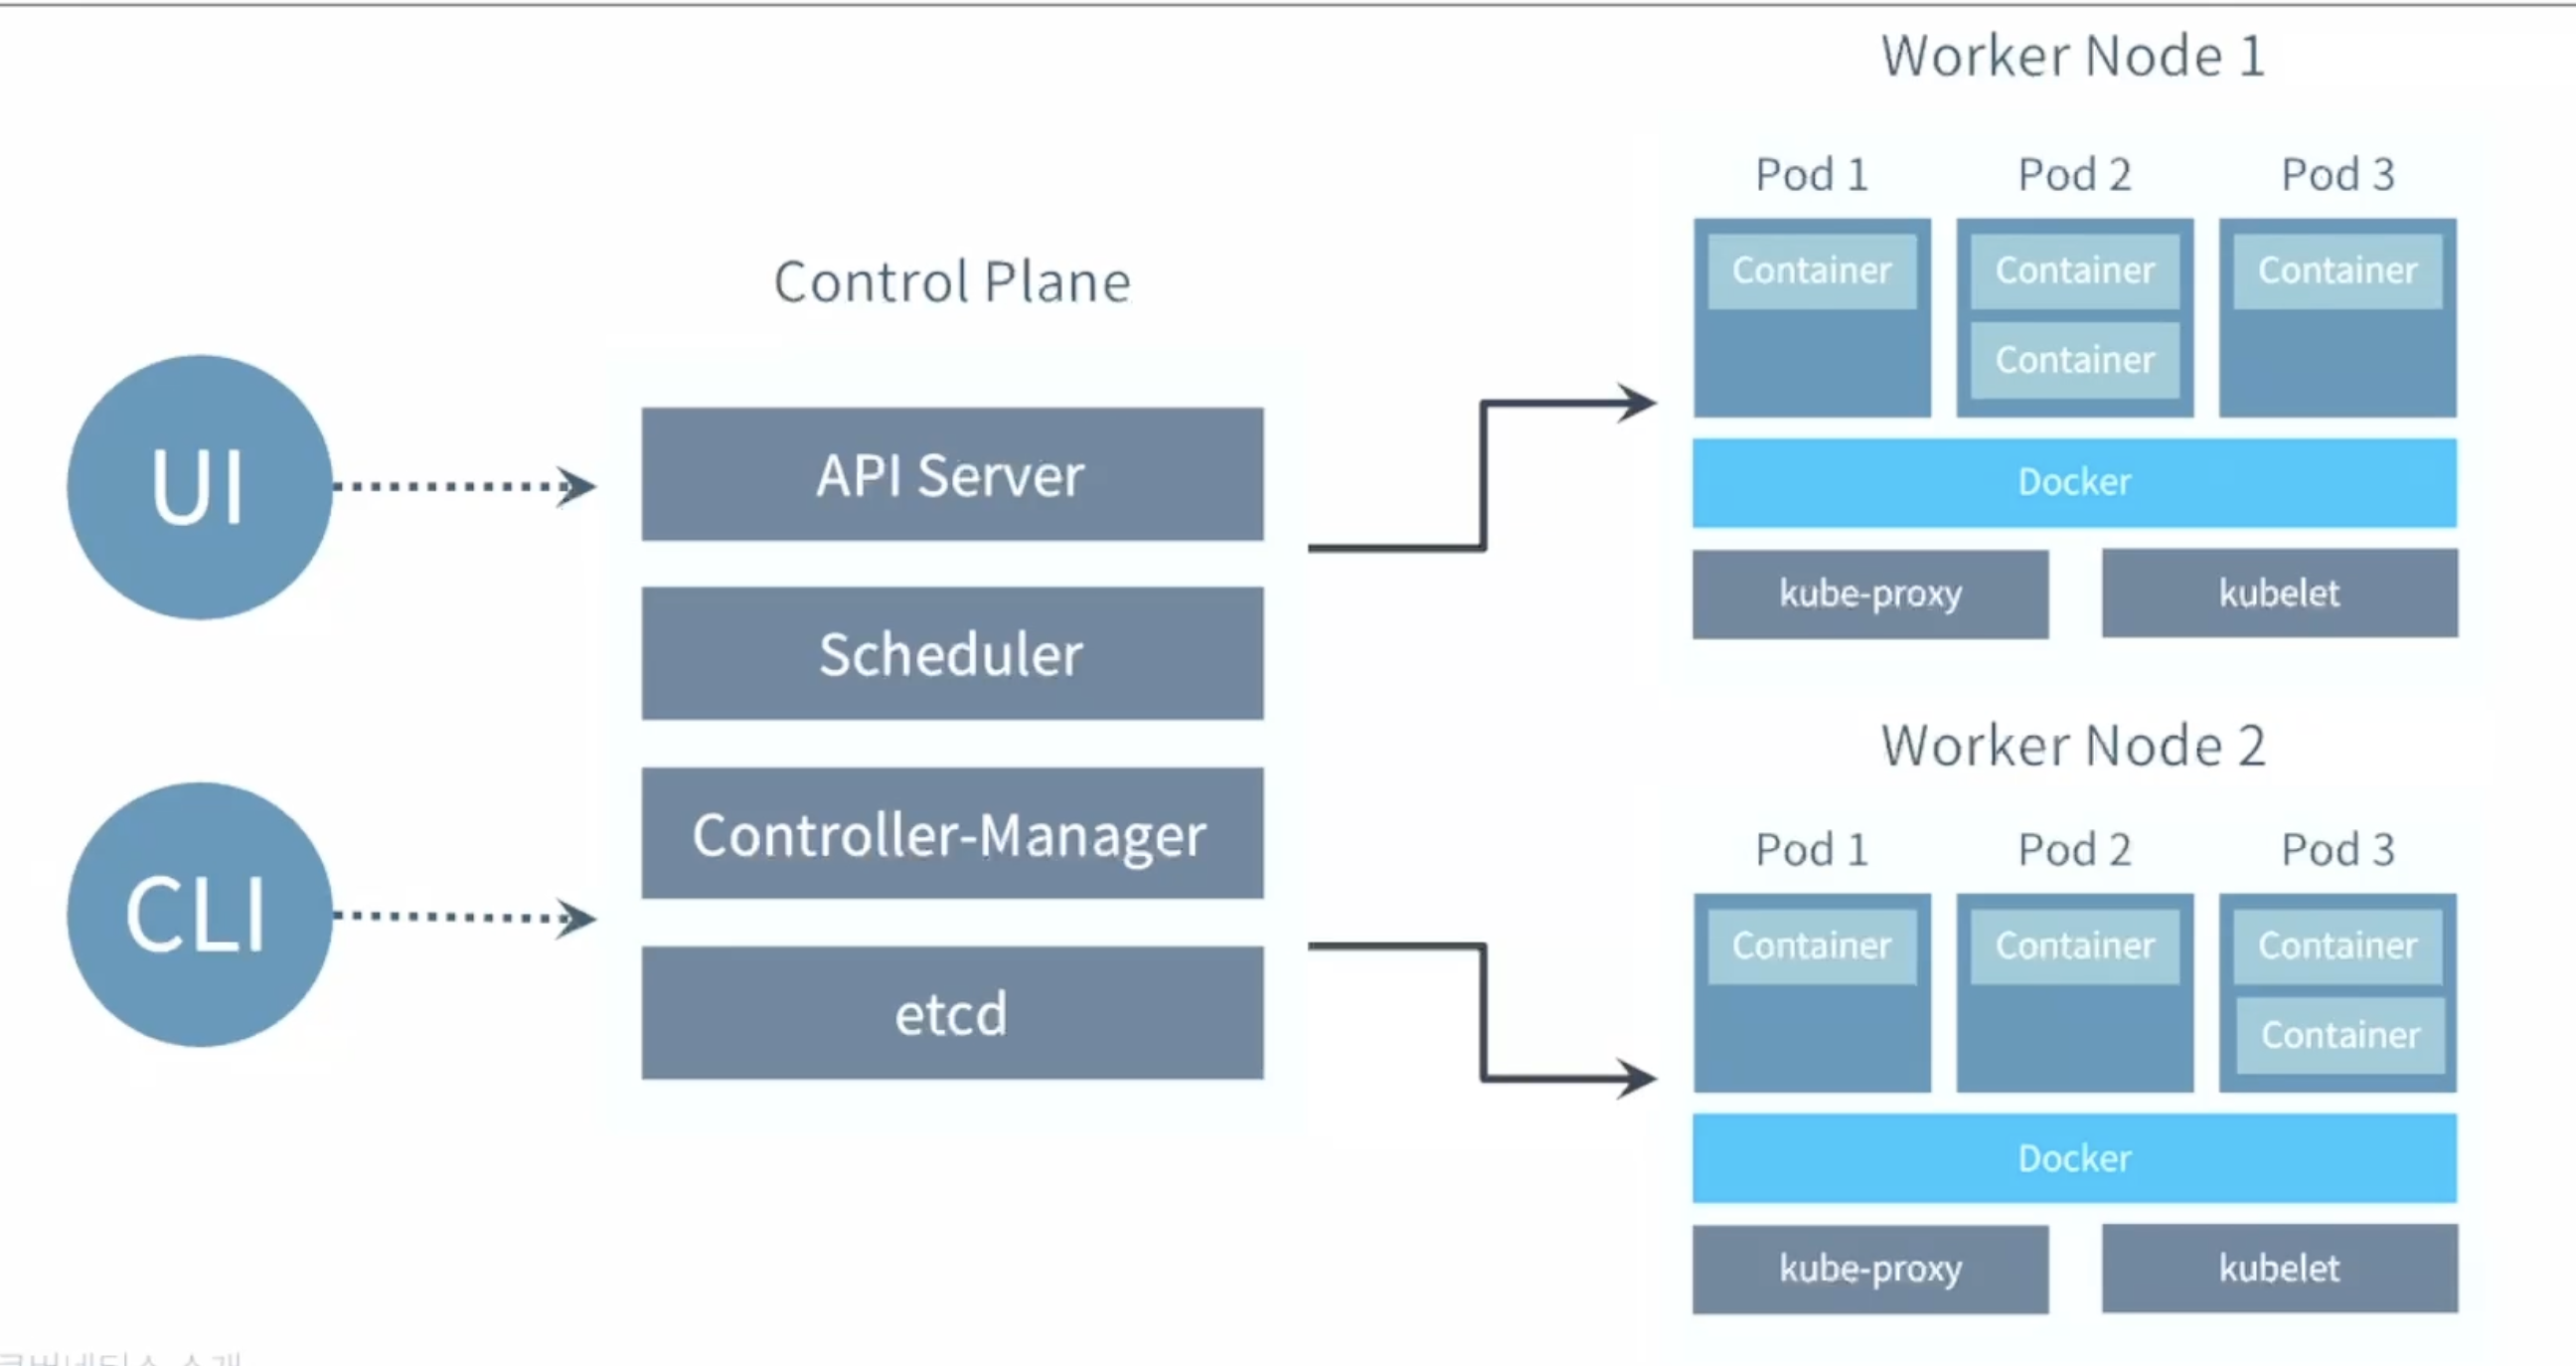
k8s 클러스터
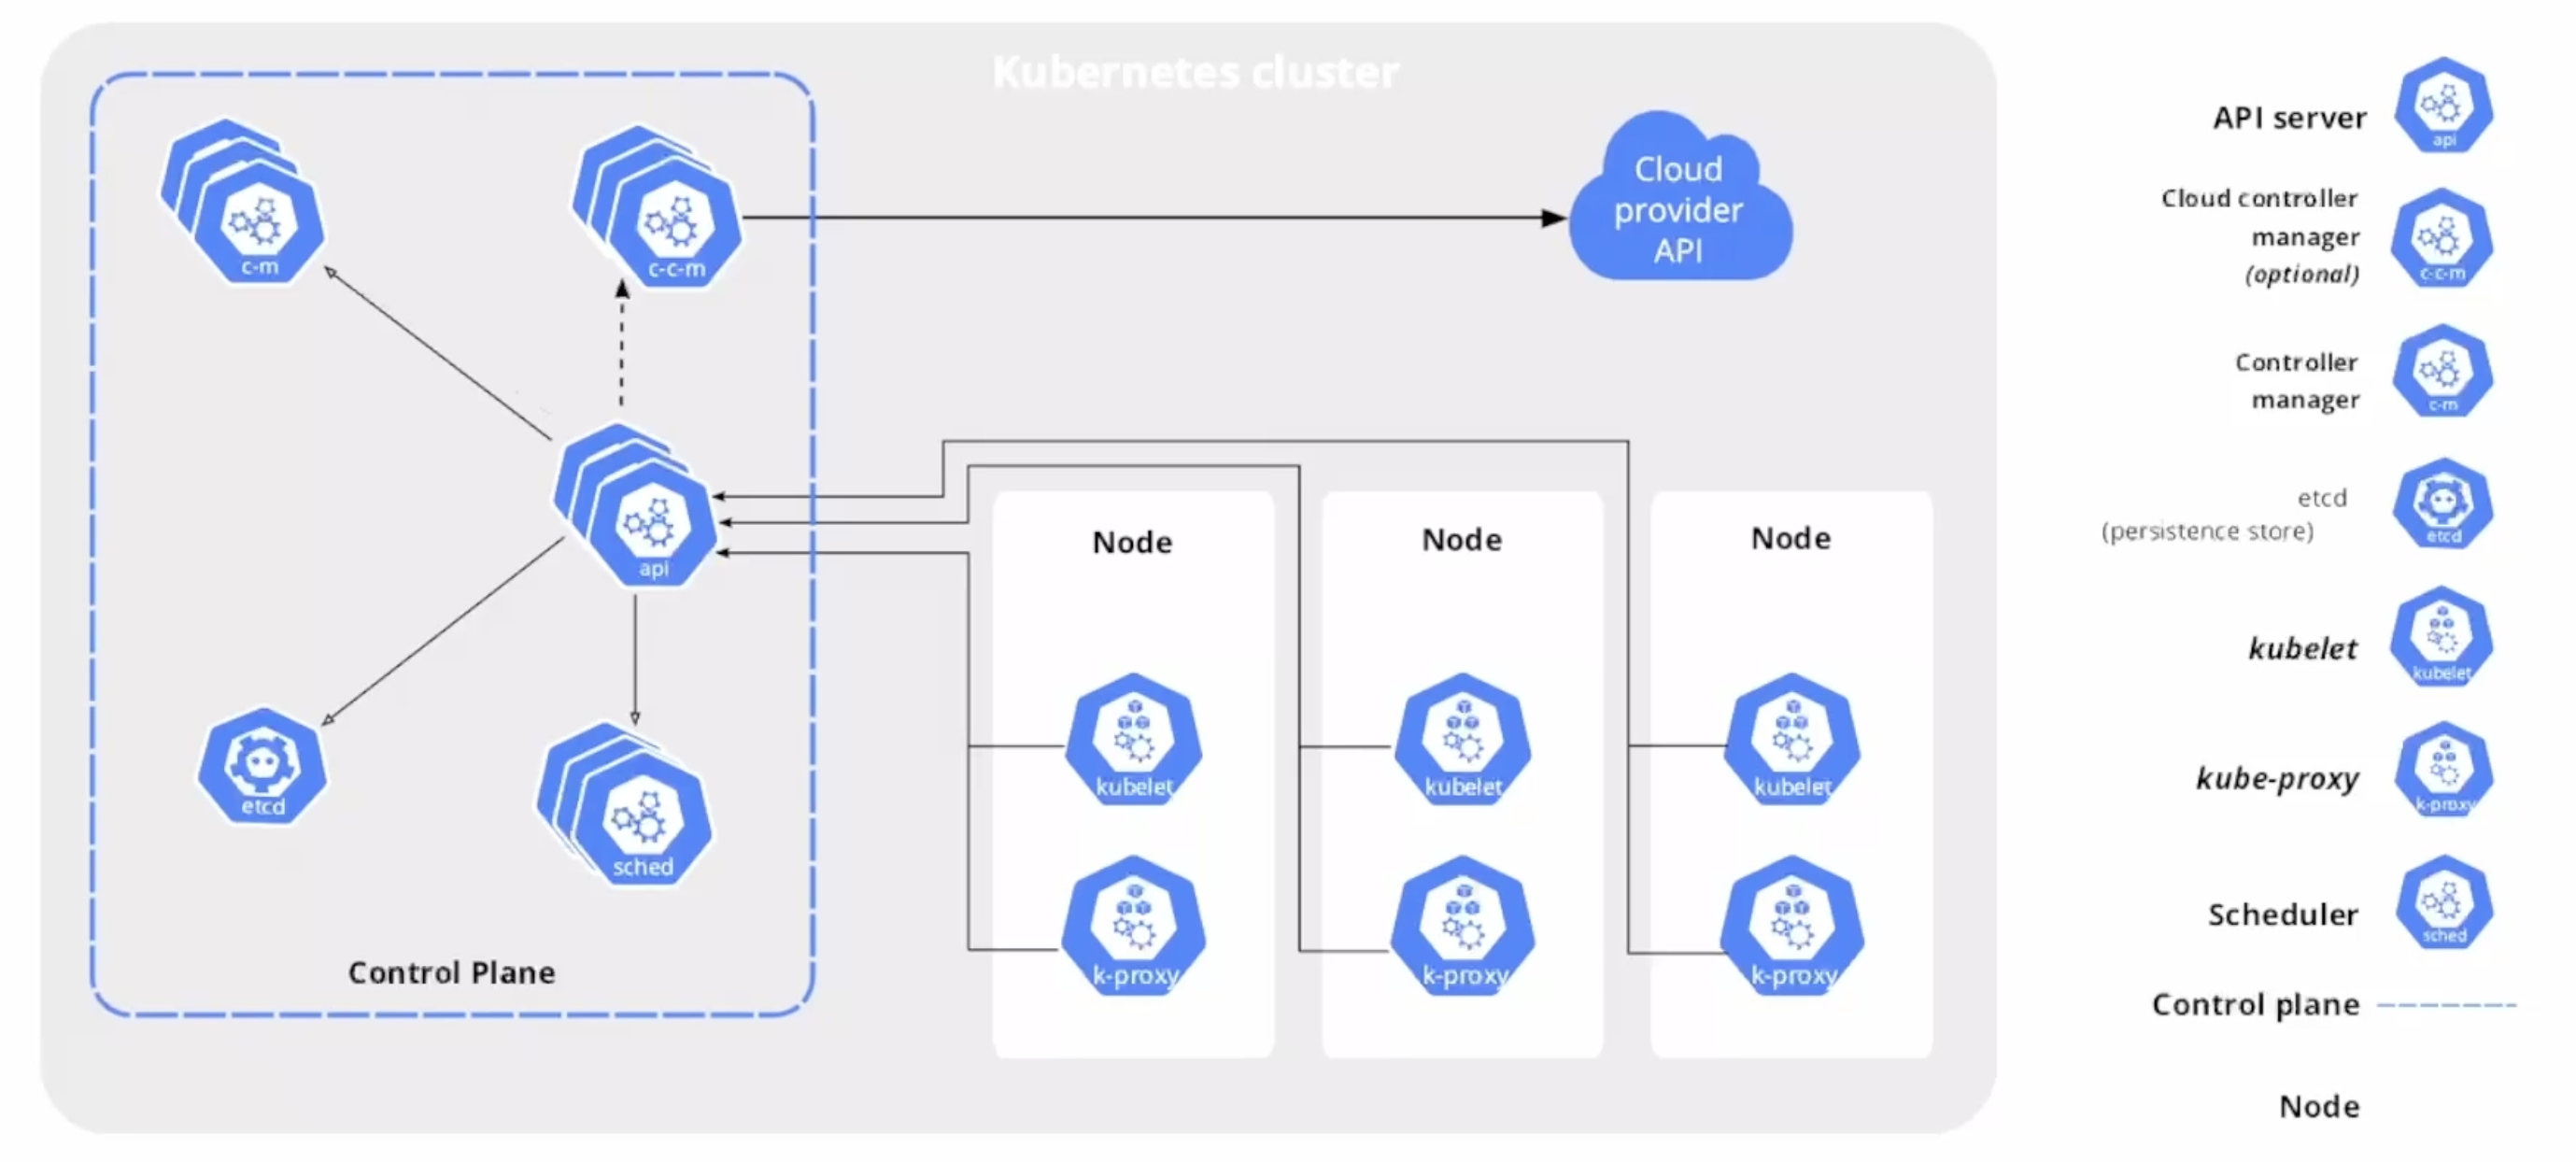
구성요소
- 클러스터는 하나 이상의 노드들로 구성됨
- 마스터 노드( 컨트롤 플레인)
- kubectl(반드시 마스터 노드에 있어야 하는 것은 아니지만)
- API 서버, etcd - 클러스터의 중심 역할을 하는 구성 요소들
- 컨트롤러 매니저, 스케줄러
- 워커노드
- 컨테이너 런타임(CRI; Container Runtime Interface) - 포드를 이루는 컨테이너의 실행을 담당
- kubelet - 포드의 구성 내용을 받아 CRI에 전달하고 컨테이너들의 동작 상태를 모니터링
포드(Pod)와 컨테이너(Container)
k8s 가 제공하는 기능
컨테이너 밸런싱(container balancing)
-
포드의 부하 균등화를 수행 - 몇 개의 응용을 복재할 것인지를 알려주면 나머지는 k8s가 처리
트래픽 로드 밸런싱(traffic load balancing)
-
응용의 복제본이 둘 이상 있다면 k8s가 트래픽 부하 균등화를 수행하여 클러스터 내부에 적절히 분배
동적 수평 스케일링(HPA; horizontal pod autoscaling)
-
인스턴스 수를 동적으로 확장하거나 감축하여 동적 요구사항에 대응하면서 시스템 자원을 효율적으로 활용
오류 복구(error reovery)
-
포드와 노드를 지속적으로 모니터링하고 장애가 발생하면 새 포드를 실행하여 지정된 복제본의 수를 유지
롤릴 업데이트(rolling update)
-
지연 시간을 적용하고 순차적으로 업데이트 배포함으로써 문제가 발생하더라도 서비스를 정상 유지할 수 있음
스토리지 오케스트레이션(storage orchestration)
-
원하는 응용에 다양한 스토리 시스템(Amzaon EBS, Google CGE Persistent Disk등)을 마운트할 수 있음
서비스 디스커버리(service discovery)
-
태생적으로 수명이 짧은 포드의 동적 성질을 관리하기 위하여 자체 DNS 기반으로 서비스를 동적으로 바인딩할 수 있는 기능을 제공
k8s Pod의 생명 주기(Life Cycle)
kubectl을 통해서 API 서버에 포드의 생성을 요청
- (업데이트가 있을 때 마다) API 서버는 etcd에 기록하고 클러스터의 상태를 최신으로 유지(하려고함)
컨트롤러 매니저는 포드를 생성하고, 이상태를 API 서버에 전달
- 아직 어떤 워커 노드에 포드를 적용할 지는 결정하지 않은 상태
스케줄러는 포드가 생성되었다는 정보를 인지하고, 이 포드를 어떤 워커 노드에 적용할지를 결정해서 해당 노드에 포드의 실행을 요청
해당 노드의 kubelet이 CRI에 요청하여 포드가 만들어지고 사용 가능한 상태가 됨
k8s는 절차적인 구조가 아닌 선언적인 구조를 가지고 있음
- 각 요소가 추구하는 상태(desired state)를 선언하면 현재 상태(current state)와 비교하고 지속적으로 맞추어가려고 노력하는 구조
k8s 오브젝트
기본 오브젝트
- Pod - 한개 이상의 컨테이너로 단일 목적의 일을 하기 위해서 모인 단위
- 독립적인 공간과 사용 가능한 IP를 가지고 있음, 언제든지 죽을 수 있음
- Namespace - k8s 클러스터에서 사용되는 리소스들을 구분해 관리하느 ㄴ그룹
- Volume - 포드가 생성될 때 포드에서 사용할 수 있는 디렉토리 제공
- Service - 유동적인 포드들에 대한 접속을 안정적으로 유지하도록 클러스터 내/외부에 연결하는 역할
디플로이먼트(Deployment)
- 기본 오브젝트들을 보다 효율적으로 작동할 수 있도록 조립하고 추가로 구현한 것
- 레플리카셋 (replicaset) 오브젝트를 합쳐 놓은 형태로 단순하게 생각할 수 있음
k8s 인프라 구축
로컬 환경
- kubeadm, docker desktop 등을 설치, 운용함으로써 로컬 환경에 간단한 클러스터 구성 가능
- 개발 단계에서의 테스트 등에 이용
Public clouds
- AWS EKS(Elastic Kubernetes Services)
- GCP(Google Cloud Platform)의 GKE(Google Kubernetes Engine)
- Microsofe의 aks(Azuer Kubernetes Service)
On-prem 설치
- SASE의 Rancher
- RedHat의 OpenShift
실습 준비
- 도커 데스크톱을 이용한 로컬 환경 클러스터 구성
- 설정에서 kubernetes에 들어가
Enable Kubernetes를 설정하여 Docker Desktop이 실행 시작할 때 단일 노드(내 컴퓨터)로 이루어진 K8s클러스터를 운용하도록 지시
- 설정에서 kubernetes에 들어가
- 도커 데스크톱을 이용한 로컬 환경 클러스터 구성
- 명령어:
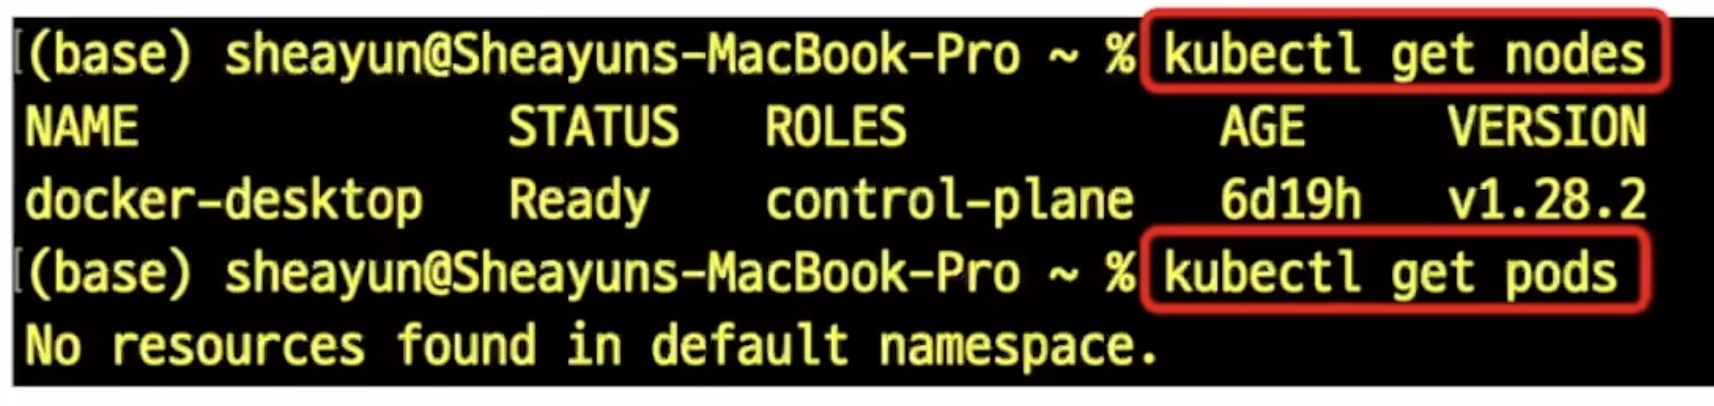
kubectl get nodes - kubectl이 에러러 없이 실행됨을 확인
- 하나의 노드에 대한 정보가 (아직은 해석하지 않지만) 표시됨을 확인
- 명령어:
요약
- Kubernetes라는 것은 무엇이며 어떤 기능을 하는가?
- 이것이 우리가 목표로 하고 있는 CI/CD 파이프라인의 구축과는 어떤 관계가 있을 것으로 예상하는가?
- 다음에 대하여 나는 어떻게 이해하고 있는가? (그것이 대강 올바른가?)
- k8s 클러스터
- 노드, 포드와 컨테이너의 관계
- k8s 클러스터를 구축하고 운영하는 방법에는 어떠한 것들이 있으며, 이 중 우리는 어떤 것을 이용해 실습에 적용할 예정인가?
쿠버네티스 기본 사용
이번 실습 목표와 흐름
- k8s클러스에 어떠한 것을 지시할 수 있는지 살펴본다.
- 포드의 생산과 컨테이너의 실행
- 디플로이먼트를 이용하여 동일한 기능을 하는 포드의 래플리카셋을 실행
- 클러스터 외부로부터의 접근이 가능하도록 서비스를 실행
- 생성된 k8s 오브젝트들을 삭제
- k8s 클러스터의 현재 상태를 조회하는 방법을 알아본다.
- 오브젝트 스팩(object spec)을 작성하는 기초를 익히고 실습해 본다.
노드와 포드 정보를 조회
명령어
kubectl get nodeskubectl get pods
🚀 Minikube란?
Minikube는 로컬 환경에서 간단히 쿠버네티스 클러스터를 실행할 수 있게 해주는 도구입니다. 일반적으로 쿠버네티스를 학습하거나 개발 환경에서 빠르게 테스트할 때 사용합니다.
Minikube는 로컬의 Docker 또는 가상머신 환경을 사용하여 클러스터를 생성하므로, 실제 프로덕션 환경과 유사한 쿠버네티스 환경을 손쉽게 구성하고 테스트할 수 있습니다.$> minikube start 😄 minikube v1.35.0 on Darwin 15.4.1 (arm64) ✨ Using the docker driver based on existing profile 👍 Starting "minikube" primary control-plane node in "minikube" cluster 🚜 Pulling base image v0.0.46 ... 🏃 Updating the running docker "minikube" container ... 🐳 Preparing Kubernetes v1.32.0 on Docker 27.4.1 ... 🔎 Verifying Kubernetes components... ▪ Using image gcr.io/k8s-minikube/storage-provisioner:v5 🌟 Enabled addons: default-storageclass, storage-provisioner 🏄 Done! kubectl is now configured to use "minikube" cluster and "default" namespace by default
어떤 정보를 파악할 수 있는지 알아보자.
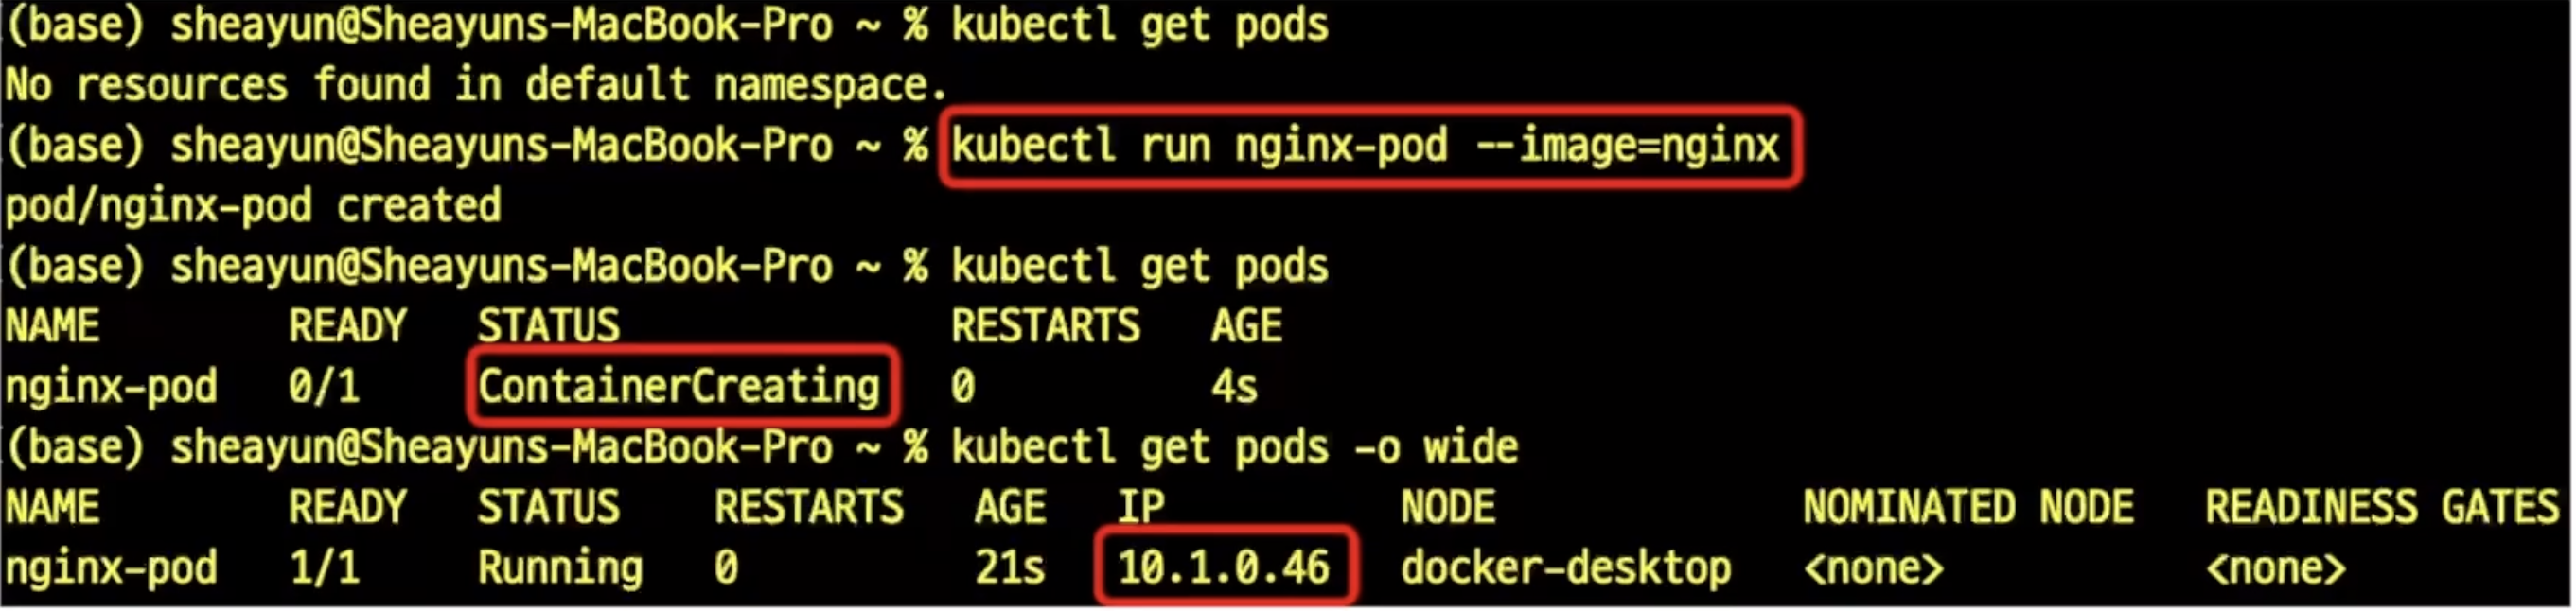
옵션"-o wide"를 적용하여 무엇이 더 출력되는지 살펴보자.
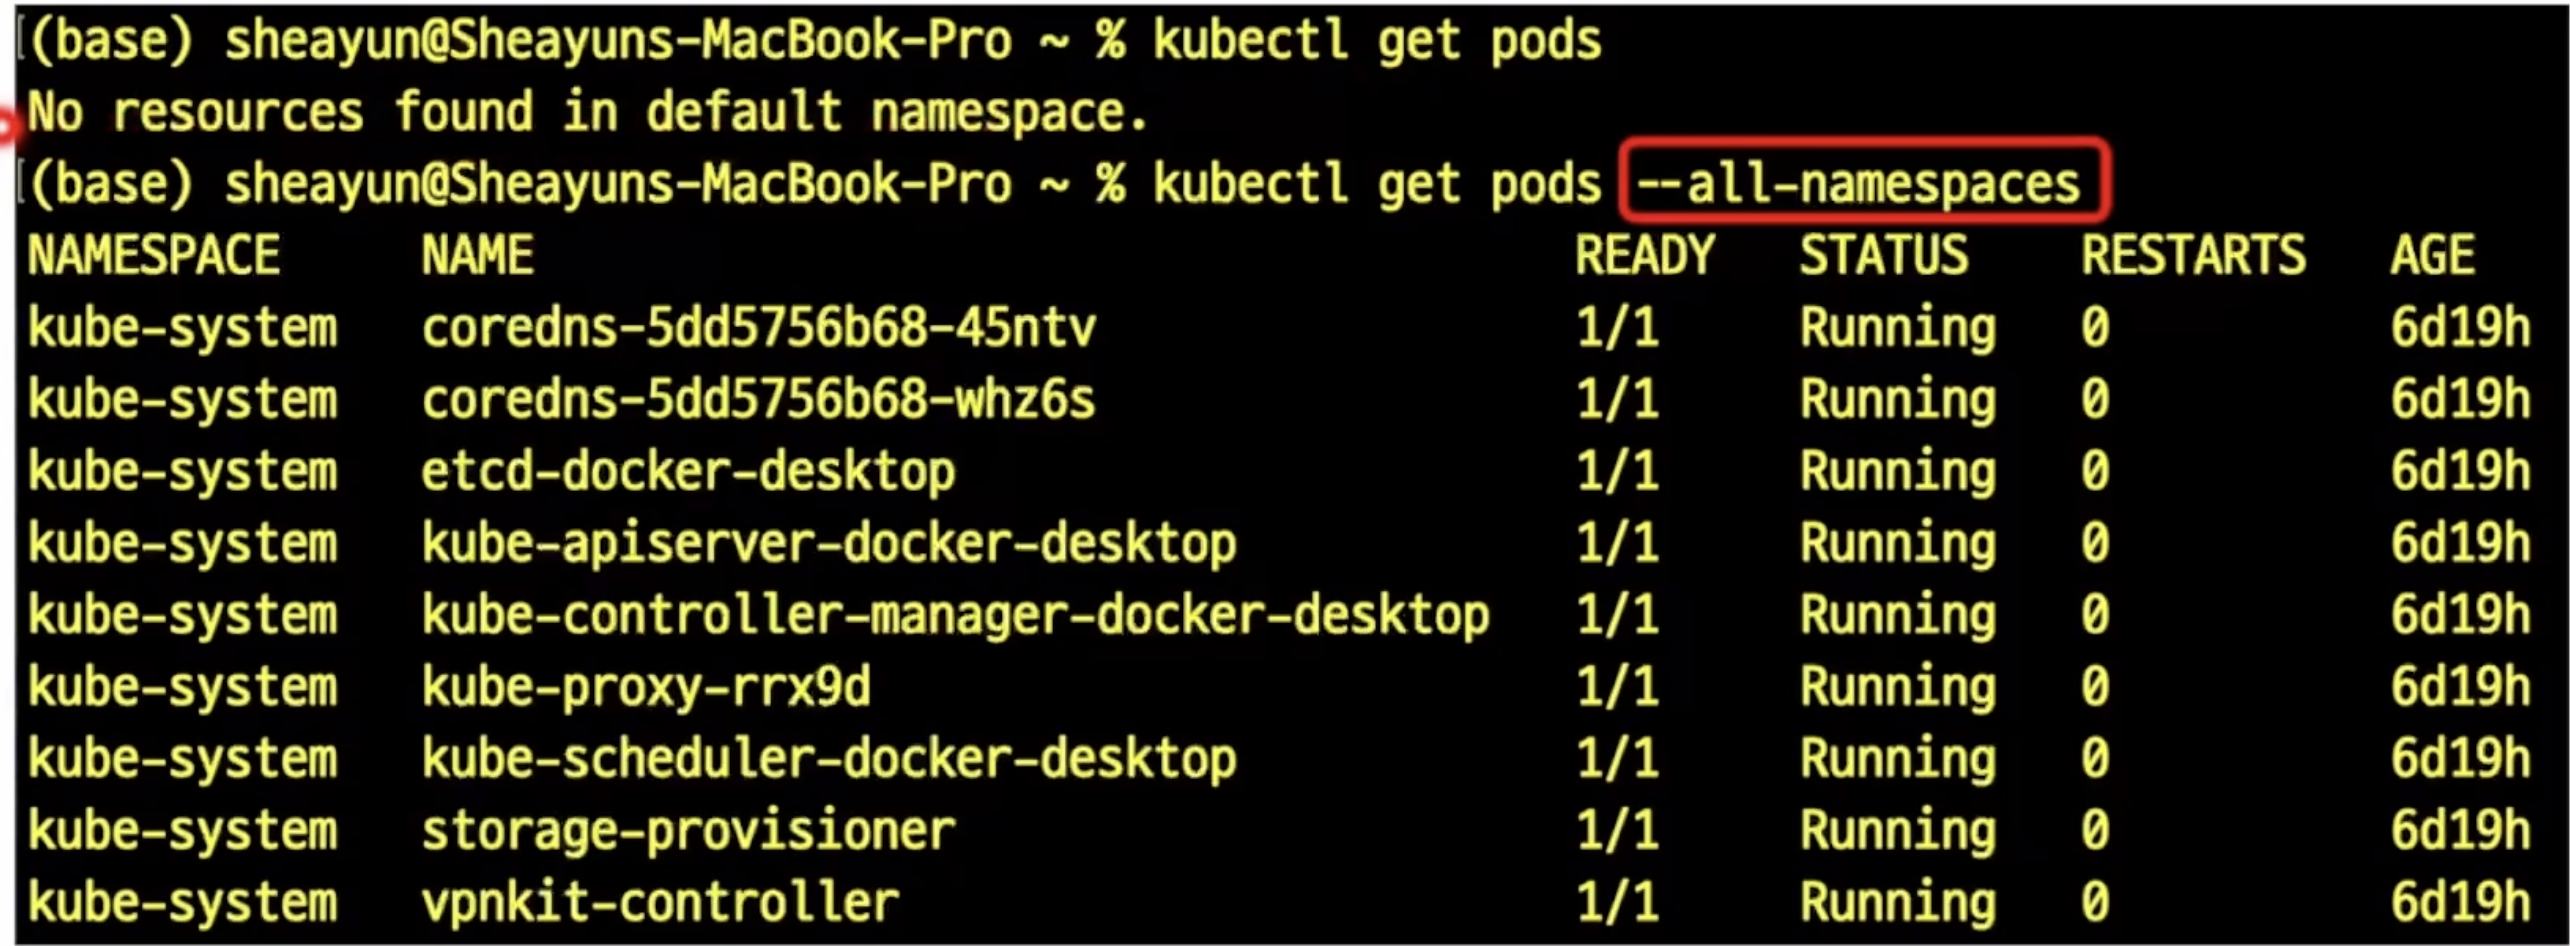
모든 pods들을 확인할려면 다음과 같이 검색해볼 수 있다.
컨테이너 이미지를 이용한 포드 생성
명령어: `kubectl run <포드이름> --image=<이미지 지정>
쿠버네티스 디플로이먼트
Deployment
- 응용의 배포를 위하여 많이 이용되는 k8s의 오브젝트 형태
- 동일한 모습의 포드들의 복제본 모음인 레플리카셋(replicaset)을 이용하는 것이 일반적
- 단순한 레플리카셋에 비하여 동적 업데이트 및 롤백(rollback), 배포 버전의 관리 등이 유연하여 응용의 배포에 널리 이용됨
- 보통은 상태가 없는 (stateless) 응용의 배포에 이용
- (기억하자)포드는 언제라도 사멸할 수 있음
동작 방식
- 디플로이먼트의 상태를 선언하면 k8s가 동적으로 의도된 상태(desired state)가 되도록 레플리카셋을 관리
$> kubectl describe pod nginx-pod

Name:             nginx-pod
Namespace:        default
Priority:         0
Service Account:  default
Node:             minikube/192.168.49.2
Start Time:       Fri, 16 May 2025 00:56:26 +0900
Labels:           run=nginx-pod
Annotations:      <none>
Status:           Running
IP:               10.244.0.7
IPs:
  IP:  10.244.0.7
Containers:
  nginx-pod:
    Container ID:   docker://3ed9fb82b100787b1ef62d205bd232608c2950056d3f0e8f20972272630a8701
    Image:          nginx
    Image ID:       docker-pullable://nginx@sha256:c15da6c91de8d2f436196f3a768483ad32c258ed4e1beb3d367a27ed67253e66
    Port:           <none>
    Host Port:      <none>
    State:          Running
      Started:      Fri, 16 May 2025 00:56:28 +0900
    Ready:          True
    Restart Count:  0
    Environment:    <none>
    Mounts:
      /var/run/secrets/kubernetes.io/serviceaccount from kube-api-access-cjn4q (ro)
Conditions:
  Type                        Status
  PodReadyToStartContainers   True
  Initialized                 True
  Ready                       True
  ContainersReady             True
  PodScheduled                True
Volumes:
  kube-api-access-cjn4q:
    Type:                    Projected (a volume that contains injected data from multiple sources)
    TokenExpirationSeconds:  3607
    ConfigMapName:           kube-root-ca.crt
    Optional:                false
    DownwardAPI:             true
QoS Class:                   BestEffort
Node-Selectors:              <none>
Tolerations:                 node.kubernetes.io/not-ready:NoExecute op=Exists for 300s
                             node.kubernetes.io/unreachable:NoExecute op=Exists for 300s
Events:
  Type    Reason     Age   From               Message
  ----    ------     ----  ----               -------
  Normal  Scheduled  13s   default-scheduler  Successfully assigned default/nginx-pod to minikube
  Normal  Pulling    14s   kubelet            Pulling image "nginx"
  Normal  Pulled     12s   kubelet            Successfully pulled image "nginx" in 1.935s (1.935s including waiting). Image size: 197741310 bytes.
  Normal  Created    12s   kubelet            Created container: nginx-pod
  Normal  Started    12s   kubelet            Started container nginx-pod

$> kubectl scale deployment dpy-nginx --replicas=3
deployment.apps/dpy-nginx scaled

$> kubectl get pods
NAME                         READY   STATUS    RESTARTS   AGE
dpy-nginx-746fbb5c5c-7qrjj   1/1     Running   0          16s
dpy-nginx-746fbb5c5c-9z9zr   1/1     Running   0          16s
dpy-nginx-746fbb5c5c-rgj58   1/1     Running   0          9m48s
nginx-pod                    1/1     Running   0          4m18s

$> kubectl get deployments
NAME        READY   UP-TO-DATE   AVAILABLE   AGE
dpy-nginx   3/3     3            3           10m
클러스터 바깥으로 응용을 노출해 보자
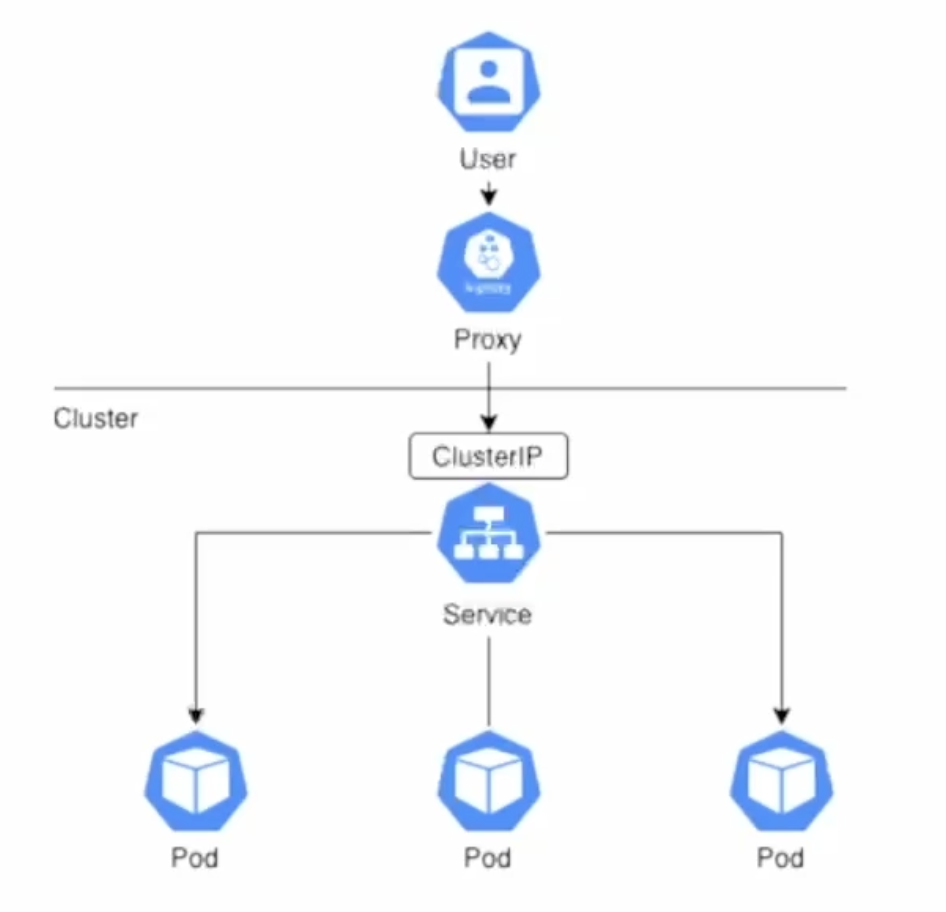
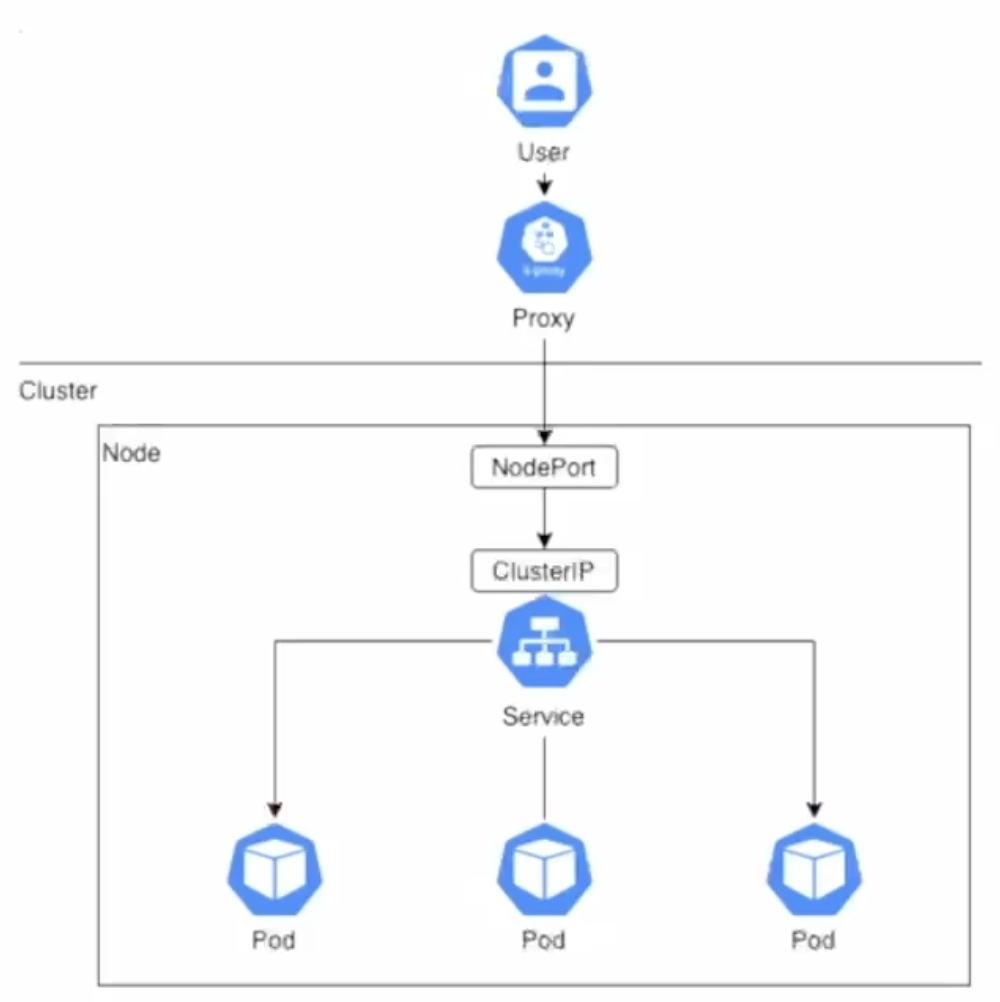
k8s 서비스
- 클러스터 내부의 포드에 의하여 실행되는 응용을 외부에 접근 가능하도록 노출하는 기능을 하는 오브젝트
노출하는 대상 - 특정 포드(또는 포드들의 집합)에서 실행하는 컨테이너의 특정 포트
서비스의 서로 다른 형태들
- ClusterIP
- NodePort: 지금 우리가 만들려는 형태
- LoadBalancer
- ExternalName
$> kubectl get pods
NAME                         READY   STATUS    RESTARTS   AGE
dpy-nginx-746fbb5c5c-7qrjj   1/1     Running   0          2m28s
dpy-nginx-746fbb5c5c-9z9zr   1/1     Running   0          2m28s
dpy-nginx-746fbb5c5c-rgj58   1/1     Running   0          12m
nginx-pod                    1/1     Running   0          6m30s

$> kubectl expose pod nginx-pod --type=NodePort --name=pod-svc --port=80
service/pod-svc exposed

$> kubectl get svc
NAME         TYPE        CLUSTER-IP       EXTERNAL-IP   PORT(S)        AGE
kubernetes   ClusterIP   10.96.0.1        <none>        443/TCP        2d5h
pod-svc      NodePort    10.106.211.243   <none>        80:32317/TCP   11s

$> curl localhost:32317
curl: (7) Failed to connect to localhost port 32317 after 0 ms: Couldn't connect to server

$> minikube service pod-svc
minikube service pod-svc
|-----------|---------|-------------|---------------------------|
| NAMESPACE |  NAME   | TARGET PORT |            URL            |
|-----------|---------|-------------|---------------------------|
| default   | pod-svc |          80 | http://192.168.49.2:32317 |
|-----------|---------|-------------|---------------------------|
🏃  Starting tunnel for service pod-svc.
|-----------|---------|-------------|------------------------|
| NAMESPACE |  NAME   | TARGET PORT |          URL           |
|-----------|---------|-------------|------------------------|
| default   | pod-svc |             | http://127.0.0.1:61882 |
|-----------|---------|-------------|------------------------|
🎉  Opening service default/pod-svc in default browser...
❗  Because you are using a Docker driver on darwin, the terminal needs to be open to run it.

// 다른 터미널에서
$> curl 127.0.0.1:61882
<!DOCTYPE html>
<html>
<head>
<title>Welcome to nginx!</title>
<style>
html { color-scheme: light dark; }
body { width: 35em; margin: 0 auto;
font-family: Tahoma, Verdana, Arial, sans-serif; }
</style>
</head>
<body>
<h1>Welcome to nginx!</h1>
<p>If you see this page, the nginx web server is successfully installed and
working. Further configuration is required.</p>

<p>For online documentation and support please refer to
<a href="http://nginx.org/">nginx.org</a>.<br/>
Commercial support is available at
<a href="http://nginx.com/">nginx.com</a>.</p>

<p><em>Thank you for using nginx.</em></p>
</body>
</html>
오브젝트의 삭제
- 명령어:
kubectl delete <오브젝트 형태> <오브젝트 이름>
서비스의 삭제
실습과제
- 앞에서와 마찬가지 방법으로 dpy-nginx 디플로이먼트를 노출하고 있던 서비스(dpy-svc)를 삭제해보세요.
확인 - 이전에 서비스 제공되던 localhost의 포트에 접속 불가능
- 서비스 오브젝트 없음, 그러나 디플로이먼트와 포드들은 여전히 그대로임
포드도 삭제
kubectl run에 의하여 생성된 포드의 삭제
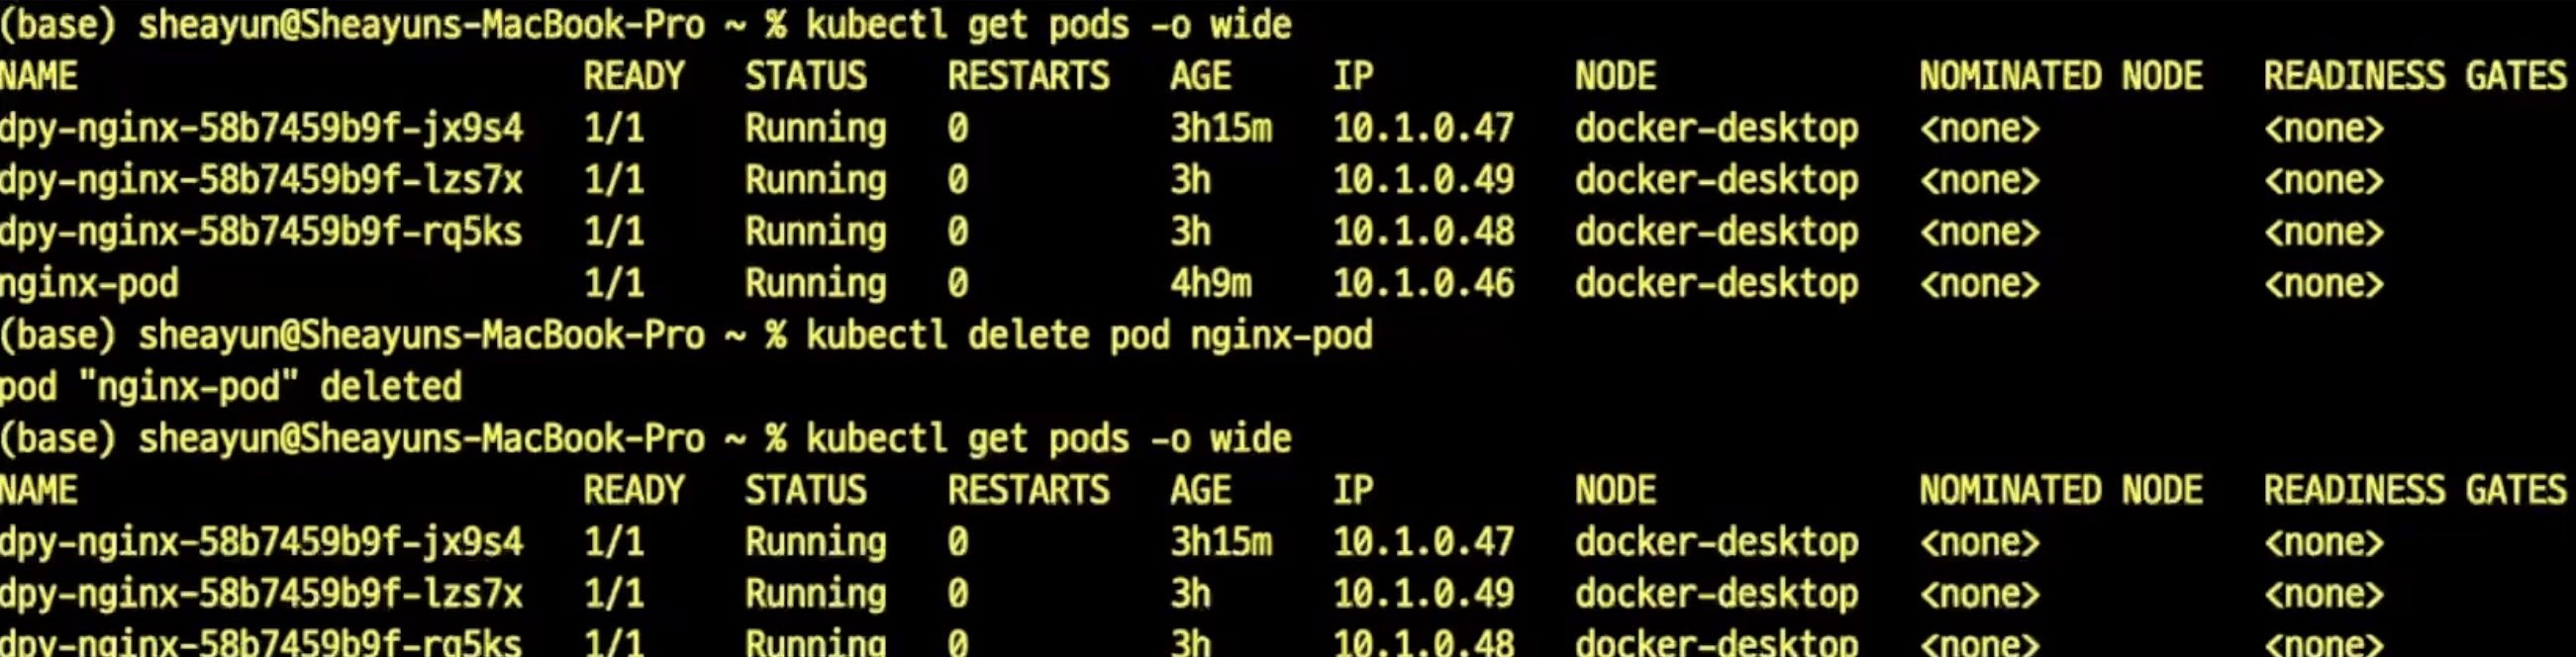
디플로이먼트의 생성에 의하여 만들어진 포드의 삭제
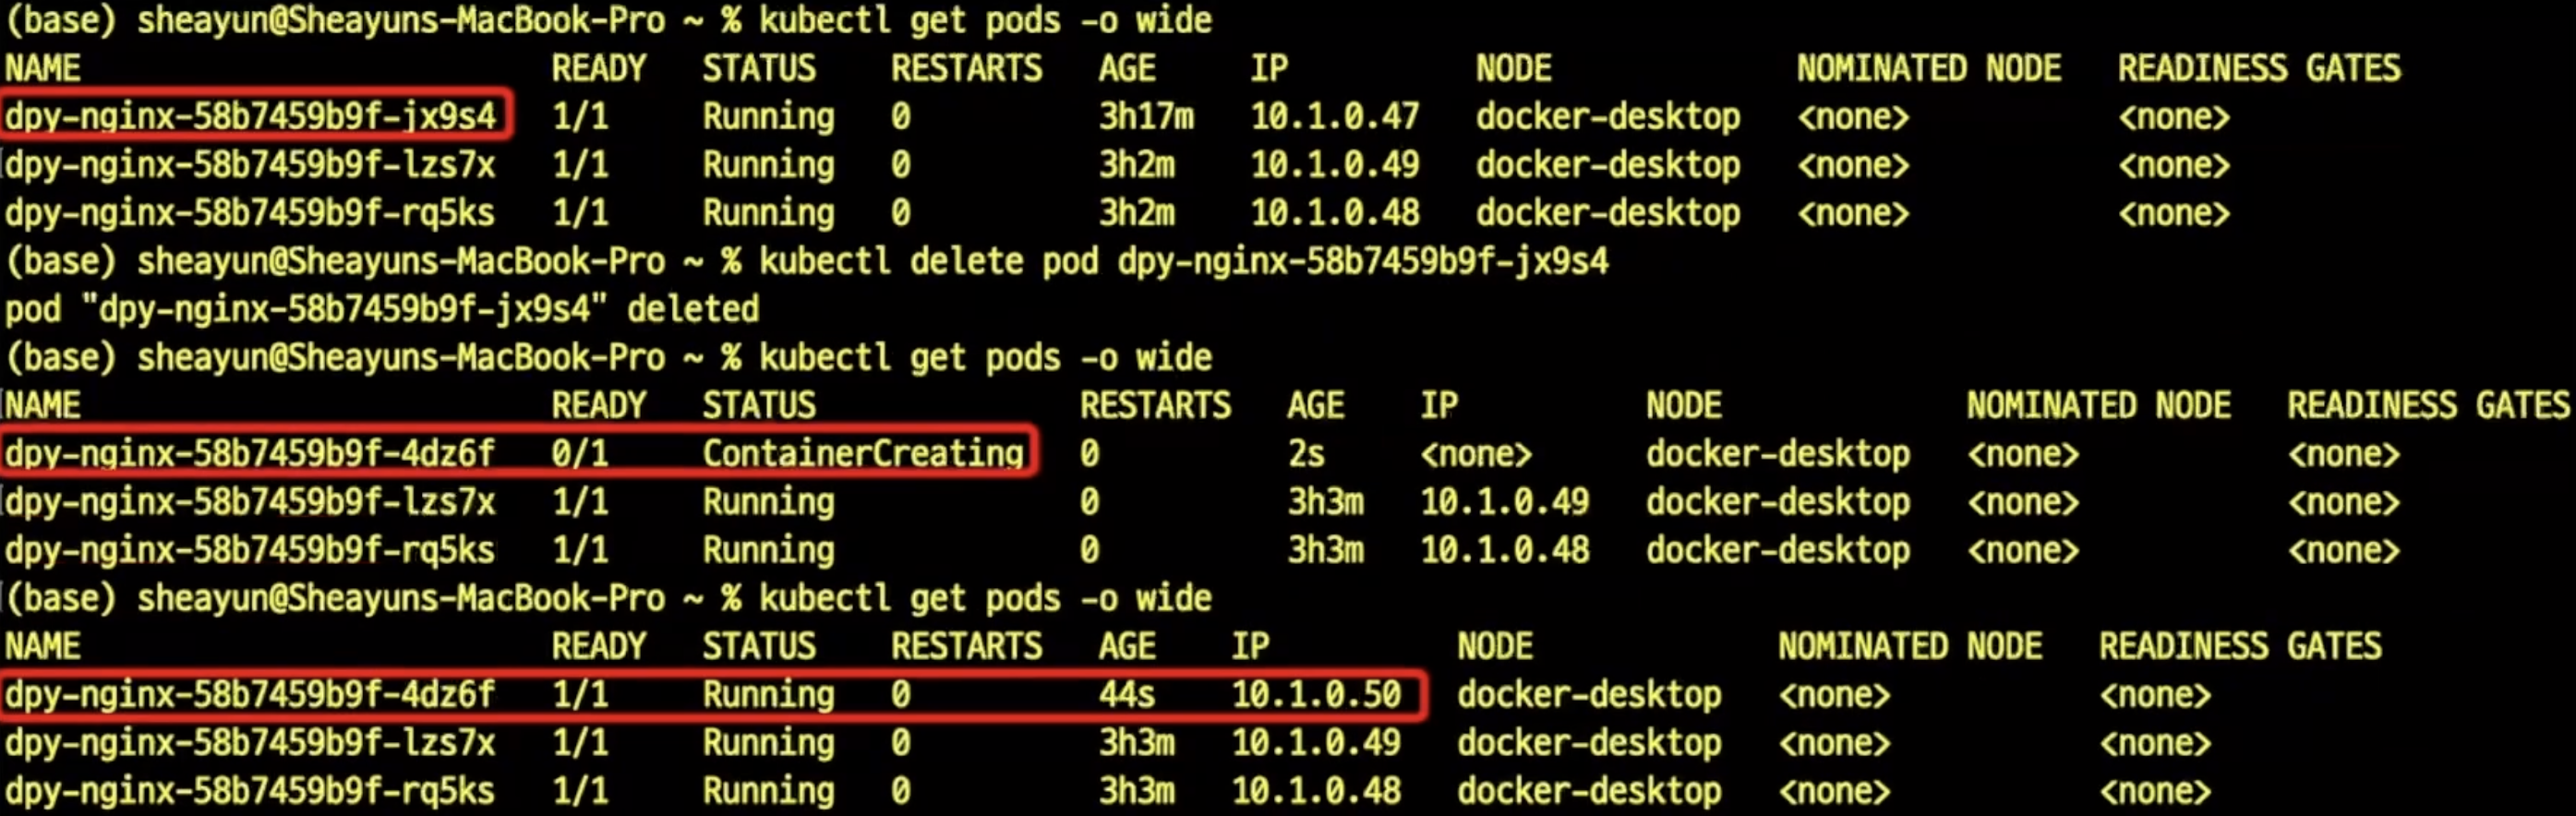
포드가 삭제되기는 하지만, 곧 이어 디플로이먼트의 선언 상태에 맞도록 다른 포드가 생성되어 세 개의 포드를 유지
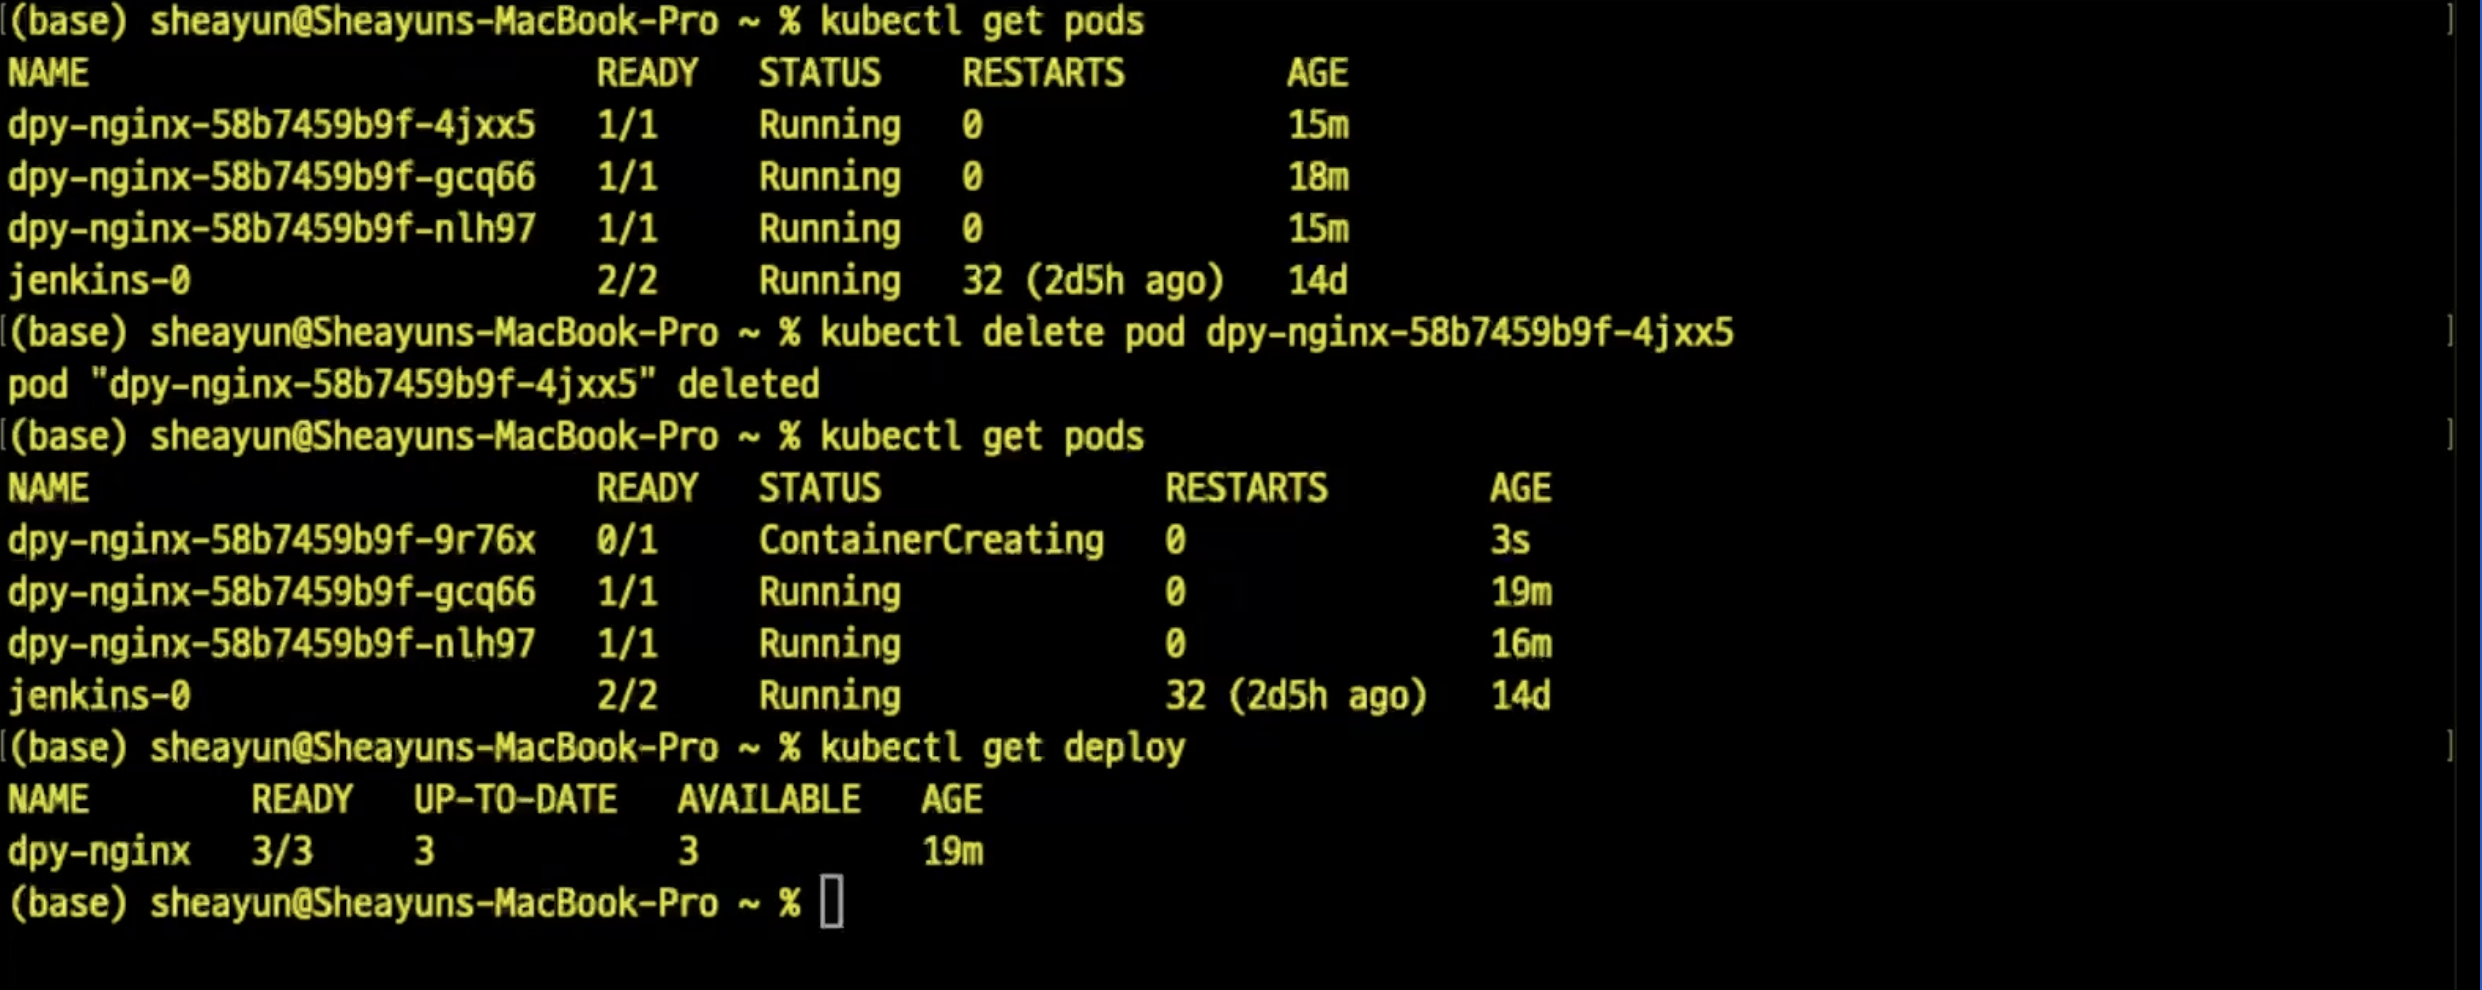
이제 디플로이먼트를 삭제하면 어떻게 될까?

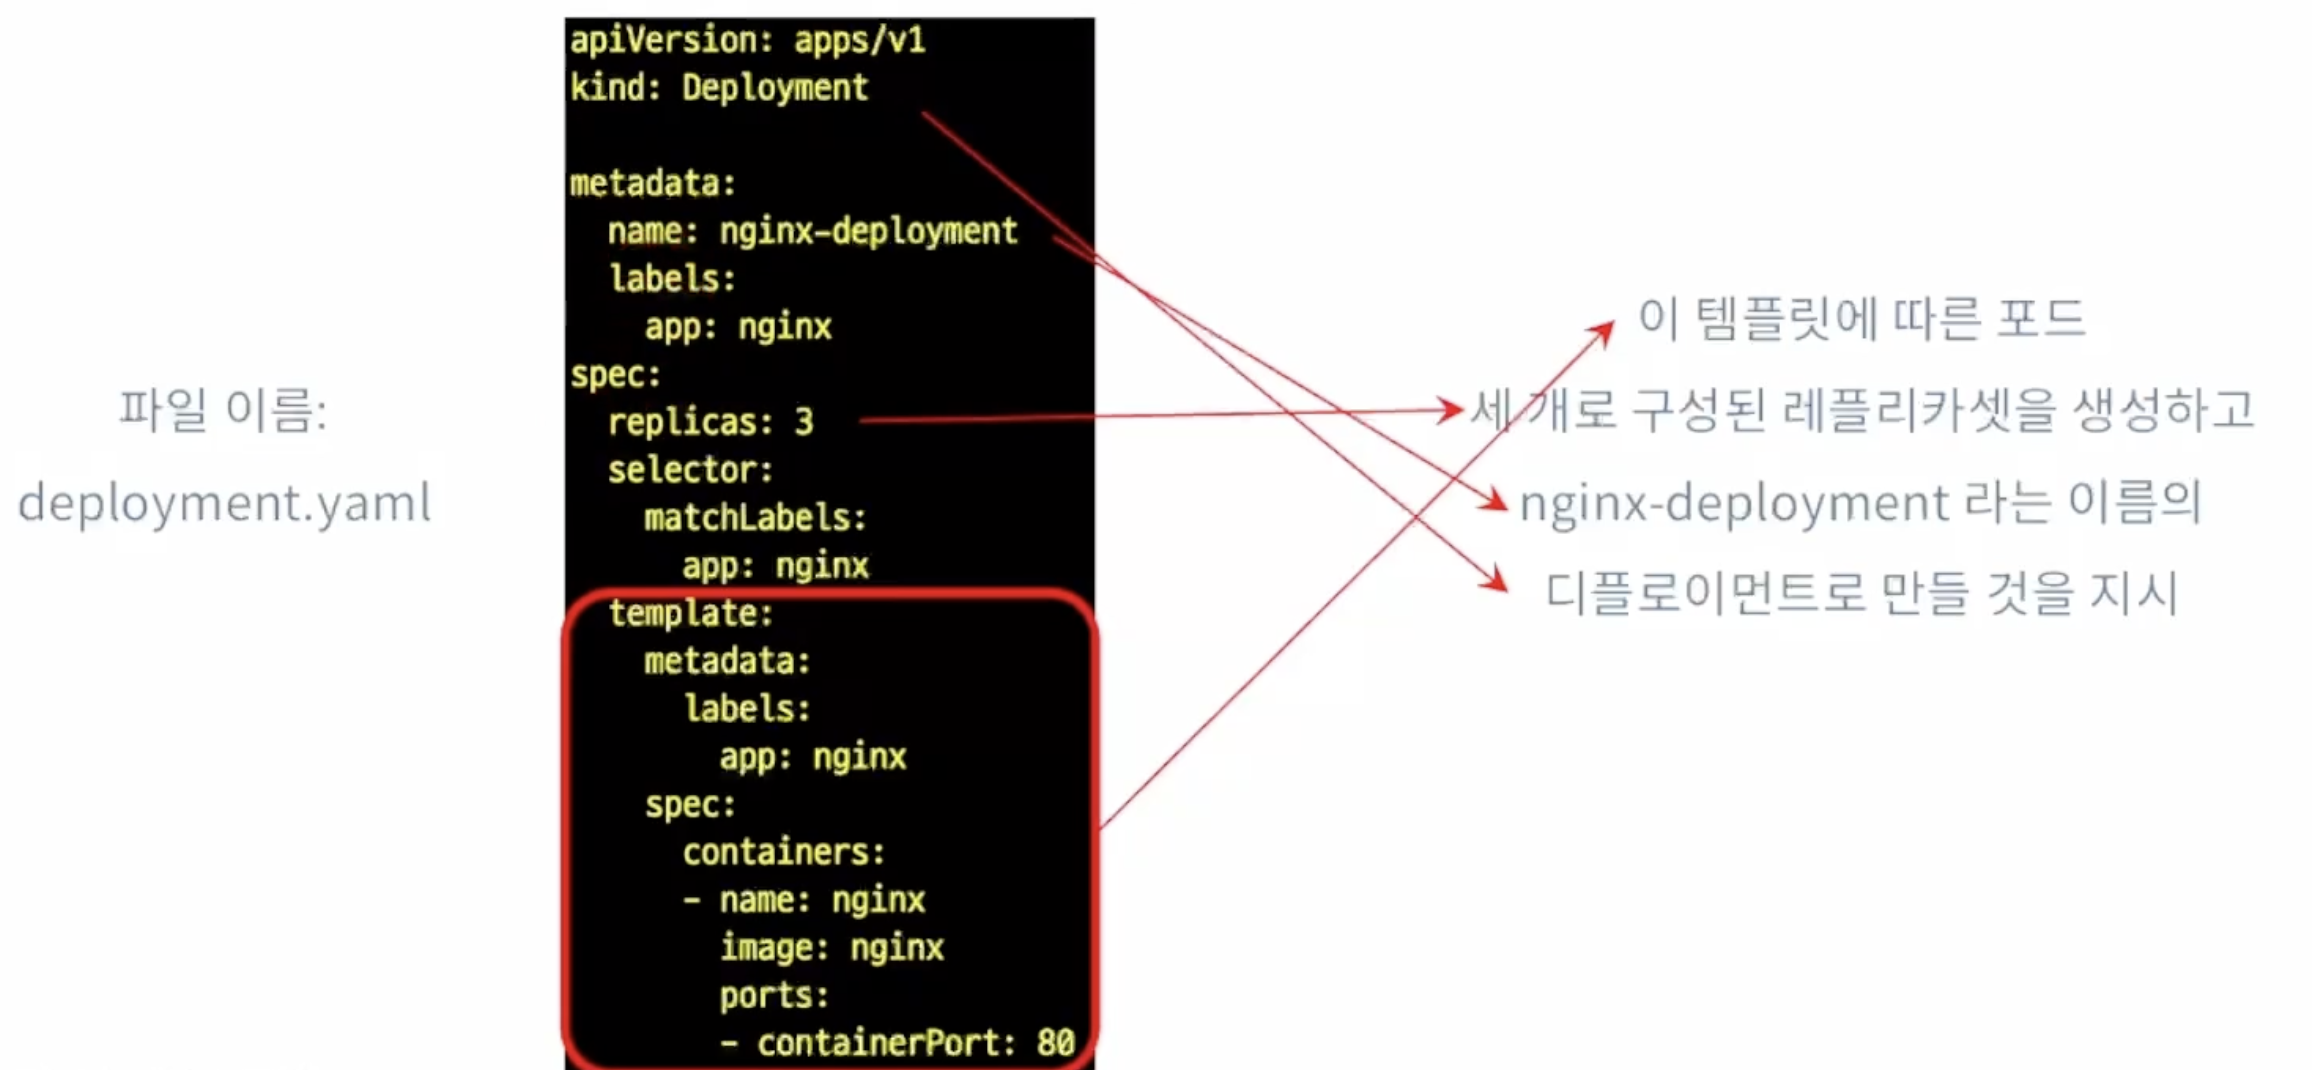
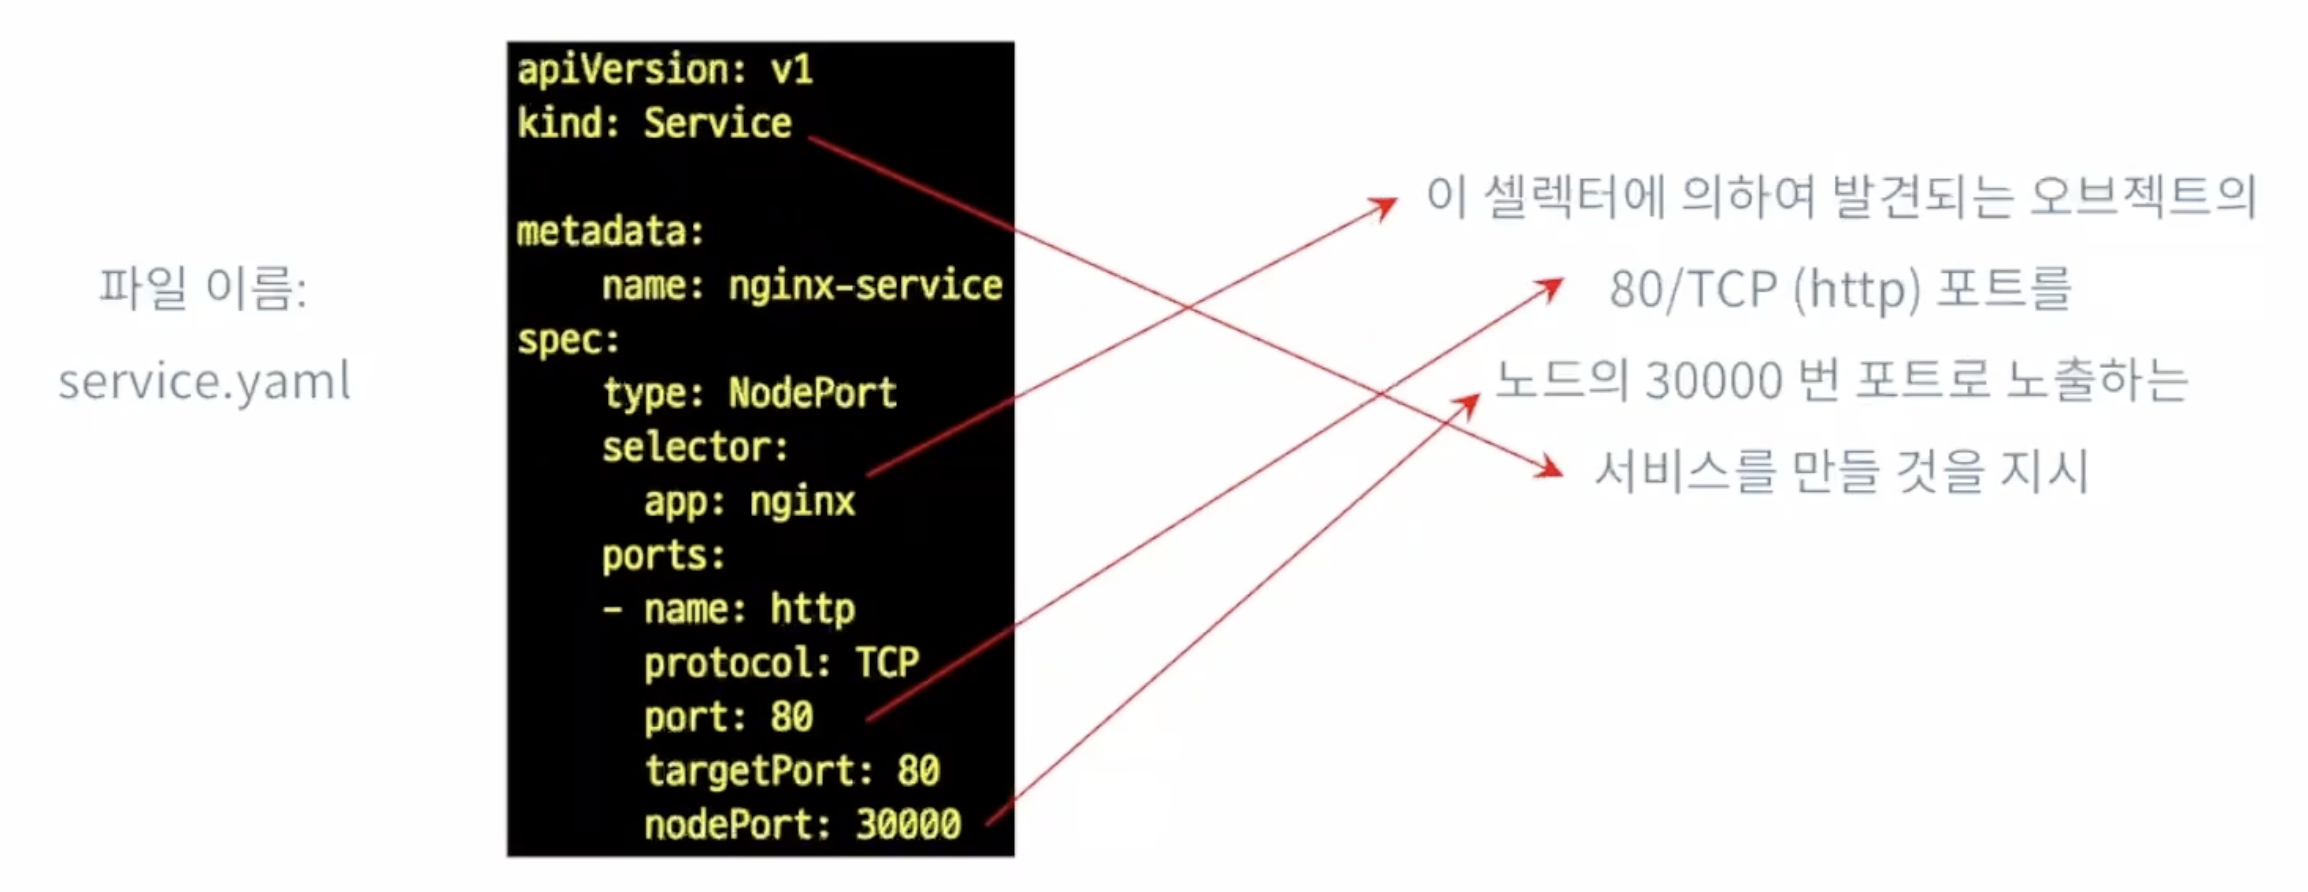
매니페스트(manifest)
k8s 오브젝트에 대한 명세를 파일로 기록한 것
- YAML(Yet Another Markup Language 또는 YAML Ain't Markup Language)형태를 이용
파일에 각 오브젝트에 의도하는 상태(desired state)를 기술
- 이 것을 오브젝트 스팩(ojbect spec.)이라고 부름
이 파일을 이용하여
- 오브젝트를 생성할 수 있고
- (파일의 내용을 변경하여) 오브젝트의 상태를 변경할 수 있음
- 물론, 파일의 내용을 변경하지 않고 다른 파일을 이용하여 오브젝트 상태를 변경하는 것도 가능
자동화가 필요한 환경에서 (단연히) 명령어 라인에 일일이 입력하는 것보다 많이 이용됨
디플로이먼트의 오브젝트 스펙
앞서 kubectl create deployment 명령을 이용한 것과 동일한(다만, 옵션 --replicas=3 적용) 형태의 디플로이먼트를 생성하는 데 이용할 수 있는 파일(예시) => 이거 나중에 한번 따라해봐요
서비스의 오브젝트 스펙
위와 동일하나 nodePort 설정을 통해 노드의 어느 포트를 통해 노출할 것인지를 설정
매니페스트를 이용한 오브젝트 생성
명령어 kubectl apply -f <매니페스트 파일>
- kubectl create -f 를 이용할 수도 있으나 위의 명령을 더 널리 이용함
- (왜 그럴까?)이후 실습에서 두 가지 방법을 모두 적용해 보고 생각해 볼것
실습 과제
- 앞에서 행했던 실험(명령어 라인에 명령을 입력하여 했던 것들)을 모두 매니페스트 파일들을 이용해서 반복
- 디플로이먼트와 포드의 생성, 서비스 실행 확인, 접속 가능 확인 등
- 그 후에는 kubectl delete ... 를 이용하여 오브젝트들을 삭제
쿠버네티스를 이용한 서비스 운용
목표: 반복 실습과 함계 k8s 클러스터에 배포된 응용의 동작 보증 관찰
실습 단계
- 간단한 테스트용 flask웹 응용을 만들고 이것을 nginx위에 쌓아 도커 이미지 만들기
- 만들어진 이미지를 이용한 컨테이너를 실행하고 서비스로 노출하도록 매니페스트 작성
- 이 응용을 (수동으로)k8s 클러스터에 배포하고 예외상황에 대한 k8s의 대처 방식 관측
- 포드가 사멸하는 경우
- 컨테이너 실행에 문제가 생기는 경우
예제로 (쿠버네티스 동작을 관찰하기 위해)간단한 웹 응용을 제작
- 기능: 웹 요청을 수신하여 이의 응답으로 다음의 두 가지 정보를 출력
- hostname: 이것은 어떻게 설정될까? 노드의 정보인가?
- ip주소: 이것은 또 어떻게 설정될까? 포드에 동적으로 붙여지는 것인가?
- 구현방법
- docker build를 통해 (Dockerfile 작성) 예제 서버 이미지 작성
- 웹 서버로는 nginx를 이용(base image 는 nginx:latest)
- Flask를 이용한 웹 응용 작성
- 설정 및 구동 파일 등은 각각 작성해서 이미지에 추가
이것의 목적은: 클러스터에서 수신한 요청에 대하여 k8s가 반응하는 방식을 간단히 (hostname 과 ip로)모니터링하려고
서버 구성 준비
설정과 구동을 위한 간단한 파일들
-
app.py
-
deployment.yaml
-
Dockerfile

-
requirements.txt
-
service.yaml
-
site.conf
-
start.sh
을 만들고,
$> docker build -t hostname:latest .
[+] Building 18.9s (19/19) FINISHED                               docker:desktop-linux
 => [internal] load build definition from Dockerfile                              0.0s
 => => transferring dockerfile: 739B                                              0.0s
 => WARN: JSONArgsRecommended: JSON arguments recommended for ENTRYPOINT to prev  0.0s
 => [internal] load metadata for docker.io/library/nginx:latest                   0.0s
 => [internal] load .dockerignore                                                 0.0s
 => => transferring context: 2B                                                   0.0s
 => [ 1/14] FROM docker.io/library/nginx:latest                                   0.0s
 => [internal] load build context                                                 0.0s
 => => transferring context: 1.28kB                                               0.0s
 => [ 2/14] RUN apt update                                                        2.6s
 => [ 3/14] RUN apt install -y python3-full                                      11.5s
 => [ 4/14] RUN apt install -y procps                                             0.9s
 => [ 5/14] WORKDIR /flaskapp                                                     0.0s
 => [ 6/14] RUN python3 -m venv /flaskapp/venv                                    1.6s
 => [ 7/14] COPY requirements.txt requirements.txt                                0.0s
 => [ 8/14] RUN /flaskapp/venv/bin/pip install -r requirements.txt                1.3s
 => [ 9/14] COPY app.py app.py                                                    0.0s
 => [10/14] COPY site.conf /etc/nginx/sites-available/flaskapp.conf               0.0s
 => [11/14] RUN ln -s /etc/nginx/sites-available/flaskapp.conf /etc/nginx/conf.d  0.1s
 => [12/14] RUN mv /etc/nginx/conf.d/default.conf /etc/nginx/conf.d/default.conf  0.1s
 => [13/14] COPY start.sh start.sh                                                0.0s
 => [14/14] RUN chmod 777 start.sh                                                0.1s
 => exporting to image                                                            0.4s
 => => exporting layers                                                           0.4s
 => => writing image sha256:fa97cc98749d14296060fae9ce043d178fda54c475540dbae6db  0.0s
 => => naming to docker.io/library/hostname:latest                                0.0s

View build details: docker-desktop://dashboard/build/desktop-linux/desktop-linux/s8s53en34vtw3at8aieu2l4ks

 1 warning found (use docker --debug to expand):
 - JSONArgsRecommended: JSON arguments recommended for ENTRYPOINT to prevent unintended behavior related to OS signals (line 20)

What's next:
    View a summary of image vulnerabilities and recommendations → docker scout quickview
$> docker tag hostname:latest wltjd1688/hostname:latest
$> docker push wltjd1688/hostname:latest
The push refers to repository [docker.io/wltjd1688/hostname]
614ad2fa7bf6: Preparing
3a274698c2a7: Preparing
7d57c511aed5: Preparing
98ad5337e510: Preparing
257f3ef9c56d: Preparing
32e2ff731b1c: Preparing
a67faa235a3f: Pushed
4238f5594310: Pushed
7807f2ce2306: Pushed
b0b457edfe5a: Pushed
7c6c2c738f7d: Pushed
a91837cadc52: Pushed
9a20e1cd113f: Pushed
512fe6d93add: Mounted from library/nginx
7c0361586037: Mounted from library/nginx
4b69dde42081: Mounted from library/nginx
fdadf1c8aa80: Mounted from library/nginx
40e23e74a0ac: Mounted from library/nginx
4650184d9922: Pushed
66a307619b8c: Mounted from library/httpd
latest: digest: sha256:2d0bf18c40cf033a70d0483446a4802e9cb4ab04ce96ec5c5541fe47077cac30 size: 4490
리포지토리의 이미지 태그는 각자의 Docker Hub 계정에 맞게 지정해야 함
푸시가 잘 일어진 이후에는 리포지토리부터 이미지를 풀하여 컨테이너 생성에 이용할 수 있게 됨
매니페스트 작성
deployment.yaml
...
    spec:
      containers:
      - name: hname
-       image: hostname:latest
+       image: wltjd1688/hostname:latest
        ports:
        - containerPort: 80
배포할때는 image에 또 들어가는게 달라진다.
service.yaml
apiVersion: v1
kind: Service

metadata:
    name: svc-hname
spec:
    type: NodePort
    selector:
        app: hostname
    ports:
    - name: http
      protocol: TCP
      port: 80
      targetPort: 80
      nodePort: 30000
app:hostname에 의하여 발견되는 응용의 80/TCP 포트를 노드의 port 30000에 노출하겠다는 뜻
테스트 응용의 (수동) 배포
depolyment.yaml에 지정된 대로 포드 생성해서 컨테이너 실행
$> kubectl apply -f deployment.yaml && kubectl apply -f service.yaml
deployment.apps/dpy-hname created
service/svc-hname created

$> minikube service svc-hname
|-----------|-----------|-------------|---------------------------|
| NAMESPACE |   NAME    | TARGET PORT |            URL            |
|-----------|-----------|-------------|---------------------------|
| default   | svc-hname | http/80     | http://192.168.49.2:30000 |
|-----------|-----------|-------------|---------------------------|
🏃  Starting tunnel for service svc-hname.
|-----------|-----------|-------------|------------------------|
| NAMESPACE |   NAME    | TARGET PORT |          URL           |
|-----------|-----------|-------------|------------------------|
| default   | svc-hname |             | http://127.0.0.1:62808 |
|-----------|-----------|-------------|------------------------|
🎉  Opening service default/svc-hname in default browser...
❗  Because you are using a Docker driver on darwin, the terminal needs to be open to run it.

$> curl http://127.0.0.1:62808/
<p>Hostname: dpy-hname-84c4d554b9-9cnzd</p><p>IPv4 Address: 10.244.0.20</p>
$> curl http://127.0.0.1:62808/
<p>Hostname: dpy-hname-84c4d554b9-f9g5f</p><p>IPv4 Address: 10.244.0.19</p>
$> curl http://127.0.0.1:62808/
<p>Hostname: dpy-hname-84c4d554b9-9cnzd</p><p>IPv4 Address: 10.244.0.20</p>
$> curl http://127.0.0.1:62808/
<p>Hostname: dpy-hname-84c4d554b9-9cnzd</p><p>IPv4 Address: 10.244.0.20</p>
$> curl http://127.0.0.1:62808/
<p>Hostname: dpy-hname-84c4d554b9-f9g5f</p><p>IPv4 Address: 10.244.0.19</p>
$> curl http://127.0.0.1:62808/
<p>Hostname: dpy-hname-84c4d554b9-f9g5f</p><p>IPv4 Address: 10
주기적인 요청을 이용해 테스트
- Linux/MacOs: bash 스크립트
- windows: PowerShell 스크립트
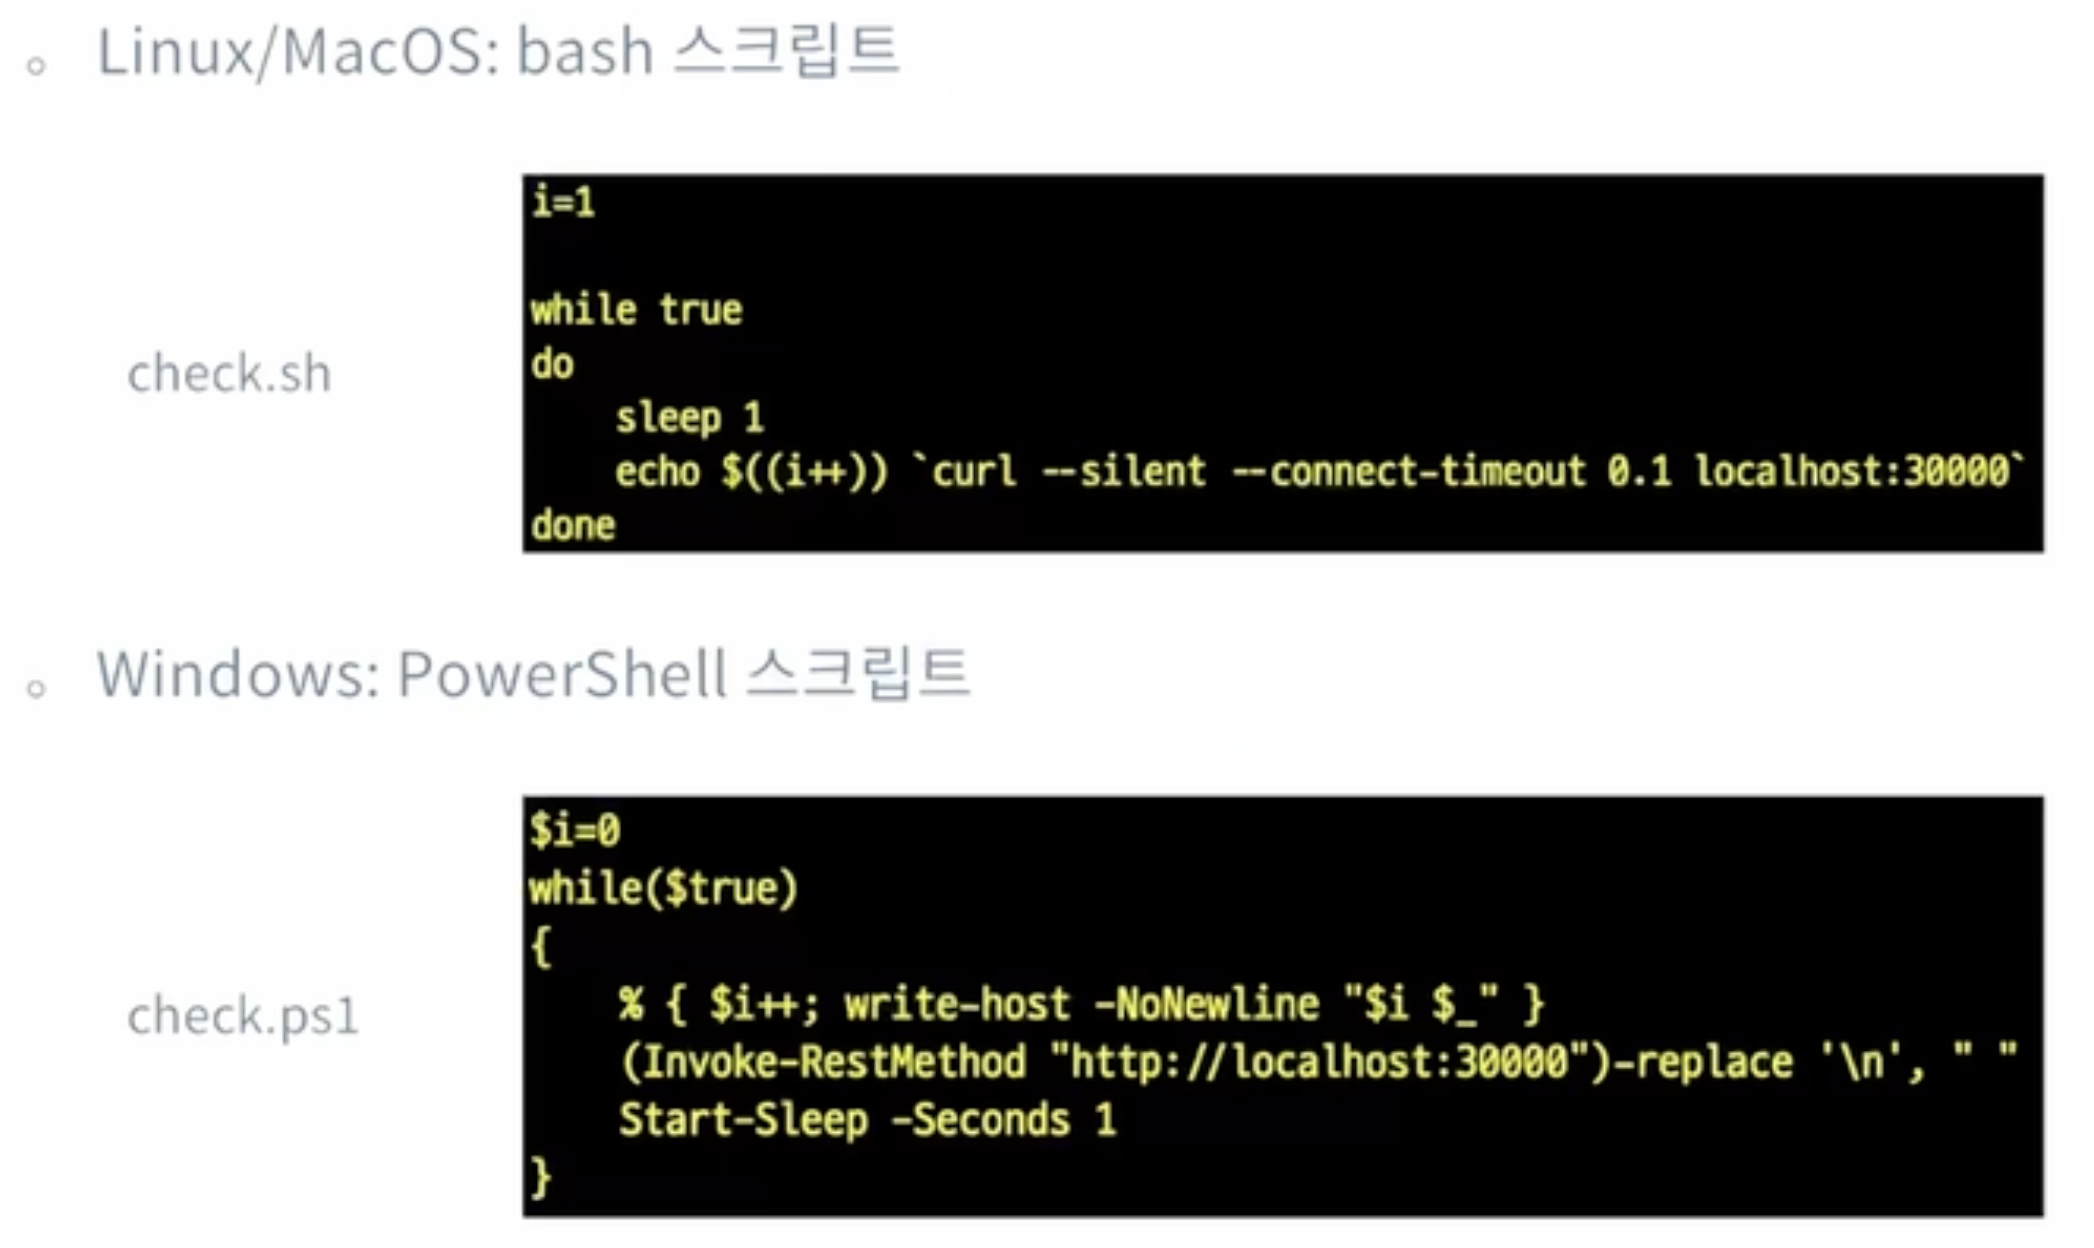
요청이 반복적으로 도착하고 있는 상태에서, 클러스터 내에 예외상황(?)이 발생하는 경우 k8s가 어떻게 대응하는지를 관찰
- 디플로이먼트의 레플리카셋에 포함된 포드가 사멸하는경우
- 특정 포드에서 실행하는 컨테이너에 오류가 발생하는 경우
테스트 준비: 포드 개수를 1로 줄여둠
실습 과제
- deployment.yaml 파일을 수정하여 레플리카셋의 크기를 1로 만들기
- kubectl apply 를 해서 디플로이먼트를 스케일다운
확인
- kubectl을 이용하여 포드들의 상태를 확인하고
- 명령어 라인에 curl을 반복입력하여 동일한 결과가 지속적으로 얻어짐을 확인
- check.sh을 실행하여 동일한 결과를 확인
테스트: 포드가 사멸하는 경우
한 터미널에서 check.sh실행, 주기적으로 1초 응답 확인하면서 다른 터미널에서 디플로이먼트에 속한 포드를 삭제
-> 삭제된 후 다른 이름으로 포드를 새로만듬
간접적으로 확인할 수 있는 바
- 포드가 사별하면 k8s는 새로운 포드를 생성함으로써 디플로이먼트에 선언된 "의도된 상태"를 유지하려고 함
- 클러스터 외부에는 별도의 서비스에 의하여 노출되므로 개별 포드의 클러스터 내(동적 할당되는)IP 주소 등에 대해서는 사용자가 관리할 필요 없음
- 단, 포드는 언제든지 죽을 수 있는 오브젝트이므로 컨테이너에 기반한 응용을 개발함에 있어 상태를 띠지 않는 (stateless)방식으로 만들어야함
테스트: 컨테이너에 오류 발생
컨테이너에 셀 접속을 얻어 이 응용(flask 기반)을 실행하고 있는 프로세스의 PID를 알아내고 Kill을 이용해서 이 프로세스를 강제 종료하는것
관측할 사항: 주기적으로 이 서비스에 요청을 보내고 있는 스크립트(check.sh)가 어떤 응답을 받게 되는지 확인
root@dpy-hname-84c4d554b9-z6cw4:/flaskapp# kill -9 22
root@dpy-hname-84c4d554b9-z6cw4:/flaskapp# command terminated with exit code 137
$> kubectl get pods
NAME                         READY   STATUS    RESTARTS      AGE
dpy-hname-84c4d554b9-z6cw4   1/1     Running   1 (35s ago)   2m45s

67 <p>Hostname: dpy-hname-84c4d554b9-z6cw4</p><p>IPv4 Address: 10.244.0.27</p>
68
69
70
71
72 <p>Hostname: dpy-hname-84c4d554b9-z6cw4</p><p>IPv4 Address: 10.244.0.27</p>
디플로이먼트에 의하여 배포된 포드의 컨테이너 실행에 문제가 생기면, k8s는 이 포드에서 실행하던 컨테이너를 삭제하고 다시 컨테이너를 생성해 응용을 지속 실행
k8s에 의하여 관리되는 포드는 복구할 수 없는 오류를 맞닥뜨리는 경우에는 재시작(RESTART)에 의하여 정해진 동작을 지속하도록 보장됨
요약
k8s 서비스 구성 및 간단한 장애에 어떻게 대응하는지를 확인함
포드의 업데이트와 복구
배포된 소프트웨어의 업데이트와 복구
- 소프트웨어의 업데이트가 발생함에 따라(매번 새로 배포하는 것이 아니라)동적 업데이트 필요
여기에서는 수동(kubectl)으로 업데이트 적용하는 실습을 통해 k8s가 어떻게 업데이트를 수행하는지 관찰 - 소프트웨어의 업데이트는 실패할 수 있으므로, 빠르고 유연한 복구는 필수 기능
업데이트 자체가 실패하는 경우 - 이번 강의에서 복구(rollback)하는 내용 포함
새 버전의 소프트웨어가 오동작하는 경우 - 가능한 한 발생하지 않도록 해야하겠으나, 만약 발생하는 경우에는 민첩한 복구 조치가 필요하다.
롤아웃 정보의 열람
-
"쿠버네티스 기본 사용법"에서 사용한 deployment.yaml 파일을 이용하여 디플로이먼트를 생성
다만, nginx 이미지의 버전을 지정(배포한 파일의 제20행, image: nginx:1.16.0)
그리고 이번 강의에서는 이 파일의 이름을 rollout.yaml로 하기로 -
새로 배우는 명령을 이용하여 롤아웃 정보와 이력을 조회
-
kubectl rollout status deployment <디플로이먼트>
디플로이먼트의 배포 상태를 조회 -
kubectl rollout history deployment <디플로이먼트>
디플로이먼트의 배포 이력을 조회
$> kubectl apply -f rollout.yaml
deployment.apps/dpy-nginx created

$> kubectl rollout status deployment dpy-nginx
deployment "dpy-nginx" successfully rolled out

$>  kubectl rollout history deployment dpy-nginx
deployment.apps/dpy-nginx
REVISION  CHANGE-CAUSE
1         <none>
이후 rollout.yaml파일을 수정하고 다시 하게되면
$> kubectl apply -f rollout.yaml --record
Flag --record has been deprecated, --record will be removed in the future
deployment.apps/dpy-nginx configured

$> kubectl rollout status deployment dpy-nginx
deployment "dpy-nginx" successfully rolled out

$> kubectl rollout history deployment dpy-nginx
deployment.apps/dpy-nginx
REVISION  CHANGE-CAUSE
1         kubectl apply --filename=rollout.yam
다음과 같이 무언가 바뀌었다고 나온다.
배포 이력의 기록
이전 과정을 다시 해보되, 이번에는 kubectl annotate를 적용해본다.
순서
- kubectl delete deployment dpy-nginx
- rollout.yaml 파일에 지정된 nginx 이미지의 버전은 다시 1.16.0으로(파일수정)
- kubectl apply -f rollout.yaml
- kubectl set image deployment dpy-nginx nginx=nginx:1.17.0
- kubectl annotate deployment dpy-nginx kubernetes.io/change-cause="설명"
- kubectl rollout history deployment dpy-nginx
$> kubectl delete deployment dpy-nginx
deployment.apps "dpy-nginx" deleted
$> kubectl apply -f rollout.yaml
deployment.apps/dpy-nginx created
$> kubectl apply -f service.yaml
service/svc-hname created
$> kubectl get service
NAME TYPE CLUSTER-IP EXTERNAL-IP PORT(S) AGE
kubernetes ClusterIP 10.96.0.1 <none> 443/TCP 8d
svc-nginx NodePort 10.102.169.199 <none> 80:30000/TCP 11s
(3.10.14) jisung ☃️ ~/programers/2-03 minikube service svc-nginx
|-----------|-----------|-------------|---------------------------|
| NAMESPACE | NAME | TARGET PORT | URL |
|-----------|-----------|-------------|---------------------------|
| default | svc-nginx | http/80 | http://192.168.49.2:30000 |
|-----------|-----------|-------------|---------------------------|
🏃 Starting tunnel for service svc-nginx.
|-----------|-----------|-------------|------------------------|
| NAMESPACE | NAME | TARGET PORT | URL |
|-----------|-----------|-------------|------------------------|
| default | svc-nginx | | http://127.0.0.1:49934 |
|-----------|-----------|-------------|------------------------|
🎉 Opening service default/svc-nginx in default browser...
❗ Because you are using a Docker driver on darwin, the terminal needs to be open to run it.
---
$> curl -I --silent localhost:49934
HTTP/1.1 200 OK
Server: nginx/1.16.0
Date: Wed, 21 May 2025 13:50:57 GMT
Content-Type: text/html
Content-Length: 612
Last-Modified: Tue, 23 Apr 2019 10:18:21 GMT
Connection: keep-alive
ETag: "5cbee66d-264"
Accept-Ranges: bytes
$> curl -I --silent localhost:49934 | grep Server
Server: nginx/1.16.0
$> kubectl rollout history deployment dpy-nginx
deployment.apps/dpy-nginx
REVISION CHANGE-CAUSE
1 <none>
$> kubectl set image deployment dpy-nginx nginx=nginx:1.1
7.0
deployment.apps/dpy-nginx image updated
$> kubectl annotate deployment dpy-nginx \
> kubernetes.io/change-cause="update nginx image from 1.16.0 to 1.17.0"
deployment.apps/dpy-nginx annotated
$> kubectl rollout history deployment dpy-nginx
deployment.apps/dpy-nginx
REVISION CHANGE-CAUSE
1 <none>
2 update nginx image from 1.16.0 to 1.17.0
$> curl -I --silent localhost:49934 | grep Server
Server: nginx/1.17.0
다음과 같이 수정한 부분에 대해서 설정한게 모두 반영되는걸 볼 수 있다.
이번에는 실패했을때를 한번 만들어보겠다.
$> kubectl set image deployment dpy-nginx nginx=nginx:1.18.30 <- 없는 버전으로 설정
deployment.apps/dpy-nginx image updated

$> kubectl annotate deployment dpy-nginx \
> kubenetes.io/change-cause="update nginx image from 1.17.0 to 1.18.30
dquote> "
deployment.apps/dpy-nginx annotated

$> kubectl rollout status deployment dpy-nginx
Waiting for deployment "dpy-nginx" rollout to finish: 1 out of 3 new replicas have been updated...
^C%                 <- 없는 버전이라 로딩이 안끝남
$> kubectl rollout history deployment dpy-nginx
deployment.apps/dpy-nginx
REVISION  CHANGE-CAUSE
1         <none>
2         update nginx image from 1.16.0 to 1.17.0
3         update nginx image from 1.16.0 to 1.17.0

$> curl -I --silent localhost:49934 | grep Server
Server: nginx/1.17.0		<- 버전이 바뀌지 않는걸 볼 수 있음

$> kubectl describe deployment dpy-nginx
Name:                   dpy-nginx
Namespace:              default
CreationTimestamp:      Wed, 21 May 2025 22:46:28 +0900
Labels:                 app=nginx
Annotations:            deployment.kubernetes.io/revision: 3
                        kubenetes.io/change-cause: update nginx image from 1.17.0 to 1.18.30
                        kubernetes.io/change-cause: update nginx image from 1.16.0 to 1.17.0
Selector:               app=nginx
Replicas:               3 desired | 1 updated | 4 total | 3 available | 1 unavailable
StrategyType:           RollingUpdate
MinReadySeconds:        0
RollingUpdateStrategy:  25% max unavailable, 25% max surge
Pod Template:
  Labels:  app=nginx
  Containers:
   nginx:
    Image:         nginx:1.18.30
    Port:          80/TCP
    Host Port:     0/TCP
    Environment:   <none>
    Mounts:        <none>
  Volumes:         <none>
  Node-Selectors:  <none>
  Tolerations:     <none>
Conditions:
  Type           Status  Reason
  ----           ------  ------
  Available      True    MinimumReplicasAvailable
  Progressing    True    ReplicaSetUpdated
OldReplicaSets:  dpy-nginx-6f69c65f8b (0/0 replicas created), dpy-nginx-757d84f5ff (3/3 replicas created)
NewReplicaSet:   dpy-nginx-5f7c66f5df (1/1 replicas created)
Events:
  Type    Reason             Age    From                   Message
  ----    ------             ----   ----                   -------
  Normal  ScalingReplicaSet  13m    deployment-controller  Scaled up replica set dpy-nginx-6f69c65f8b from 0 to 3
  Normal  ScalingReplicaSet  7m52s  deployment-controller  Scaled up replica set dpy-nginx-757d84f5ff from 0 to 1
  Normal  ScalingReplicaSet  7m51s  deployment-controller  Scaled down replica set dpy-nginx-6f69c65f8b from 3 to 2
  Normal  ScalingReplicaSet  7m51s  deployment-controller  Scaled up replica set dpy-nginx-757d84f5ff from 1 to 2
  Normal  ScalingReplicaSet  7m50s  deployment-controller  Scaled down replica set dpy-nginx-6f69c65f8b from 2 to 1
  Normal  ScalingReplicaSet  7m50s  deployment-controller  Scaled up replica set dpy-nginx-757d84f5ff from 2 to 3
  Normal  ScalingReplicaSet  7m49s  deployment-controller  Scaled down replica set dpy-nginx-6f69c65f8b from 1 to 0
  Normal  ScalingReplicaSet  2m20s  deployment-controller  Scaled up replica set dpy-nginx-5f7c66f5df from 0 to 1
$> kubectl rollout status deployment dpy-nginx
Waiting for deployment "dpy-nginx" rollout to finish: 1 out of 3 new replicas have been updated...
^C%
$> kubectl rollout undo deployment dpy-nginx
deployment.apps/dpy-nginx rolled back <- 롤백되었다고 나옴

$> kubectl get pods
NAME                         READY   STATUS    RESTARTS   AGE
dpy-nginx-757d84f5ff-5c92v   1/1     Running   0          9m8s
dpy-nginx-757d84f5ff-q4dck   1/1     Running   0          9m7s
dpy-nginx-757d84f5ff-rt2c6   1/1     Running   0          9m9s

$> curl -I --silent localhost:49934 | grep Server
Server: nginx/1.17.0

$> kubectl rollout history deployment dpy-nginx
deployment.apps/dpy-nginx
REVISION  CHANGE-CAUSE
1         <none>
3         update nginx image from 1.16.0 to 1.17.0
4         update nginx image from 1.16.0 to 1.17.0 <-마지막에 롤백된것도 나옴
특정 시점으로 디플로이먼트 복구하기
- 명령어
kubectl rollout undo deployment <디플로이먼트> -to-revision=<리비전 번호>
실습과제: 특정 리비전으로 복구, 확인
- 이전 실습에서 사용했던 디플로이먼트 삭제
- 리비전 1: nginx이미지 버전 태그를 1.16.0으로 배포
- 리비전 2: nginx이미지를 1.17.0으로 업데이트(kubectl set image 이용)
- 리비전 3: nginx이미지를 "latest"로 업데이트(rollout.yaml 파일 수정)
- (문제가 발생했다고 가정하고)리비전 1로 롤백
- 각 단계에서 rollout status, rollout history, 포드들의 상태, 서버로부터의 응답 (헤더)등을 확인
$> kubectl set image deployment dpy-nginx ngin
x=nginx@latest
deployment.apps/dpy-nginx image updated

$> kubectl rollout undo deployment dpy-nginx --to-revision=1
deployment.apps/dpy-nginx rolled back

$> kubectl rollout status deployment dpy-nginx
deployment "dpy-nginx" successfully rolled out

$> kubectl rollout history deployment dpy-nginx
deployment.apps/dpy-nginx
REVISION  CHANGE-CAUSE
2         <none>
3         <none>
쿠버네티스 서비스와 볼륨
서비스
클러스터에 외부에서 클러스터에 접속하는 방법
- 클러스터 내부에서 동작하는 기능을 외부로 "노출"하는 것을 서비스라고 부름
서로 다른 서비스의 종류
- 클러스터 IP(ClusterIP)
- 노드포트 (NodePort)
- 로드밸런서 (LoadBalancer)
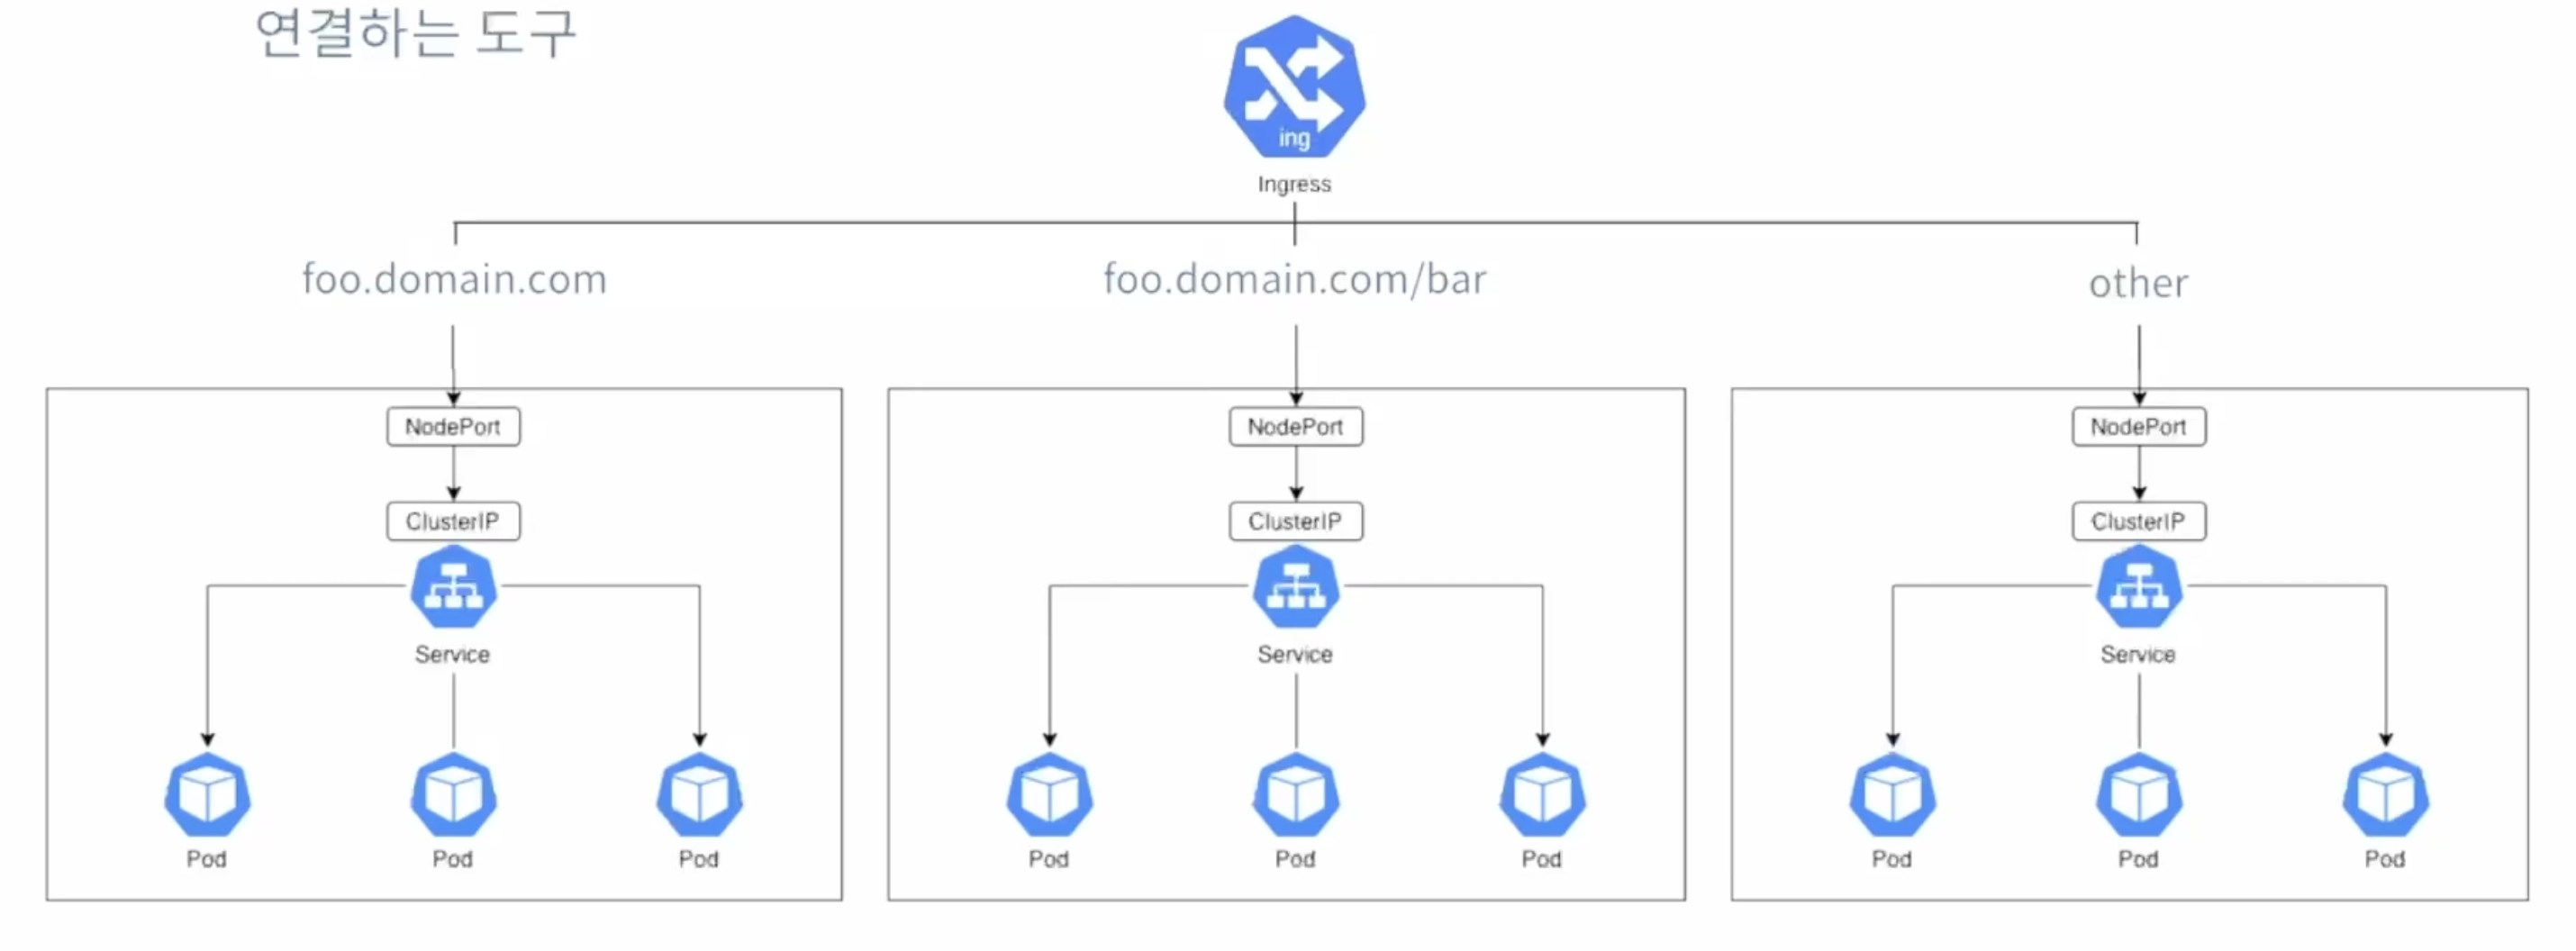
- 안그레스 (Ingress)
클러스터 IP
클러스터 내부에서만 접근할 수 있는 IP를 할당
포드 포워딩(port forwarding)또는 프록시(proxy)를 통해 클러스터 외부로부터 접근 가능
테스트, 디버깅 등의 목적에 제한적으로 이용
노드포트
모든 워커 노드의 특정 포트를 열고 여기로 오는 모든 요청을 노드포트 서비스에 전달
노드포트 서비스는 해당 요청을 처리할 수 있는 포드로 요청을 전달
우리가 앞선 실습에서 포드들이 제공하는 웹 서비스 클러스터 외부로 노출하기 위해서 적용해 보았던 방법
로드밸런서
클러스터 외부의 로드밸런서(public cloud들은 고히 제공)를 이용하여 부하 균등화 수행
노드포트와 달리 특정 노드가 접근 불가한 경우에도 서비스 제공 가능
클러스터 외부에 존재하는 로드밸런서가 노드들의 상태를 체크하고, 부하 균등화하여 노드들에 트래픽 전달(k8s는 이를 지원하기 위하여 LoadBalancer라는 서비스 타입 제공)

안그레스
엄밀히 말하자면 k8s 서비스의 한 종류는 아니고, 복수의 서비스에 대해 목적에 따라 트래픽을 연결하는 도구
동적 수평 오토스케일링
HPA(Horizontal Pod Autoscaler)
- 부하량에 따라 디폴로이먼트의 포드 수를 유동적으로 관리하는 k8s의 기능
보통의 경우 고려되는 부하량:cpu및 메모리 사용량 - 메트릭스 서버로부터 부하 계측값을 전달받아 동일한 기능을 제공하는 포드의 수를 동적으로 조절
스케일링 기준이 되는 값과 최소/최대 포드의 수를 지정
메트릭스 서버의 설치
해당 원본 파일을 수정하여 사용할 예정
- TLS(Transport Layer Security)인증을 무시하도록 설정
설치 kubectl apply -f metrics.yaml
(테스트) 응용 배포, 오토스케일러 설정
응용 (웹 서버) 배포
kubectl apply -f https://k8s.io/examples/application/php-apache.yaml- 간단한 웹 서버 응용을 배포(포드의 수:1) 하고 ClusterIP로 클러스터 내부에만 노출
HPA
- kubectl autoscale deployment php-apache --cpu-percent=50 --min=1 --max=10
- cpu 사용율 50%를 기준으로 동적 스케일링 (최소 1개, 최대 10개의 포드 운용)
(테스트) 부하의 생성
kubectl run -it load-gen --rm \ --image=busybox --restart=Never \ -- /bin/sh -c 'while sleep 0.01; do wget -q -O- http://php-apache:80; done'
--> 이 명령어 안됨
그래도 일단 cpu 사용률과 동적 스케일링에 따른 포드의 갯수를 볼 수 있는 명령어는 다음과 같다.
kubectl get hpa$> kubectl get hpa
NAME REFERENCE TARGETS MINPODS MAXPODS REPLICAS AGE
php-apache Deployment/php-apache cpu: 0%/50% 1 10 1 22m
$> kubectl get hpa php-apache
NAME REFERENCE TARGETS MINPODS MAXPODS REPLICAS AGE
php-apache Deployment/php-apache cpu: 160%/50% 1 10 4 23m
$> kubectl get pod
NAME READY STATUS RESTARTS AGE
dpy-nginx-6f69c65f8b-flrd9 1/1 Running 1 (21m ago) 58m
dpy-nginx-6f69c65f8b-kktdg 1/1 Running 1 (21m ago) 58m
dpy-nginx-6f69c65f8b-nnk5v 1/1 Running 1 (21m ago) 58m
php-apache-6487c65df8-5k9xf 1/1 Running 0 35s
php-apache-6487c65df8-f2pwb 1/1 Running 0 35s
php-apache-6487c65df8-j9ld9 1/1 Running 0 20s
php-apache-6487c65df8-r54gp 1/1 Running 0 35s
php-apache-6487c65df8-vqst7 1/1 Running 1 (21m ago) 27m
$> kubectl get hpa
NAME REFERENCE TARGETS MINPODS MAXPODS REPLICAS AGE
php-apache Deployment/php-apache cpu: 67%/50% 1 10 5 23m0.01초 간격으로 반복해서 wget으로 HTTP GET요청을 보냈을때 부하에 따라 pod갯수가 1~10개 사이로 유동적으로 생성되는 것을 확인할 수 있다.
볼륨(Volumnes)
k8s는 클러스터 내에서 이용할 수 있는 저장장치(storage)의 추상화된 객체로 볼륨을 정의
PV(PersistentVolume)
클러스터 내에 존재하는 스토리지를 추상화한 것
클러스터 내의 노드에 존재하는 물리적 저장장치를 이용할 수도 있으며, 다양한 원격 저장소 및 클라우드 서비스들도 이용할 수 있음
PVC(PersistentVolumeClaim)
(사용자에 의한)PV를 이용하기 위한 요청
Pod: Node = PVC:PV
저장공간의 크기와 접근 모드(읽기/쓰기, ...)를 지정
볼륨 이용 실습
로컬 컴퓨터(이것이 우리가 실습에 이용하는 클러스터 내의 유일한 노드)에 볼륨으로 생성할 디렉토리를 만들고 이 안에 테스트 파일을 작성
- PV생성
- PVC생성
- nginx웹 서버를 생성하는 포드 생성
- 여기에 앞에서 생성한 볼륨을 "/" URL에 대하여 서비스되는 경로로 마운트
- 웹 브라우저로 결과 확인
pv-claim.yaml
apiVersion: v1
kind: PersistentVolumeClaim

metadata:
  name: task-pv-claim
spec:
  storageClassName: manual
  accessModes:
    - ReadWriteOnce
  resources:
    requests:
      storage: 3Gi
pv-volume.yaml
apiVersion: v1
kind: PersistentVolume

metadata:
  name: task-pv-volume
  labels:
    type: local
spec:
  storageClassName: manual
  capacity:
    storage: 10Gi
  accessModes:
    - ReadWriteOnce
  hostPath:
    path: "/Users/kimjiseong/programers/2-03/data"
deployment.yaml
apiVersion: apps/v1
kind: Deployment

metadata:
  name: nginx
spec:
  selector:
    matchLabels:
      run: nginx
  template:
    metadata:
      labels:
        run: nginx
    spec:
      volumes:
        - name: task-pv-storage
          persistentVolumeClaim:
            claimName: task-pv-claim
      containers:
        - name: nginx
          image: nginx
          ports:
            - containerPort: 80
          volumeMounts:
            - mountPath: "/usr/share/nginx/html"
              name: task-pv-storage
---
apiVersion: v1
kind: Service

metadata:
  name: nginx
  labels:
    run: nginx
spec:
  type: NodePort
  selector:
    run: nginx
  ports:
    - port: 80
      nodePort: 30000
data/index.html
<p> Hello from k8s Storage!</p>전체 코드
$> minikube mount /Users/kimjiseong/programers/2-03/data:/Users/kimjiseong/programers/2-03/data
📁  Mounting host path /Users/kimjiseong/programers/2-03/data into VM as /Users/kimjiseong/programers/2-03/data ...
    ▪ Mount type:   9p
    ▪ User ID:      docker
    ▪ Group ID:     docker
    ▪ Version:      9p2000.L
    ▪ Message Size: 262144
    ▪ Options:      map[]
    ▪ Bind Address: 127.0.0.1:51775
🚀  Userspace file server: ufs starting
✅  Successfully mounted /Users/kimjiseong/programers/2-03/data to /Users/kimjiseong/programers/2-03/data

📌  NOTE: This process must stay alive for the mount to be accessible ...

---
$> kubectl apply -f pv-volume.yaml&& kubectl apply -f pv-claim.yaml&& kubectl apply -f deployment.yaml
persistentvolume/task-pv-volume created
persistentvolumeclaim/task-pv-claim created
deployment.apps/nginx created
service/nginx created

$> minikube service nginx
|-----------|-------|-------------|---------------------------|
| NAMESPACE | NAME  | TARGET PORT |            URL            |
|-----------|-------|-------------|---------------------------|
| default   | nginx |          80 | http://192.168.49.2:30000 |
|-----------|-------|-------------|---------------------------|
🏃  Starting tunnel for service nginx.
|-----------|-------|-------------|------------------------|
| NAMESPACE | NAME  | TARGET PORT |          URL           |
|-----------|-------|-------------|------------------------|
| default   | nginx |             | http://127.0.0.1:51804 |
|-----------|-------|-------------|------------------------|
🎉  Opening service default/nginx in default browser...
❗  Because you are using a Docker driver on darwin, the terminal needs to be open to run it.
---

$> kubectl get pod
NAME                          READY   STATUS    RESTARTS      AGE
dpy-nginx-6f69c65f8b-flrd9    1/1     Running   2 (41m ago)   114m
dpy-nginx-6f69c65f8b-kktdg    1/1     Running   2 (41m ago)   114m
dpy-nginx-6f69c65f8b-nnk5v    1/1     Running   2 (41m ago)   114m
nginx-5b9f9d5c5b-6nwkh        1/1     Running   0             107s
php-apache-6487c65df8-vqst7   1/1     Running   2 (41m ago)   83m

$> kubectl exec -it nginx-5b9f9d5c5b-6nwkh -- /bin/bash

root@nginx-5b9f9d5c5b-6nwkh:/# cd usr/share/nginx/html/

root@nginx-5b9f9d5c5b-6nwkh:/usr/share/nginx/html# ls -l
total 1
-rw-r--r-- 1 1000 999 32 May 21 15:15 index.html

root@nginx-5b9f9d5c5b-6nwkh:/usr/share/nginx/html# cat > tem.txt
This file is being created inside a container.

root@nginx-5b9f9d5c5b-6nwkh:/usr/share/nginx/html# cat tem.txt
This file is being created inside a container.

root@nginx-5b9f9d5c5b-6nwkh:/usr/share/nginx/html# ls -l
total 1
-rw-r--r-- 1 1000 999 32 May 21 15:15 index.html
-rw-r--r-- 1 1000 999 47 May 21 16:07 tem.txt

root@nginx-5b9f9d5c5b-6nwkh:/usr/share/nginx/html# exit
exit

$> cd data && ls -l
total 16
-rw-r--r--  1 kimjiseong  staff  32 May 22 00:15 index.html
-rw-r--r--  1 kimjiseong  staff  47 May 22 01:07 tem.txt
요약
k8s 서비스
- 클러스터 내부에서 실행되고 있는 기능을 클러스터 외부에 노출
HPA(Horizontal Pod Autoscaler)
- 부하 상황에 따라 동적으로 디플로이먼트의 레플리카셋 크기를 조정
PV (Persistent Volume)
- 포드에서 바인드 마운트로 이용할 수 있는 저장 장치
- 변화하는 데이터를 기록, 저장하기 위해서 반드시 필요