로그인 테스트
Login.jsx

import axios from 'axios';
import { useState } from 'react';
import '../../App.css';

const Login = () => {
  const [error, setError] = useState(false);
  const [loading, setLoading] = useState(false);
  const [username, setUsername] = useState('');
  const [password, setPassword] = useState('');
  const [user, setUser] = useState({});

  const handleClick = async (e) => {
    e.preventDefault();
    setLoading(true);
    try {
      const { data } = await axios.get('https://jsonplaceholder.typicode.com/users/1');
      setUser(data);
    } catch {
      setError(true);
    }
    setLoading(false);
  };

  return (
    <div className='container'>
      <span className='user'>{user.name}</span>
      <form className='form'>
        <input className='username' type='text' placeholder='username' value={username} onChange={(e) => setUsername(e.target.value)} />
        <input className='password' type='password' placeholder='password' value={password} onChange={(e) => setPassword(e.target.value)} />
        <button className='button' disabled={!username || !password} onClick={handleClick}>
          {loading ? 'please wait...' : 'Login'}
        </button>
        <span data-testid='error' style={{ visibility: error ? 'visible' : 'hidden' }}>
          Something went wrong!
        </span>
      </form>
    </div>
  );
};

export default Login;
Login.test.js
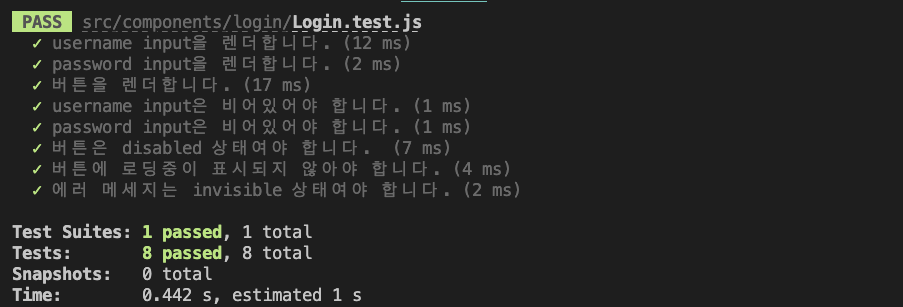
렌더링 테스트
엘리먼트가 렌더링되었는지 확인하는 테스트
- 먼저
render()함수를 이용해 Login 컴포넌트를 렌더링한다.
render()함수는 컴포넌트를 실제 DOM이 아닌 가상 DOM(Virtual DOM)에 렌더링하여 테스트 환경에서 컴포넌트 동작을 검증할 수 있게 한다. screen()함수와getByPlaceholderText쿼리를 이용해 엘리먼트를 선택한다.expect()구문과toBeInTheDocument()매처를 사용해 해당하는 엘리먼트가 존재하는지 확인할 수 있다.
import { render, screen } from '@testing-library/react';
import Login from './login/Login';

test('username input을 렌더합니다.', () => {
	render(<Login />); // 1️⃣
	const userInputEl = screen.getByPlaceholderText(/username/i); // 2️⃣
	expect(userInputEl).toBeInTheDocument(); // 3️⃣
});

test('password input을 렌더합니다.', () => {
	render(<Login />);
	const passwordInputEl = screen.getByPlaceholderText(/password/i);
	expect(passwordInputEl).toBeInTheDocument();
});

test('버튼을 렌더합니다.', () => {
	render(<Login />);
	const buttonEl = screen.getByRole('button');
	expect(buttonEl).toBeInTheDocument();
});
인풋의 value 값이 빈 값('')인지 확인하는 테스트
test('username input은 비어있어야 합니다.', () => {
	render(<Login />);
	const userInputEl = screen.getByPlaceholderText(/username/i);
	expect(userInputEl.value).toBe('');
});

test('password input은 비어있어야 합니다.', () => {
	render(<Login />);
	const passwordInputEl = screen.getByPlaceholderText(/password/i);
	expect(passwordInputEl.value).toBe('');
});
초기에 버튼이 비활성화 되어있는지 확인하는 테스트
test('버튼은 disabled 상태여야 합니다. ', () => {
	render(<Login />);
	const buttonEl = screen.getByRole('button');
	expect(buttonEl).toBeDisabled();
});
초기에 버튼에 로딩중이 표시되지 않는지 확인하는 테스트
test('버튼에 로딩중이 표시되지 않아야 합니다.', () => {
	render(<Login />);
	const buttonEl = screen.getByRole('button');
	expect(buttonEl).not.toHaveTextContent(/please wait.../i);
});
초기에 에러 메세지가 보이지 않게 되어있는지 확인하는 테스트
요소에 data-testid 속성과 값을 주면, getByTestId 쿼리를 사용해 요소를 선택할 수 있다.
test('에러 메세지는 invisible 상태여야 합니다.', () => {
	render(<Login />);
	const errorEl = screen.getByTestId('error');
	expect(errorEl).not.toBeVisible();
});
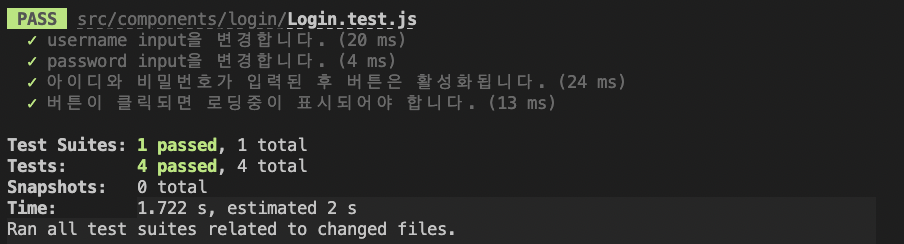
이벤트 테스트
input에서 onChange 이벤트가 잘 일어나는지 확인하는 테스트
fireEvent.change() 함수를 사용해, 입력 필드의 값이 변경되었을 때의 상황을 시뮬레이션할 수 있다.
userInputEl의 입력 필드의 값이'testId'로 변경되었다고 가정하여 이벤트를 시뮬레이션한다. 이로써 실제 사용자가 입력한 것처럼 입력 값이 변경되는 시나리오를 재현하게 된다.- 시뮬레이션된 이벤트 이후에, 실제 DOM에서
userInputEl요소의 value가'testId'인지 검증한다. 이를 통해 onChange 이벤트가 잘 동작하여 입력필드의 값이 예상대로 변경되었는지 확인할 수 있다.
이렇게 테스트를 통해 onChange 이벤트 핸들러가 잘 작동하는지 확인할 수 있다.
test('username input을 변경합니다.', () => {
	render(<Login />);
	const userInputEl = screen.getByPlaceholderText(/username/i);
	const testValue = 'testId';

	fireEvent.change(userInputEl, { target: { value: testValue } }); // 1️⃣
	expect(userInputEl.value).toBe(testValue); // 2️⃣
});

test('password input을 변경합니다.', () => {
	render(<Login />);
	const passwordInputEl = screen.getByPlaceholderText(/password/i);
	const testValue = 'testPw';

	fireEvent.change(passwordInputEl, { target: { value: testValue } });
	expect(passwordInputEl.value).toBe(testValue);
});
아이디와 비밀번호 입력 후, 버튼이 활성화되는지 확인하는 테스트
test('아이디와 비밀번호가 입력된 후 버튼은 활성화됩니다.', () => {
	render(<Login />);
	const buttonEl = screen.getByRole('button');
	const userInputEl = screen.getByPlaceholderText(/username/i);
	const passwordInputEl = screen.getByPlaceholderText(/password/i);

	const testIdValue = 'testId';
	const testPwValue = 'testPw';

	fireEvent.change(userInputEl, { target: { value: testIdValue } });
	fireEvent.change(passwordInputEl, { target: { value: testPwValue } });

	expect(buttonEl).not.toBeDisabled();
});
버튼이 클릭된(onClick) 후에 로딩중이 표시되는지 확인하는 테스트
test('버튼이 클릭되면 로딩중이 표시되어야 합니다.', () => {
	render(<Login />);
	const buttonEl = screen.getByRole('button');
	const userInputEl = screen.getByPlaceholderText(/username/i);
	const passwordInputEl = screen.getByPlaceholderText(/password/i);

	const testIdValue = 'testId';
	const testPwValue = 'testPw';

	fireEvent.change(userInputEl, { target: { value: testIdValue } });
	fireEvent.change(passwordInputEl, { target: { value: testPwValue } });
	fireEvent.click(buttonEl);

	expect(buttonEl).toHaveTextContent(/please wait.../i);
});

블로그 이전 -> https://janechun.tistory.com

즐겁게 읽었습니다. 유용한 정보 감사합니다.