
차례
1. React-Redux란 무엇인가.
2. React-Redux는 어떻게 사용하는가.
3. 정리
1. React-Redux란 무엇인가.
React-Redux은 각각의 독립적인 react와 redux를 서로 연결하는 도구.
사실 react와 redux는 각자가 독립적인 존재이기 때문에, 같이 사용하지 않을 수 있다.
하지만, react내에서 state를 중앙 집중 적으로 관리할 지 혹은 각 컴포넌트에서 관리하면서 props로 전달할지에 따라 redux와 useState로 나뉠 수 있다.
프로젝트에 따라 다르겠지만 react와 redux를 쓰는 것이 큰 시너지 효과를 만들기 때문에 redux를 많이 사용한다고 볼 수 있다.
2. React-Redux는 어떻게 사용하는가.
react에서 redux를 사용하기 위해서는 redux를 사용하지 않았을 때의 불편함에 대한 공감이 필요하다.
2-1. without redux
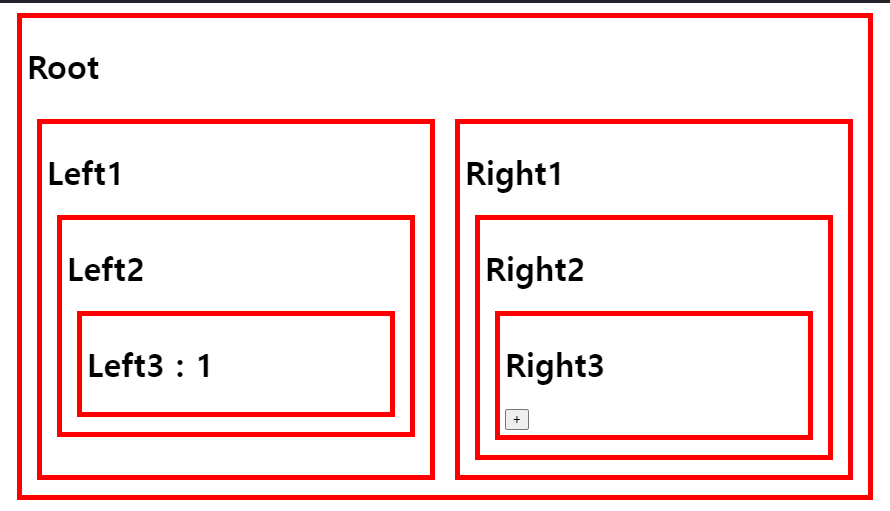
예를 들어 아래와 같이 오른쪽 3번째 박스안에 있는 +버튼을 클릭했을 때 왼쪽의 모든 숫자들이 1씩 커지는 로직을 만든다고 해보자.
위 내용을 redux 없이 react만으로 작성한다고 하면 아래와 같은 코드가 될 것이다.
가장 먼저 가장 최상위 컴포넌트를 작성하고 useState를 이용해서 number라는 변수에 초깃값 1을 할당한다. 그리고 그 내용을 출력하고 및에는 Left1 컴포넌트와 Right1 컴포넌트를 삽입한다.
Left1 컴포넌트에는 Root 컴포넌트에서 할당한 number를 Props로 전달하게 되고, Right1 컴포넌트에는 onIncrease 라는 함수를 전달하게 된다. 이는 현재 number에 1을 더하여 새로운 값을 return하는 setState 함수를 실행하게 된다.
import React, { useState } from 'react';
import './style.css';

export default function App() {
  const [number, setNumber] = useState(1);
  return (
    <div id="container">
      <h1>Root : {number}</h1>
      <div id="grid">
        <Left1 number={number}></Left1>
        <Right1
          onIncrease={() => {
            setNumber(number + 1);
          }}
        ></Right1>
      </div>
    </div>
  );
}
Left 부분에 들어가게 될 컴포넌트들은 아래와 같다. 먼저 Left1은 Root컴포넌트에서 Props로 넘겨준 number를 받아 출력하고 Left2라는 컴포넌트를 포함하고 있으며 동시에 Props로 받은 numebr를 다시 Props로 전달하고 있다.
이러한 방식은 Left2,3에서도 동일하게 나타나고 있으며, Left3에서는 받은 Props를 출력하는데애 그치고 있다.
function Left1(props) {
  return (
    <div>
      <h1>Left1 : {props.number}</h1>
      <Left2 number={props.number}></Left2>
    </div>
  );
}
function Left2(props) {
  return (
    <div>
      <h1>Left2 : {props.number}</h1>
      <Left3 number={props.number}></Left3>
    </div>
  );
}
function Left3(props) {
  return (
    <div>
      <h1>Left3 : {props.number}</h1>
    </div>
  );
}
아래는 Right에 들어갈 컴포넌트들이다. Root 컴포넌트에서 onIncrease 함수를 Props로 전달해준 것을 Right1 컴포넌트는 Right2 컴포넌트로, Right2 컴포넌트는 다시 Right3 컴포넌트로 전달하고 Right3 컴포넌트에서는 Props로 받은 함수를 input의 onClick으로 작동하게 하였다.
function Right1(props) {
  return (
    <div>
      <h1>Right1</h1>
      <Right2
        onIncrease={() => {
          props.onIncrease();
        }}
      ></Right2>
    </div>
  );
}
function Right2(props) {
  return (
    <div>
      <h1>Right2</h1>
      <Right3
        onIncrease={() => {
          props.onIncrease();
        }}
      ></Right3>
    </div>
  );
}
function Right3(props) {
  return (
    <div>
      <h1>Right3</h1>
      <input
        type="button"
        value="+"
        onClick={() => {
          props.onIncrease();
        }}
      ></input>
    </div>
  );
}
위와 같이 작성함으로써 Right3에서 + 인풋을 클릭하게 되면 Root에서 Props로 전달한 onIncrease 함수가 실행되고 number에는 1이 더해지게 된다.
그렇게 1이 더해진 number는 다시 Left1에게 할당되고 이는 Props를 타고 들어가 Left2,3까지 영향을 주게 된다.
이것이 redux없이 react만으로 state를 주고 받는 것이다.
2-2. with redux
위 내용을 redux를 사용해서 만들기 위해서는 일단 redux와 react-redux 플러그인을 설치한 후에 실시하게 된다.
1. store만들기
import React, { useState } from 'react';
import './style.css';
import {createStore} from 'redux' // Store를 만들기 위한 플러그인

const store = createStore()
redux에서 가장 중요한 것은 모든 state가 하나의 store에 저장되는 것이기 때문에 가장 먼저 store를 만들어준다.
2. reducer 만든후 store에 주입
import React, { useState } from 'react';
import './style.css';
import {createStore} from 'redux' // Store를 만들기 위한 플러그인

function reducer(state, action) {
  if (state === undefined) {
    return {
      number: 1, // initial state = 1
    };
  }
  const newState = { ...State }; // 복제본 만들기, 불변성 유지
  return newState;
}

const store = createStore()
store를 만든 후에는 인자로 반드시 reducer를 전달해야 한다. reducer는 state를 변경할 수 있는 유일한 함수이다. 따라서 reducer는 이전 state 값과 그 state값을 어떻게 변경할지에 대한 action을 인자로 받는다.
또한 기존 state 값을 받아와서 바로 가공하는 것이 아니라, 복제본을 만든 후 그것을 가공하여 return함으로 불변성을 유지할 수 있다.
3.react-redux의 3인방 (Provider, useSelector, useDispatch)
import React, { useState } from 'react';
import './style.css';
import { createStore } from 'redux';
import { Provider, useSelector, useDispatch } from 'react-redux'; // react-redux 3인방
function reducer(state, action) {
  if (state === undefined) { // state가 정의되지 않았다.
    return {
      number: 1, // 초깃값이 1이다.
    };
  }
  const newState = { ...State }; // 복제본 만들기, 불변성 유지
  return newState;
}

const store = createStore(reducer);
react-redux의 3인방에는 Provider, useSelector, useDispatch가 있다.
- Provider : 여기서 여기까지 state를 공급하겠다!
Provider는 Component인데, state를 어떤 Component에게 제공할 것인가에 대한 범위를 설정하는 것이다. 즉 store에 저장된 state를 받아서 사용할 Component들을 Provider라는 Component로 감싸면 그 안의 Component들은 Store안에 State를 사용할 수 있게 되는 것이다. 또한 Provider는 Props로 반드시 우리가 만든 Store를 Store라는 변수명으로 전달해줘야 한다.
import React, { useState } from 'react';
import './style.css';
import { createStore } from 'redux';
import { Provider, useSelector, useDispatch } from 'react-redux'; // react-redux 3인방
function reducer(state, action) {
  if (state === undefined) {
    return {
      number: 1, // 초깃값이 1이다.
    };
  }
  const newState = { ...State }; // 복제본 만들기, 불변성 유지
  return newState;
}

const store = createStore(reducer);

export default function App() {
  return (
    <div id="container">
      <h1>Root</h1>
      <div id="grid">
        <Provider store={store}> // Props로 store 전달하기
          <Left1></Left1>
          <Right1></Right1>
        </Provider>
      </div>
    </div>
  );
}
Left와 Right 컴포넌트가 Provider 컴포넌트의 하위 컴포넌트로 가게 되면서 두 컴포넌트는 Store를 이용할 수 있게 된 것이다.
- useSelector : 이 state 값을 선택하겠어!
우리가 reducer에서 initial state로 만들었던 number의 값을 Left3에서 가져다 쓰고 싶을 때 사용하는게 바로 "useSelector" 이다.
function Left3(props) {
  return (
    <div>
      <h1>Left3 </h1>
    </div>
  );
}
Left3에서 useSelector을 쓰기 위해서는 일단 가져온 state를 저장할 변수를 만들어야 한다. 근데 useSelector는 인자로 함수를 받는다. 어떤 state를 쓸지에 대한 내용이 담긴 함수이기 때문에 state를 인자로 받아 그 state 안에서 어떤 내용을 사용할지 정하는 함수이다.
function Left3(props) {
  const number = useSelector((state)=>state.number)
  return (
    <div>
      <h1>Left3 : {number} </h1>
    </div>
  );
}
위와 같이 useSelector를 통해서 원하는 state를 가져온 후 해당 변수를 사용하게 되면 아래와 같이 화면에 출력되게 된다.
- useDispatch : 이 변경 내용을 reducer로 보내겠어!
일단 useSelector를 통해서 최상위 컴포넌트에서 전역으로 할당한 number의 값을 다른 Props를 거치지 않고 받아오는 것 까지는 성공했다. 이제 Right3에서 +버튼을 누르면 number의 값이 1씩 올라가도록 만들어야 하는데, 이때 필요한게 "useSelector"이다.
function Right3(props) {
  const dispatch = useDispatch();
  return (
    <div>
      <h1>Right3</h1>
      <input
        type="button"
        value="+"
        onClick={() => {
          dispatch({ type: 'PLUS' });
        }}
      ></input>
    </div>
  );
}
위와 같이 dispatch({ type: 'PLUS' })라는 코드를 작성하게 되면 reducer가 호출되게 되는데, 이때 같이 정의해야 할 것이 type이다. 즉, 해당 타입의 dispatch가 호출되었을 때 state를 어떠한 식으로 변경하도록 하는지에 대한 코드가 아래와 같이 있어야 하는 것이다.
function reducer(state, action) {
  if (state === undefined) {
    return {
      number: 1, // 초깃값이 1이다.
    };
  }
  const newState = { ...state }; // 복제본 만들기, 불변성 유지
  if (action.type === 'PLUS') { // type이 PLUS 일때, state 가공 내용
    newState.number++;
  }
  return newState;
}
또한 추가적으로, 각각의 component에 renering 될 떄마다 콘솔에 출력되는 내용을 작성해서 확인해보면,
function Left1(props) {
  console.log('Left1 component');
  return (
    <div>
      <h1>Left1</h1>
      <Left2></Left2>
    </div>
  );
}
function Left2(props) {
  console.log('Left2 component');
  return (
    <div>
      <h1>Left2</h1>
      <Left3></Left3>
    </div>
  );
}
function Left3(props) {
  console.log('Left3 component');
  const number = useSelector((state) => state.number);
  return (
    <div>
      <h1>Left3 : {number}</h1>
    </div>
  );
}
아래와 같이 Left1과 Left2의 console내용은 출력되지 않는 것을 볼 수 있다. 이말은 state가 변하는 Left3만 재렌더링 되고 Left1과 Left2는 재렌더링 되지 않아 성능면에서도 장점이 있다고 볼 수 있다.
3. 정리
React-Redux는 react와 redux를 이어주는 도구이고, useState를 사용하여서 Component간의 Props이동을 통한 state 전달의 비효울성을 막고자 도입된 방법이라고 볼 수 있다.
react에서 redux를 사용하기 위해서는 Provider, useSelector, useDispatch를 사용해야 한다.
-끝-
[출처]
https://www.youtube.com/watch?v=yjuwpf7VH74 (react-redux (2022년 개정판))