목표
- 아두이노로 웹 소켓 클라이언트를 구현해보자!
준비물
- 아두이노 우노 R4
- esp8266
Reference
세부 분할
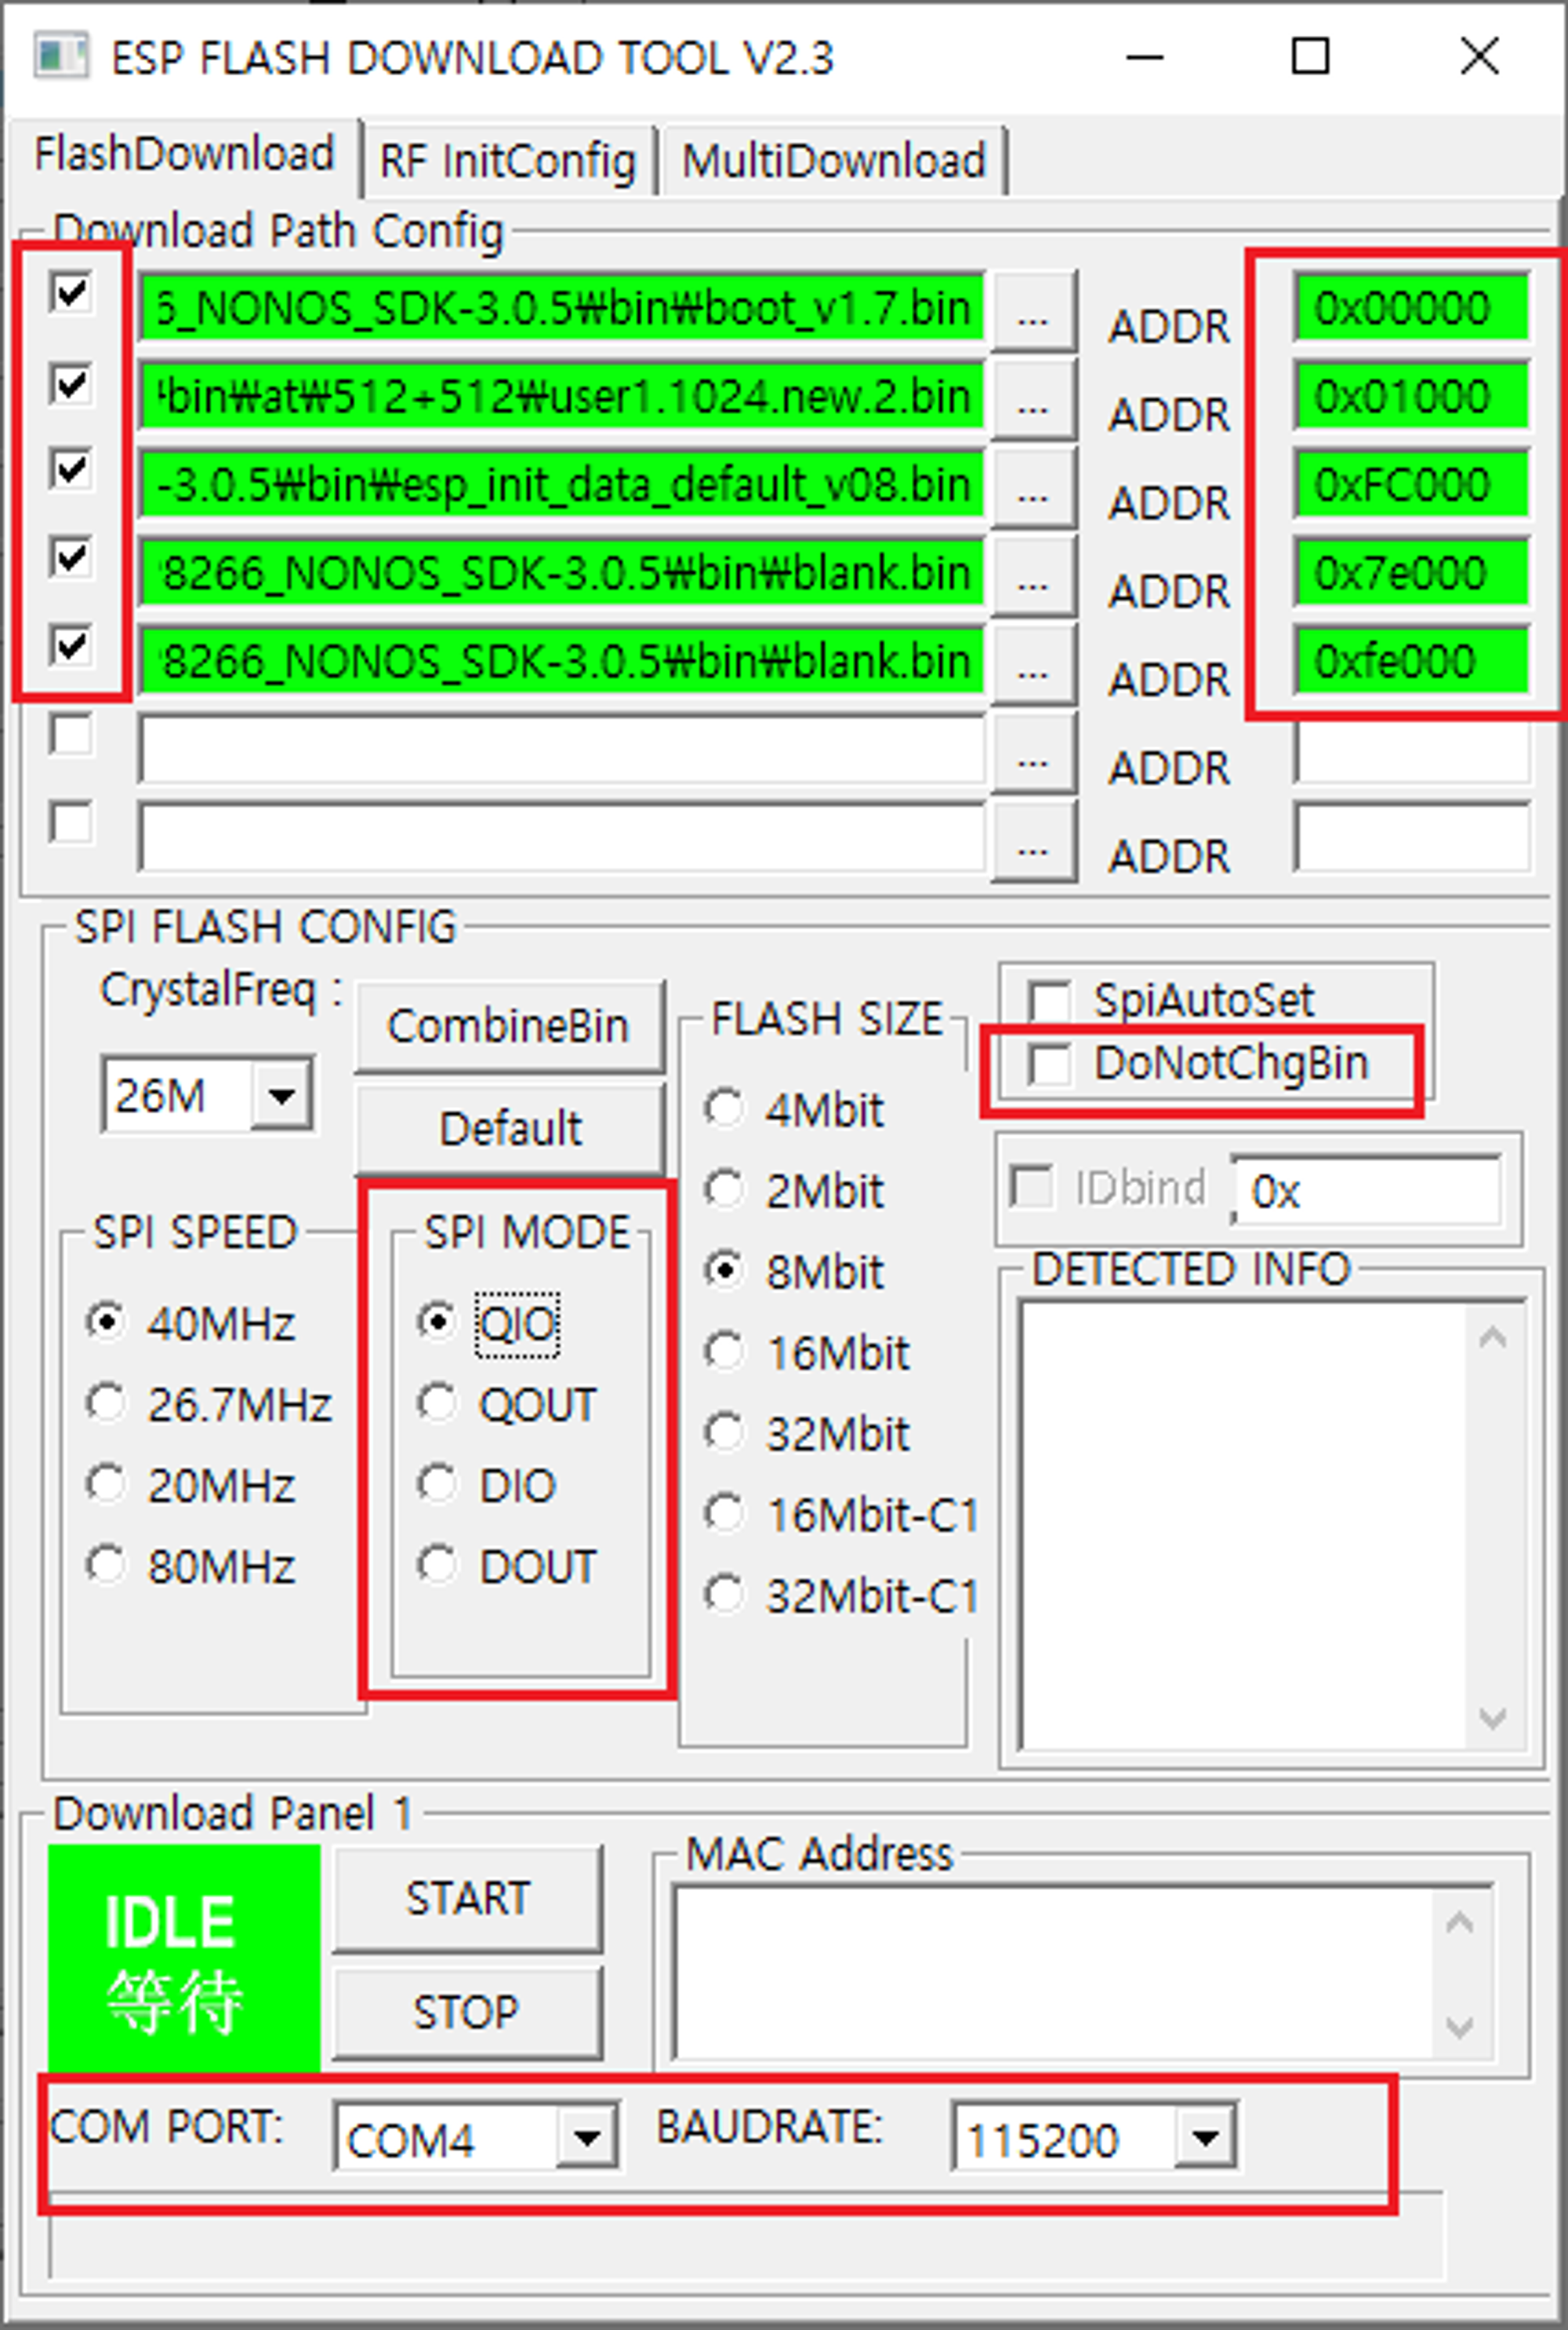
ESP8266 Firmware Update
- 위 레퍼런스를 참조했다. 이때까지만 해도 AT Command가 뭔지 몰랐고, 코드로 명령어를 입력해두면 자동으로 시리얼 모니터에 응답이 나올거라 생각했다.
- 왜냐면 정석적으로 아두이노로 코드 짜보는거는 이번이 처음이였다.
ESP 모듈 공장 초기화
-
삽질을 꽤 많이 했다. 왜 펌웨어 업데이트를 해야하는지는 알겠는데 꼭 해야하나 싶었다.. 포기하고 알게된건 AT-Command를 더 잘 사용할 수 있다 정도였다.
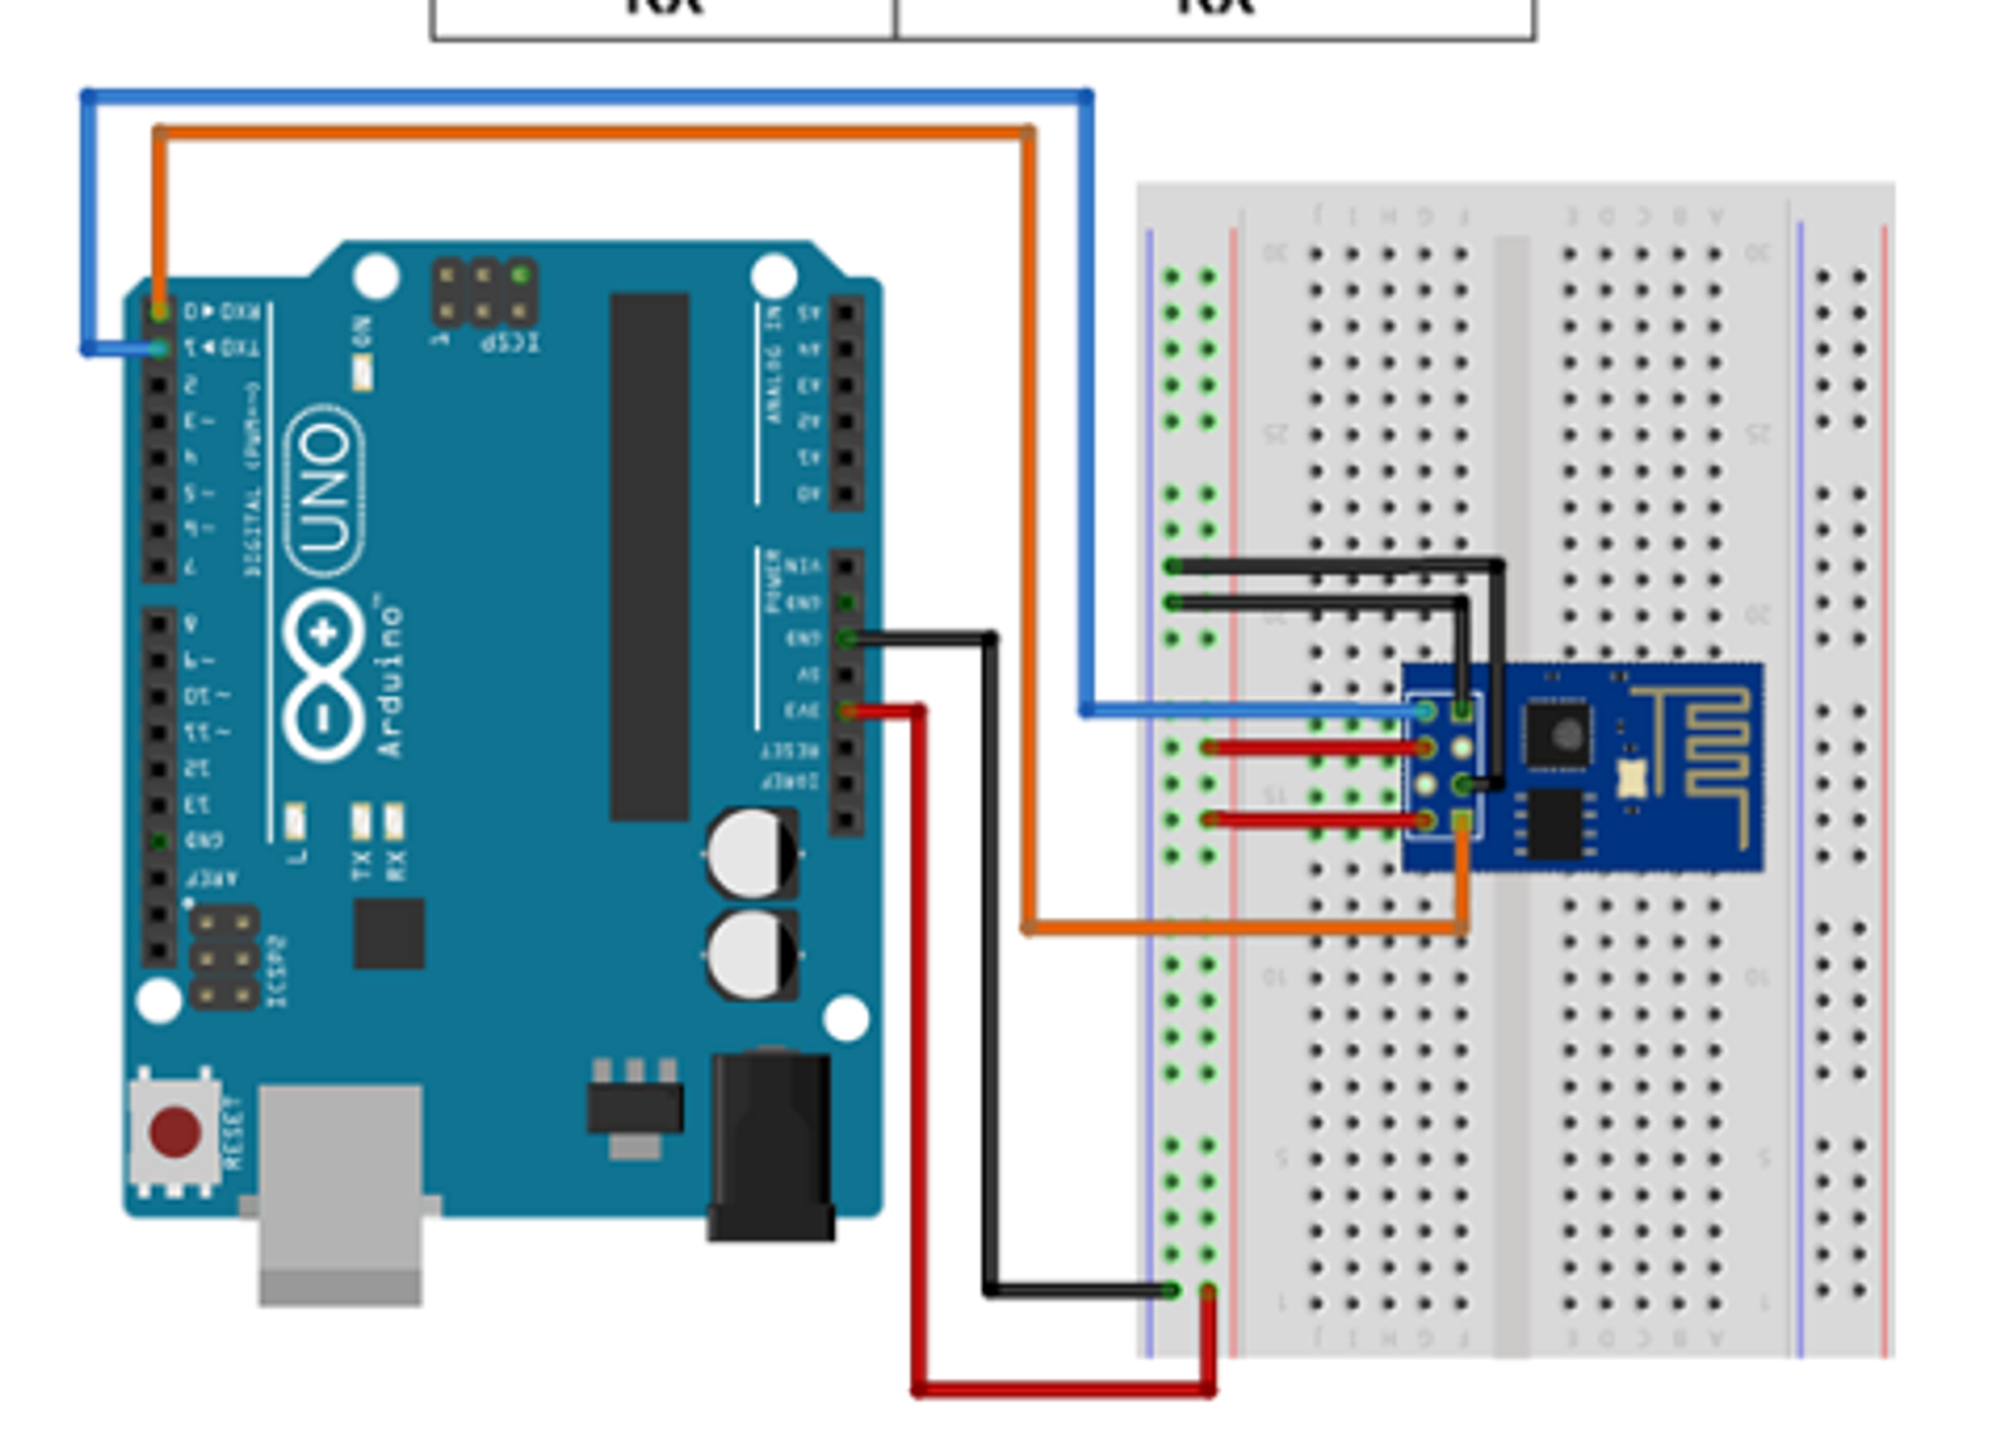
-
위 그림처럼 우노 보드와 연결하고 공장 초기화를 진행했다.
- https://crystalcube.co.kr/215
- 위 사이트에서 하란대로 어찌저찌 펌웨어를 업데이트하는데까지도 성공했다
AT Command?
"Attention"의 약자로, 모뎀이나 통신 장비와 통신하는 데 사용되는 명령어 라고 한다.
AT Command를 통해서 와이파이 상태나 설정 등을 할 수 있다고 한다. 그래서 정리를 좀 해봤다.
-
AT Command 모음
- AT+GMR
- ESP8266모듈 버전 확인
- AT+CWMODE
- WIFI모드 확인 및 설정 명령
- AT+CWMODE?
- 현재 WIFI모드 확인
- AT+CWMODE=<1or2or3>
- 1 : Station Mode : AP에 접속할 수 있는 기기로 설정
- 2 : AP Mode : 공유기 기능으로 설정
- 3 : AP + Station Mode : 접속기기 + AP, 복합 모드 설정
- AT+CWLAP
- 주변의 AP 리스트 출력
- AT+CWJAP=”ssid”,”password”
- 특정 AP에 연결
- ssid랑 pw 사이 공백 없어야함
- 5GHz 안됨
- AT+CWJAP?
- 연결된 AP 확인
- AT+CWQAP
- AP 접속 해제 명령
- AT+CIFSR
- 할당받은 IP 주소 확인
- AT+CIPSTATUS
- TCP/IP 연결 상태 확인
- 만약 STATUS:2면 IP 주소를 획득한 상태
- AT+CIPSTART=종류,주소,포트
- TCP/UDP 연결
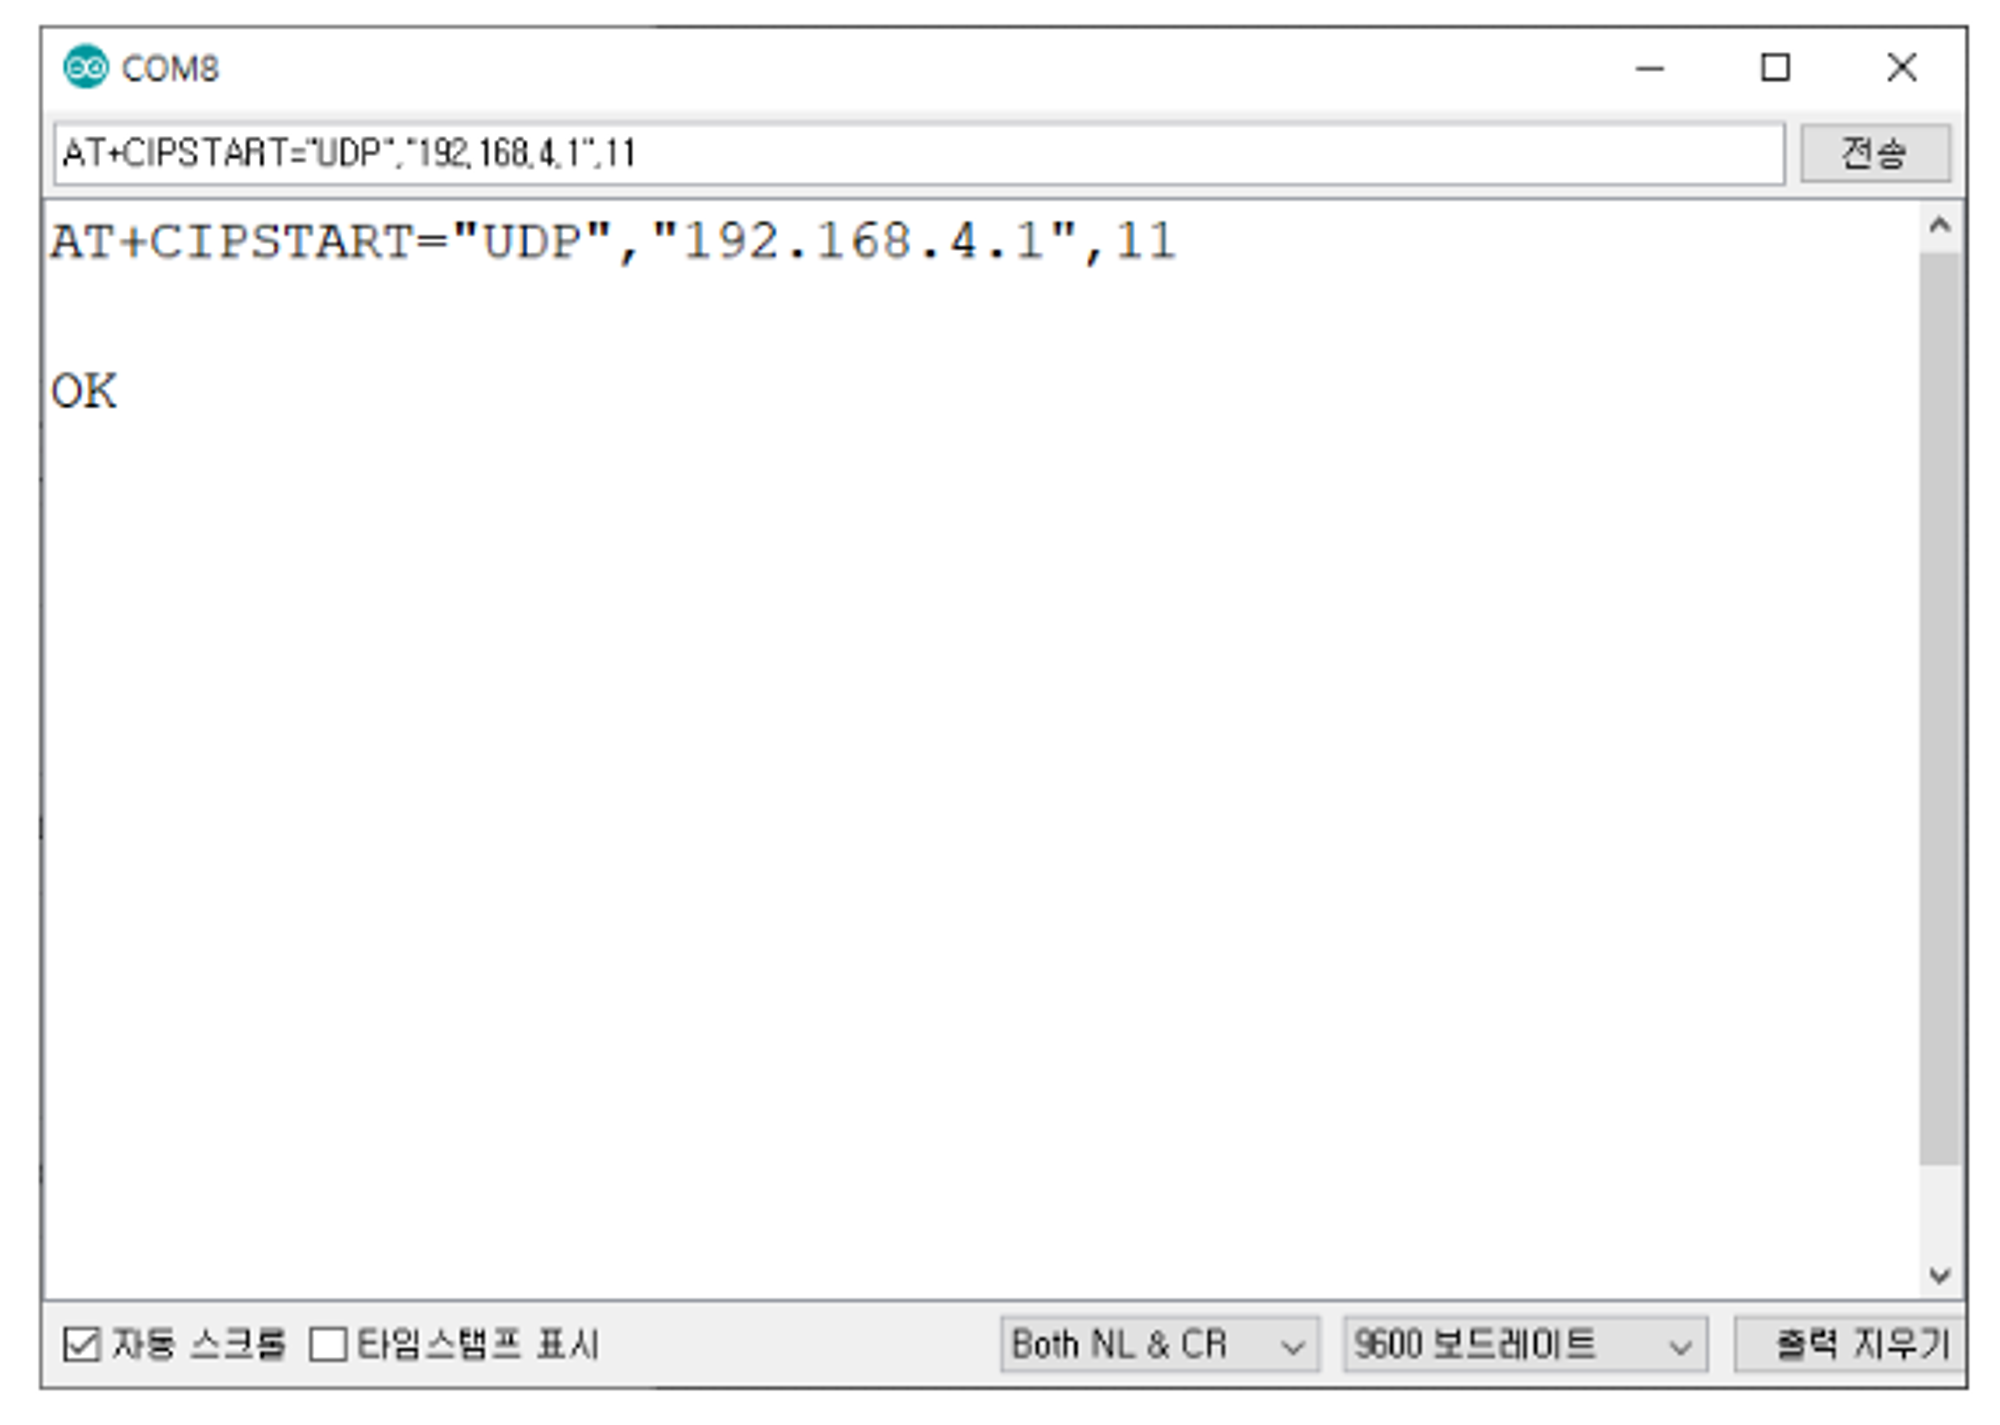
- TCP/UDP 연결
- AT+CWLIF
- 모듈의 SoftAP에 접속된 station 리스트 보여줌
- AT+CWDHCP
- DHCP 활성 / 비활성 설정(AP mode)
- AT+CIPSTAMAC
- Station Mode의 MAC 주소 설정(Station mode)
- AT+CIPAPMAC
- AP mode의 MAC주소 설정(AP Mode)
- AT+CIPSTA
- Station Mode의 IP주소를 고정(고정 IP)
AT+CIPSTA="ip","gateway","netmask"
- AT+CIPAP
- AP Mode의 IP주소를 설정
- AT+RST
- 리셋
- AT+RESTORE
- 설정 초기화
- AT+GMR
Wifi 연결
- AT Command를 사용해서 와이파이 연결은 무난하게 성공했었다.
AT+CWMODE=1
AT+CWJAP=”ssid”,”password”
가 끝이였다.
? 그래서 이제 뭐해야해?
- 3일정도 GPT와 구글링을 계속 했다. 결국 알아냈던건 아두이노 우노 보드에서 웹 소켓을 하려면 esp8266에서 웹 서버와 통신을 한 뒤 받아온 데이터를 다시 아두이노에 보내줘야 한다는 점이다.(확실하진 않음)
???: 에헤이 조졌네 이거
- 그럼 이제 어떡하지? 디바이스마트에서 모터 드라이버, RFID, 스위치 등등 사면서 아두이노 우노 R4-Wifi가 새로 나왔대서 주문 해봤다. 아무래도 데스크 모듈에 핀이 부족하겠다 싶어서 이참에 우노 보드를 바꾸고 되면 대박일테니 하면서 주문한게 마침 도착했다. 이걸로라도 해봐야 겠다 싶었다.

아두이노 우노 R4-WiFi로 GET 먼저 해볼까?
아두이노 우노 R4-Wifi는 ESP32-S3-MINI-1-N8를 Wi-Fi, Bluewtooth 통신 모듈로 사용하고 있다고 한다. 실제로 연결하고 보드를 업데이트 해보니 여러 예제가 있었다.
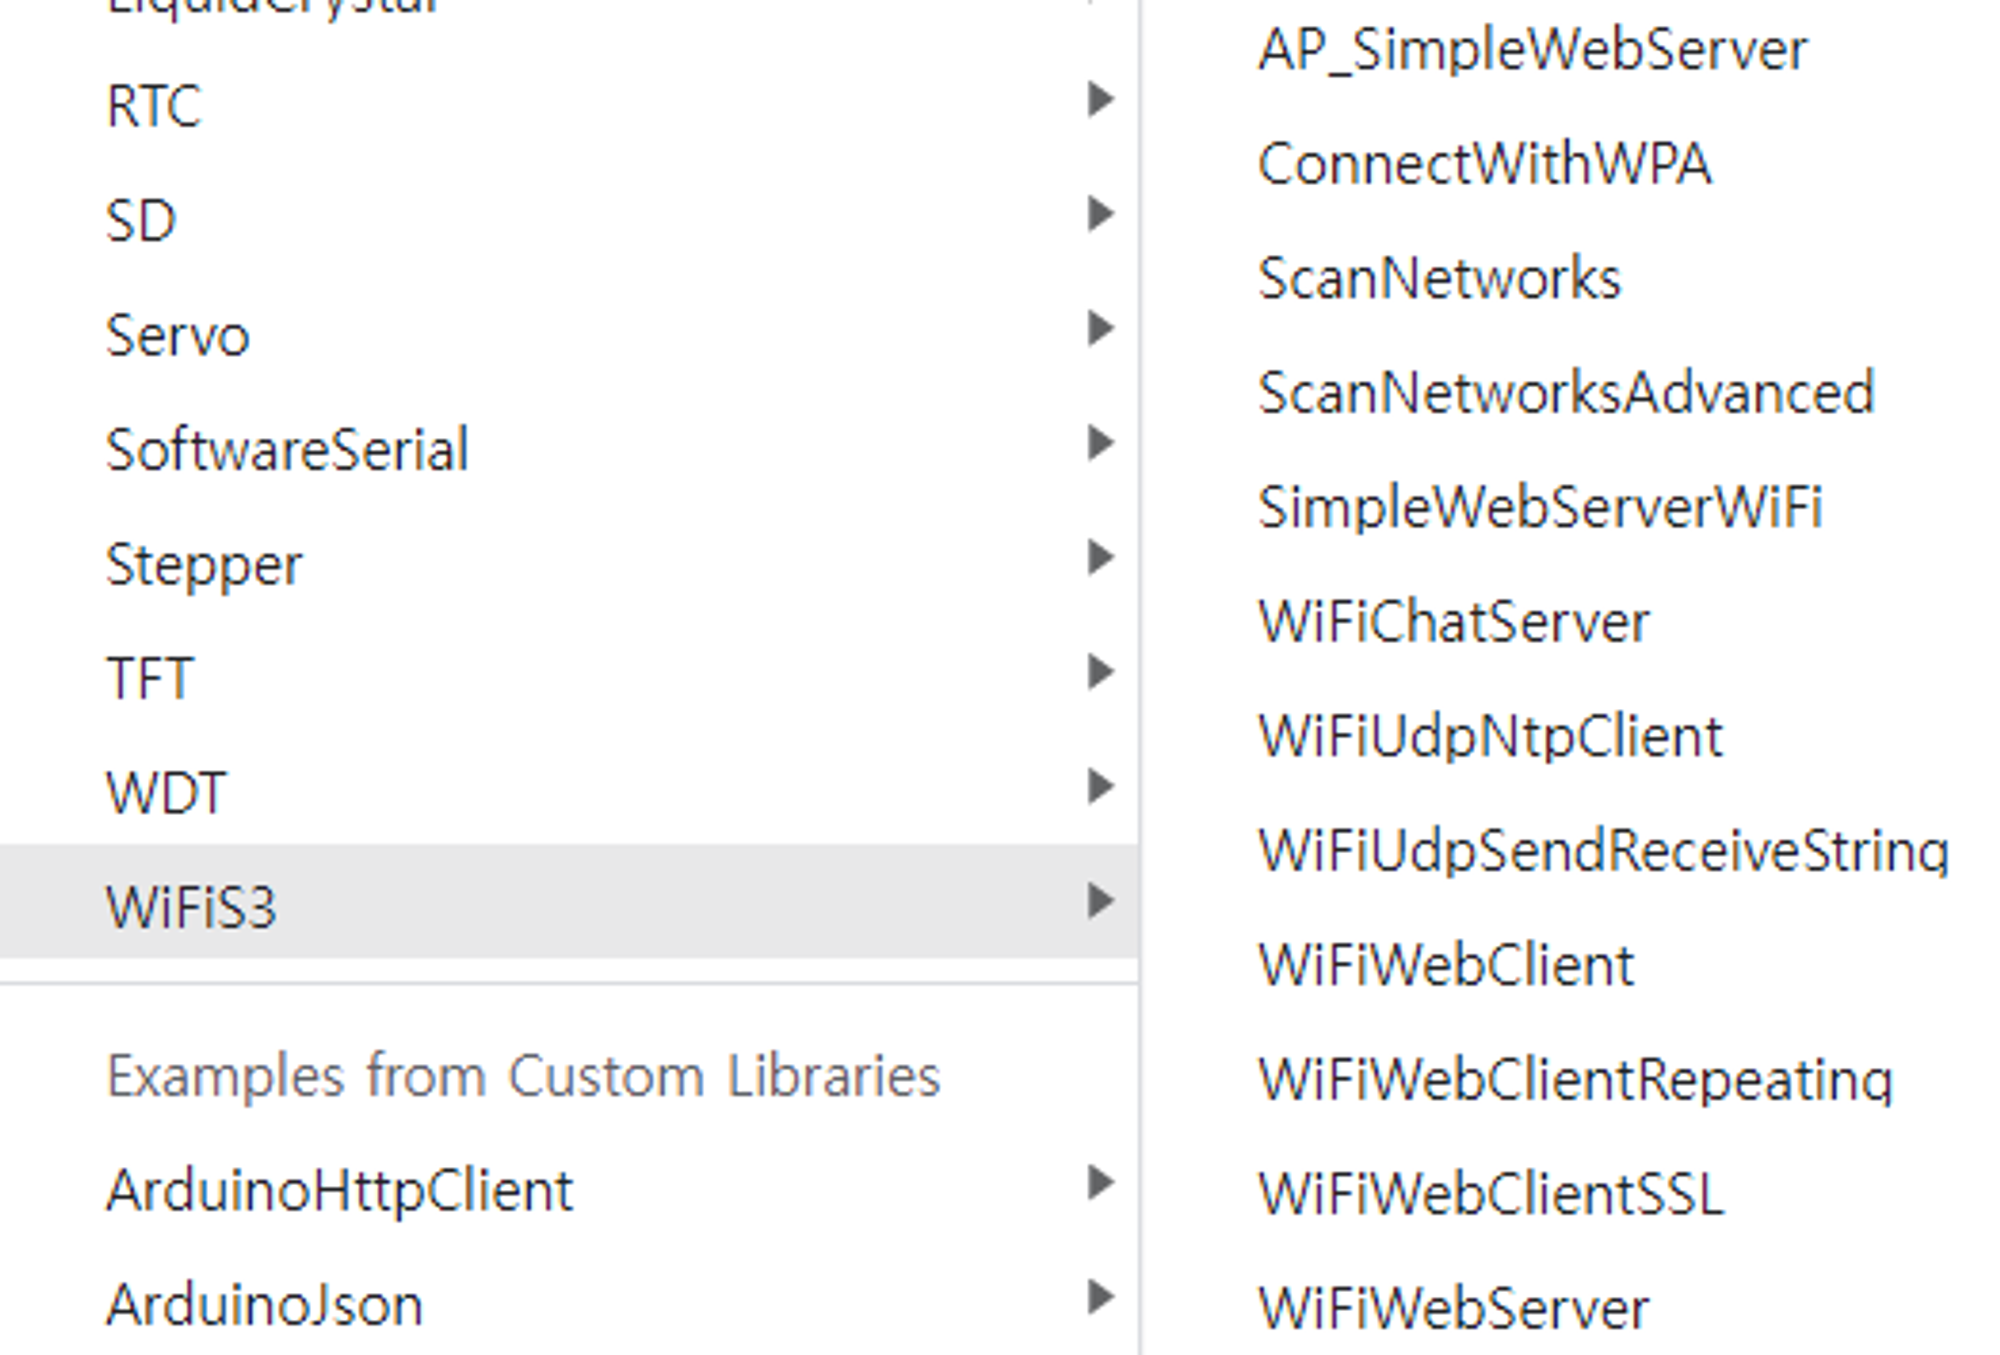
- Web Socket Client…없네….. WiFiWebClient라도 해봐야겠다 싶어서 해당 코드를 수정했다.
#include <WiFiS3.h> #include "arduino_secrets.h" // WiFiWebClient // ///////please enter your sensitive data in the Secret tab/arduino_secrets.h char ssid[] = SECRET_SSID; // your network SSID (name) char pass[] = SECRET_PASS; // your network password (use for WPA, or use as key for WEP) int keyIndex = 0; // your network key index number (needed only for WEP) int status = WL_IDLE_STATUS; char server[] = "192.168.171.2"; // WebSocket server address WiFiClient wifiClient; /* -------------------------------------------------------------------------- */ void setup() { /* -------------------------------------------------------------------------- */ // Initialize serial and wait for port to open: Serial.begin(9600); while (!Serial) { ; // wait for serial port to connect. Needed for native USB port only } // Check for the WiFi module: if (WiFi.status() == WL_NO_MODULE) { Serial.println("Communication with WiFi module failed!"); // Don't continue while (true); } String fv = WiFi.firmwareVersion(); if (fv < WIFI_FIRMWARE_LATEST_VERSION) { Serial.println("Please upgrade the firmware"); } // Attempt to connect to WiFi network: while (status != WL_CONNECTED) { Serial.print("Attempting to connect to SSID: "); Serial.println(ssid); // Connect to WPA/WPA2 network. Change this line if using open or WEP network: status = WiFi.begin(ssid, pass); // Wait 10 seconds for connection: delay(10000); } printWifiStatus(); Serial.println("\nStarting connection to server..."); // if you get a connection, report back via serial: if (wifiClient.connect("server", 8080)) { Serial.println("connected to server"); // Make a HTTP request: // wifiClient.println("GET /tables/list/ HTTP/1.1"); wifiClient.println("GET / HTTP/1.1"); wifiClient.println("Host: 192.168.171.2"); wifiClient.println("Connection: close"); wifiClient.println(); } } /* just wrap the received data up to 80 columns in the serial print*/ /* -------------------------------------------------------------------------- */ void read_response() { /* -------------------------------------------------------------------------- */ uint32_t received_data_num = 0; while (wifiClient.available()) { /* actual data reception */ char c = wifiClient.read(); /* print data to serial port */ Serial.print(c); /* wrap data to 80 columns*/ received_data_num++; if(received_data_num % 80 == 0) { Serial.println(); } } } /* -------------------------------------------------------------------------- */ void loop() { /* -------------------------------------------------------------------------- */ // Maintain the WebSocket connection read_response(); // if the server's disconnected, stop the client: if (!wifiClient.connected()) { Serial.println(); Serial.println("disconnecting from server."); wifiClient.stop(); // do nothing forevermore: while (true); } } /* -------------------------------------------------------------------------- */ void printWifiStatus() { /* -------------------------------------------------------------------------- */ // Print the SSID of the network you're attached to: Serial.print("SSID: "); Serial.println(WiFi.SSID()); // Print your board's IP address: IPAddress ip = WiFi.localIP(); Serial.print("IP Address: "); Serial.println(ip); // Print the received signal strength: long rssi = WiFi.RSSI(); Serial.print("Signal strength (RSSI):"); Serial.print(rssi); Serial.println(" dBm"); } - 만약 Web Socket을 결국 못하면 1분에 한번 데이터를 서버로 보내고 받아 오는 작업을 해야 하니 테스트로 받아올 장고 RESTful API 서버를 만들었다.
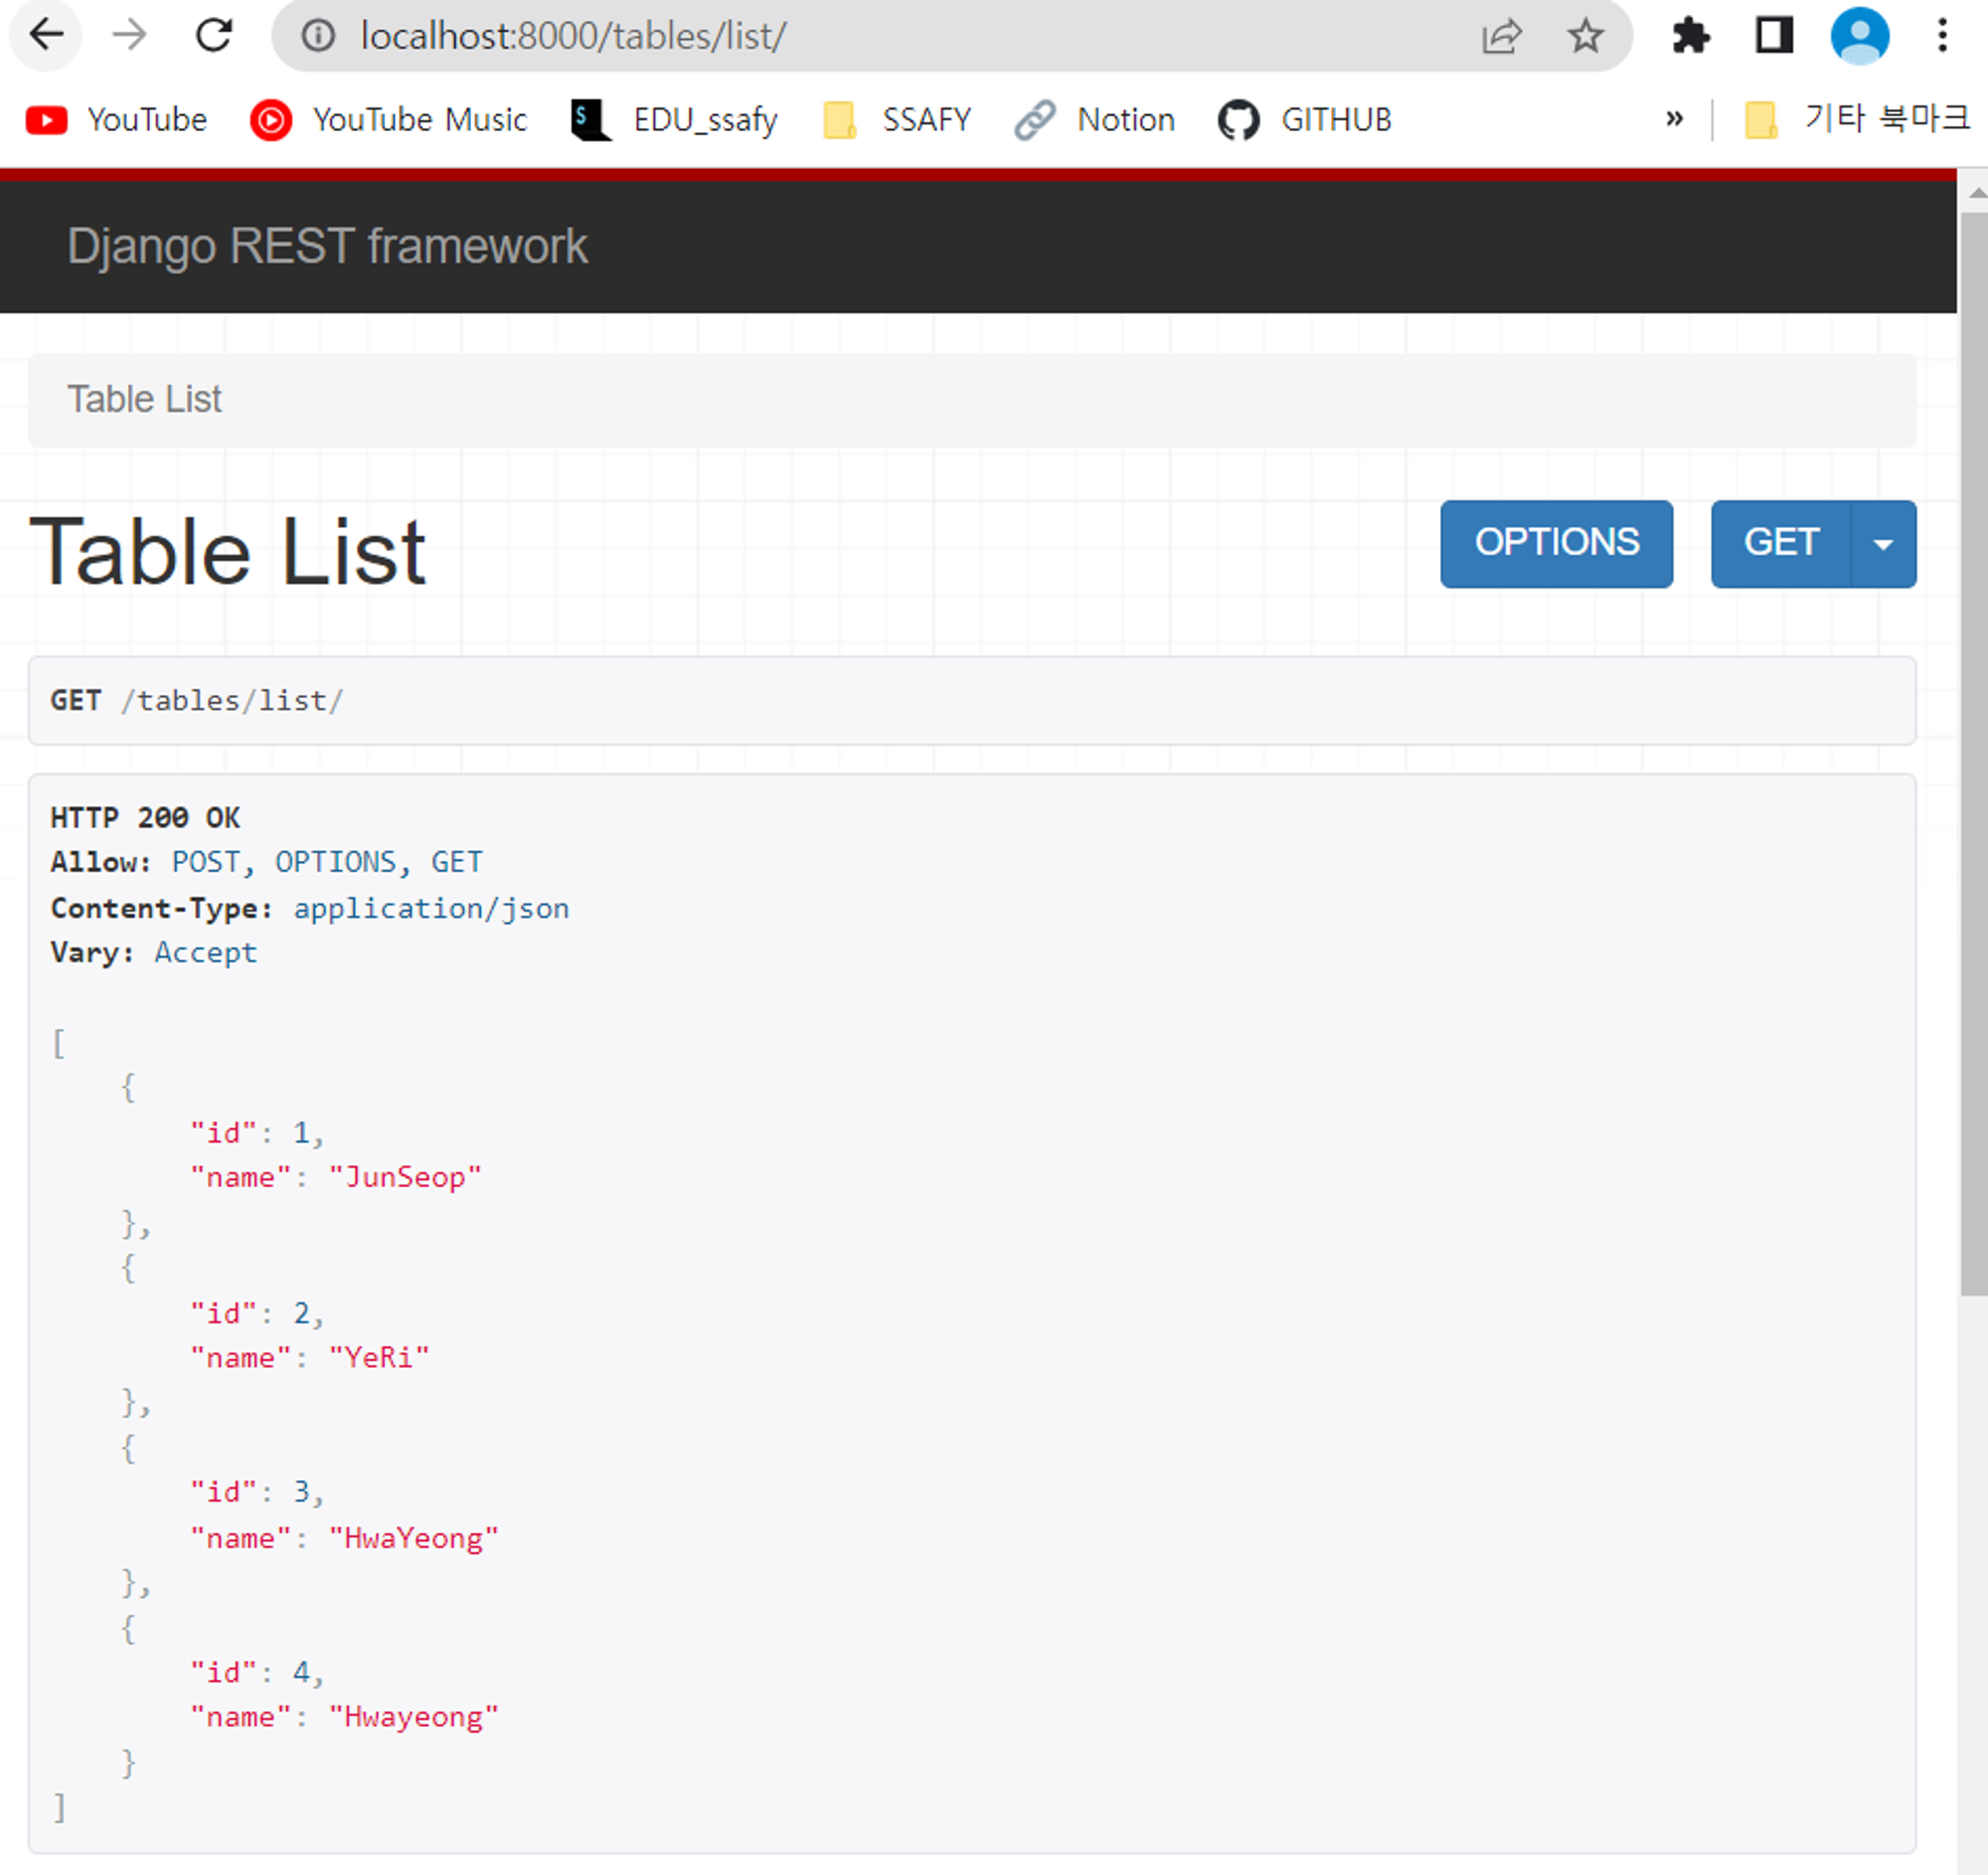
- 잘 돌아간다!
11:04:19.652 -> Content-Type: application/json 11:04:19.768 -> Vary: Accept, Cookie 11:04:19.768 -> Allow: POST, 11:04:19.768 -> OPTIONS, GET 11:04:19.768 -> X-Frame-Options: DENY 11:04:19.768 -> Content-Length: 104 11:04:19.768 -> X-Content-Type-Options 11:04:19.893 -> : nosniff 11:04:19.893 -> Referrer-Policy: same-origin 11:04:19.893 -> 11:04:19.893 -> [{"id":1,"name":"JunSeop"},{"id":2,"n 11:04:19.893 -> ame":"YeRi"},{"id":3,"name":"HwaYeong"},{"id":4,"name":"Hwayeong"}] 11:04:19.970 -> disconnecting from server.- JSON 데이터를 잘 받아왔으니 이제 파싱해서 데이터를 DP에 저장하면 되겠네! 가 아니고 웹 소켓 뚫어야지ㅋㅋㅋㅋ
라이브러리? 그먼…?
- 아두이노는 기본적으로 가지고 있는 예제(표준 라이브러리) 말고, 다른사람이 만들어둔 라이브러리(사용자 커스텀 라이브러리)를 참조해서 개발이 가능하다. 그럼 웹 소켓 클라이언트를 구현해둔 라이브러리를 찾아서 참조하면 가능하겠네?
웨 다 ESP임?
- 여러 라이브러리들을 찾아보면서 문제가 있다는 걸 알았다. 대부분의 커스텀 라이브러리들은 esp 모듈을 기반으로 하기 때문에 ‘아두이노 우노’에서 사용하는 예제가 담긴 라이브러리가 필요했다.
- ArduinoWebsockets
- arduinoWebSockets
- ArduinoHttpClient
- 위 3개 라이브러리들을 순서대로 사용해보았다. 먼저 ArduinoWebsockets는 컴파일부터 안되길래 빠르게 포기했다.
arduinoWebSockets
const socket = new WebSocket('ws://192.168.171.2:8080');를 콘솔에서 실행하면 서버에서는 연결되었다는 말이 뜬다. 근데 해당 라이브러리에서 제공하는 코드의 핸드셰이크 부분이 계속 막혀있었다(연결되었다는 말이 안뜬다).- server.js
const WebSocket = require('ws'); // 웹 소켓 서버 생성 const wss = new WebSocket.Server({ host: '0.0.0.0', port: 8080 }); let cnt = 0; // 허용할 클라이언트 IP 주소들을 배열로 정의합니다. const allowedIPs = ['127.0.0.1', '192.168.171.72', '192.168.171.2', '192.168.171.151']; // 클라이언트가 연결되었을 때 처리 wss.on('connection', (ws, req) => { // 클라이언트의 IP 주소를 가져옵니다. const clientIP = req.socket.remoteAddress; // 허용되지 않은 IP 주소라면 연결을 종료합니다. if (!allowedIPs.includes(clientIP)) { console.log(`클라이언트 ${clientIP}의 연결이 거부되었습니다.`); ws.terminate(); // 연결 종료 return; } console.log(`클라이언트 ${clientIP}가 연결되었습니다.`); // 클라이언트로부터 메시지를 받았을 때 처리 ws.on('message', (message) => { console.log(`받은 메시지(${clientIP}):`, message.toString()); // 클라이언트에게 메시지 전송 ws.send('서버가 받았습니다.' + cnt); cnt++; }); // 클라이언트와 연결이 끊겼을 때 처리 ws.on('close', () => { console.log(`클라이언트 ${clientIP}와의 연결이 끊겼습니다.`); }); }); - 아두이노 WebSocketClient코드
#include <WiFiS3.h> #include <WebSocketsClient.h> #include "arduino_secrets.h" ///////please enter your sensitive data in the Secret tab/arduino_secrets.h char ssid[] = SECRET_SSID; // your network SSID (name) char pass[] = SECRET_PASS; // your network password (use for WPA, or use as key for WEP) int keyIndex = 0; // your network key index number (needed only for WEP) int status = WL_IDLE_STATUS; char server[] = "192.168.171.2"; // WebSocket server address int port = 8080; WiFiClient wifiClient; WebSocketsClient webSocket; /* -------------------------------------------------------------------------- */ void setup() { /* -------------------------------------------------------------------------- */ // Initialize serial and wait for port to open: Serial.begin(9600); wifiInit(); // Attempt to connect to WiFi network: while (status != WL_CONNECTED) { Serial.print("Attempting to connect to SSID: "); Serial.println(ssid); // Connect to WPA/WPA2 network. Change this line if using open or WEP network: status = WiFi.begin(ssid, pass); delay(3000); } Serial.println("Connected to WIFI"); printWifiStatus(); // Connect to the WebSocket server // webSocket.begin("echo.websocket.org", 80, "/"); webSocket.begin("192.168.171.2", 8080, "/"); delay(3000); // Set up event handler for WebSocket events webSocket.onEvent(webSocketEvent); } /* -------------------------------------------------------------------------- */ void loop() { /* -------------------------------------------------------------------------- */ // Maintain the WebSocket connection webSocket.loop(); } /* -------------------------------------------------------------------------- */ void webSocketEvent(WStype_t type, uint8_t *payload, size_t length) { /* -------------------------------------------------------------------------- */ switch (type) { case WStype_DISCONNECTED: Serial.println("Disconnected from WebSocket server"); break; case WStype_CONNECTED: Serial.println("Connected to WebSocket server"); webSocket.sendTXT("7603"); break; case WStype_TEXT: // Handle incoming text data from the WebSocket server Serial.print("Received data: "); for (size_t i = 0; i < length; i++) { Serial.print((char)payload[i]); } Serial.println(); break; } } /* -------------------------------------------------------------------------- */ void printWifiStatus() { /* -------------------------------------------------------------------------- */ // Print the SSID of the network you're attached to: Serial.print("SSID: "); Serial.println(WiFi.SSID()); // Print your board's IP address: IPAddress ip = WiFi.localIP(); Serial.print("IP Address: "); Serial.println(ip); // Print the received signal strength: long rssi = WiFi.RSSI(); Serial.print("Signal strength (RSSI):"); Serial.print(rssi); Serial.println(" dBm"); } void wifiInit(){ while (!Serial) { ; // wait for serial port to connect. Needed for native USB port only } // Check for the WiFi module: if (WiFi.status() == WL_NO_MODULE) { Serial.println("Communication with WiFi module failed!"); // Don't continue while (true); } String fv = WiFi.firmwareVersion(); if (fv < WIFI_FIRMWARE_LATEST_VERSION) { Serial.println("Please upgrade the firmware"); } }-
41번째 줄에
webSocket.begin("192.168.171.2", 8080, "/");코드가 문제일거라 생각해서 해당 함수를 담고있는 라이브러리를 또 찾아갔다.void WebSocketsClient::begin(const char * host, uint16_t port, const char * url, const char * protocol) { _host = host; _port = port; #if defined(HAS_SSL) _fingerprint = SSL_FINGERPRINT_NULL; _CA_cert = NULL; #endif _client.num = 0; _client.status = WSC_NOT_CONNECTED; _client.tcp = NULL; #if defined(HAS_SSL) _client.isSSL = false; _client.ssl = NULL; #endif _client.cUrl = url; _client.cCode = 0; _client.cIsUpgrade = false; _client.cIsWebsocket = true; _client.cKey = ""; _client.cAccept = ""; _client.cProtocol = protocol; _client.cExtensions = ""; _client.cVersion = 0; _client.base64Authorization = ""; _client.plainAuthorization = ""; _client.isSocketIO = false; _client.lastPing = 0; _client.pongReceived = false; _client.pongTimeoutCount = 0; #ifdef ESP8266 randomSeed(RANDOM_REG32); #elif defined(ARDUINO_ARCH_RP2040) randomSeed(rp2040.hwrand32()); #else // todo find better seed randomSeed(millis()); #endif #if(WEBSOCKETS_NETWORK_TYPE == NETWORK_ESP8266_ASYNC) asyncConnect(); #endif _lastConnectionFail = 0; _lastHeaderSent = 0; DEBUG_WEBSOCKETS("[WS-Client] Websocket Version: " WEBSOCKETS_VERSION "\n"); } -
해당 begin 함수를 WebSocketsClient.cpp 파일에서 찾아 냈다. 근데..esp8266이란다…내 우노는 esp32를 쓰기 때문에 해당 라이브러리를 참조해서 성공시키려면 라이브러리를 수정하는 방법밖에 없나 싶었다.
-
- ArduinoHttpClient
-
라이브러리 이름부터 이렇게 되어있었어서 처음에는 웹 소켓이 아닌 REST API만 다루는 라이브러리라고 생각했다
-
socket이라고 검색했는데 계속 뜨길래 얘는 도대체 뭐하는 애지? 하고 한번 읽어봤다.
This library can be used for HTTP (GET, POST, PUT, DELETE) requests to a web server. It also supports exchanging messages with WebSocket servers.

- 오,,,? 되는건가? 싶어서 바로 다운받고 wifi 설정한 뒤 실행시켜 보았다
// SimpleWebSocketClient /* Simple WebSocket client for ArduinoHttpClient library Connects to the WebSocket server, and sends a hello message every 5 seconds created 28 Jun 2016 by Sandeep Mistry modified 22 Jan 2019 by Tom Igoe this example is in the public domain */ #include <ArduinoHttpClient.h> #include <WiFiS3.h> #include "arduino_secrets.h" #include "Arduino_LED_Matrix.h" ArduinoLEDMatrix matrix; ///////please enter your sensitive data in the Secret tab/arduino_secrets.h /////// WiFi Settings /////// char ssid[] = SECRET_SSID; char pass[] = SECRET_PASS; char serverAddress[] = "192.168.171.2"; // server address int port = 8080; WiFiClient wifi; WebSocketClient client = WebSocketClient(wifi, serverAddress, port); int status = WL_IDLE_STATUS; int count = 0; void setup() { Serial.begin(9600); while ( status != WL_CONNECTED) { Serial.print("Attempting to connect to Network named: "); Serial.println(ssid); // print the network name (SSID); // Connect to WPA/WPA2 network: status = WiFi.begin(ssid, pass); } matrix.loadSequence(frames); matrix.begin(); matrix.play(true); // print the SSID of the network you're attached to: Serial.print("SSID: "); Serial.println(WiFi.SSID()); // print your WiFi shield's IP address: IPAddress ip = WiFi.localIP(); Serial.print("IP Address: "); Serial.println(ip); } void loop() { Serial.println("starting WebSocket client"); client.begin(); while (client.connected()) { Serial.print("Sending hello "); Serial.println(count); // send a hello # client.beginMessage(TYPE_TEXT); client.print("hello "); client.print(count); client.endMessage(); delay(50); // increment count for next message count++; // check if a message is available to be received int messageSize = client.parseMessage(); if (messageSize > 0) { Serial.println("Received a message:"); Serial.println(client.readString()); } // wait 5 seconds delay(5000); } Serial.println("disconnected"); }SSID: IP Address: 192.168.171.72 starting WebSocket client Sending hello 0 Sending hello 1 Received a message: 서버가 받았습니다.0
-
결론 : ESP8266이나 ESP32는 웹 통신이 메인, 추가적인 센서 제어를 여러개 하려면 Wifi 모듈을 쓰거나, 아니면 ESP 모듈과 아두이노끼리 통신해야함. 헛짓 조심

선천적 베짱이 입니다
아두이노로 웹소켓이라니 멋지십니다