Video Call
User Video
유저로부터 비디오를 가져와 화면에 비디오를 보여줘야 함.
video#myFace(autoplay, palysinline, width="400",height="400")playsinline은 모바일 브라우저가 필요로 하는 property임.
가끔 모바일 기기로 비디오를 재생할 때, 그 비디오가 전체화면이 되버리는데 이걸 방지. 대신에 오직 웹사이트에서만 실행됨.
const socket = io();

const myFace = document.getElementById("myFace");

let myStream;

async function getMedia() {
    try {
        myStream = await navigator.mediaDevices.getUserMedia({
            audio :true,
            video :true
        });
        myFace.srcObject = myStream;
    } catch (error) {
        console.log(error)
    }
}

getMedia();
stream은 비디오와 오디오가 결합된 것.
Navigator.mediaDevices.getUserMedia()로 사용자의 비디오 가져오고 constraints를 보내줌.
MediaDevices: getUserMedia() method - Web APIs | MDN
음소거와 비디오를 끄고 키는 버튼만들기
        main
            div#myStream
                video#myFace(autoplay, palysinline, width="400",height="400")
                button#mute 음소거
                button#camera 비디오끄기
const muteBtn = document.getElementById("mute")
const cameraBtn = document.getElementById("camera")
let muted = false;
let cameraOff = false;
function handleMuteClick() {
if(!muted){
muteBtn.innerText="Unmute";
muted=true;
}else{
muteBtn.innerText="Mute"
muted=false;
}
}
function handleCameraClick() {
if(cameraOff){
cameraBtn.innerText = "Turn Camera Off";
cameraOff = false;
}else{
cameraBtn.innerText = "Turn Camera On";
cameraOff = true;
}
}
muteBtn.addEventListener("click",handleMuteClick)
cameraBtn.addEventListener("click",handleCameraClick)Call Controls
실제로 카메라,소리 On&Off하기
function handleMuteClick() {
    myStream.getAudioTracks().forEach(track => track.enabled = !track.enabled)
    if(!muted){
        muteBtn.innerText="Unmute";
        muted=true;
    }else{
        muteBtn.innerText="Mute"
        muted=false;
    }
}

function handleCameraClick() {
    myStream.getVideoTracks().forEach(track => track.enabled = !track.enabled)
    if(cameraOff){
        cameraBtn.innerText = "Turn Camera Off";
        cameraOff = false;
    }else{
        cameraBtn.innerText = "Turn Camera On";
        cameraOff = true;
    }
}
myStream.getAudio/getVideoTracks의 enabled옵션을 클릭할때마다 상태를 바꿔줌.
유저가 가지고 있는 카메라들의 목록 만들기
enumerateDevices() : 우리에게 모든 장치와 미디어 장치를 알려줌. 컴퓨터에 연결되거나 모바일이 가지고 있는 장치들 모두.
async function getCamera() {
    try {
        const devices = await navigator.mediaDevices.enumerateDevices();
        const cameras = devices.filter(device => device.kind === "videoinput");
        console.log(cameras)
    } catch (error) {
        console.log(error)
    }
}

async function getMedia() {
    try {
        myStream = await navigator.mediaDevices.getUserMedia({
            audio :true,
            video :true
        });
        myFace.srcObject = myStream;
        await getCamera();
    } catch (error) {
        console.log(error)
    }
}
⇒ getMedia할때 getCamera()를 실행시켜주면서 유저의 모든장치와 미디어장치를 알려주고 그 중 비디오인것들만 가져와 보여준다!
많은 비디오 장치중 유저가 고르게 하기!
        main
            div#myStream
                video#myFace(autoplay, palysinline, width="400",height="400")
                button#mute Mute
                button#camera Turn Camera Off
                select#cameras
const camerasSelect =document.getElementById("cameras")
async function getCamera() {
try {
const devices = await navigator.mediaDevices.enumerateDevices();
const cameras = devices.filter(device => device.kind === "videoinput");
cameras.forEach(camera =>{
const option = document.createElement("option");
option.value = camera.deviceId;
option.innerText = camera.label;
camerasSelect.appendChild(option);
})
} catch (error) {
console.log(error)
}
}Camera Switch
선택한 카메라에 따라서 비디오가 보여지게하는 카메라도 바꾸기!
비디오 장치의 Id를 받아와서 강제로 stream을 다시 시작하게 함!
async function getMedia(deviceId) {
    const initalContrains = {
        audio : true,
        video : {facingMode : "user"},
    }
    const cameraContrains = {
        audio : true,
        video : {deviceId : { exact : deviceId }}
    }
    try {
        myStream = await navigator.mediaDevices.getUserMedia(
            deviceId ? cameraContrains : initalContrains
        );
        myFace.srcObject = myStream;
        if(!deviceId){
	        await getCamera();
	      }
    } catch (error) {
        console.log(error)
    }
}

async function handleCameraChange() {
    await getMedia(camerasSelect.value)
}
⇒ 처음 비디오를 시작할때에는 FacingMode를 User로 설정된 contrains를 전달하고, 후에 카메라를 바꾸면 deviceId에 따라서 그 카메라로 stream을 다시생성.
최근 사용한 카메라로 select가 설정되도록 수정
async function getCamera() {
    try {
        const devices = await navigator.mediaDevices.enumerateDevices();
        const cameras = devices.filter(device => device.kind === "videoinput");
        const currentCamera = myStream.getVideoTracks()[0]
        cameras.forEach(camera =>{
            const option = document.createElement("option");
            option.value = camera.deviceId;
            option.innerText = camera.label;
            if(currentCamera.label == camera.label){
                option.selected = true;
            }
            camerasSelect.appendChild(option);
        })
    } catch (error) {
        console.log(error)
    }
}
Introduction to WebRTC
WebRTC란 web Real-Time Communication을 뜻하며 실시간 커뮤니케이션을 가능하게 해주는 기술임.
chatroom을 만들때는 우리가 서버에게 메세지를 보내고, 서버가 다시 나에게 메세지를 보내면서 서버를 사용해서 채팅을 했었음. 이건 Peer-to-Peer가 아님.
WebRTC는 Peer-to-Peer임. 즉, 내 영상과 오디오와 텍스트가 서버로 가지 않고 직접 보내짐. 서로서로 보낼때 서버가 필요없기때문에 속도가 엄청 빨라 실시간으로 가능함.
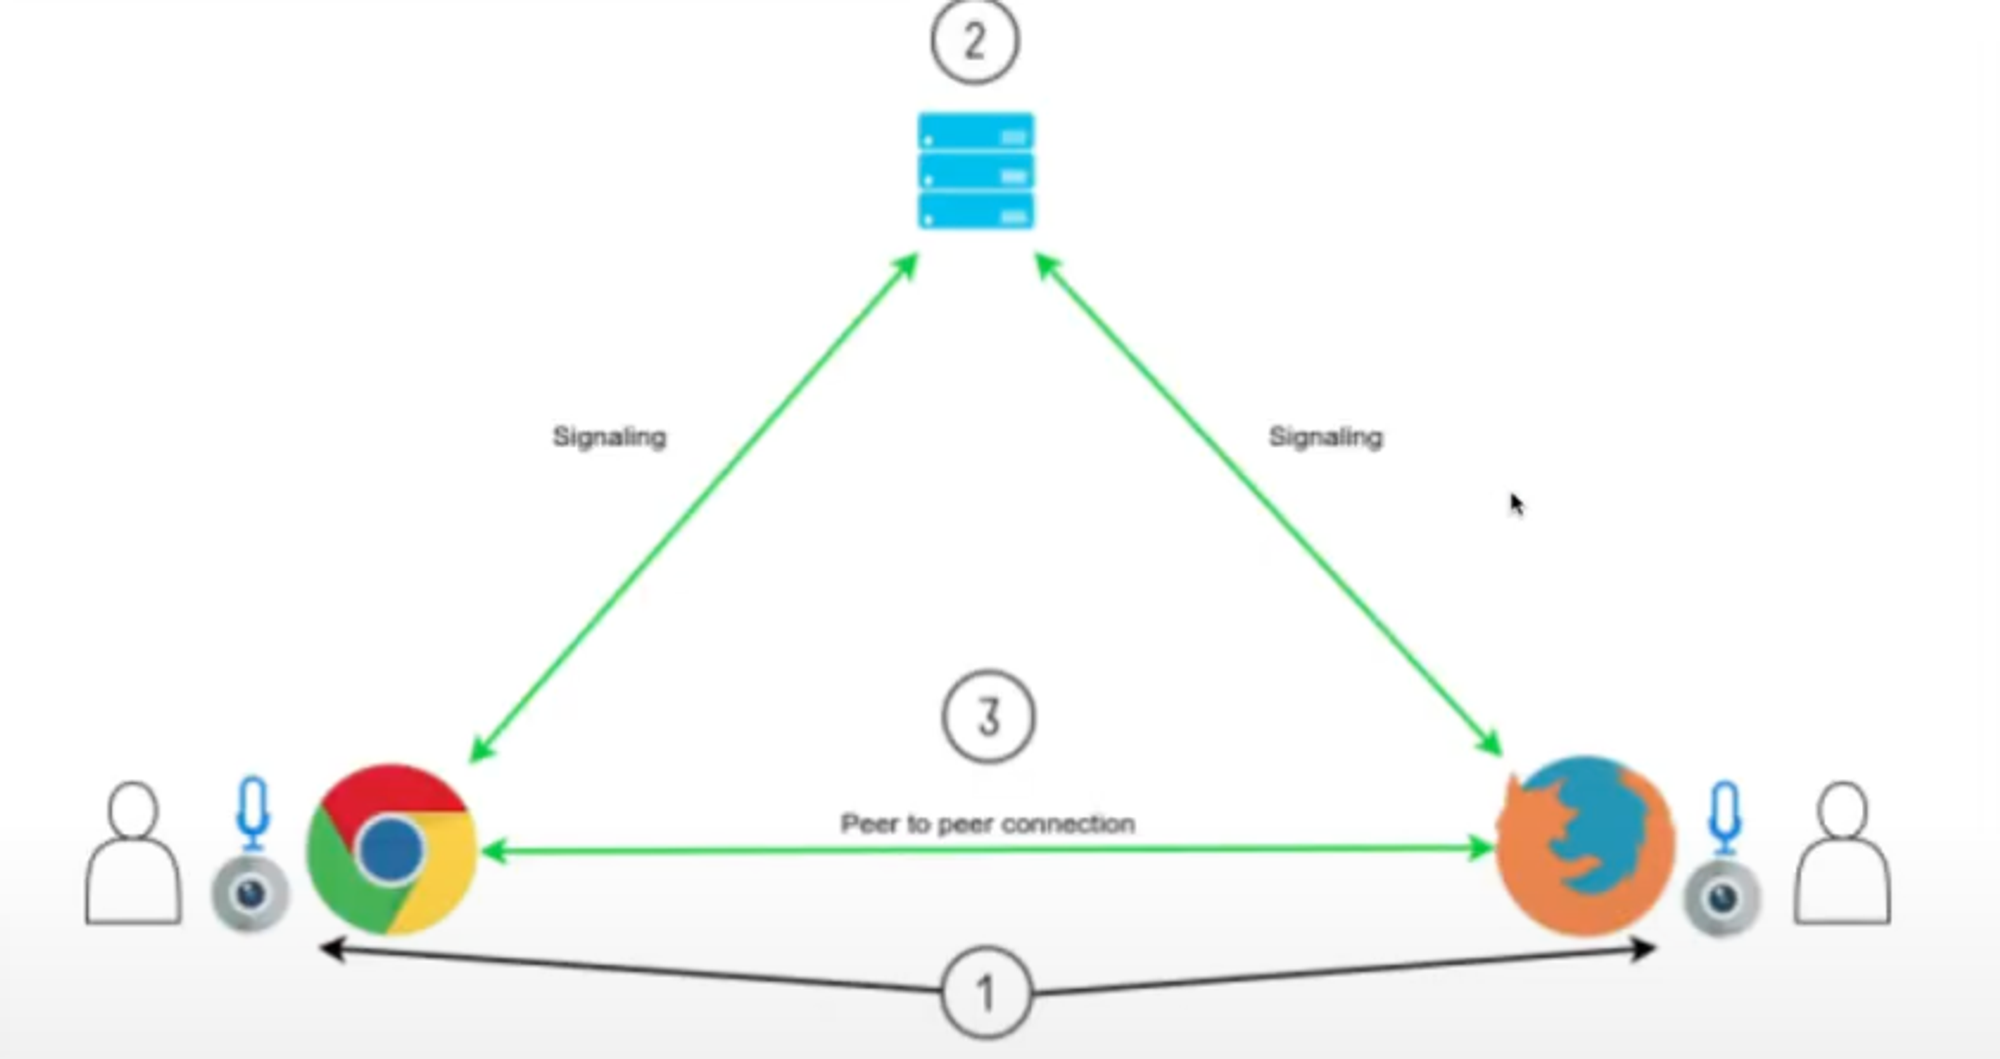
서버가 아예 필요하지는 않음. 우리는 signaling이라는걸 하기 위해 서버가 필요함. 우리의 브라우저가 연결하고싶은 상대가 어디에 있는지 알게 하기 위해서 서버가 필요함.
⇒ 브라우저는 서버에게 인터넷에서의 그들의 위치와, settings, configuration, 방화벽이나 라우터가 있는지 등등의 정보를 서버에게 전달함. 그리고 서버는 이 정보를 다른 브라우저에게 전달해 둘이 서로 찾을 수 있게 해줌. (websocket사용)