서비스 API를 개발한 후 개발된 API 스펙을 프론트엔드 개발자와 공유하며 협업을 진행하게 되는데요
이때 구두로 API 스펙을 공유할 수도, 혹은 문서화 후 그 문서를 공유하며 협업을 진행할 수 있습니다.
저희 팀에서는 얼마전까지만 해도 API 개발을 마친 후 노션에 API 스펙을 기재하고 그것을 프론트엔드 개발자가 직접 확인 하며 작업하는 프로세스로 개발을 진행하고 있었는데요.
서비스를 개발한 개발자가 직접 문서화 해야했고, API 스펙이 수정될때마다 일일히 찾아 변경해줘야하는 번거로움이 따르고 있었습니다.
이러한 문제를 해결하기 위해 개인적으로 이전에 사용해봤던 테스트 코드를 기반으로 API 스펙을 자동으로 문서화할 수 있게 도와주는 Spring Rest Docs를 사용해보자는 건의를 하게 되었고, 결국 채택되어 Spring Rest Docs를 도입하게 되었습니다.
오늘은 이번 기회에 Spring Rest Docs를 좀더 깊게 공부하고, 다른 분들과 공유하고자합니다
참고! Maven, Junit5 기준으로 작성되었습니다.
Spring Rest Docs란?
테스트 코드를 기반으로 작성된 스니펫(snippets)과 필요하다면 직접 특정 부분을 수정함으로써 최종적인 API 스펙에 대한 문서를 얻어낼 수 있는 자동 문서화 도구입니다.
스니펫 정보가 잘못되었거나 혹은 테스트가 실패한다면 스니펫은 생성되지 않습니다.
Spring Rest Docs는 문서화를 위해 Asciidoctor 기본적으로 사용하는데 필요에 따라 Asciidoctor가 아닌 Markdown을 사용하도록 설정할 수 있습니다.
Dependancy
<dependency>
	<groupId>org.springframework.restdocs</groupId>
	<artifactId>spring-restdocs-mockmvc</artifactId>
	<version>{version}</version>
	<scope>test</scope>
</dependency>

<build>
	<plugins>
		<plugin>
			<groupId>org.asciidoctor</groupId>
			<artifactId>asciidoctor-maven-plugin</artifactId>
			<version>1.5.8</version>
			<executions>
				<execution>
					<id>generate-docs</id>
					<phase>prepare-package</phase>
					<goals>
						<goal>process-asciidoc</goal>
					</goals>
					<configuration>
						<backend>html</backend>
						<doctype>book</doctype>
					</configuration>
				</execution>
			</executions>
			<dependencies>
				<dependency>
					<groupId>org.springframework.restdocs</groupId>
					<artifactId>spring-restdocs-asciidoctor</artifactId>
					<version>{version}</version>
				</dependency>
			</dependencies>
		</plugin>
	</plugins>
</build>
만약 생성된 API 스펙 문서를 jar 파일과 함께 패키징하고 싶다면 아래와 같이 추가해줍니다
<plugin>
	<groupId>org.asciidoctor</groupId>
	<artifactId>asciidoctor-maven-plugin</artifactId>
</plugin>
<plugin>
	<artifactId>maven-resources-plugin</artifactId>
	<version>2.7</version>
	<executions>
		<execution>
			<id>copy-resources</id>
			<phase>prepare-package</phase>
			<goals>
				<goal>copy-resources</goal>
			</goals>
			<configuration>
				<outputDirectory>
					${project.build.outputDirectory}/static/docs
				</outputDirectory>
				<resources>
					<resource>
						<directory>
							${project.build.directory}/generated-docs
						</directory>
					</resource>
				</resources>
			</configuration>
		</execution>
	</executions>
</plugin>
Configuration
먼저 스니펫을 생성해낼 테스트 클래스에 아래의 어노테이션을 추가해야합니다.
@ExtendWith(RestDocumentationExtension.class)그 후 아래와 같은 코드를 추가해줍니다.
private MockMvc mockMvc;
@BeforeEach
void setUp(WebApplicationContext webApplicationContext, RestDocumentationContextProvider restDocumentation){
this.mockMvc = MockMvcBuilders.webAppContextSetup(webApplicationContext)
.apply(documentationConfiguration(restDocumentation))
.build();
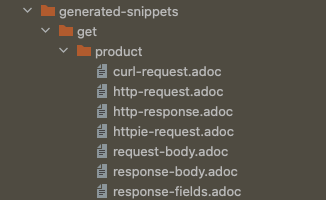
}테스트를 수행한 후 생성된 스니펫은 기본적으로 target/generated-snippets 경로에 자동으로 생성됩니다.
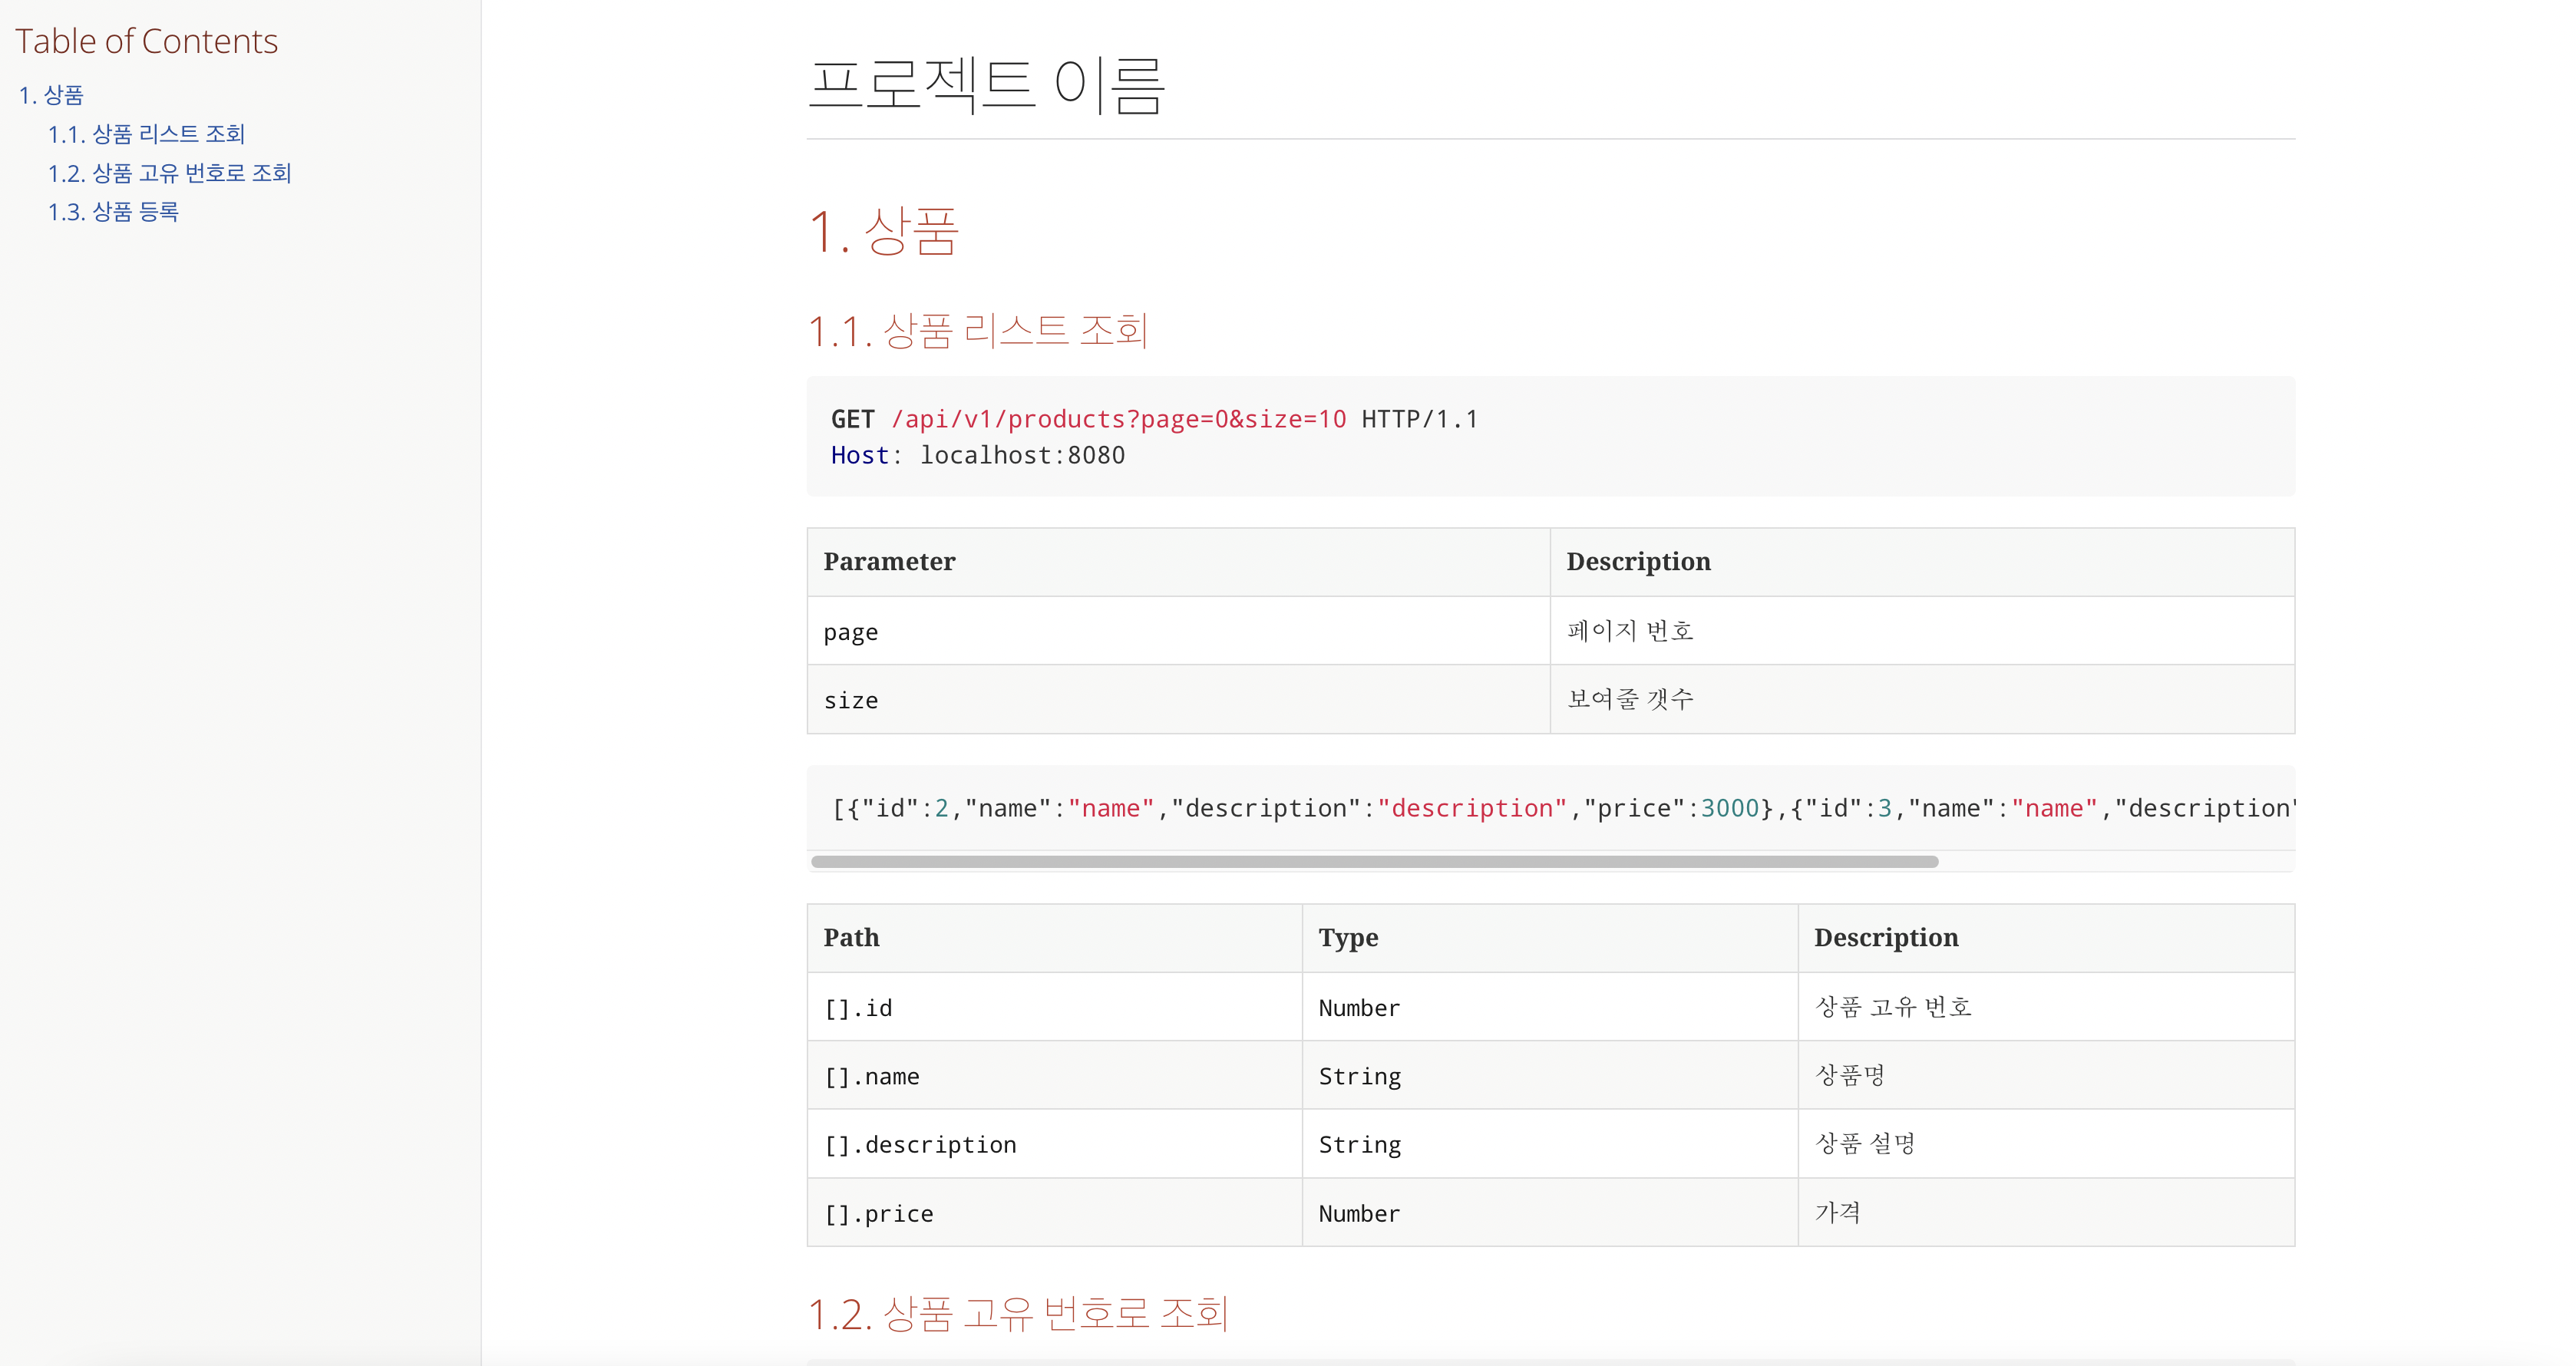
.adoc 생성
스니펫을 통해 API 스펙을 문서화하기 위해서는 .adoc 형식의 파일이 존재해야합니다.
다음과 같은 경로에 .adoc 파일을 생성해주세요.
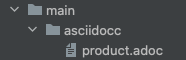
src/main/asciidoc/파일명.adoc
위 경로에 .adoc을 생성 후 API 문서화를 진행하게 되면 입력한 .adoc 파일명과 같게 문서 이름이 매치됩니다.
개인적으로 자주쓰는 형식
만약 문서를 좀더 이쁘게 꾸미고 싶다면 여기를 참고해주세요
= 프로젝트 이름
:doctype: book
:icons: font
:source-highlighter: highlightjs
:toc: left
:toclevels: 4
:sectnums:
:sectlinks:
:sectanchors:

[[api]]
== 제목
=== 부제목
include::{snippets}/get/product/http-request.adoc[]
include::{snippets}/get/product/http-response.adoc[]
How to use
Response
예제를 통해 알아보도록 하겠습니다.
클라이언트가 다음과 같은 응답을 받는다고 가정해봅시다.
{
	"product": {
		“id": 1,
		“name": “상품명"
	}
}

mockMvc.perform(get(“/products/1"))
		.andExpect(status().isOk())
		.andDo(document(
		“response”,
		 responseFields(
			fieldWithPath(“product.id").type(JsonFieldType.NUMBER).description(“상품 고유 번호"),
			fieldWithPath(“product.name").type(“string").description(“상품명”)
		)
	)
);
.andDo() 메서드에 document() 메서드를 호출하는 모습을 볼 수 있습니다.
해당 메소드는 static 메서드로 첫번째 문자열은 스니펫의 이름을 나타내고 두번째 부터는 API 명세에 대한 내용을 나타냅니다.
만약 스니펫을 디렉터리로 구조화 하고싶다면 /(슬래시)로 구분하시면 됩니다.
responseFields() 내의 fieldWithPath() 메소드에 어떤식으로 작성해야하는지는 아래의 표를 참고해주세요.
[기준]
{
	"a":{
		"b":[
			{
				"c”:”one"
			},
			{
				"c”:”two"
			},
			{
				"d”:”three"
			}
		],
		"e.dot" : “four"
	}
}| Path | Value |
|---|---|
| a | b를 포함하는 객체 |
| a.b | 3개의 json 배열을 가진 객체 |
| a.b[].c | one, two 값을 의미 |
| a.b[].d | three 값을 의미 |
| a[‘e.dot’] | four 값을 의미 |
Request
예제를 통해 알아보도록 하겠습니다.
클라이언트가 API 사용을 위해 요청하게 되는 정보입니다.
| Key | Value |
|---|---|
| EndPoint | /products |
| Params | ?size=10&page=1 |
mockMvc.perform(get(“/products?page=1&size=10"))
.andExpect(status().isOk())
.andDo(document(
		“get products”,
		 requestParameters(
				parameterWithName("page").description(“page 설명"),
				parameterWithName(“size").description(“size 설명")
		)));
RequestPath
예제를 통해 알아보도록 하겠습니다.
클라이언트가 API 사용을 위해 요청하게 되는 정보입니다.
| Key | Value |
|---|---|
| EndPoint | /location/{latitude}/{longtitude} |
mockMvc.perform(get("/locations/{latitude}/{longitude}", 51.5072, 0.1275))
.andExpect(status().isOk())
		  .andDo(document(
				"locations”,
				 pathParameters(
				parameterWithName("latitude").description(“latitude 좌표 값"),
				parameterWithName("longitude").description(“longitude 좌표 값")
		)));
Header
mockMvc.perform(get("/people”)
		.header("Authorization", "Basic dXNlcjpzZWNyZXQ="))
		.andExpect(status().isOk())
		.andDo(document(
				"headers”,
				requestHeaders(
					headerWithName("Authorization").description(“인증 정보”)
				),
				responseHeaders(
						headerWithName("X-RateLimit-Limit")
								.description(“설명"),
						headerWithName("X-RateLimit-Remaining")
								.description("설명"),
						headerWithName("X-RateLimit-Reset")
								.description("설명”)
				)
			)
	);
Validation
presentation layer에서 받아오는 객체를 validation 처리하고 싶다면 우선 위 경로에 위 파일을 추가해주어야합니다.

그 후 request-fields.snippet 파일의 내용을 수정합니다.
[예시]

|===
|Path|Type|Description|Constraints

{{#fields}}
|{{#tableCellContent}}`+{{path}}+`{{/tableCellContent}}
|{{#tableCellContent}}`+{{type}}+`{{/tableCellContent}}
|{{#tableCellContent}}{{description}}{{/tableCellContent}}
|{{#tableCellContent}}{{constraints}}{{/tableCellContent}}

{{/fields}}
|===
예제를 통해 알아보도록 하겠습니다.
| Key | Value |
|---|---|
| name | 이름은 필수 값 입니다. |
mockMvc.perform(post("/user”))
		.andExpect(status().isOk())
		.andDo(document(
				“create-user”,
				requestFields(
			        requestFields("name”).description(“이름”)
                    .attributes(key(“Constraints”).value(“이름은 필수 값 입니다."))
				)
			)
	);
Create Docs
테스트 코드를 모두 구현하였다면 마지막으로 maven install을 진행 후 API Docs를 확인합니다.