22.07.26
설계서 추가
경력 인증 플랫폼 : 서비스 Layer1
-
회원
1.1 회원 가입
1.2 회원 암호 키페어 (공개키, 개인키) ——————————— A (create)
1.3 회원 전자지갑(wallet) ——————-—————————— B (create)
- 주소
- 인증 내역
1.3.1 tx 발생 이력 (ref) ———————————————— C (ref) -
경력 인증
2.1 경력 등록(tx 생성) —————————————————— D (create)
2.2 경력 조회(tx/block)
2.2.1 전체 리스트 조회(tx) ——————————————— E (ref)
- 경력
- 등록 일자
- 회사명
2.2.2 상세 조회(tx/block) ———————————————- F (ref)
- 경력
- 회사명
- 직무
- 등록일자
- 경력증명서 URL
- 블록체인 메타(header) 정보
- tx 메타 정보(TxID)
Layer2
RoutePath FunctionName Layer2 Method
“/genKeyPair” NewKeyPair A - Layer3(1) POST
“/MakeWallet” ConnetWallet B - Layer3(2, 3, 4) POST
“/refTx” FindTxByAddr C - Layer3(7) GET
“/Apply/Career”, “/newBlk” ApplyCareer,CreateNewBlock D - Layer3(6,9) POST
“/refTx“ , “tx/ref” FindTxByAddr E - Layer3(7) GET
“/searchBlk” SearchBlock F - Layer3(10) GET
Layer3
< RPC >
- 키 생성
- 주소 생성
- 주소 검증
- 지갑 생성
< HTTP>
- 거래 생성
- 거래 전체 조회 (By Address)
- 거래 상세 조회 (By TxID)
- 블록 생성
- 블록 조회 (by TxID)
상위 설계(인터페이스) 작성
< RPC >
- 지갑 생성 요청
URL : /MakeWallet
Parameter : { w http.ResponseWriter, re *http.Request}
Receive : Alias ( 지갑 이름)
Return : -
Send : 지갑 주소 , PublicKey , PrivateKey
func (r *Request) ConnectWallet(w http.ResponseWriter, re *http.Request) {}< HTTP >
- 블록 생성
URL : /newBlk
Parameter : {http.ResponseWriter w, *http.Request req}
Receive : { “data”: 기타 메시지(copyright등), “txid”:TxID }
Return : -
Send : Block ID [32]byte
func CreateNewBlock(w http.ResponseWriter, req *http.Request) {}- 블럭조회
URL : /searchBlock
Parameter: { w http.ResponseWriter, re *http.Request}
Receive : TxID
Return : -
Send : Hash(블록 해시), Data(블록 데이터) , Timestamp(블록 타임스탬프)
func SearchBlock(w http.ResponseWriter, req *http.Request) {}트랜잭셩 생성(HTTP)
/cabb/user/httppkg/generateTransaction.go
package httppkg

import (
	"cabb/user/txpkg"
	"encoding/json"
	"fmt"
	"net/http"
	_ "net/http"
)

// Request 구조체
type Request struct {
	Address string    `json:"address"`
	T       *txpkg.Tx `json:"transaction"`
}

//Json 타입으로 리턴해주기 위한 구조체
type JsonResponse struct {
	Address string   `json:"address"`
	Txid    [32]byte `json:"txid"`
}

// Generate Transaction
func ApplyCareer(w http.ResponseWriter, req *http.Request) {
	var body Request

	decoder := json.NewDecoder(req.Body)
	decoder.DisallowUnknownFields()
	err := decoder.Decode(&body)
	//에러 체크
	if err != nil {
		fmt.Print(err)
		return
	}

	Txs := txpkg.CreateTxDB() // [임시] 최초에 만들어서 운용중인 Txs(DB) 가져와야함
	Txid := Txs.AddTx(body.T) // Txs(임시)에 트랜잭션 등록

	var response = JsonResponse{Address: body.Address, Txid: Txid}
	json.NewEncoder(w).Encode(response)
}
블록 생성(HTTP)
/cabb/user/httppkg/generateBlock.go
package httppkg

import (
	"cabb/user/blockpkg"
	"encoding/json"
	"fmt"
	"net/http"
)

// Response 데이터를 담을 구조체
type blkID struct {
	BlockID [32]byte `json:"BlockID"`
}

// Request 데이터가 담길 구조체
type reqBody struct {
	TxID string `json:"txID"`
	Data string `json:"data"`
}

func CreateNewBlock(w http.ResponseWriter, req *http.Request) {

	//request용 구조체 생성
	var body reqBody

	//Json 데이터 파싱
	decoder := json.NewDecoder(req.Body)
	decoder.DisallowUnknownFields()
	err := decoder.Decode(&body)
	//에러 체크
	if err != nil {
		fmt.Print(err)
		return
	}

	prevHash := [32]byte{} // (임시)가장 최근의 블록 해시를 불러와야 함
	height := 0            // (임시)가장 최근 블록의 height 또는 블록체인의 길이를 저장

	// string으로 받은 TxID를 [32]byte로 변환
	tmp := []byte(body.TxID)
	var txID [32]byte
	copy(txID[:], tmp)

	data := body.Data

	// response용 구조체 생성
	res := &blkID{}
	// 블록 패키지에 구현해놓은 NewBlock() 실행후 해시값 저장
	res.BlockID = blockpkg.NewBlock(prevHash, height, txID, data).Hash
	// response 구조체 JSON으로 인코딩후 전송
	json.NewEncoder(w).Encode(res)
}
Restful 에서 블록생성 요청을 받아서 :9000/newBlk 으로 넘겨주고 이 때 Body에는 JSON 형식으로 트랜잭션 ID와 기타 메시지가 담긴 Data가 담아져 있어야 한다. 이를 JSON 구조체로 받아와 Decoding하여 파싱한 후 blockpkg의 NewBlock() 함수를 호출하여 실행한다. 생성된 블록의 해시 값을 response 바디에 담아 다시 돌려준다.
HTTP
/cabb/user/program/main.go
func main() {

	router := mux.NewRouter()
	router.HandleFunc("/Apply/Career", httppkg.ApplyCareer).Methods("Post")
	router.HandleFunc("/newBlk", httppkg.CreateNewBlock).Methods("Post")

	http.ListenAndServe(":9000", router)
}
9000번 포트와 /newBlk URL로 요청을 받는다.
테스트
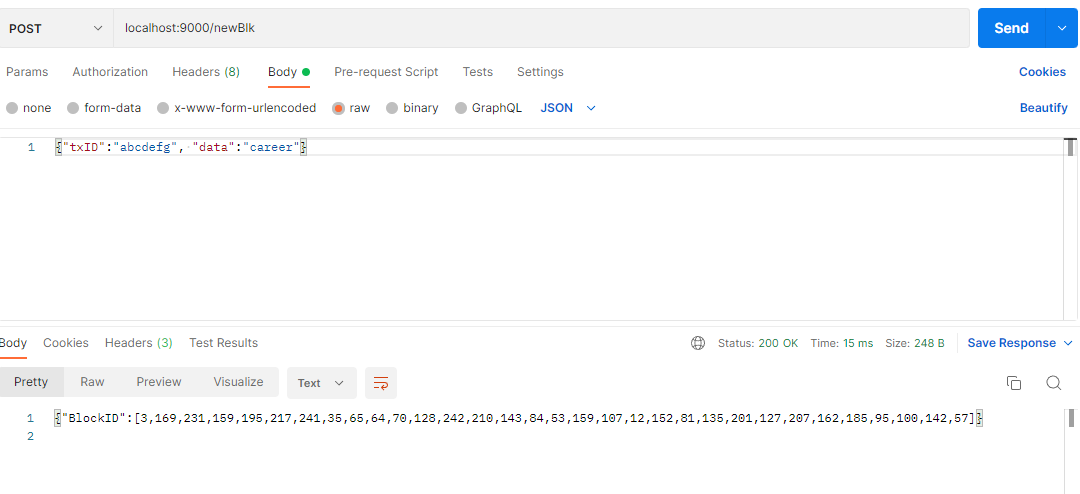
포스트맨으로 테스트해본 결과 성공적이다.
Git