
why qemu?
chroot 환경은 삼성 vendor 커널을 그대로 쓰기 때문에(= aarch64, 커널헤더 없음),
x86_64 커널드라이버 개발을 할수가 없다. qemu 를 사용해 개발환경을 구성해본다.
pre-requisites
chroot 환경
구성도
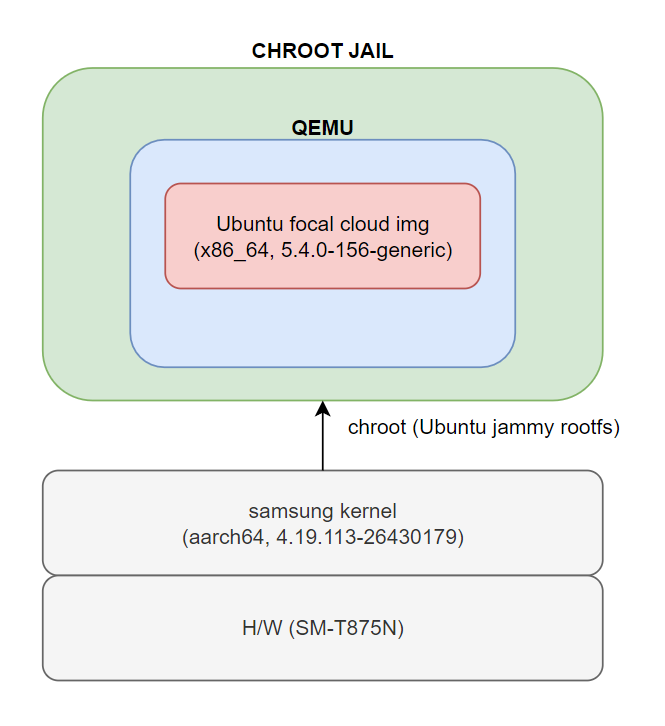
장단점
장점 : 안드로이드 태블릿에서 x86_64 커널드라이버를 작성하고 빌드할수 있다.
단점 : 많이 느리다
- 태블릿 cpu 에서 "kvm 을 미지원" 하므로, qemu 가 느린 software emulation 으로 대신하기 때문
(Intel vt-x, AMD-v) - 로그인까지 4분 소요
- 단순 모듈 빌드에도 1분 소요
구성순서
1) PC 에 cloud img 를 다운로드
https://cloud-images.ubuntu.com/focal/current/focal-server-cloudimg-amd64.img
- qcow2 타입이므로 설치없이 qemu 에서 바로 사용가능
- 큰 기업들, 리눅스 쪽에서도 이런식으로 이미지를 공유해서 바로바로 쓰는게 대세인듯 하다.
2) PC 에서 qemu-nbd 를 사용, cloud img 에 root password 부여
https://wiki.archlinux.org/title/QEMU#Mounting_a_partition_from_a_qcow2_image
- 다른 방식(cloud-init, virt-manager) 도 있으나, 이 방식이 가장 깔끔해보인다.
root@ubuntu22-virtual-machine:~# modprobe nbd max_part=16
root@ubuntu22-virtual-machine:~# qemu-nbd -c /dev/nbd0 focal-server-cloudimg-amd64.img
root@ubuntu22-virtual-machine:~# partprobe /dev/nbd0
root@ubuntu22-virtual-machine:~# fdisk -l /dev/nbd0
Disk /dev/nbd0: 2.2 GiB, 2361393152 bytes, 4612096 sectors
Units: sectors of 1 * 512 = 512 bytes
Sector size (logical/physical): 512 bytes / 512 bytes
I/O size (minimum/optimal): 512 bytes / 512 bytes
Disklabel type: gpt
Disk identifier: 88146121-F81C-4493-8F8F-0DB57D573BFC

Device        Start     End Sectors  Size Type
/dev/nbd0p1  227328 4612062 4384735  2.1G Linux filesystem
/dev/nbd0p14   2048   10239    8192    4M BIOS boot
/dev/nbd0p15  10240  227327  217088  106M EFI System

Partition table entries are not in disk order.
root@ubuntu22-virtual-machine:~# mount /dev/nbd0p1 mnt
root@ubuntu22-virtual-machine:~# chroot ./mnt /bin/passwd root
New password:
Retype new password:
passwd: password updated successfully
root@ubuntu22-virtual-machine:~#
3) cloud img 를 타블랫 chroot jail 로 전달
4) 타블랫에 qemu-system-x86_64 설치하고, cloud img 실행
#!/bin/bash
qemu-system-x86_64 -M pc -m 4096 -nographic -smp 4 \
	-device virtio-net-pci,netdev=net0,romfile="" \
	-netdev type=user,id=net0,hostfwd=tcp::2222-:22,dns=8.8.8.8 \
	-device virtio-blk-pci,drive=drv0 \
	-drive format=qcow2,file=focal-server-cloudimg-amd64.img,if=none,id=drv0
6) cloud img 내 cloud-init 패키지 삭제
apt-get purge cloud-init7) cloud img 내 ip 할당
dhclient8) cloud img 내 make, gcc 설치
- 커널 헤더는 이미 존재하므로 설치할 필요가 없음
apt-get install make gcc커널모듈 빌드예시
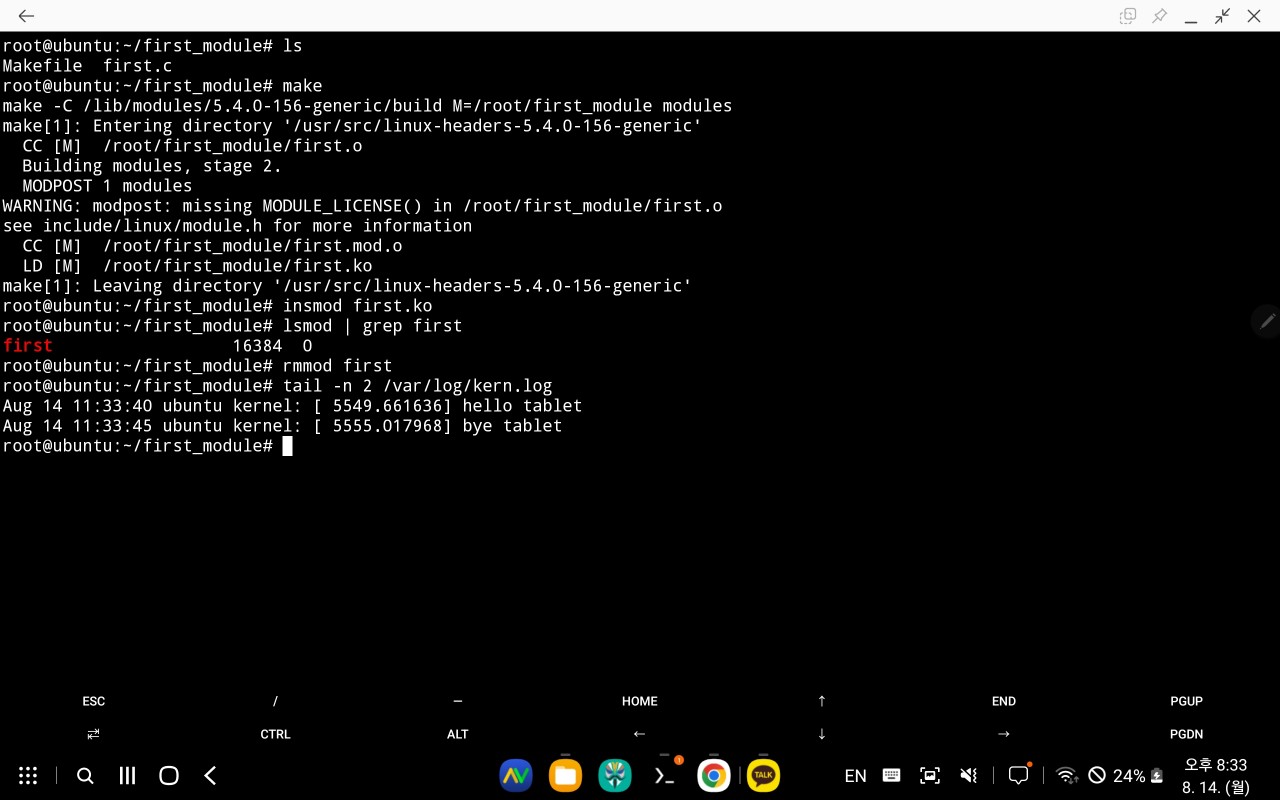
Confer.
생각했던 것보다 타블랫은 커널 드라이버 개발에 적합하지 않은듯 하다.

관심분야 : Filesystem, Data structure, user/kernel IPC