본 글을 개인공부를 위해 참고자료를 포함하여 작성한 글입니다.
💡 순수 JPA
@MappedSuperclass
@Getter
public class JpaBaseEntity {

  @Column(updatable = false)
  LocalDateTime createdDate;
  LocalDateTime lastModifiedDate;

  @PrePersist
  public void PrePersist(){ //영속성컨텍스트 일어나기 전에 시행
    LocalDateTime now = LocalDateTime.now();
    createdDate = now;
    lastModifiedDate = now;
  }

 @PreUpdate
  public void PreUpdate(){ // 업데이트 일어나기 전에 실행
    lastModifiedDate = LocalDateTime.now();
 }

}
💡 SpringData JPA Auditing
📌 엔티티의 이벤트를 감시하는 Auditing
- Auditing 을 사용하면 엔티티를 누가 언제 생성/마지막 수정 했는지 자동으로 기록되게 할 수 있다.
📌 Auditing 적용 방법
-
메인 애플리케이션 위에
@EnableJpaAuditing추가@EnableJpaAuditing @SpringBootApplication public class Application { -
엔티티 클래스 위에
@EntityListeners(AuditingEntityListener.class)추가
@Getter
@MappedSuperclass
@EntityListeners(AuditingEntityListener.class)
public class TimeStamp {
    @CreatedDate
    private LocalDateTime createdAt;

    @CreatedBy
    @ManyToOne
    private User createdBy;

    @LastModifiedDate
    private LocalDateTime modifiedAt;

    @LastModifiedBy
    @ManyToOne
    private User modifiedBy;
}
3. AuditorAware 구현체 만들기
@CreatedBy(생성자), @LastModifiedBy(수정자)
spring-data-commons 에는 @CreatedBy, @LastModifiedBy 라는 어노테이션이 있습니다. 물론, @CreatedDate, @LastModifiedDate가 자매품(?)으로 있긴하지만, 생성시간과 업데이트시간은 구현체 없이 해당 어노테이션을 지정하는 것만으로도 끝나지만 ,
🔑 생성자, 수정자는 별도의 구현체가 필요합니다.
이 과정에서 Spring Security 셋팅이 필수로 필요합니다. Spring Security 셋팅 없이도 할 수 있겠지만 요즘 백엔드와 프론트엔드도 분리되고 JWT 토큰으로 인증을 하기에 더더욱 필요한 것 같습니다.
- SpringSecurity 의
SecurityContextHolder에서 인증정보안에 담긴UserDetailsImpl을 사용하여 user 객체를 가져와서 넣어준다. - SpringSecurity의 JwtFilter 에서 우리가 저장해주는 부분 코드보기
// JwtAuthFilter.java

@Slf4j
@RequiredArgsConstructor
public class JwtAuthFilter extends OncePerRequestFilter {

    private final JwtUtil jwtUtil;

    @Override
    protected void doFilterInternal(HttpServletRequest request, HttpServletResponse response, FilterChain filterChain) throws ServletException, IOException {
        String token = jwtUtil.resolveToken(request);

        if(token != null) {
            if(!jwtUtil.validateToken(token)){
                jwtExceptionHandler(response, "Token Error", HttpStatus.UNAUTHORIZED.value());
                return;
            }
            Claims info = jwtUtil.getUserInfoFromToken(token);
						// 인증정보 세팅함수 호출
            setAuthentication(info.getSubject());
        }
        try {
            filterChain.doFilter(request, response);
        }catch(FileUploadException e){
            jwtExceptionHandler(response,"File Upload Error",400);
        }
    }

    public void setAuthentication(String username) {
				// SecurityContextHolder 는 threadLocal 로 구현되어 요청쓰레드내에서 공유할 수 있다.
        SecurityContext context = SecurityContextHolder.createEmptyContext();
        Authentication authentication = jwtUtil.createAuthentication(username);
				// 요기서 인증정보(계정정보)를 담아준다.
        context.setAuthentication(authentication);

        SecurityContextHolder.setContext(context);
    }
		...
}
@Service
public class UserAuditorAware implements AuditorAware<User> {
    @Override
    public Optional<User> getCurrentAuditor() {
        Authentication authentication = SecurityContextHolder.getContext().getAuthentication();

        if (authentication == null || !authentication.isAuthenticated()) {
            return Optional.empty();
        }

        return Optional.of(((UserDetailsImpl) authentication.getPrincipal()).getUser());
    }
}
AuditorAware을 implements 하면 getCurrentAuditor() UserAuditorAware 오버라이드 해야한다.
AuditorAware을 implements한 UserAuditorAware을 구현한 후 @Service를 달아 빈으로 등록 후
4. @EnableJpaAuditing에 AuditorAware 빈 이름 설정하면
인식된 유저 정보가 담기게 된다.
@EnableJpaAuditing(auditorAwareRef = "userAuditorAware") // auditorAware 의 빈이름을 넣어준다.
@SpringBootApplication
public class Application {
💡 Auditing 직접 구현해보기
- 생성일시, 생성자, 수정일시, 수정자는 결국 엔티티의 영속성이 변경될때 저장한다.
- 엔티티의 영속성이 변경되는
생성 > 수정 > 삭제이 흐름을 엔티티 라이프 사이클 이벤트라고 한다. - Auditing 도 이러한 엔티티의 라이프 사이클 이벤트를 통해 구현하고있다.
- 우린 엔티티 라이프 사이클을 직접 관리하여 구현할 수 있다.
💡 객체가 생성되면 자동으로 실행하도록 메소드에 붙이는
**@PostConstruct**의 원리와 같다.
엔티티 저장 이벤트
전 : @PrePersist : EntityManager 가 엔티티를 영속성상태로 만들기 직전에 메소드 수행
후 : @PostPersist : EntityManager 가 엔티티를 영속성상태로 만든 직후에 메소드 수행
엔티티 수정 이벤트
전 : @PreUpdate : EntityManager 가 엔티티를 갱신상태로 만들기 직전에 메소드 수행
후 : @PostUpdate : EntityManager 가 엔티티를 갱신상태로 만든 직후에 메소드 수행
엔티티 삭제 이벤트
전 : @PerRemove : EntityManager 가 엔티티를 삭제상태로 만들기 직전에 메소드 수행
후 : @PostRemove : : EntityManager 가 엔티티를 삭제상태로 만든 직후에 메소드 수행
이걸 활용해서 createdAt, modifiedAt 를 기록해보자
@Getter
@MappedSuperclass
@EntityListeners(AuditingEntityListener.class)
public class Timestamp {

private LocalDateTime createdAt;

private LocalDateTime modifiedAt;

//@updateCreatedAt() ,updateModifiedAt() 은 MappedSuperclass를 생성하기위해 이미 정의되어 있기  때문에  해당 클래스에서 어노테이션을 사용 해 구현 할 수 없다.  어노테이션을 제외한 메소드만 작성후 사용하는 해당 클래스에 라이프사이클 메서드를 구현해준다.
// @PrePersist
public void updateCreatedAt() {
  this.createdAt = LocalDateTime.now();
}

//  @PreUpdate
//  @PrePersist
public void updateModifiedAt() {
  this.modifiedAt = LocalDateTime.now();
}
}
//Entity 내 정의
//라이프 사이클 메소드
@Prepersist
public void prePersist(){
super.updateCreatedAt();
super.updateModifiedAt();
@PreUpdate
public void preUpdate(){
super.updateModfiedAt();
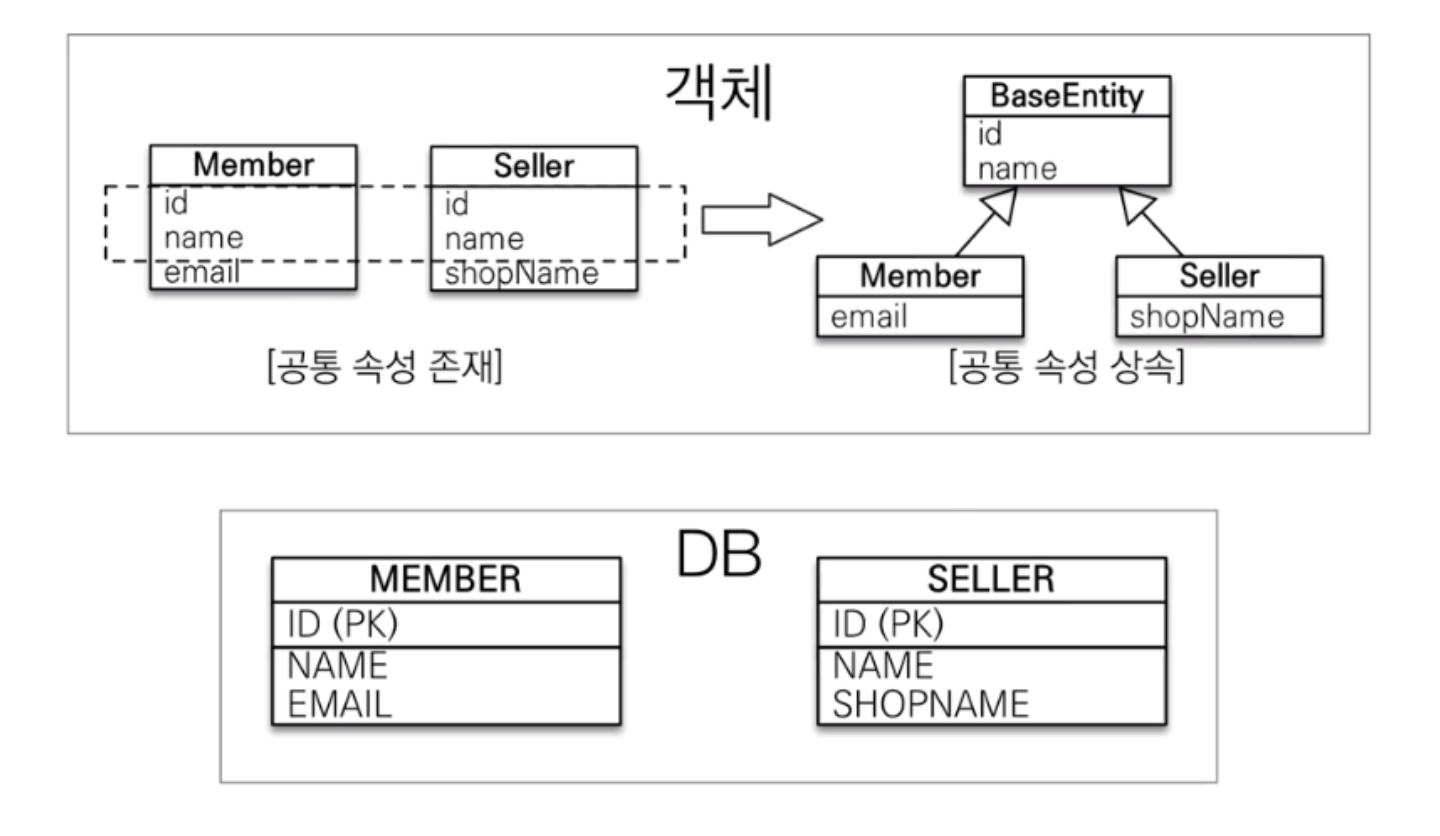
}👍🏻 @MappedSuperclass 에 관하여
-
일반적으로, 상속 관계 매핑 전략에서 부모 클래스와 자식 클래스 모두 데이타베이스 테이블과 매핑을 한다.
-
이와 달리, 부모 클래스를 상속받는 자식클래스에게
🔑 매핑 정보 속성만 제공하고 싶을때 이 어노테이션을 사용하면 된다. -
엔티티 종류에 상관없이 공통으로 가지고 있어야 하는 정보가 있다면 ( ex. 데이타 생성시간, 수정시간 등 ) 공통 클래스로 추출하고 이를 상속받는 방식으로 구현할 때 사용 한다.
그러나 엔티티는 엔티티만 상속받을 수 있기 때문에 엔티티가 아닌 클래스를 상속받기 위해서 @MappedSuperclass 를 사용한다.
DB 테이블과는 상관없다. 아래에 보면 DB는 매핑 정보 다 따로 쓰고 있다. 객체의 입장이다.
코드로 이해하기
생성자, 생성시간, 수정자, 수정시간을 모든 엔티티에 공통으로 가져가야 하는 상황에서
아래와 같이 BaseEntity를 정의해서 활용할 수 있다.
- BaseEntity.java
매핑정보만 상속받는 Superclass라는 의미의 @MappedSuperclass 어노테이션 선언
@Getter
@MappedSuperclass
public abstract class BaseEntity {
private String createdBy;
private LocalDateTime createdDate;
private String lastModifiedBy;
private LocalDateTime lastModifiedDate;
}- Member.java, Team.java
BaseEntity 상속
@Entity
public class Member extends BaseEntity {
  ...
}
@Entity
public class Team extends BaseEntity {
...
}- 실행된 DDL
BaseEntity에 선언된 컬럼들이 생성 된다.
Hibernate:
   create table Member (
      id bigint generated by default as identity,
       createdBy varchar(255),
       createdDate timestamp,
       lastModifiedBy varchar(255),
       lastModifiedDate timestamp,
       age integer,
       description clob,
       roleType varchar(255),
       name varchar(255),
       locker_id bigint,
       team_id bigint,
       primary key (id)
  )
Hibernate:
   create table Team (
      id bigint generated by default as identity,
       createdBy varchar(255),
       createdDate timestamp,
       lastModifiedBy varchar(255),
       lastModifiedDate timestamp,
       name varchar(255),
       primary key (id)
  )
...
정리
1. 상속광계 매핑이 아니다.
-
@MappedSuperclass가 선언되어 있는 클래스는 엔티티가 아니다. 당연히 테이블과 매핑도 안된다.
-
단순히 부모 클래스를 상속 받는 자식 클래스에 매핑 정보만 제공한다.
-
조회, 검색이 불가하다. 부모 타입으로 조회하는 것이 불가능하다는 이야기.(em.find(BaseEntity) 불가능)
-
직접 생성해서 사용할 일이 없으므로 추상 클래스로 만드는 것을 권장한다.
-
테이블과 관계가 없고, 단순히 엔티티가 공통으로 사용하는 매핑 정보를 모으는 역할을 한다.
-
주로 등록일, 수정일, 등록자, 수정자 같은 전체 엔티티에서 공통으로 적용하는 정보를 모을 때 사용한다.
- JPA에서 @Entity 클래스는 @Entity나 @MappedSuperclass로 지정한 클래스만 상속할 수 있다.
@AttributeOverride
만약 book 테이블의 생성일시만 createdAt이 아닌 publishedAt 으로 바꾸고 싶으면 Book만 BaseEntity를 상속받지 않고 따로 만들어야할까 ?
그럴 필요는 없고, 아래와 같이 @AttributedOverride 어노테이션으로 필요한 매핑정보만 재정의가 가능하다.
@Data
@Entity
@AttributeOverride(name = "createdAt", column = @Column(name = "publishedAt"))
public class Book extends BaseEntity { ...
또한,


@AttributeOverrides({
        @AttributeOverride(...),
        @AttributeOverride(...)
})
위와 같은 형식으로 여러개의 매핑정보도 한번에 재정의 할 수 있다.
참고