DOM (Document Object Model)
DOM(Document Object Model)이란 HTML 문서의 계층적인 구조를 트리(tree)로 표현한 것을 의미한다.
다시 말해 자바스크립트가 간편하게 HTML 문서에 접근하여 수정할 수 있도록 HTML 요소를 객체로 만들어 놓은 것이다.
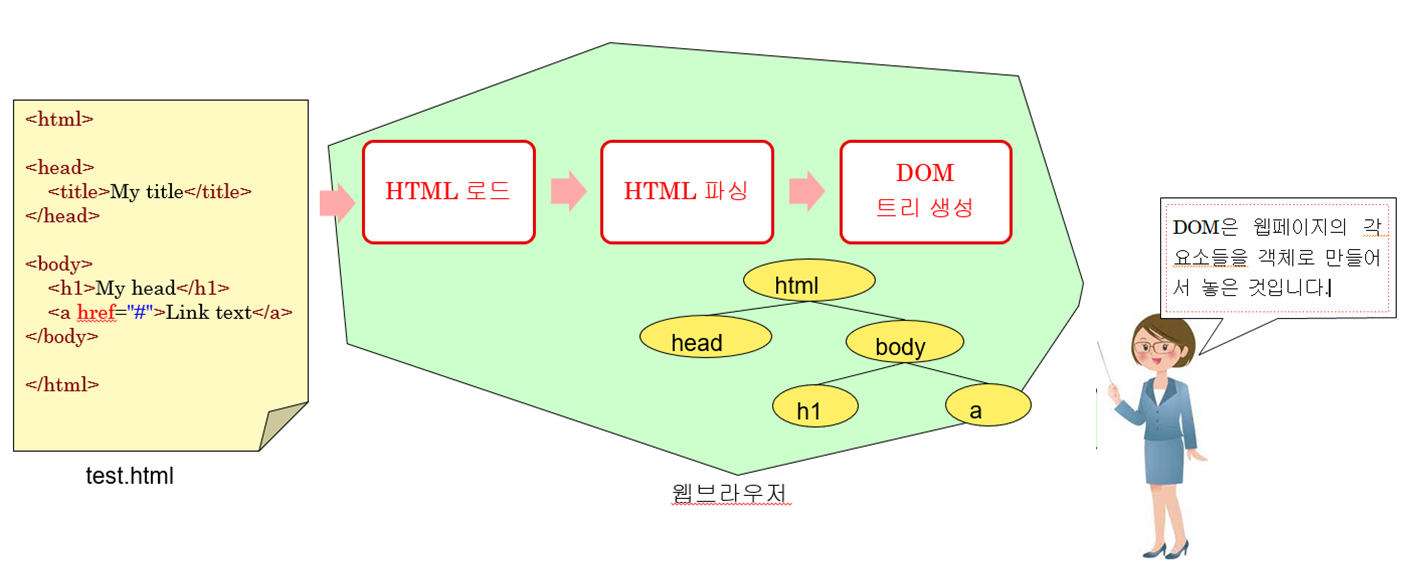
웹 페이지가 로드되면 브라우저는 DOM을 생성한 후에 이 DOM을 순회하면서 웹 페이지를 화면에 표시한다.
우리는 자바스크립트를 사용하여 DOM 트리를 순회하면서 페이지 안의 HTML 요소들의 내용(콘텐츠)이나 속성, CSS 스타일을 우리 마음대로 변경할 수 있다. 이 말은 즉 동적인 웹 페이지 구성이 가능하다는 의미가 된다.
정리하면 HTML 문서를 객체로 표현한 것을 DOM이라고 한다. DOM 외에도 웹 브라우저는 frames[], history, location, navigator, screen을 포함하고 있는데, 이를 모두 포함한 개념은 웹 브라우저를 객체로 표현하였다고 해서 BOM(Browser Object Model)이라고 한다.

BOM에 대해서는 다음 포스팅에서 상세하게 살펴보도록 하고, 이번에는 DOM에 대해 자세하게 알아보도록 하자.
HTML 요소 찾기
동적인 웹 페이지를 구성하려면 원하는 요소를 찾아야 한다. HTML 요소는 ID, 태그 이름, 클래스 이름, CSS 선택자 총 4가지 방식으로 찾아낼 수 있다.
ID로 HTML 요소 찾기
DOM에서 HTML 요소를 찾는 가장 기본적인 방법으로, 요소의 ID를 통해 찾아내는 것이다.
x = document.getElementById("special");
<!DOCTYPE html>
<html>
<body>
  <p id="special"></p>
  <script>
    document.getElementById("special").innerHTML = "Hello World!";
  </script>
</body>
</html>
태그 이름으로 HTML 요소 찾기
태그의 이름을 인수로 받아서 이 태그를 사용하는 모든 요소들을 배열에 넣어서 반환한다.
eleArray = document.getElementsByTagName("p");
<!DOCTYPE html>
<html>

<body>
    <p>첫번째 p 요소</p>
    <p>두번째 p 요소</p>
    <p id="special"></p>
    <script>
        let eleArray = document.getElementsByTagName('p')
        let elt = document.getElementById('special')
        elt.innerHTML = 'eleArray[0]: ' + eleArray[0].innerHTML
    </script>
</body>

</html>
CSS 선택자로 HTML 요소 찾기
지정된 CSS 선택자와 일치하는 모든 HTML 요소를 찾으려면 querySelectorAll() 메서드를 사용하면 된다.
<!DOCTYPE html>
<html>
<body>
    <p class="special">This is a first paragraph.</p>
    <p class="special">This is a second paragraph.</p>
    <p id="result"></p>
    <script>
        let arr = document.querySelectorAll("p.special");
        document.getElementById("result").innerHTML =
            '첫번째 요소는: ' + arr[0].innerHTML;
    </script>
</body>
</html>
객체들 간의 관계를 이용한 DOM 트리 순회
DOM은 트리 형태로 구성되어 있으므로, 부모 노드와 자식 노드 간의 관계를 이용하여 방문이 가능하다. 대표적으로 childNodes[], nextSibling[], parentNode[]를 이용한다.
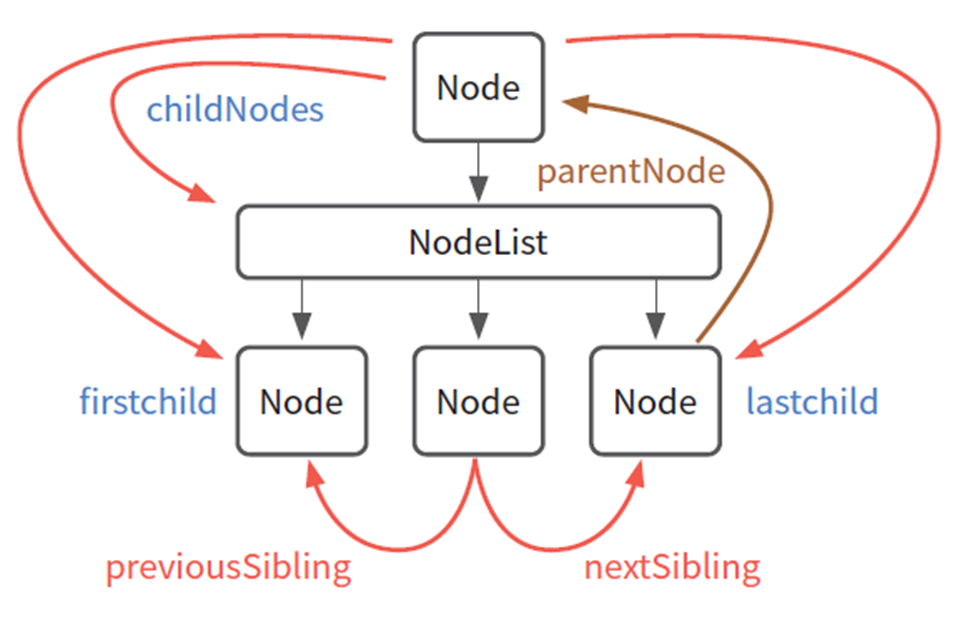
- childNodes[]: 한 요소의 모든 자식 요소에 접근하므로 배열 반환
- firstChild: childNodes[]에서 가장 첫 번째 자식 반환
- lastChild: childNodes[]에서 가장 마지막 자식 노드 반환
- parentNode: 현재 노드의 부모 노드 반환
- nextSibling: 현재 노드의 다음 형제 노드 반환
- previousSibling: 현재 노드의 이전 형제 노드 반환
<!DOCTYPE html>
<html lang="ko">
<head>
<meta charset="UTF-8" />
<title>childNodes 예제</title>
<style>
#output {
background-color: #f4f4f4;
padding: 10px;
border-radius: 8px;
margin-top: 20px;
font-family: Arial, sans-serif;
}
</style>
</head>
<body>
<h1>childNodes 사용법</h1>
<div id="container">
<p>First paragraph</p>
<p>Second paragraph</p>
<!-- Comment node -->
<p>Third paragraph</p>
</div>
<button id="showChildren">Show childNodes</button>
<div id="output"></div>
<script>
function listChildNodes() {
const container = document.getElementById('container')
const output = document.getElementById('output')
let htmlContent = '<ul>' // Start the list
container.childNodes.forEach(node => {
let textContent = node.textContent.trim() // Extract text content
if (textContent) {
htmlContent += `<li>${node.textContent}</li>`
// Append text content to the list
}
})
htmlContent += '</ul>' // Close the list
output.innerHTML = htmlContent // Set the innerHTML of the output div
}
document
.getElementById('showChildren')
.addEventListener('click', listChildNodes)
</script>
</body>
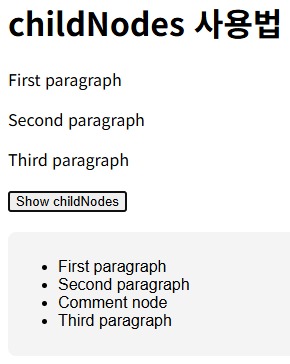
</html>여기서 한 가지 주의할 점은 container.childNodes는 container의 요소 노드, 텍스트 노드, 주석 노드 모두 포함시켜서 들고온다. 따라서 주석으로 적힌 <!-- Comment node --> 역시 포함되어 아래와 같이 결과가 나타난다.
Truthy 값
방금 위 코드 예제에서 아래와 같은 조건문을 확인하였을 것이다.
if (textContent) {
  htmlContent += `<li>${node.textContent}</li>` // Append text content to the list
}
자바스크립트에서 if (textContent) 표현을 사용하는 것은 textContent 변수가 truthy 값일 때 true를 반환한다는 의미이다.
Truthy 값의 정의는 다음과 같다.
- 비어 있지 않은 문자열: "hello"와 같이 어떤 내용이 들은 문자열
- 양의 또는 음의 숫자: 0 이 아닌 모든 값
- 객체: {}, [], new Date() 등과 같은 모든 객체
- true 불린 값: true 불린 값 그 자체
반대로 Falsy 값의 정의는 다음과 같다.
- 빈 문자열: ""
- 숫자 0: 0
- null
- undefined
- NaN: Not a Number
- false
입력 양식에서 사용자 입력값 읽기
일반 HTML 요소는 innerHTML 속성을 이용하여 요소 안의 내용을 읽으면 되지만, <input> 과 같은 입력 양식을 읽어들이기 위해서는 기본적으로 .value 를 통해 가져올 수 있으며, 구체적인 방법은 다음과 같다.
document.getElementById("target").value 사용하기
<!DOCTYPE html>
<html>
<head>
  <script>
    function process() {
      let obj = document.getElementById('target')
      alert(obj.value)
    }
  </script>
</head>
<body>
  <form name="myform">
    <input type="text" id="target" name="text1" />
    <input type="submit" value="제출" onclick="process()" />
  </form>
</body>
</html>
event.target.elements['text1'] 사용하기
<!DOCTYPE html>
<html>
<head>
  <script>
    function process(event) {
      event.preventDefault() // 기본 제출 막기
      let inputElement = event.target.elements['text1']
      alert(inputElement.value)
    }
  </script>
</head>
<body>
  <form name="myform" onsubmit="process(event)">
    <input type="text" id="target" name="text1" />
    <input type="submit" value="제출" />
  </form>
</body>
</html>
여기서 process(event)를 통해 event 객체 자체를 전달하게 된다. event.target은 이벤트가 발생한 요소, 즉 폼 자체를 나타낸다. text1이라는 이름을 가진 요소를 가지고 온다는 뜻이므로 <input type="text" id="target" name="text1" />를 선택하게 된다.
document.myform.text1 사용하기
<!DOCTYPE html>
<html>

<head>
    <script>
        function process() {
            let obj = document.myform.text1
            alert(obj.value)
        }
    </script>
</head>

<body>
    <form name="myform">
        <input type="text" id="target" name="text1" />
        <input type="submit" value="제출" onclick="process()" />
    </form>
</body>

</html>
form 이름을 myform으로 주게 되면 document.myform.text1과 같이 사용하여 <input type="text" id="target" name="text1" /> 를 선택하는 것이 가능하다!
참고로 여기서 대괄호 사용[] 과 점. 을 통한 사용은 모두 동일한 접근이다.
event.target.elements.text1
event.target.elements['text1']

document.myform.text1
document.myform['text1']
텍스트 영역에서 읽기
텍스트 영역인 <textarea> 역시 getElementById()를 통해 사용자가 입력한 텍스트를 가져올 수 있다.
let s = document.getElementById('textArea').value
<!DOCTYPE html>
<html lang="ko">

<head>
    <script>
        function copyTextAreaValue() {
            let s = document.getElementById('textArea').value
            document.getElementById('result').value = s
        }
    </script>
</head>

<body>
    <textarea id="textArea" rows="5" cols="20">This is a TextArea.</textarea>
    <input type="button" onClick="copyTextAreaValue();" value="클릭" />
    <textarea id="result" rows="5" cols="20"></textarea>
</body>

</html>
체크 박스에서 읽기
체크박스의 경우 checked 속성을 통해 체크 유무를 확인할 수 있다.
document.getElementById('myCheckBox').checked
<!DOCTYPE html>
<html lang="ko">
  <head>
    <script>
      function get() {
        if (document.getElementById('myCheckBox').checked) {
          document.getElementById('result').value = '동의하셨습니다.'
        } else {
          document.getElementById('result').value = '동의하지 않으셨습니다.'
        }
      }
    </script>
  </head>
  <body>
    <input type="checkbox" id="myCheckBox" />동의합니다.<br />
    <input type="button" onClick="get();" value="클릭" />
    <input type="text" id="result" value="" />
  </body>
</html>
라디오 버튼에서 읽기
라디오 버튼에서는 checked 속성을 통해 체크 유무와, getElementsByName()을 통해 요소 중 이름에 해당하는 것을 가져올 수 있다.
let list = document.getElementsByName('color')
<!DOCTYPE html>
<html lang="en">

<head>
    <script>
        function getValue() {
            let list = document.getElementsByName('color')
            for (let i = 0; i < list.length; i++) {
                if (list[i].checked) {
                    document.getElementById('result').value = list[i].value
                    break
                }
            }
        }
    </script>
</head>

<body>
    <input type="radio" name="color" CHECKED value="red" />RED<BR />
    <input type="radio" name="color" value="blue" />BLUE<BR />
    <input type="radio" name="color" value="green" />GREEN<BR />
    <input type="button" onClick="getValue();" value="클릭" />
    <input type="text" id="result" value="" />
</body>

</html>
SelectList에서 값 읽기
풀다운 메뉴 기능을 제공하는 SelectList는 selectedIndex를 통해 사용자가 선택한 인덱스를 읽어들여 사용이 가능하다.
document.getElementById("myList").selectedIndex;
<!DOCTYPE html>
<html lang="en">

<head>
    <script>
        function getValue() {
            let elt = document.getElementById('myList')

            let selected = elt.selectedIndex
            let s = elt.options[selected].value
            document.getElementById('result').value = s
        }
    </script>
</head>

<body>
    <select id="myList">
        <option value="학생">학생</option>
        <option value="직장인" SELECTED>직장인</option>
        <option value="전문직">전문직</option>
        <option value="무직">무직</option>
    </select>
    <input type="button" onClick="getValue()" value="클릭" />
    <input type="text" id="result" value="" />
</body>

</html>
HTML 요소 변경하기
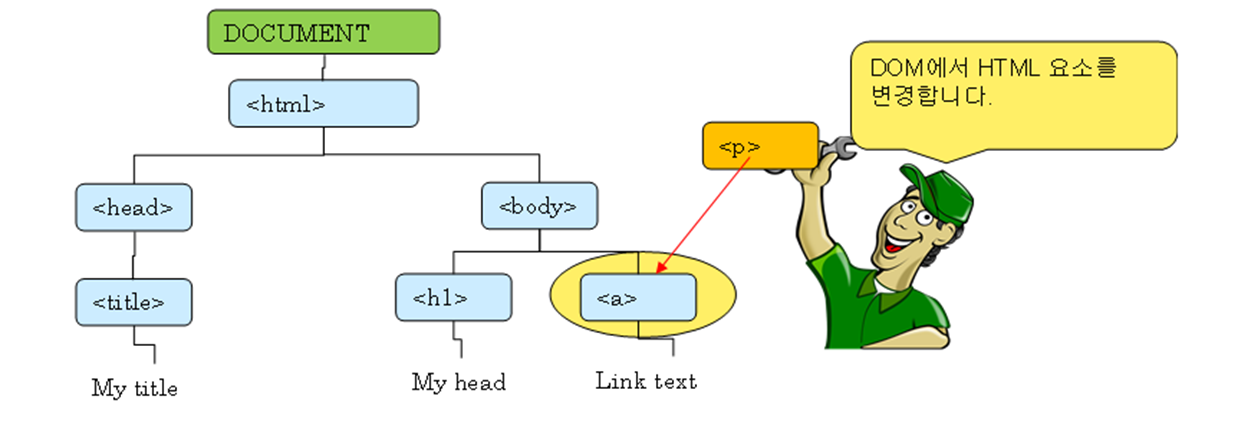
자바스크립트를 통해 HTML 문서의 DOM에 대한 요소의 내용, 속성, 스타일, 클래스 변경이 가능하다.
HTML 문서 자체가 변경되는 것이 아니라, DOM만 변경된다는 점을 잊지말자.
요소의 내용 변경
내용을 변경하는 가장 기본적인 방법은 innerHTML 속성을 사용하여 변경하는 것이다.
<div id="main"> 이것이 div 요소입니다.</div>
innerHTML이란 시작 태그와 종료 태그 사이에 놓여진 모든 HTML 코드와 텍스트를 의미한다.
<!DOCTYPE html>
<html>
  <head>
    <title></title>
    <script>
      function get() {
        let val = document.getElementById('ex').innerHTML
        alert(val)
      }
      function set(v) {
        document.getElementById('ex').innerHTML = v
      }
    </script>
  </head>

  <body>
    <div id="ex">여기가 div로 선언되었습니다.</div>
    <a href="#" onclick="get()">div 요소 내용 출력하기</a><br />
    <a href="#" onclick="set('변경되었습니다.')">div 요소 내용 변경하기</a>
  </body>
</html>
요소의 속성 변경
HTML 요소의 속성을 변경하려면 .속성이름을 통해 변경이 가능하다.
document.getElementById("image").src = "poodle.png";
<!DOCTYPE html>
<html>
  <body>
    <img id="image" src="pome.png" width="120" height="100" />
    <script>
      function changeImage() {
        document.getElementById('image').src = 'poodle.png'
      }
    </script>
    <input type="button" onclick="changeImage()" value="눌러보세요" />
  </body>
</html>
요소의 스타일 변경
DOM과 자바스크립트를 사용하면 HTML 요소의 스타일도 얼마든지 동적으로 변경이 가능하다.
반드시 style.속성이름 형식을 통해 변경해야 한다.
document.getElementById("pw").style.color="blue";
<!DOCTYPE html>
<html>
  <body>
    <p id="p1">This is a paragraph.</p>
    <script>
      function changeStyle() {
        document.getElementById('p1').style.color = 'red'
        document.getElementById('p1').style.fontFamily = 'Century Schoolbook'
        document.getElementById('p1').style.fontStyle = 'italic'
      }
    </script>
    <input type="button" onclick="changeStyle()" value="눌러보세요" />
  </body>
</html>
다음은 배경색과 텍스트 색을 다크 모드와 화이트 모드로 전환이 가능한 토글 기능이다.
document.getElementsByTagName('body')[0].style.backgroundColor = 'black' 에서 <body> 요소를 찾아 HTMLCollection이라는 배열과 유사한 객체로 반환한다.
일반적으로 HTML 문서는 하나의 <body> 요소를 포함하고 있기 때문에, [0]를 사용하여 그 배열의 첫 번째(그리고 유일한) 요소에 접근하는 것이다.
<!DOCTYPE html>
<html>

<head>
    <script>
        let mode = 'white'
        function sub() {
            if (mode == 'white') {
                document.getElementsByTagName('body')[0].style.backgroundColor = 'black'
                document.getElementsByTagName('body')[0].style.color = 'white'
                mode = 'black'
            } else {
                document.getElementsByTagName('body')[0].style.backgroundColor = 'white'
                document.getElementsByTagName('body')[0].style.color = 'black'
                mode = 'white'
            }
        }
    </script>
</head>

<body>
    <h2>다크 모드와 라이트 모드</h2>
    <p>버튼을 누르면 다크 모드와 라이트 모드가 토글됩니다.</p>
    <button onclick="sub()">다크모드 토글</button>
</body>

</html>
요소의 클래스 변경
근데 위의 예제터럼 요소의 스타일을 개별적으로 변경하게 되면 일일이 지정해야 하는 번거로움이 있다.
이를 해결하기 위해 CSS의 클래스를 사용하면 편리하다.
.alarm {
	color: red,
    ...
}
이와 같이 CSS에서 클래스 안에 속성 값들을 이것저것 집어넣고 다음과 같이 사용이 가능한 것이다.
document.getElementById("myElement").className = "alarm";className
이전 시간에 배웠듯이, 하나의 요소에는 여러개의 클래스 지정이 가능하다. 만약 여러 클래스를 추가하고 싶다면 클래스 이름을 공백으로 구분하면 된다.
document.getElementById("myElement").className = "newClass";
document.getElementById("myElement").className = "button active";
classList.add
document.getElementById("myElement").classList.add("newClass");classList.remove
document.getElementById("myElement").classList.remove("existingClass");classList.toggle
toggle의 경우 만약 요소에 이미 클래스가 있으면 제거하고, 없으면 새로 추가할 수 있는 기능이다.
document.getElementById("myElement").classList.toggle("active");예제로 본다면 "active" 클래스가 이미 있는 경우 제거, 없다면 새로 추가하는 것이다.
<!DOCTYPE html>
<html lang="ko">

<head>
    <meta charset="UTF-8" />
    <title>통합 클래스 조작 예제</title>
    <style>
        body {
            font-family: Arial, sans-serif;
        }

        .active {
            color: green;
            background-color: #e0ffe0;
            padding: 10px;
            border: 1px solid #0f0;
        }

        .alarm {
            color: red;
            background-color: #ffe0e0;
            padding: 10px;
            border: 1px solid #f00;
        }

        button {
            margin: 5px;
            cursor: pointer;
        }
    </style>
</head>

<body>
    <h2>클래스 변경</h2>
    <p>
        클래스를 <strong>alarm</strong>으로 변경하거나 브라우저의 기본 스타일로
        복원할 수 있습니다:
    </p>
    <div id="divClassName">내용: 브라우저 기본 상태</div>
    <button onclick="changeToAlarm()">Alarm으로 변경</button>
    <button onclick="changeToDefault()">브라우저 기본 스타일로 복원</button>

    <h2>클래스 추가 및 제거</h2>
    <p><strong>Active</strong> 클래스를 추가하거나 제거할 수 있습니다:</p>
    <div id="divClassList">내용: 브라우저 기본 상태</div>
    <button onclick="activate()">Active 추가</button>
    <button onclick="deactivate()">Active 제거</button>

    <h2>클래스 토글</h2>
    <p>
        클래스 <strong>active</strong>를 토글합니다. 현재 상태는 브라우저의 기본
        스타일입니다:
    </p>
    <div id="divToggle">내용: 브라우저 기본 상태</div>
    <button onclick="toggleActive()">Active 토글</button>

    <script>
        function changeToAlarm() {
            var element = document.getElementById('divClassName')
            element.className = 'alarm'
        }

        function changeToDefault() {
            var element = document.getElementById('divClassName')
            element.className = '' // 모든 클래스 제거하여 브라우저 기본 스타일로 설정
        }

        function activate() {
            var element = document.getElementById('divClassList')
            element.classList.add('active')
        }

        function deactivate() {
            var element = document.getElementById('divClassList')
            element.classList.remove('active')
        }

        function toggleActive() {
            var element = document.getElementById('divToggle')
            element.classList.toggle('active')
        }
    </script>
</body>

</html>
DOM 노드 삭제와 추가
HTML의 속성인 innerHTML을 통해 내용을 넣을수도 있지만, 자바스크립트로도 노드를 추가 및 삭제가 가능하다.
document 객체는 DOM 트리의 루트 노드이다. 따라서 document 객체는 HTML 요소를 찾거나 추가하거나 삭제하는 메서드 모두 제공한다.
- document.createElement(element): HTML 요소를 생성
- document.removeChild(element): HTML 요소를 삭제
- document.appendChild(element): HTML 요소를 추가
- document.replaceChild(new, old): HTML 요소를 대체
- document.write(text): HTML 출력 스트림에 쓰기
HTML 요소 생성
- document.createElement() 메서드 호출
let node = document.createElement("p");- getElementById()를 통해 DOM 트리 내에서 추가할 위치 찾기
let parent = document.getElementById("target");- appendChild()를 통해 새로운 요소를 기존의 요소에 연결
parent.appendChild(node);<!DOCTYPE html>
<html lang="ko">
<head>
<script>
function addNode(t) {
let node = document.createElement('p')
node.innerHTML = t
document.getElementById('target').appendChild(node)
}
</script>
</head>
<body>
<div id="target" onclick="addNode('동적으로 텍스트가 추가됩니다.')" style="font: 20px italic">
여기를 클릭하세요.
</div>
</body>
</html>HTML 요소를 삭제
<!DOCTYPE html>
<html>

<head>
    <script>
        function removeNode() {
            let parent = document.getElementById('target')
            let child = document.getElementById('p1')
            parent.removeChild(child)
        }
    </script>
</head>

<body>
    <div id="target">
        <p id="p1">첫번째 단락</p>
        <p id="p2">두번째 단락</p>
    </div>
    <button onclick="removeNode()">누르세요!</button>
</body>

</html>
테이블에 새로운 행과 셀 추가
테이블에 새로운 행을 추가하기 위해 insertRow()와 새로운 셀 추가를 위해 insertCell()을 사용할 수 있다.
<!DOCTYPE html>
<html>

<head>
    <style>
        table,
        td {
            border: 1px solid black;
        }
    </style>
</head>

<body>
    <table id="special">
        <tr>
            <td>(1, 1) 셀</td>
            <td>(1, 2) 셀</td>
        </tr>
        <tr>
            <td>(2, 1) 셀</td>
            <td>(2, 2) 셀</td>
        </tr>
    </table>
    <br />
    <button onclick="insert()">행 추가</button>
    <script>
        function insert() {
            let table = document.getElementById('special')
            let row = table.insertRow(0)
            let cell1 = row.insertCell(0)
            let cell2 = row.insertCell(1)
            cell1.innerHTML = '새로운 셀 (1, 1)'
            cell2.innerHTML = '새로운 셀 (1, 2)'
        }
    </script>
</body>

</html>
또는 아래처럼 JavaScript 함수 호출에서 백틱(`) 방식을 통해 행과 셀 추가도 가능하다.
<!DOCTYPE html>
<html>

<head>
    <style>
        table,
        td {
            border: 1px solid black;
        }
    </style>
</head>

<body>
    <table id="special">
        <tr>
            <td>(1, 1) 셀</td>
            <td>(1, 2) 셀</td>
        </tr>
        <tr>
            <td>(2, 1) 셀</td>
            <td>(2, 2) 셀</td>
        </tr>
    </table>
    <br />
    <button onclick="insert()">행 추가</button>
    <script>
        function insert() {
            let table = document.getElementById('special');
            let newRow = `
          <tr>
            <td>새로운 셀 (1, 1)</td>
            <td>새로운 셀 (1, 2)</td>
          </tr>
        `;
            table.innerHTML = newRow + table.innerHTML; // 새 행을 첫 번째에 추가
        }
    </script>
</body>

</html>
document.write
document.write() 메서드의 경우 DOM 트리 생성 종료 이전까지는 큰 문제 없이 현재 작업 중인 트리에 추가하여 작성한다.
하지만 DOM 트리가 완전히 생성된 후에 document.write() 호출하게 되면 기존의 DOM을 모두 삭제하고 새롭게 작성되므로 주의가 필요하다.
<!DOCTYPE html>
<html>

<body>
    <h2>write() 메소드 실험</h2>
    <script>
        document.write('<h3> DOM 완성전까지는 기존 문서에 추가됩니다.</h3>')
    </script>
    <button onclick="sub()">write() 호출</button>
    <script>
        function sub() {
            document.write('<h1>write() 호출</h1>')
        }
    </script>
</body>

</html>
동적 속성 관리 샘플
요소는 객체이고, 객체는 딕셔너리이다. 여기서 중요한 것은 딕셔너리는 데이터를 동적으로 추가, 삭제가 가능하므로 프로그래밍에 필요한 정보를 요소의 속성으로 관리가 가능하다는 점이다.
<!DOCTYPE html>
<html lang="ko">

<head>
    <title>data-* 속성 처리 예제 (div)</title>
    <style>
        #targetElement {
            margin-top: 20px;
            padding: 20px;
            border: 1px solid #ccc;
            background-color: #f0f0f0;
        }

        #log {
            margin-top: 20px;
            font-family: monospace;
            white-space: pre-wrap;
            background: #f9f9f9;
            border: 1px dashed #999;
            padding: 10px;
            font-size: 1.1em;
            /* 글자 크기 증가 */
        }

        button {
            margin-right: 10px;
            margin-top: 10px;
        }
    </style>
</head>

<body>
    <h1>data-* 속성 동적 처리 예제 (div 요소)</h1>

    <div id="targetElement">대상 요소입니다.</div>
    <div>
        <button onclick="addData()">속성 추가</button>
        <button onclick="updateData()">속성 변경</button>
        <button onclick="removeData()">속성 제거</button>
    </div>
    <div id="log"></div>

    <script>
        const el = document.getElementById('targetElement')
        const log = document.getElementById('log')

        function showStep(description) {
            const attrs = []
            for (const attr of el.attributes) {
                attrs.push(`${attr.name}="${attr.value}"`)
            }
            const current = attrs.length > 0 ? attrs.join(', ') : '(없음)'

            const dataAttrs = []
            for (const key in el.dataset) {
                dataAttrs.push(`data-${key}: ${el.dataset[key]}`)
            }
            const dataSummary = dataAttrs.length > 0 ? dataAttrs.join('\n→ ') : '(없음)'

            log.textContent += `${description}\n→ ${dataSummary}\n→ HTML 속성: ${current}\n\n`
        }

        function addData() {
            el.dataset.id = "user123"
            el.dataset.password = "p@ssw0rd"
            el.dataset.email = "user@example.com"
            showStep('[1단계] data-* 속성 추가')
        }

        function updateData() {
            el.dataset.id = "leesub"
            el.dataset.password = "newpass"
            el.dataset.email = "leesub@example.com"
            showStep('[2단계] data-* 속성 변경')
        }

        function removeData() {
            delete el.dataset.id
            delete el.dataset.password
            delete el.dataset.email
            showStep('[3단계] data-* 속성 제거')
        }
    </script>
</body>

</html>
참고로 attributes, dataset은 이미 HTML 요소에 내장되어 있는 속성이다.
-
attributes: HTML 요소가 가지고 있는 모든 속성을 컬렉션 형태로 제공하는 NamedNodeMap 객체
예를 들어,
<div id="targetElement" class="example">와 같은 요소에서 attributes를 참조하면, id와 class 속성이 포함된 객체가 반환됩니다.이 객체는 읽기 전용(live) 형태로, 요소의 속성이 바뀌면 자동으로 업데이트된다.
-
dataset: HTML5에서 도입된 기능으로, 요소의
data-* 속성들을 간편하게 접근할 수 있도록 해주는 DOMStringMap 객체예를 들어,
<div data-id="123" data-name="John">와 같은 요소에서 dataset를 참조하면, { id: "123", name: "John" } 형태의 객체를 얻을 수 있다.이 속성은 사용자가 직접 정의한 데이터 값을 쉽게 읽거나 수정할 수 있도록 설계되었다.