소프트웨어공학 수업을 들으면서 정리한 내용입니다.
Ansible
- 상대적으로 최근에 나옴 -> RedHat이 인수
- Shell Script 기반, Yaml로 관리 사항 기재
역할
- IT Automation : 작업의 자동화
- Configuration Management : infra의 일관성 유지
- Automatic Deployment : 어플리케이션을 자동으로 deploy
Ansible Architecture
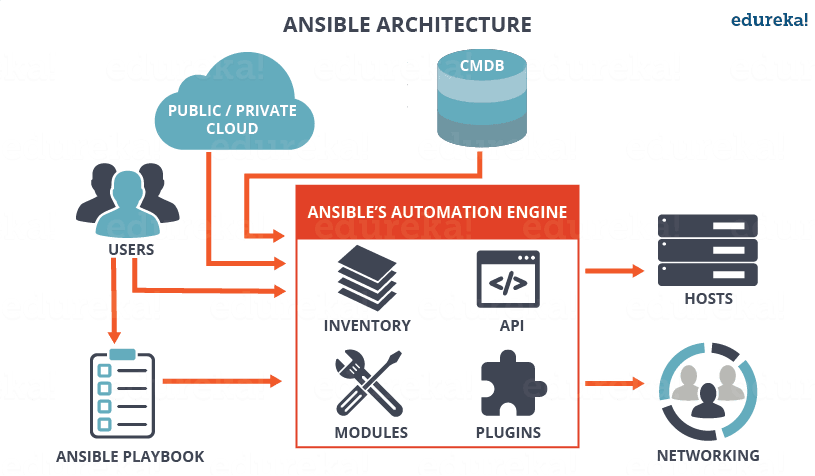
- ansible은 local server machine에 설치
- module: 각 노드들이 어떤 기능을 하는지 정리 -> 정해진 configuration이 되도록 명령
- inventory: ansible이 관리하는 모든 이름을 모아둔 .txt
playbook
- ansible architecture의 핵심 !
- module을 포함한 각 노드들의 configure하는 instruction
- yaml 언어로 기재된다
-> yaml이란? dictionary의 list로 indentation format을 따름
예를 들어,
---
- name : test
  hosts : webservers
  gather_facts : true
  tasks :
          - name : copy a file
            copy : src=/root/test.txt dest=/root/text2.txt
로 구성된 playbook이 있을때 -는 list를 의미한다.
- gather_facts? 원격 대상인 node의 호스트 네임, CPU, Memory 정보 등을 수집하는 setup 모듈
- 각 노드들이 유지해야 하는 policy와 IT process step을 기재한다
-> 관리자/사용자가 이를 참고해서 관리함
특징
- 무료임
- agentless
- ssh connection 사용
- configuration file은 yaml 구문
- python 언어로 구현
Ansible Master와 Node 사이의 SSH 연결
- 일반 사용자로 ansible을 운영해야함
- ansible 운영자들 사이에서 ssh연결: master가 client, node들이 server의 역할을 함
- node의 제어를 위해서 ansible 운영자에 sudo 권한이 필요함
- 마스터&노드 사이의 ssh 연결을 위해 필요한 key를 공유한다.
ssh -keygen
cat ~/.ssh/id_rsa.pub
ssh-copy-id {SSH key를 공유할 노드의 private ip addr}- 노드에 ssh 연결을 위한 password 필요
- 매번 ssh 연결시 password를 묻지 않아도 되게 node의 ssh demon config 수정
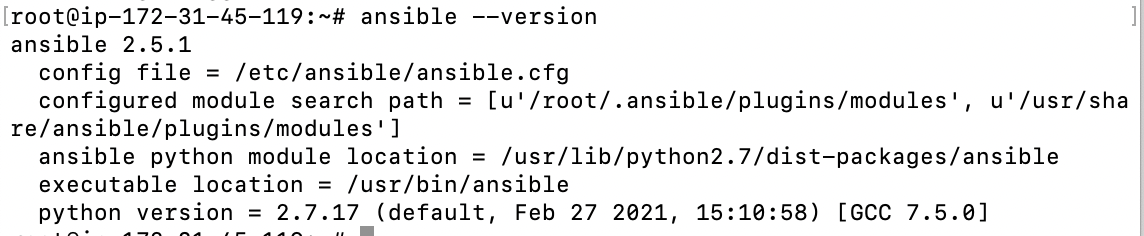
1. Ubuntu machine에 ansible 설치하기
master로 쓸 machine 하나, node로 쓸 machine 하나를 이용해서 실습하려고 합니다.

node로 쓸 mahine에 apache server에 접근하기 위한 default 포트번호 80번을 열어줍니다.
이해를 돕기 위해 Master Machine은 흰 배경, Node Machine은 까만 배경의 터미널로 작업했습니다.

[Master Machine]
루트로 동작하게끔 루트 권한을 줍니다.
sudo su - Ansible을 설치합니다.
apt-get update
apt-get install -y ansible
잘 설치되었는지 확인해봅니다.
Node Machine
같은 방법으로 root 권한으로 Ansible을 설치합니다.
Node Machine에는 설치가 필요없다고 합니다. 공식문서 따라 다시 실습해보고 수정예정
2. Host Machine 등록하기
[Master Machine]
master에 node machine의 private ip 주소를 추가해줍니다. /etc/ansible/hosts의 위치에 개별적인 기계의 ip주소, domain name을 넣으면 작동됩니다.
vim /etc/ansible/hostsansible adhoc command를 이용해서 node machine이 제대로 등록되었는지 확인합니다.
-> adhoc command란? playbook에 등록할 필요없이 필요할때 한번씩만 사용하는 명령어
ansible all --list-host
잘 등록되었음이 확인됩니다.
3. node machine과 ssh로 연결하기
ansible all -m ping ping이란 이름의 module을 사용해서 node와 ssh 연결이 되는지 확인합니다.
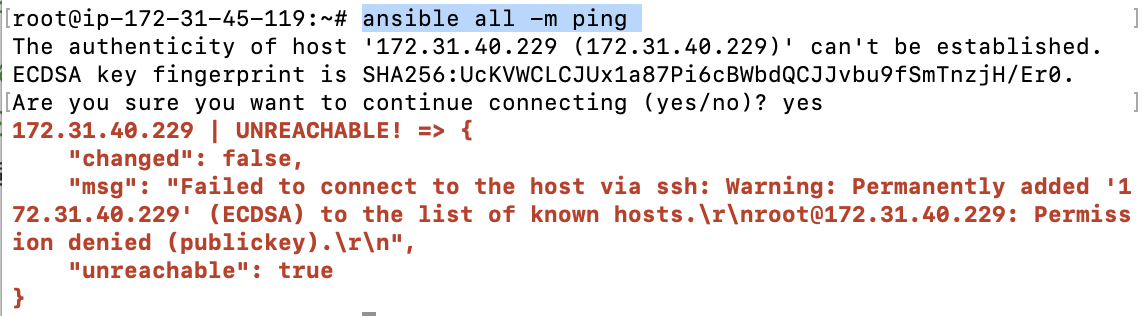
연결이 되지 않는다.
-> 와이? master와 node사이에 ssh key값을 공유하지 않았기 때문에 !
ssh key 만들고 공유하기
- key 만들기
ssh -keygen
- root 권한으로 key 공유가 가능하게 Node machine 설정
[Node Machine]
vim /etc/ssh/sshd_config를 다음과 같이 수정해줍니다.

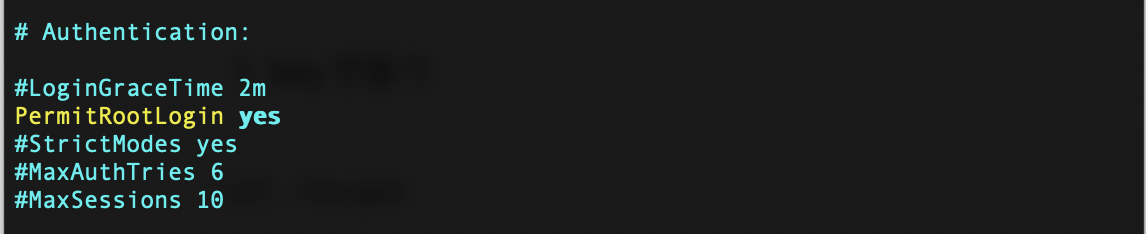
실습이고 빈 machine이니까 이렇게 수정해도 문제없지만, 실제 시스템에서 이렇게 설정하면 보안상 문제가 될 수 있다.
systemctl restart sshd수정한 sshd_config가 적용되도록 restart한다.
- node machine의 root password 생성
passwd root- ssh key 공유
[Master Machine]
ssh-copy-id 172.31.40.229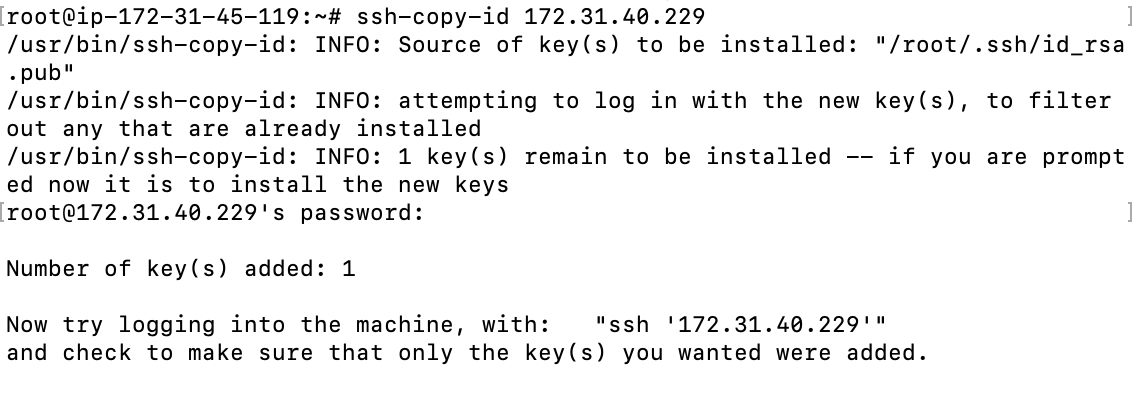
-
연결하기
ssh '{연결할 node machine의 ip주소}'
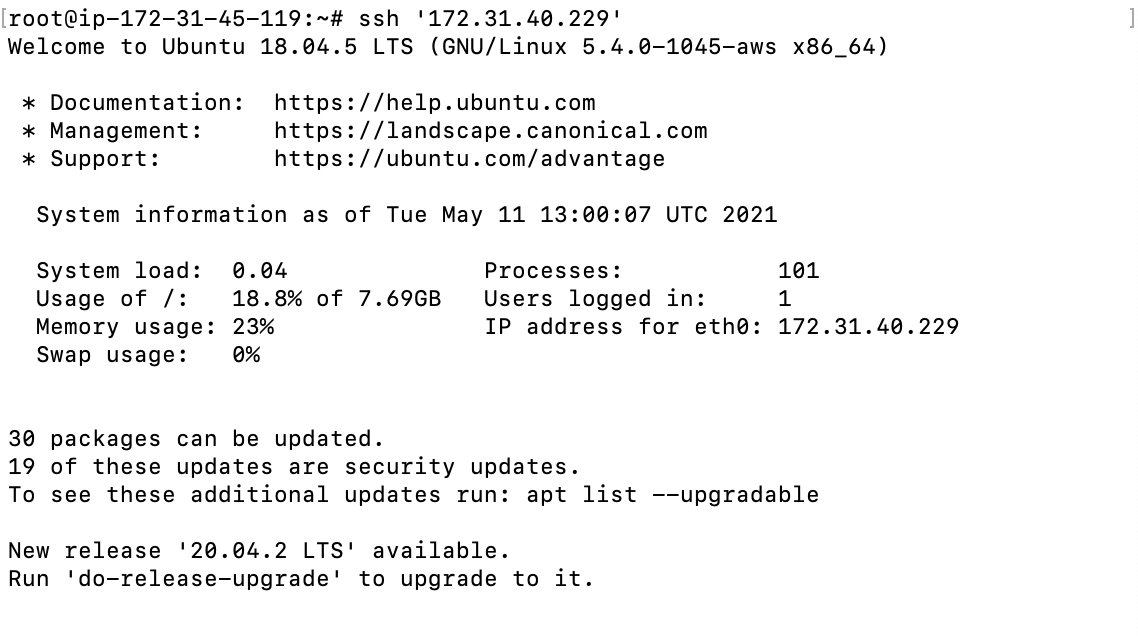
exit후, ping이 정상적으로 찍히는 것도 확인이 가능하다.ansible all -m ping
PlayBook 만들기
임의의 txt파일을 하나 생성합니다. 저는 test.txt이름을 갖게 생성했습니다.
vim test.txt
vim text.yml으로 yml 파일을 생성합니다.
---
- name : test
  hosts : webservers
  gather_facts : true
  tasks :
          - name : copy a file
            copy : src=/root/test.txt dest=/root/text2.txt
- host : /etc/ansible/hosts에서 확인한 host machine의 ip 주소를 담는 webservers 배열을 host로
- copy : 서비스 모듈 중 하나인 copy 실행하여 모든 Node들의 root dir에 copy하도록 동작
playbook으로 만든 yml 파일의 문법 오류가 없는지 체크합니다.
ansible-playbook test.yml --syntax-check
문법에 문제가 없으면 playbook을 실행합니다.
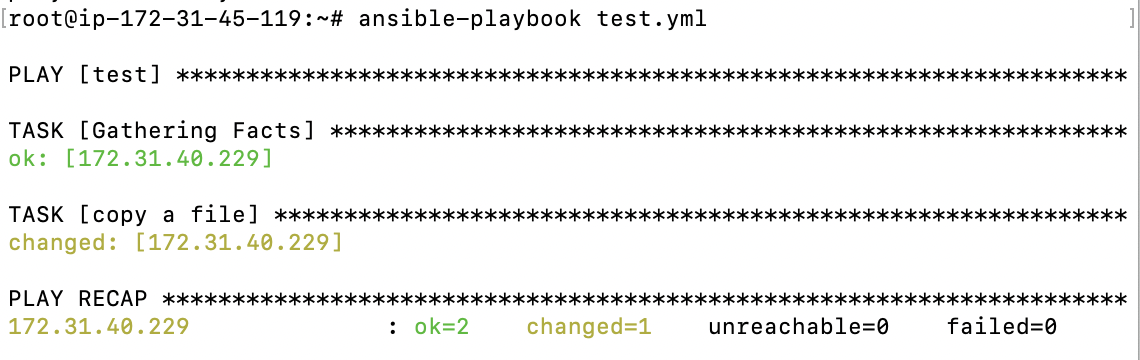
대상이 되는 node에 1가지 변화가 생겼음을 알 수 있습니다.
Node machine에서 올바르게 동작했는지 확인해봅니다.
[Node Machine]

yml 파일에 정의한대로 맞게 copy됐음을 확인할 수 있습니다.
Node machine에 웹서버 띄우기
playbook으로 사용할 yml 파일 생성
---
- name : install apache2&php
  hosts : webservers
  gather_facts : true
  tasks :
          - name : "install apache2"
            package : name=apache2 state=present
          - name : "install apache2 php 7"
            package : name=libapache2-mod-php state=present
          - name : "install php cli"
            package : name=php-cli state=present
          - name : "install php gd"
            package : name=php-gd state=latest
          - name : start apache2
            service : name=apache2 state=restarted
ansible-playbook
syntax check 후 에러가 없다면 실행시켜줍니다.
ansible-playbook demo1.yml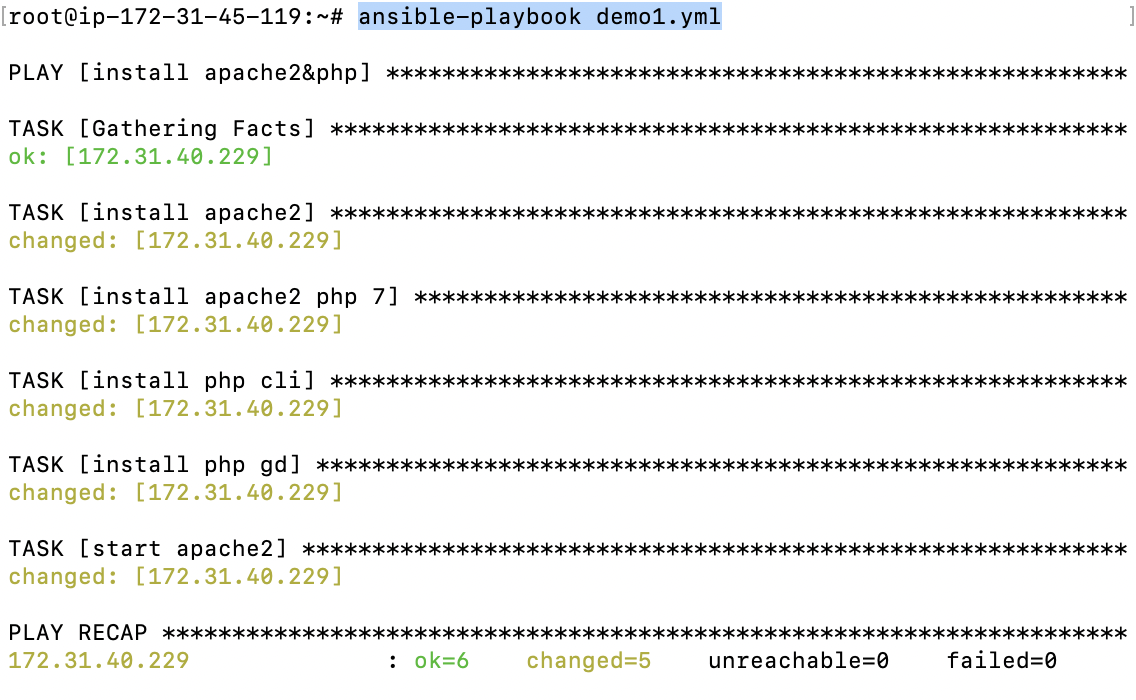
Node에서 확인하기
node로 사용한 machine의 public dns 주소로 접속하면 apache2 서버가 잘 실행됨을 알 수 있습니당 !!!!
php 웹서버 띄우기
conver.php
<?php // convert.php
$f = $c = '';
if (isset($_POST['f'])) $f = sanitizeString($_POST['f']);
if (isset($_POST['c'])) $c = sanitizeString($_POST['c']);
if (is_numeric($f))
{
$c = intval((5 / 9) * ($f - 32));
$out = "$f °f equals $c °c";
}
elseif(is_numeric($c))
{
$f = intval((9 / 5) * $c + 32);
$out = "$c °c equals $f °f";
}
else $out = "";
echo <<<END
<html>
<head>
<title>Temperature Converter</title>
</head>
<body>
<pre>
Enter either Fahrenheit or Celsius and click on Convert
<b>$out</b>
<form method="post" action="convert.php">
Fahrenheit <input type="text" name="f" size="7">
Celsius <input type="text" name="c" size="7">
<input type="submit" value="Convert">
</form>
</pre>
</body>
</html>
END;
function sanitizeString($var)
{
if (get_magic_quotes_gpc())
$var = stripslashes($var);
$var = htmlentities($var);
$var = strip_tags($var);
return $var;
}
?>deploywebsites.yml
---
- name : install deploy files
  hosts : webservers
  gather_facts : true
  tasks :
          - name : copy php file
            copy : src=/root/convert.php dest=/var/www/html/convert.php
ansible-playbook deploywebsites.yml로 실행
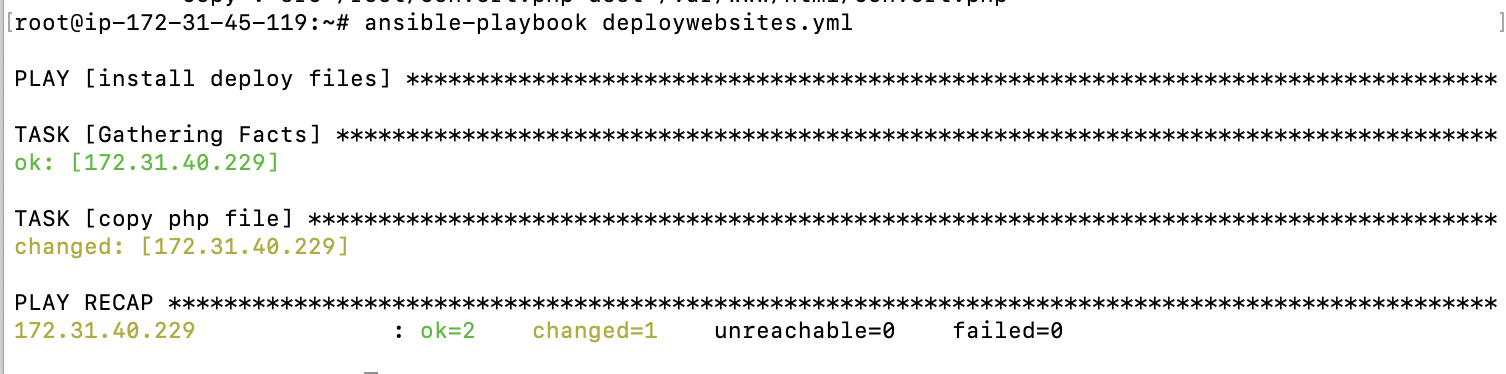
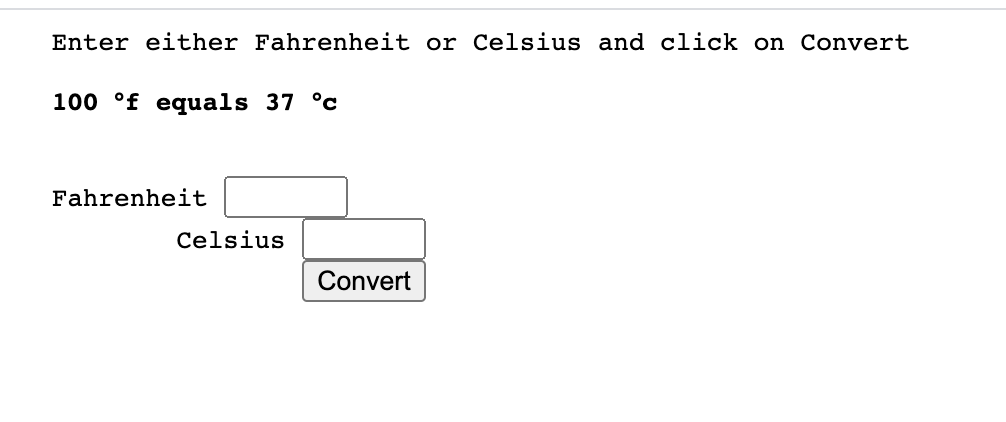
Node Machine의 public DNS 주소/convert.php시 맞게 실행됨을 확인할 수 있습니다.
출처
https://dev.to/keecheriljobin/ansible-architecture-working-co9
https://november11tech.tistory.com/108

안녕하세요! 좋은 글 감사합니다 :)
(저의 얕은 지식으로는) Node에는 Ansible을 설치하지 않아도 되는 것으로 알고 있는데 설치하신 이유가 있을까요?!